Tag Archives: soft light

Sidelight – How to capture great texture in your photographs

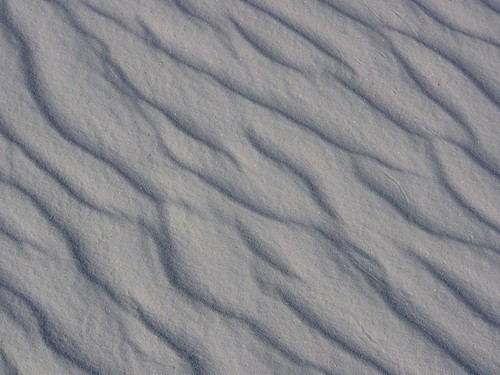
Rippled Sand • Sidelight creates a lovely texture

• Rippled Sand •
Beautiful soft sidelight from bottom left creates lovely shadows after each ripple. Had the shot been taken with flash from above, the ripples would have been near invisible.
Rippled sand by Seldom Scene Photography, on FlickrExternal link - opens new tab/page

The capture of texture depends on the angle of light.

It is that simple. The lower you get your light to the side of your subject the more you will create shadows that stand out. Photographers have long recognised the benefit of long shadows for their definition in landscapes. Beside the great colours of sunset, the long shadows from sidelight provide character and definition to the landscape.

The same idea can be applied to the much smaller scale. Still life, studio set-ups and even drying paint can all be enhanced by sidelight. When working with smaller subjects, “get in tight and sidelight” is great advice.

Vintage Store Photo Challenge

This is the best video I have seen on working with smaller objects and side lighting. Gavin Hoey explains with an off-camera flash how to bring out texture and detail in still life photos. This is a very simple lesson. After seeing it you will want to explore side lighting further.

After the video there are some more resources on the subject…


Approaching sidelight with your images

In the video Gavin Hoey used a diffused speedlight, off-camera flash. In the post “Off-camera flash” you can find out all about what they are and the functions they provide.

If you want to improve your off-camera flash working with some sort of diffuser is a great idea. I have worked with a range of off-camera flash diffusers over the years and often been disappointed. I am really enthusiastic about the Rogue Flashbender range of diffusers. I use the Large Rogue Flashbender and the diffuser to go with it for work and my own projects. It is an exceptionally flexible piece of kit and occupies only a tiny space in your kitbag since it rolls up very tightly. The whole Rogue Flashbender range are great products and worth checking out.

One of the great tools I keep within reach when doing table top photography is the little LED light unit below. Designed for camping it has become a great light for my table top product work. It is small, adaptable and very cheap to run as it uses very little battery power.

I have two of these and place them on the table lying down or on end. The light itself is quite white so it will not give you colour casts. If the light is too harsh I just cover the LED panel with tracing paper or ordinary (white) toilet tissue. The tissue-light is gorgeous, soft and easy to use. These are excellent products and inexpensive to buy. They are probably the simplest way to set up a table top sidelight.

Working with people, stronger light gives you more control over freezing your subject. For portrait work a flash helps. To freeze a portrait for a sharp picture use a brighter light and a short exposure. A side-lit portrait is 100% better than a pop-up flash shot where the light is straight on. For this, the off-camera flash is the way to go. You have the flexibility to create a sidelight that creates shadows that define the face. Make the light as soft as possible so the shadows wrap around. Avoid hard or harsh shadow lines on faces. It is not flattering.

At the other end of the scale the low intensity light of the LED panels allows for long exposures when using static subjects. Use a longer shutter time if you want your subject to be lit more brightly. Of course to do that you will need a way of steadying your camera for long exposures. A tripod is probably best in this situation.

The way to go…

In the wilds, or doing table-top studies the best light comes in from a shallow angle as sidelight. It is the shadows that define objects and bring out strong textures. Look for side lighting where ever you can, and create it yourself if the natural light can’t do it for you.

find out more...Photokonnexion tips by email
If you enjoyed this article please sign up for our
daily email service.
                                                 Find out more
#11030#

By Damon Guy (author and Photokonnexion editor)

Damon Guy - Netkonnexion

Damon Guy (Netkonnexion)

Damon is a writer-photog and editor of this site. He has run some major websites, a computing department and a digital image library. He started out as a trained teacher and now runs training for digital photographers.
See also: Editors ‘Bio’.

Can you write? Of course you can!
Write for Photokonnexion...

We would love to have your articles or tips posted on our site.
Find out more…
Write for Photokonnexion.

Twelve Simple tips for atmospheric candlelight shots

Candles put out a wonderful light…

Everyone feels the atmospheric impact of candlelight. The colour and the low light seems to draw you in. Capturing that light is easy with a few simple hints. Lets look at what is needed…

Tripod…

There is nearly always low light associated with candle photography. That means working with longer exposures. A tripod is excellent for that. Indoors, beware of a wooden floor, any move you make can be transferred to the tripod. Floor vibrations can ruin a shot or make it soft. For sharpness remember to use the camera timer for the shot or a remote shutter release.

Lighting…

The best way to view candles is by their own light. Because they don’t use a tripod many people are tempted to use flash. Unfortunately flash will over-power the candlelight. It will take out the colour from the light and tend to create hard, sharp shadows. It will ruin the atmosphere of the candlelight. Make sure you switch off your flash. If you need more light the you can use as many candles as you need to raise light levels. They don’t need to be in the shot, but they will keep the light the same throughout the shot.

Composition…

First decide if your candle or candles are the subject or are props. This decision will affect your focus and how you lay out your scene. Candles can create a strong bright spot in the scene. If it is too bright the flame will form a burnt out white spot. Once you have arranged your scene, ensure that the candle will only draw the eye a small amount unless it is the subject. You should consider the placement of the candle in a way that might minimise the impact of the bright flame spot.

Positioning…

If all your candles are close together the light will tend to act as one light source. This will tend to act as a hard light creating more defined shadows. If you want the light to be softer and the shadows with less well defined edges set your candles further apart. If the light is to be cast on a face then soft light will be more flattering.

Movement…

One of the peculiarities of working with candles is that the flames are subject to the slightest air movement. Unfortunately candle flicker is attractive to the eye in real-time; but looks like a loss of sharpness in a still image. It is quite useful in close focus shots with a candle to use an air break of some kind nearby to stop air movement. In a table-top study use a large sheet of card to one side out of shot. That will help prevent air movements. If not, keep an eye on the flames when shooting. Try to capture the flame upright or, if using more than one flame, make sure they are all going the same way. They look more natural that way.

Since candle light is low intensity, make sure you also prevent other sources of movement in the shot. They will inevitably be blurred as the shot will be using a long exposure. This will look like a distraction against still flames.

Can you write? Of course you can!
Write for Photokonnexion...

We would love to have your articles or tips posted on our site.
Find out more…
Write for Photokonnexion.

Light intensity…

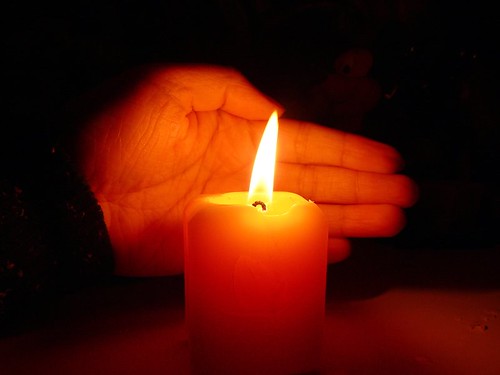
The light from a candle can be made much more intense if you use something to catch the light from the candle. A face, hand or other objects bring alive the picture and complements the candle. The presence of the object acts to reflect the candlelight. Light flesh tones are particularly good in this respect since the flesh colour is tonally close to the candlelight hues and they act as a reflector to bring out the light.

From

From “Candle Series” by Spicedfish
From “Candle Series” by Spicedfish on Flickr External link - opens new tab/page

Using reflectors in a candle scene is a great way to raise the light intensity. You can find other types of surface than the one in this picture in most scenes. Walls, ceilings and even off-shot reflectors are all good. Be careful to use neutral colours. Colour reflectors will affect the colour of the scene. If you are using a big card out-of-shot make it white. This will reflect the same colour light back into the scene, filling in the light.

Shadows…

The other side of light intensity is the shadows. The darker tones and strong contrasts of candle shots create most of the atmosphere. Spend time studying the shadows created in your scene. Strong contrasts are great subjects. If you create shadows that fall badly across your scene it will impact on the overall effect. The best use of shadows is often to the edges of the shot. If the light fades out to edges this holds the scene into the shot – naturally focusing the eye. Work with shadows to ensure the mood is harmonious.

Additional lights…

If you want to use fill light in the scene try to match the quality of light from your candles. Use soft light sources and natural light with hues matching the candles. Natural light will fill the scene well but tend to neutralise the colour of the candle light. The warm glow of candles is a great mix with evening, low-intensity light.

Some people use light with gels to give a warm glow. Warming gels can also be used with a flash. However, beware the power of flash. The candles will lose their soothing effect if all the shadows are taken away around the base of the candle and harsh shadows are introduced from one side. Typically use a diffused flash on the lowest setting – it also helps to be a distance away from the candles as well.

Multiple candles…

When working with one candle as subject the main focus of the shot is clear. However, there is a lot of scope for creativity. Consider two main issues. How to layout your candles and how to use the overall light with the layout. Using candles for making patterns is great fun and can produce excellent shots.
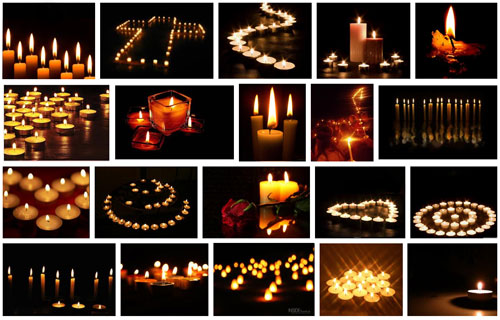
Patterns with candles

Making patterns with candles
Click to view Google Images “Candle Light” search

Try to keep the scene simple. Overlapping candles or indistinct objects in the pattern are confusing. Work with the sharp contrasts and keep your pattern well defined.

Exposure…

How long should you make your exposure? This depends, like any scene, on your light levels. To get more light in the exposure a long shutter speed is suitable for most candle shots. A range of 1/15 second down to 2 seconds is a good starting range with an ISO of 100. Camera settings vary significantly with reflectors, multiple candles or fill lights. Experiment to get it right. Aim to make the shot moody or atmospheric while providing detail for the eye to look at around the candle flame(s).

The main exposure concern with dark or shadowy shots is digital noise. If ISO is too high you will get more noise. It is better to use a low ISO, say 100 and have longer shutter opening. This reduces noise and means more detail is visible.

Lenses…

A fast lens allows a wider aperture. Faster lenses will allow a quicker exposure than a smaller aperture. Nevertheless, when experimenting check the depth of field. With big candle patterns, or larger subjects, a very wide aperture will give a very shallow depth of field. Too shallow and you will lose a lot of detail. On the other hand, lots of candles in the background with a shallow depth of field will produce pleasing bokeh. For choosing your lens, more than other aspects of your set-up, you need to have a clear vision of what you want your final shot to look like. Then do some “Chimping” to check results.

Prime lenses, especially the 50mm, will give an approximation to the human eyes. To capture the mood of a scene a 50mm will help. A wide angle lens close-up can provide great exaggerations of candle tallness or broadness – depending on lens orientation. There is great scope for artistic interpretation. Also remember that zoom lenses tend to foreshorten, reducing the apparent depth of the shot. With a zoom lens place your candles to give an impression of depth.

White balance…

The warm glow of candles is attractive. If you change the white balance you will change the characteristics of the warm glow. Candlelight shots are about moodiness and atmosphere. It is worth playing with the white balance to influence the shot and increase moodiness, but be careful you don’t remove it. You only need to adjust white balance when shooting in *.jpg as it will be fixed once the shot is taken. If you are shooting in RAW you have more flexibility with settings in post processing to control colours and the final exposure. If you cannot shoot in RAW then, again, make sure you do some “chimping” to get the colours right.

Being safe…

Although fun, candles are naked flames. It is all too easy in low light to leave something close to the candle. Fires start quickly and spread fast too. Feel free to experiment but make sure you don’t accidentally knock over candles, touch wall paper with one or do something else to set off a fire. Never leave candles alight and unattended. Always blow them out and wait for the smoke stop raising before leaving.

find out more...Photokonnexion tips by email
If you enjoyed this article please sign up for our
daily email service.
                                                 Find out more
#11030#

By Damon Guy (author and Photokonnexion editor)

Damon Guy - Netkonnexion

Damon Guy (Netkonnexion)

Damon is a writer-photog and editor of this site. He has run some major websites, a computing department and a digital image library. He started out as a trained teacher and now runs training for digital photographers.
See also: Editors ‘Bio’.
Easy ideas for controlling your flash unit

Specular highlights

Bath toy
Specular highlights are distracting and draw the eye which spoils the shot.

Flash is a great benefit and a problem all at once!

Most people don’t realise two things about flash. First, the standard setting is nearly always too powerful. Second, the highlights resulting from flash are very distracting.

Working with flash power

Like all things in photography you need to think carefully about using flash. It is not simply click and move on. Most improving photographers are just beginning to make shots rather than snaps when they begin to see the quality and colour of light. So it is easy to miss some of the impacts that flash has on a subject. Here are a few consequences of a flash shot…

  • An over-bright subject.
  • Strong highlights with a tendency to wash out colours.
  • Specular highlights that create sharp, bright spots that distract the eye.
  • Bright foreground, dark background.
  • Flesh tones strongly whitened giving a sick look to the face.

Each of these is almost always down to using too much power in the flash. So, the way to over come these issues is to do two things. Turn down the power of the flash and diffuse the flash so it scatters the light.

Turning down the flash is simple. You must find the setting that adjusts the flash power level. This is easy if you are using an off camera flash because the unit usually has a display and a dial or buttons to change the settings. On-camera (pop-up) flash is usually adjusted by finding a menu setting that turns the power up or down. You may need to consult your camera manual to find where that setting is found.

The key to getting the right setting for your flash is to understand how to change it. Most off-camera flash units are marked up so there is two stops of light on the flash. Normally if the flash is marked 1:1 then that is full power, and more often than not this is the default setting. You can usually turn this down by one third of a stop of light at a time. Each time you stop down the setting one stop you are halving the light it emits.

Pop-up flash units may not be marked so clearly. Some are marked [low – medium – high], others, particularly point and shoot cameras, may just have “full | half”. More sophisticated pop-up units may also be marked in the same way that off-camera flash units are marked. Which ever your flash is, you should practice with it so you have an idea of how powerful it is and how much the settings can change the impact of the flash.

Flash diffusion

The best way to get used to using flash and controlling the power is experimenting. However, the issue of nasty highlights is the other problem the inexperienced user often does not spot at first. Strong highlights raise the light levels so you can see the tonal changes in the colour of the surface the light hits. This helps to define the shape of an object. So, for example, a brighter top on a ball and dark shadows under it help to define the spherical shape.

If the light intensity is too high, particularly on reflective surfaces, the reflected light level will exceed the level the camera can cope with. The highlight then becomes blown out. The light is so bright in that area that it becomes a bright spot where all the detail is lost to pure white. Unfortunately such strong, blown out areas, are severe distractions. In the picture above, the small reflective points, called specular highlights, are also strongly distracting. So what can you do to avoid these nasty effects?

If your power adjustments are not working and you still have blown out spots or highlights then you should consider diffusing the flash. This makes a difference in two ways. The diffused light will scatter the light from the flash over a wider area. This effectively lowers the light intensity even further in the area of the highlight since the light is not hitting it from a direct focused hard light from the flash.

Secondly, diffused light spreads the effect of the light. This makes it more likely to bounce off other surfaces nearby. These surfaces then become multiple mini-light sources. All these sources hitting your subject create a soft light which is much less likely to create specular highlights or very strong colour-destroying highlights.

So how do you do this diffusing? I just love this great flash diffuser. Designed to fit your off-camera flash unit it is an ingenious design and easily adaptable to any flash unit. Check out the Rogue FlashBender 2 – off camera flash. If you have an off-camera flash this is the best. It is the most adaptable diffuser I have ever used. You attach it to the flash with a wrap around grip. The big diffuser stands up above the lens of the flash. It is tough, flexible and creates a lovely daylight-white light. It is superb for portraits and still life work. Coupled with adjustments to the power settings on your flash it gives you excellent control and helps reduces highlights and the effects of hard light direct onto the subject.

For off camera flash there are a range of diffusers available. They are based on various different mounting or reflector principles too. So, you need to look around to see if you can find a diffuser that suits you.

For pop-up flash the options are not as easy. However, I recommend one of two options. I have successfully used ordinary white tissue paper sticky taped over the pop-up flash to both reduce and diffuse flash. However, while this works well, reducing the light by about a full stop, it is a temporary solution. Also, if you use the flash a lot the extra insulation may cause the flash to over heat. So, not for regular use.

My favoured options for pop-up flash diffusion are one of these three methods…

Professor Kobre’s Lightscoop, Standard Version Bounce Flash Device, Universal Model, fits over the Pop-up Flash of most SLR Cameras This diffuser produces a very effective ceiling bounce for the diffusion. However, make sure that in rooms where you use it there is no strong colours on the ceiling or it will cause colour casts.


Gary Fong Puffer – Pop-Up Flash Diffuser for Canon / Nikon / Pentax / Olympus / Panasonic- Lumix pop-up flashes A well reviewed unit, and has the advantage of an easy fit. The other advantage is that it diffuses the light moving forwards. The other two units here bounce the light which puts you slightly at a disadvantage in controlling the flash light direction.


Cateye LETS Flash Reflector/Diffuser Hybrid, for use with DSLR pop-up flashes Although I have not used this one personally, I know some people who have. I have had some very good feedback on this unit and it seems to work effectively in a wide range of situations.


Great shots with flash…

Yes, like everything else in photography, to get good with it, you have to practice use of flash. However, first you need to make sure you can spot the highlights, specular highlights and over-powered flash. Once you know what you are looking for you can adjust your flash power.

The best way to gain control of your flash is reducing the power, or at least adjusting it. Also, the more you soften the harsh, hard flash light the less distracting and natural the highlights will be.

Whatever you decide to do to make your flash manageable do plenty of experimenting to gain control of the light. Don’t forget to Examine Shots Before Shooting Again – “Chimping” to check for highlights. The practice will pay you back in great, well lit shots many times over.

find out more...Photokonnexion tips by email
If you enjoyed this article please sign up for our
daily email service.
                                                 Find out more
#11030#

By Damon Guy (author and Photokonnexion editor)

Damon Guy - Netkonnexion

Damon Guy (Netkonnexion)

Damon is a writer-photog and editor of this site. He has run some major websites, a computing department and a digital image library. He started out as a trained teacher and now runs training for digital photographers.
See also: Editors ‘Bio’.

Simple mistakes to avoid in photography

The quick way to improve:

…Is undoubtedly to listen to the mistakes that others made. Here are some easy things you can do to improve your photography in leaps and bounds. Getting lots of practice is the first step. The more you shoot the more you will get to know what works and what does not. However, going further than that takes a little diligence. So here are some things to do for quick improvements…

1. Not reading the manual

Get the manual out. Learn a technique from the manual. Then go out and use that technique.

2. Not reading the manual again in six months

Repeat (1) in six months. Using your camera will become easier and your memory will be refreshed.

3. Not making friends

The most fun you can have in photography is with friends. Join a club, find some other camera owners, join a website that shares comments… whatever you do – get people to look at your photos and help you with tips and tricks.

4. The equipment you own

Read “Seven deadly photographic sins” and realise that you should concentrate on learning everything about the equipment you own. Once you are an excellent photographer with your current equipment then consider new stuff, but not before.

5. File resolution

Shoot with the largest file size and highest resolution. If you do not know how to do that consult the manual. This is important. Using tiny files and low resolution will really frustrate your improvement.

6. Not checking the image

Beginners often click away without checking the image. Shoot-and-hope mostly fails. Check your screen, check and check again. Reduce the number of shots you take. Concentrate on composition – make the images you do take higher quality. Read up on “Chimping” the gentle art of screen checking!

7. Deleting in camera

Do not delete in camera… There are many good reasons for this…

  • Constant deleting shortens the life of your memory card – only ever format the card.
  • Unless very experienced you are probably not qualified to say if a shot is good or bad.
  • You cannot possibly tell if an image is good enough in the low resolution of a camera screen.
  • As your ‘eye’ develops you will change your idea of what is a ‘delete’. I have seen an image voted Best-shot-of-the-day but listed as a deleter by the author before the vote.
8. Not looking at the image in full size

There is only one sure test of sharpness, look at the image in full resolution. When you pull the image up on screen it is reduced and sharpened. Expand it to 100% to see it as you took it. Read your software manual to see how.

9. Ignoring the light

Find out all you can about light – all types of light and all sorts of lighting situations. You can find a whole range of resources here… Light and Lighting – Resource pages on Photokonnexion. Your knowledge of light will make you a great photographer if you focus on that alone.

10. Not using a tripod

The best sharpness tool is using a tripod. Never forget your tripod and you will always have sharp images!

For more on this subject and some detail of how to get past these mistakes read: Mistakes beginners make and how to overcome them

Here is a short video with four more great tips for you to take on board…

Mistakes to Avoid as a Beginner Photographer

startphotography channel External link - opens new tab/page

find out more...Photokonnexion tips by email
If you enjoyed this article please sign up for our
daily email service.
                                                 Find out more
#11030#

By Damon Guy (author and Photokonnexion editor)

Damon Guy - Netkonnexion

Damon Guy (Netkonnexion)

Damon is a writer-photog and editor of this site. He has run some major websites, a computing department and a digital image library. He started out as a trained teacher and now runs training for digital photographers.
See also: Editors ‘Bio’.

Five easy tips for better photos in difficult weather and light

Its easy to make weather excuses, but….

We can actually find a way to shoot in almost any weather situation. Here are some tips to get the shot even though the weather conditions are not ideal for a photograph.

1. Rain…

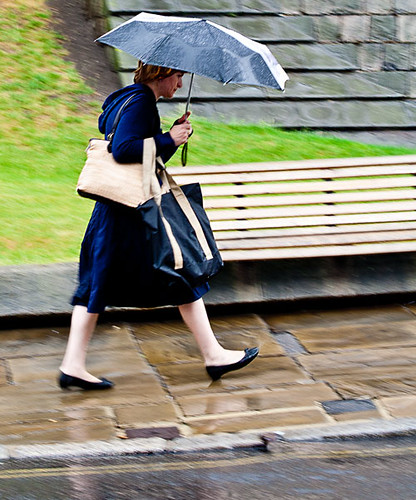
Cameras hate water. If there is a sure fire way to ruin your equipment, get it wet. So we want to dodge the rain shots. Actually rain is fun. You don’t need to be shooting right in the rain. Most of the time there is cover you can use to work from for your shot. Shop fronts, cars, through open windows, under canopies… you can think of thousands of rain hides if you try. And, rain provides lots of great things to shoot too. Rain is a great cleanser. The pavements and side roads are dust-free, shiny, or with splashing drops and running water. Yet life goes on. Street photography becomes dynamic, frenetic and full of new behaviors. People are doing things they normally do not do. They run, they put up umbrellas, they crowd under cover… lots of great behaviors that often do not get photographed. Look to catch people in the puddles, jumping, dashing for cover. Look for colours and reflections. Look for droplets, wet surfaces, running water. Most of all try to catch the reactions of people as they try not to get wet. Rain is great fun. Don’t hide your equipment away. Get out and take some great shots. After the rain look for skyward glances, great reflections, splashes and people emerging from cover.

2. High noon…

A high and harsh sunlit situation is not good for any kind of photography. Normally we think of it as pretty awful for any kind of portrait shot. The direct light creates washed out, over-exposed areas of the shot. The faces look flat and colours lose the subtle tonality. You can still get a great shots though. Seek out some cool, even shade. Under the canopy of shops or malls is ideal, or maybe within the shade of a substantial tree. Look for anything that provides enough shade for you and your subject to get out of the direct sunlight. However, stay near to the main sunlight area. The direct sunlit area will act as your main light source. The shade will act as a diffuser. Now, make sure you do not shoot into the direct sunlight or deeper darkness of deep shade. Try to keep your shot on your subject and make sure any background you use is also in the same light-shade level of intensity. That way your contrasts and colours will all be within the same dynamic range of light – which your camera deal with. However, the main light source will be diffused – creating a lovely soft, bright light source. Remember, if you shoot out of the shade into the sun you will find the contrast range too high. You will get bright highlights and over-exposure which will draw the eye away from your subject. So keep the shots tight to the light level you are working within and your shots will be fine and bright. Don’t shoot in mixed or dappled light.

3. Insufficient shade?

Avoiding very hard light or direct sunlight makes sense but what if you cannot find enough shade for you and your subject to be in the same light. If you are trying to photograph a person the impact of this direct light is particularly hard on their face and unflattering. Unfortunately putting your subject into the shade can make the situation worse. The darkness in the shade contrasts strongly with the bright light outside where you are standing. So you get bright spots in your shot and harsh darker areas in the deeper shade – very distracting. To overcome this high contrast situation take your shot on the shadow line. Line up the person you want to shoot on the shadow edge so the bright light is softened. In this intermediate place your subject gets the golden glow from the brighter light but it is softened by the slight shadow.

To help your camera to cope try to shoot from the same half-in half-out of shadow position too. The contrasts will not overpower your sensor there. If you get it right you will split the light to make it just right. Carefully placed you will capture the lovely sky and background but not lose detail in the shadow-darkness under the shade. Be careful not to get dappled light from sun through the leaves, and make sure the shadow line does not cross your subject. Bright contrasts and sharp shadow lines on the subject are very unflattering. Instead shoot along the half shade into the brighter light utilising the foreground weaker light as your main source for the subject.

4. The sun flattens the landscape

Often, particularly on holiday or when out on a shoot, we cannot wait for the golden hour. We are in a place where there is a deadline to move on and you want to get the shot. Unfortunately the high, direct sunlight flattens everything, eliminating shadows and ironing out colour tones. The light is boring and harsh and the shadows minimal.

How do you get the landscape? Include more sky than usual. Often in these situation the most interesting lighting is for the sky. The clouds and far away places look good. So expose for the sky and reduce the amount of landscape you include. This means using the sky as the main bright source of light. Point your focus point to a cloud. If the auto-focus ‘hunts‘ and will not focus turn it off and focus manually. Make the sky your subject and concentrate on the distance and sky. This may mean some of your foreground will be slightly underexposed. However, it is easier to brighten the foreground or a near subject later in post-processing if you have exposed for the sky.

#11030#

5. Dreary, grey diffused sky light

Another bad light situation for the photographer is the dreary grey day. Uniform light from across the sky leaves little or no shadow detail anywhere. Everything looks flat and dead. The problem here is there is nothing in the landscape that provides relief for the greyness. The sky is difficult too – you cannot do foreground shots as the uniform lack of colour or shadow means everything is pale and uninteresting. The distance has lost its sky appeal too. Even exposing for the sky creates almost uniform grey.

Well, this is the time to get out the flash. Off-camera flash is best, although pop-up flash will also do the trick. Get close to the ground or a surface with great texture. Then, shoot along the surface with the flash. If the flash is off-camera set it off to one side so it exaggerates ground shadows. If you are working with pop-up flash then make sure you work with the shadow at its maximum. This may mean shooting with your camera upside down so the light is really close to the surface and the optical axis is across the surface lit by the flash. If you use a relatively wide aperture, these low-level flash shots will bring out shadow detail in the foreground and leave the distance in bokeh and out of focus.

Some places to find great surfaces for this type of shot are low grasses, sandy or gravelly surfaces, tarmac, along road lines, autumnal leafy forest floors, bare rock… well, you get the idea. Seek out any surface that provides texture for you to capture. Lots of small to medium undulations and detail is best. Large objects will block the foreground so reserve them for the middle distance.

Remember the five rules…

The key to difficult weather and light situations is…

  • Find the right vantage point to shelter/shoot from
  • Maximise the opportunities for spotting unusual behavior
  • Make the most of the weather opportunities (sky, puddles, splashes etc)
  • Keep the light where you are shooting within approximately the same dynamic range
  • Look for, or create, light situations that exploit texture detail

By Damon Guy (author and Photokonnexion editor)

Damon Guy - Netkonnexion

Damon Guy (Netkonnexion)

Damon is a writer-photog and editor of this site. He has run some major websites, a computing department and a digital image library. He started out as a trained teacher and now runs training for digital photographers.
See also: Editors ‘Bio’.

Winter photography inspiration – colour, texture and tone…

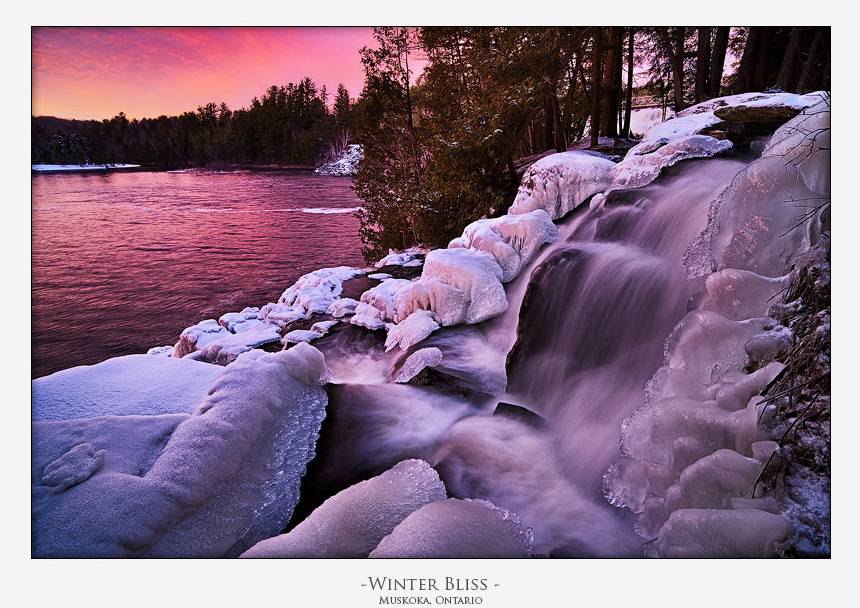
• Winter Bliss • By Kyle McDougall

• Winter Bliss • By Kyle McDougall

Winter photogrpahy – free your vision.

Too often the dull, dim and dank days of Winter leave us cold. Venturing out? Winter photography? Noooo! Yet Winter offers a world of inspiring colours, textures, sights and light not there at other times of the year.

Not grey, great!

Like any other time of the year sunset and sundown are times of the day when the most amazing colours are revealed. The magic of the golden hour pinks and golds is just as exciting in the winter as it is in the summer – and you don’t have to be out so early or so late with shorter days. What is not so obvious to the inexperienced, Winter photography is the power of the winter colours. There is amazing colour, strong colour. However, especially in snowy environments, the golds, pinks and blues are mellowed into a softness that you don’t see at other times of the year. The wonderful pink tones in the image above show the point beautifully.

I have mentioned before in these pages that often the best pictures are captured just after the sun has gone down or just before it comes up. This “blue” period of the day provides infinite tonal blues that caress the eye. I just love these times of day. The great thing is that most photographers have packed up and gone home as the “blue” time starts… you have the stage. Make the best of this time as you will be among the few who use it well.

In Winter, texture wins the day

The lower light levels, and lower angle of light in the sky, often puts off photographers in Winter. But this is the best time to capture some wonderful textures. Muted winter colours and low light combine to create excellent contrasts and micro-shadows. Along with the soft light these environmental factors are a gift to the seeing photographer. Ice, snow and even water take on an almost ethereal glow punctuated by texture. If you can capture that with a good composition your pictures will create wonderful and lasting images in your viewers mind. Look for opportunities to get the sun low in the sky and those lovely early morning or evening tones and shadows from the side.

Opportunities

In your winter photography look for opportunities to express the colours and contrasts that appear. They are different to those you find in the Summer. The subtleties of tone, texture and colour are there for all to see, but only the insightful photographer will make good use of them.

My thanks to Kyle McDougall for his permission to use his photographs.

find out more...Photokonnexion tips by email
If you enjoyed this article please sign up for our
daily email service.
                                                 Find out more
#11030#

By Damon Guy (author and Photokonnexion editor)

Damon Guy - Netkonnexion

Damon Guy (Netkonnexion)

Damon is a writer-photog and editor of this site. He has run some major websites, a computing department and a digital image library. He started out as a trained teacher and now runs training for digital photographers.
See also: Editors ‘Bio’.

A simple project with fruit – a tutorial for fun!

• Orange •

• Orange •
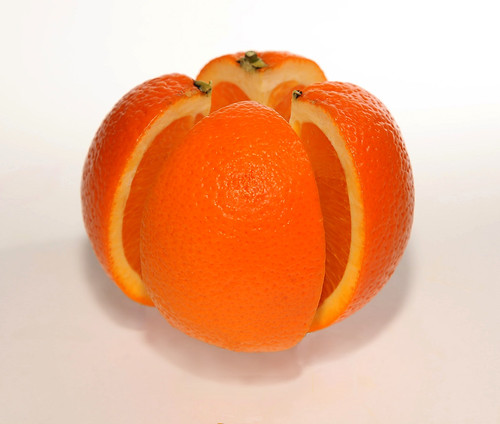
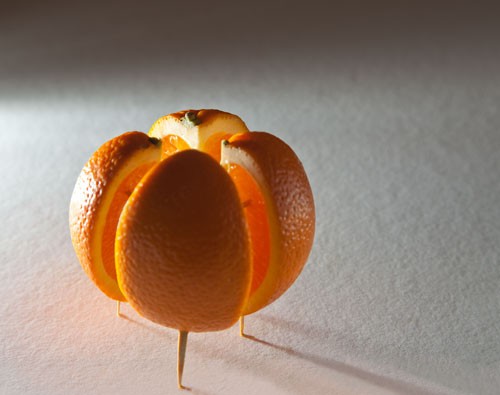
Have a go at producing a floating orange in “exploded view”
Click image to view large
Orange By Netkonnexion on Flickr External link - opens new tab/page

Fruit is fun!

This tutorial will show you how to photograph fruit in all its glory – in a unique way. There are ways you can make the project your own with plenty of room for creative ideas. It is an easy project giving you some useful tips for still life lighting and working with a high key background. Have fun!

The picture of the orange

The picture above shows an orange, a wonderful fruit, in all its glory. We can see both inside parts and out. In this tutorial I will show you how to create this yourself and show some other similar examples to give you some ideas of your own. This tutorial will cover the following simple steps:

  1. Pick a good firm, clean orange.
  2. Cut it into quarters.
  3. Assemble the orange in an “exploded view” using toothpicks.
  4. Create lighting to show off your orange without highlights.
  5. Finally you will clone out the toothpicks on the computer.
Choose your fruit

Be careful, make sure that your orange is nicely shaped, no odd depressions or bruises, and as firm as possible, not over-ripe. Check the skin for consistent colour too. You want your orange to look delicious. No one will be interested in your shot if it is damaged, dripping and discoloured. Also, wash and gently wipe the skin before starting the tutorial. The skin should look bright and clean. Dirt, hairs and marks will really draw the eye of the viewer. Don’t let them be distracted.

Constructing the orange

Cut it in four pieces top to bottom (two cuts). It helps not to have too many cuts. Cut carefully and accurately. If you hack the orange you will be adding distractions to draw the eye. Be careful and slow to ensure accuracy.

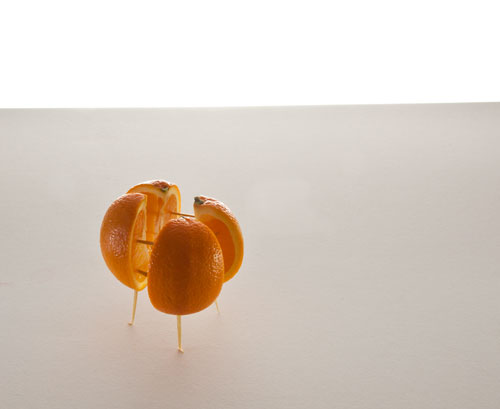
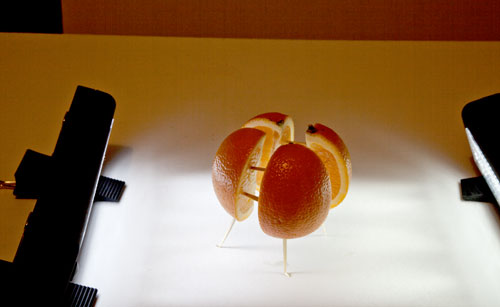
Once cut we are going to assemble the orange in an “exploded view”. That is the term used to describe an “almost” assembled item that is floating in space so you can see how it would assemble. To hold the pieces apart I arranged the quarters using tooth picks. In the picture below you can see how the orange is braced with the toothpicks. The picture also shows how the back lighting is set up.

• The toothpick set-up and initial back-lighting •

• The toothpick set-up and initial back lighting •
• The toothpick set-up and initial backlighting • By Netkonnexion on Flickr  External link - opens new tab/page

You can see from the picture the orange is held firmly together by the toothpicks. It is also supported by four toothpicks as legs. We want the orange to be slightly off the ground so it has the feel of an independent object in space.

The white card under the orange extends to the edge of a table. On a chair a little way back from the table is another upright card. You can see the white back-card is very bright. I used a strong light under the table to illuminate that card giving it a high-key brightness. There are some links at the end to explain more about high-key effects.

We want to take the final shot with a little shadow under the orange. This give the impression the orange is floating in space. I will light the orange from the front with a flash. You can use the flash on your camera. However, that will create a very sharp shadow since flash is a very hard light. This means very harsh, sharp-edged shadows that will be quite dark.

In the next picture you can see how I created some under-lighting below the orange to soften the shadows created by the flash. I have two cheap Rolson 61770 72 LED Camping Lights. These are really flexible for table-top still-life and can be easily set up for fill light. They are great lights and affordable.

The underlighting setup to soften the shadows and create fill light.

• The underlighting setup to soften the shadows and create fill light •
• The underlighting setup to soften the shadows and create fill light • By Netkonnexion on Flickr External link - opens new tab/page

The lights under the orange and the back-lit card provide light on all sides except the front. If you have an off-camera flash you can use that, off-set to one side, for the front lighting. It is important to off-set so that you prevent ugly highlights on the front of the orange. Better still you could bounce the light off the ceiling if it is white. That way the orange will be evenly lit from above. To find out more about off-camera flash and some great opportunities for affordable models see:

If you only have a pop-up or on-camera flash then you should find a way of diffusing the light from it. Alternatively you could create a diffused reflection. You should be trying to find ways to prevent the flash pointing directly on the orange. Bright highlights would be created that are distracting and ugly.

Once the lighting is set up to your satisfaction you need to position the orange for the final shot. It is important to spend a little while positioning the orange so it obscures as many of the toothpicks as possible ready for your final shot.

The final position ready to photograph the orange obscures as many of the toothpicks as possible.

The final position ready to photograph the orange obscures as many of the toothpicks as possible. Then there is less cloning work to do on the computer.
The positioned orange By Netkonnexion on Flickr External link - opens new tab/page

You can see from the picture that the orange is positioned so most of the internal toothpicks are not visible and the legs are minimised. Once the shot is taken we are going to clone out the remaining sticks. So if you have less showing you have less cloning-out to do.

Now you are ready to take the shot – shoot it! Make a few attempts. Do plenty of chimping to ensure you have the lighting right. Pay special care to minimising highlights on the orange. When you are ready you can download your shots to your computer.

The remaining work is to clone out the toothpicks. You will need to very carefully clone the white surface around the legs over the legs themselves until you can not see them any more. Pay attention to any shadows so that they remain realistic and consistent after your cloning is finished. When cloning over the toothpicks in the orange interior use the same coloured flesh of the orange to clone out the remaining toothpicks you can see.

If you are not familiar with cloning techniques you can see a tutorial here: Getting Started With Cloning.

find out more...Photokonnexion tips by email
Enjoying this article? Please sign up for our
daily email service.
                                                Find out more…
#11030#

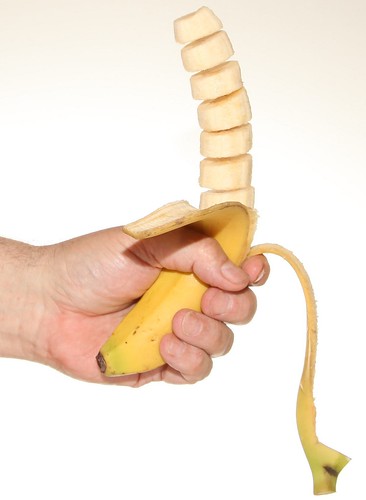
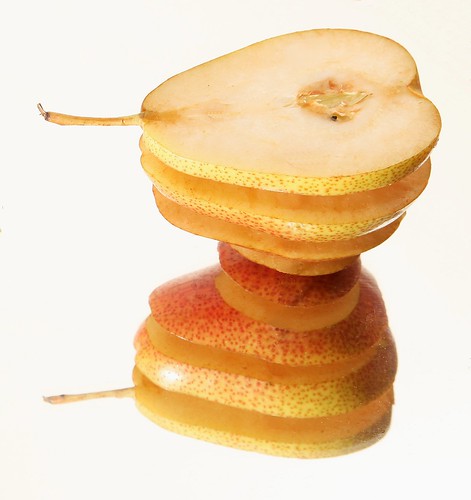
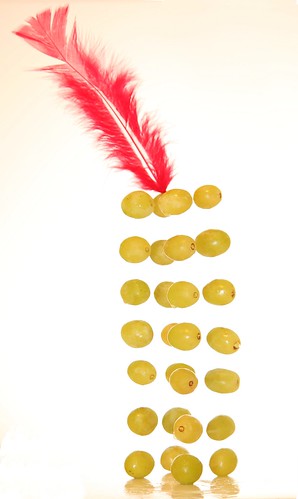
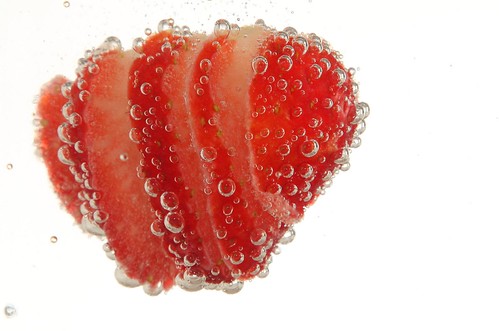
If you want to try other ideas here are a selection of other fruit-cut pictures below. All done using toothpicks or cocktail sticks. There is an infinite variety of things you can do using this technique so have lots of fun!

• Sliced Banana •

• Sliced Banana •
Click image to view large
The banana slices were held together with cocktail sticks while the shot was taken. Then they were cloned out afterwards.
• Sliced Banana • By Netkonnexion on Flickr External link - opens new tab/page


• Sliced pear on mirror •

• Sliced pear on mirror •
Click image to view large
A half pear was sliced and held in the exploded view with toothpicks. However, the pear was on a mirror – giving the effect of an inverted pear.
• Sliced pear on mirror • By Netkonnexion on Flickr External link - opens new tab/page


•  Alexander The Grape •

• Alexander The Grape •
Click image to view large
Each grape was painstakingly held apart using cocktail sticks.
• Alexander The Grape • By Netkonnexion on Flickr External link - opens new tab/page


• Strawberry Layer Drink •

• Strawberry Layer Drink •
Click image to view large
The strawberry has been sliced and held together with toothpicks. Then it has been placed in sparkling water to create the bubbles.
• Strawberry Layer Drink • By Netkonnexion on Flickr External link - opens new tab/page

By Damon Guy (author and Photokonnexion editor)

Damon Guy - Netkonnexion

Damon Guy (Netkonnexion)

Damon is a writer-photog and editor of this site. He has run some major websites, a computing department and a digital image library. He started out as a trained teacher and now runs training for digital photographers.
See also: Editors ‘Bio’.