
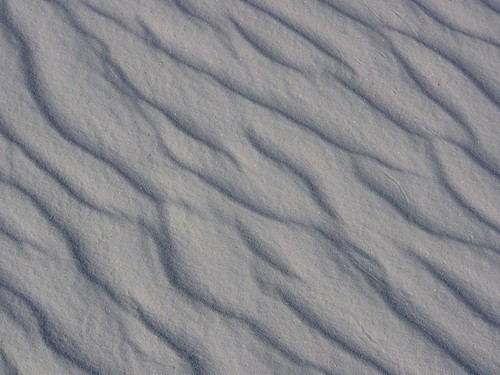
• Rippled Sand •
Beautiful soft sidelight from bottom left creates lovely shadows after each ripple. Had the shot been taken with flash from above, the ripples would have been near invisible.
Rippled sand by Seldom Scene Photography, on Flickr![]()
The capture of texture depends on the angle of light.
It is that simple. The lower you get your light to the side of your subject the more you will create shadows that stand out. Photographers have long recognised the benefit of long shadows for their definition in landscapes. Beside the great colours of sunset, the long shadows from sidelight provide character and definition to the landscape.
The same idea can be applied to the much smaller scale. Still life, studio set-ups and even drying paint can all be enhanced by sidelight. When working with smaller subjects, “get in tight and sidelight” is great advice.
Vintage Store Photo Challenge
This is the best video I have seen on working with smaller objects and side lighting. Gavin Hoey explains with an off-camera flash how to bring out texture and detail in still life photos. This is a very simple lesson. After seeing it you will want to explore side lighting further.
After the video there are some more resources on the subject…
Approaching sidelight with your images
In the video Gavin Hoey used a diffused speedlight, off-camera flash. In the post “Off-camera flash” you can find out all about what they are and the functions they provide.
If you want to improve your off-camera flash working with some sort of diffuser is a great idea. I have worked with a range of off-camera flash diffusers over the years and often been disappointed. I am really enthusiastic about the Rogue Flashbender range of diffusers. I use the Large Rogue Flashbender and the diffuser to go with it for work and my own projects. It is an exceptionally flexible piece of kit and occupies only a tiny space in your kitbag since it rolls up very tightly. The whole Rogue Flashbender range are great products and worth checking out.
One of the great tools I keep within reach when doing table top photography is the little LED light unit below. Designed for camping it has become a great light for my table top product work. It is small, adaptable and very cheap to run as it uses very little battery power.

I have two of these and place them on the table lying down or on end. The light itself is quite white so it will not give you colour casts. If the light is too harsh I just cover the LED panel with tracing paper or ordinary (white) toilet tissue. The tissue-light is gorgeous, soft and easy to use. These are excellent products and inexpensive to buy. They are probably the simplest way to set up a table top sidelight.
Working with people, stronger light gives you more control over freezing your subject. For portrait work a flash helps. To freeze a portrait for a sharp picture use a brighter light and a short exposure. A side-lit portrait is 100% better than a pop-up flash shot where the light is straight on. For this, the off-camera flash is the way to go. You have the flexibility to create a sidelight that creates shadows that define the face. Make the light as soft as possible so the shadows wrap around. Avoid hard or harsh shadow lines on faces. It is not flattering.
At the other end of the scale the low intensity light of the LED panels allows for long exposures when using static subjects. Use a longer shutter time if you want your subject to be lit more brightly. Of course to do that you will need a way of steadying your camera for long exposures. A tripod is probably best in this situation.
The way to go…
In the wilds, or doing table-top studies the best light comes in from a shallow angle as sidelight. It is the shadows that define objects and bring out strong textures. Look for side lighting where ever you can, and create it yourself if the natural light can’t do it for you.
 Photokonnexion tips by email
If you enjoyed this article please sign up for our
daily email service.
Find out more…
Photokonnexion Photographic Glossary – Definitions and articles.
Light and Lighting – Resource pages on Photokonnexion
Soft Light (Information and use)
Soft Light (Definition)
Hard Light (Information and use)
Hard Light (Definition)
Make soft light work for you
Six things to know about light
Three little known facts about shadows
By Damon Guy (author and Photokonnexion editor)

Damon Guy (Netkonnexion)
See also: Editors ‘Bio’.

Find out more…
Write for Photokonnexion.
