Category Archives: Shooting specific subjects

Information on how to shoot specific subjects and locations etc.

Low light action shots – tips for getting them right

“Low light action shots” is contributed by Melanie Hyde (Bio) of PaintShopPro.com Low light action shots | External link - opens new tab/page.

Low light action shots need care to get them right.

Low light action shots need care to get them right.

Action photography itself can be extremely challenging. Being in the perfect place at just the right time, capturing that incredible moment. Then, hoping to transport anyone who sees your photo across time and space to take them back to the moment the image was taken. It’s a truly a magical experience, whether you’re taking the picture or the viewer.

Given the challenges that come with action photography, removing most of the light only makes it all the more difficult.

There is good news. The same principles of action photography and proper exposure apply. It’s just a little more challenging to get those low light action shots.

Light sources for your low light action shots

When it comes to taking low light action photos, you’ll need to combine the available light sources. This will help to make the most of the situation. First, take a look around and identify whether the lighting is constant or variable.

Constant Light

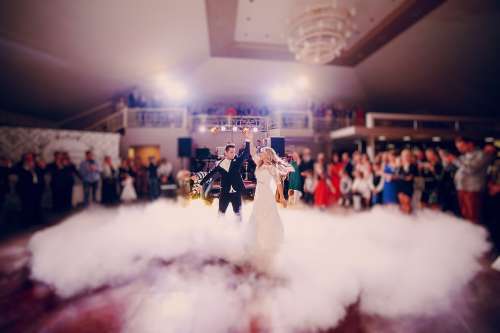
Constant light occurs within your setting when you can isolate out a source for a shot. Framing the shot is important so that the light is consistent for that shot. The next shot may have a different source – you need to isolate the light for that too. For example, if you were shooting a wedding reception, you might capture an image of the bride and groom on the dance floor. Then, you turn around and capture an image of the bride’s parents dancing across the room. Depending on the setting, the lighting may be different between the two subjects but consistent within each shot.

When lighting is consistent, operating your camera becomes much easier. The camera can adjust to meet the needs of the low light action shots. Here are a few points to keep in mind when shooting with constant low light:

  • Shoot in shutter priority mode so the camera can adjust.
  • Use Auto White Balance so the camera can adjust.
  • Manually control your ISO.
Variable light

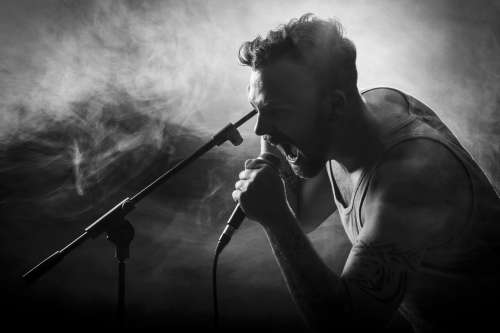
Variable light occurs when light sources are constantly changing and are inconsistent across your field of view. Imagine you’re photographing the lead singer at a rock concert. You may have to deal with strobes, spotlights and pyrotechnics. The constant changes in light sources will cause your camera to struggle to automatically expose the image correctly.

Low light action shots with variable light sources can confuse your camera - go manual.

Low light action shots with variable light sources can confuse your camera – go manual.

When dealing with variable light conditions it’s usually best to go manual. In this situation, remember to:

  • Manually set your aperture and shutter speed.
  • Manually set your White Balance.
  • Manually set your ISO.
Balance aperture, shutter speed, and ISO

You have three ways to control the way your camera exposes an image. Aperture, shutter speed, and ISO. To successfully capture great low light action shots, you must be able to manipulate these elements. Select settings that allow you to capture the highest quality image for the ambient light conditions.

The exposure triangle helps you to keep your shot’s exposure within the capability of the camera and lens. So when going manual your settings should allow these three essentials to balance. Look in your viewfinder to get the needle settled in the centre for a proper exposure. For more detail check out The Exposure Triangle – An aid to thinking about exposure.
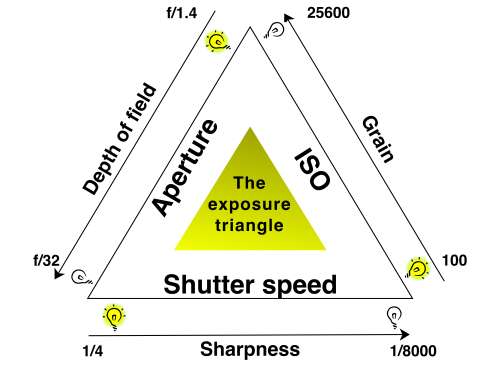
The exposure triangle is an idea that helps you balance aperture, shutter speed and ISO for a good exposure.

The exposure triangle is an idea that helps you balance aperture, shutter speed and ISO for a good exposure.

Start with shutter speed

Low light action shots are by definition going to be in difficult light for your camera. Getting your shutter speed right can be tricky. However, it has a huge impact when shooting movement in low light. The following diagram will help you select the right setting.
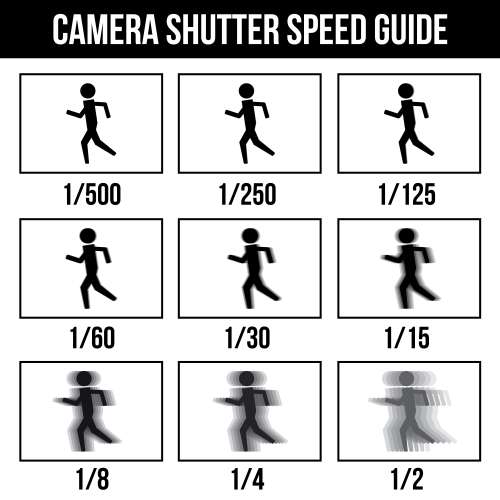
Camera shutter speed guide.

Camera shutter speed guide :: Low light action shots need the right camera speed. If the shutter speed is too low you get blurring.

You have to select a speed that is fast enough to capture the motion clearly and without blur. The speed should still slow enough to deal with the lack of light. For action shots, it’s always best to use the fastest shutter speed that the light allows. It is a balancing act so you will need to practice.

Select the widest aperture for your low light action shots

In action photography, capturing crisp and clean images is usually the priority. When shooting with low light settings, it’s crucial to get as much light to your sensor in the small amount of time that your shutter is open as possible.
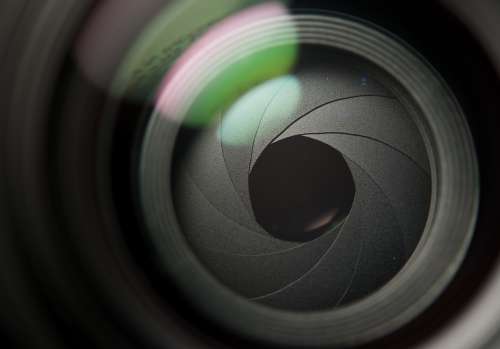
For low light action shots use a wide aperture to increase the incoming light.

The aperture sets the initial amount of light coming into the lens. For low light action shots use a wide aperture to increase the incoming light.

To accomplish this, use the widest aperture that your camera allows. While shooting in shutter priority mode, you allow your camera to do this automatically. Shooting in manual mode however, you’ll need to keep a close eye on your exposure. You need to make sure that your images are not underexposed in the low light.

Using high ISO

Are your images are consistently coming out blurry with your aperture is as wide as can be? Consider stepping up your ISO settings.

Your low light action shots can really win the day if you get your ISO right.

On the dance floor the light is almost always difficult. Your low light action shots can really win the day if you get your ISO right.

By changing your ISO, you alter your camera’s sensitivity to light. The higher the ISO, the more exposed your image will be. Just be cautious: using a higher ISO may introduce more “noise” to your photos. This noise can often be reduced or corrected in a post-processing software like PaintShop Pro Low light action shots | External link - opens new tab/page or Lightroom Low light action shots | External link - opens new tab/page. (Shooting in RAW is especially helpful with noise reduction).

Check your work as you go

Throughout the shoot, use your histogram. (See: Can you use the histogram on your camera?) It will help to make sure you’re exposing your images correctly. The histogram shows the distribution of the type of light in your shot. It aims to help you capture a consistent amount of light across the full spectrum of your image.

The histogram on your camera helps you ensure effective use of light in your exposure.

The histogram on your camera helps you ensure effective use of light in your exposure.

The histogram on your camera helps you ensure effective use of light in your exposure.

You’ll also want to make sure that your white balance looks good and adjust accordingly. In most cases, your camera is going to be able to set white balance automatically, but you may need to tweak it; especially if your lighting is wildly inconsistent.

Increase your odds

Low light action shots are all about being in the right place at the right time with the right equipment.

Use the fastest lens you can find. The wider the aperture, the more light your lens allows to strike your camera sensor. Anything higher than F2.8 will cause you to struggle with exposure.

Set the camera to continuous drive. This equips your camera to capture a burst of images every time you press the shutter release and gives you a better chance of capturing that perfect picture.

Use a fast memory card. Your camera can only capture images as fast as it can write them to the memory card. If you snap too many images in rapid succession, you’ll have to wait for the card to catch up with your camera and you might miss “the shot.”

Be prepared to shoot…a lot. You’re going to have a lot of images that are no good. So remember to keep tinkering with your settings. The key is shooting lots of images at different settings until you get the perfect mix.

Don’t forget to have fun

Low light action photography can be both challenging and fulfilling. As you refine your skills and your eye for lighting, action, and composition, remember to regularly experiment and try new settings.

Comments, additions, amendments or ideas on this article? Contact Us
or why not leave a comment at the bottom of the page…

Like this article? Don’t miss the next — sign up for tips by email.

Exposure changes the mood of your image

Exposure changes can affect many aspects of an image.

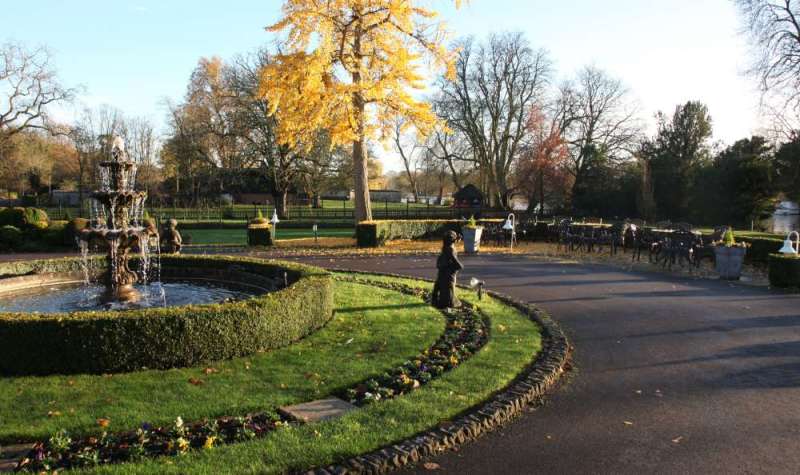
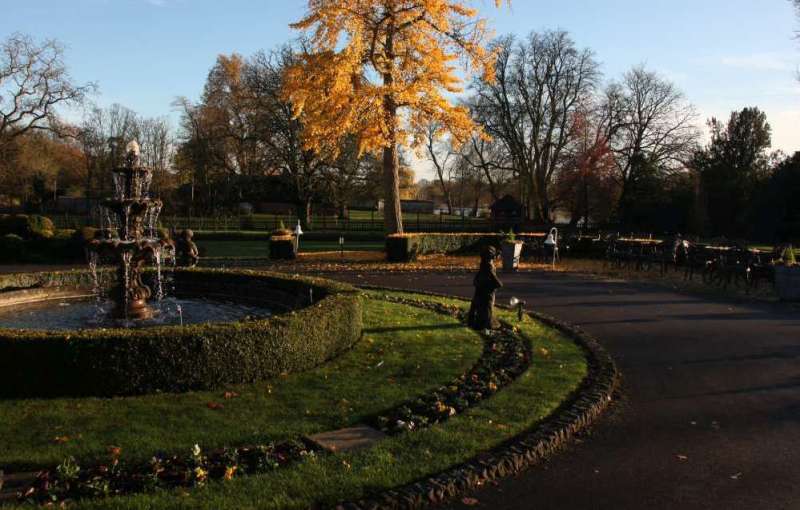
Exposure changes can affect many aspects of an image. Colour, mood, visual impact, contrast and others. The second image below show the differences.
Image better seen large. Click image to view large.

There is no such thing as a perfect exposure

The main goal of starter photographers is to control the exposure. The Exposure Triangle, or other models of balancing light, lead learners to pursue ‘perfection’. Once they grasp the concept of balancing ISO, Aperture and Shutter speed, the needle in the camera viewfinder is their guide.

In manual mode, that central needle is important. It shows that the three elements are balanced. The unwary learner is soon overwhelmed by that needle. They have learned how to keep it central. Now they are going to keep it there despite everything. They have learned that, if the exposure changes, the needle drifts off the middle position. When that happens it is no longer “perfect”.

That mid-position needle is useful. However, it is not ‘perfection’. It is just a guide. Modern camera manufacturers have made things easy for the camera user. The technology, sensors and controls on a modern camera mislead the unwary into a false position. Complex technology and controls give the user confidence that the camera must be right. They assume the central needle creates the perfect capture. That is simply not true.

The balance of light controls the quality of outcome you want. Your final image is created by that quality of light. The creative photographer uses exposure changes to to conjure up the result they want. A good photographer commands the camera to create the picture. The camera does not create the perfect exposure for the user. The user makes exposure changes to create the desired image. Deliberate under or overexposure is an important part of creating your image.

Exposure changes allow you to command the camera

In the image below we see (almost) the same picture as above…

A different quality of exposure changes the whole experience of the picture.

This second image shows same scene as above. But the different quality of exposure changes the experience of the picture. This outcome is no more correct than the top picture. However, when it was taken this one was 1 and 1/3 stops underexposed on the camera viewfinder scale. It was taken within seven seconds of the first image.
Image better seen large. Click image to view large.

Exposure changes allow the user to create the mood of the shot. This is clearly shown by the deeper contrasts, more saturated blues in the sky and reds in the Autumnal leaves. The low sunlight brings out the shadows and colours more. It all adds up. Together they create a very different view of this fountain scene. A twilight feel perhaps.

I was trying to create an Autumn evening view and the deliberate underexposure gave me the key. Yes, I deliberately underexposed to create the effect. I was commanding the camera to create my “perfect” scene for what I wanted.

Experienced photogs make exposure changes regularly

For me, the darker version was right for the reasons I needed that photograph. The control of the intensity of shadows, colours, contrasts, and so on, can be done many ways.

For example, High key shots often use exposure changes. They are created by deliberate overexposure. That brings out the intense whites in a high key image.

Many portraits are lit very brightly to the eye, but a very small aperture or fast shutter speed limits the light entering the camera. This will create an underexposure bringing out the facial features. This gives shadows a depth, without harshness, as can be seen in the next image. This use of exposure changes is a great mood enhancer.

Portrait shot in bright light but underexposed in-camera.

Portrait underexposed in-camera creates a tonally controlled result.

Create the exposure changes you want

How do you create this effect of under or overexposure? Simple. There is a control that can do it in auto or semi-auto modes. While in an auto-mode use the “exposure compensation” dial. You can add or subtract one or two stops of light. You can find out how to use the dial in your manual.

For the learner going fully manual it is even easier. That central needle position is your guide to what the camera calculates as an optimum light level for the shot. To create a manual over or underexposure simply dial the exposure-meter back or forward. Move the needle away from the central position. Shocking I know. You actually create exposure changes by deviating from the central needle position.

Exposure changes of one stop halves or doubles the light entering the camera. So be careful. Take several test shots. Dial one third of a stop or more at a time. Look at the result and check if you have created the right effect.

Create your image in mind – then make exposure changes to suit

The way you want your image is a creative decision. The camera should not be allowed to dictate the outcome.

You have two choices. If you go with the settings the camera gives you, the result is an optimum of the balance of the settings. If you can foresee what you want to achieve, then create your own result. In this case, make the balance of settings so the exposure changes to your choice. Your choice will be different to the result the camera would give you. But with care and practice it will be what you intend for your shot. You have taken control.

So next time you are taking a photo consider this. If you think your picture would be more effective as a darker or lighter representation, then make the exposure changes you need. Do it – create. Really make your images – don’t just capture what is there.

Comments, additions, amendments or ideas on this article? Contact Us
or why not leave a comment at the bottom of the page…

Like this article? Don’t miss the next — sign up for tips by email.

Damon Guy - Netkonnexion

Damon Guy (Netkonnexion)

Damon is a writer-photographer and editor of this site. He has run some major websites, a computing department and a digital image library. He started out as a trained teacher and now runs training for digital photogs.
See also: Editors ‘Bio’.
By Damon Guy see his profile on Google+.

Get down to eye level with animals

Work at the eye level of the animal - get into their world

Work at the eye level of the animal – get into their world.

The world at eye level…

Photography can be wonderful because of the alternative views we can get. Often the best photographs are the ones that show us new views, or ones we don’t see from our normal standing position. The world of animals is a particular case in point. Use the eyes as a guide. Work at eye level.

Photographing animals

There is a whole range of animals involved in our lives. Domestic animals and others make great photo-subjects and there is a huge number of different ways to photograph them. Inexperienced photogs often make the mistake of taking the shot from the normal upright standing position. This does two things. It renders the subject “normal” in the eyes of the viewer – because this is the angle they see it normally. This upright position also tends to make the animal seem small and subservient. Both these viewpoints can make your shot look mundane or worse, flat. It will probably be uninteresting to the viewer.

Get down to the eye level of the animal. All of a sudden you are in the animals own world. By engaging directly with the animal at its eye level you create a correspondence with it. Eye-to-eye communication is an excellent way to get to the story of the animal. You see it at its own height. You can also see its world the way the animal does.

The point about this is that you are telling the viewer a new story. It is one they normally stand above. The viewer will have a much better insight from the animal you have pictured. More to the point you will be developing the eye level contact between the pictured animal and the viewer themselves. That contact brings the viewer into the picture. Eye to eye pictures are very powerful.

Eye level contact

Getting eye level contact with an animal is very powerful. The line of sight view the animal has, and the impact of the stare, can all be used to good advantage. If your animal has particularly amazing eyes you are also going to gain from the directness of the shot.

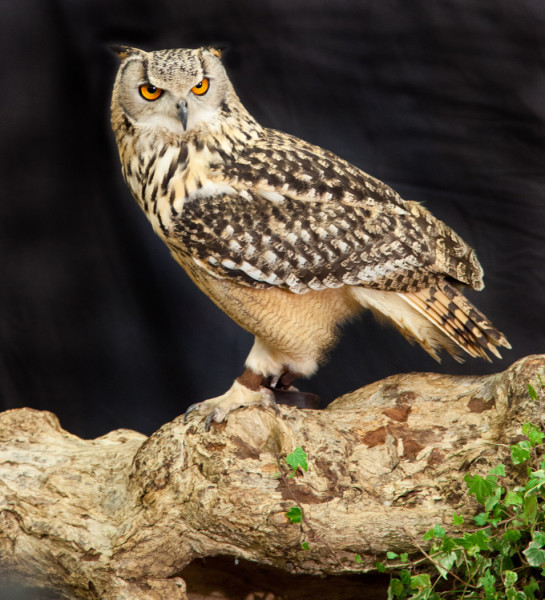
Eye level contact with animals and birds is a very powerful way to draw viewers into your picture.

Eye level contact with animals and birds is a very powerful way to draw viewers into your picture.
(Click image to view large)


Of course you can do the same for animals, in many situations. I enjoy doing photography in zoos. When you try to picture animals there, try to get them at eye level too. To do that you may need to get up a little higher. For example monkeys may be above your head height. I have often found a light ladder or folding step useful when photographing this way. It gets you up to their level.

Getting down low is important too. So be ready to lie down or at least bend for some shots. Try to get your shot right into the eyes of the animal subject you are imaging.

Bring the eyes alive

Eyes tend to look dead if they don’t reflect light. So when possible arrange the light or take the shot to see these reflections. They are called catchlights. If the eyes look alive the dynamic feel of the catchlights will add to the drama of the shot. Catchlights are more easily captured at eye level. So taking a picture on a direct line of sight will help to capture the feel of a penetrating eye.

Eye to eye level

All living subjects have eyes. You will always find that they are most important in the power of your shot. If you get your shot with an eye to eye level correspondence you will connect with that power. Animal or human subject, that power will be there. Your photography will benefit from emphasising it when ever you can.

Comments, additions, amendments or ideas on this article? Contact Us
or why not leave a comment at the bottom of the page…

Like this article? Don’t miss the next — sign up for tips by email.

Damon Guy - Netkonnexion

Damon Guy (Netkonnexion)

Damon is a writer-photographer and editor of this site. He has run some major websites, a computing department and a digital image library. He started out as a trained teacher and now runs training for digital photogs.
See also: Editors ‘Bio’.
By Damon Guy see his profile on Google+.

Beach views – ideas for a seaside photoshoot

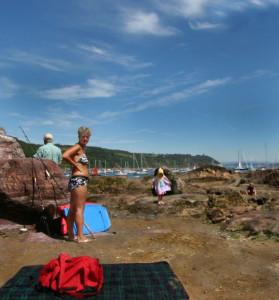
Beach views are really worth planning out.

• Cornish Afternoon •
The great British beach experience is based on our long history of holidays by the sea. The beach views that come with it are worth pursuing too.
(Click image to view large).

Work up a great coastal vista shot.

Beach views can be magnificent and there is always something worth photographing. Sea makes a magical subject in almost any weather. In the right place the views can be magnificent. Here are a few ideas for you to help you get a great photo from your visit to the seaside.

Beach views :: great vista shots

Photographers should be aware of the opportunities for great vista shots. Here are three tips to help you get the shot and the right light…
1. Spotting a rugged coast: Scout out the maps near your destination. Most good maps will show contours and the coastal shape. If you are looking for interesting coastline check out the height of the land beside the sea. Cliffs and hills indicate harder, more resistant rocks. This helps build up a range of rugged landscapes. Also, the more jagged edges the map shows along the sea/beach line the more likely the coast will have an interesting viewpoint.

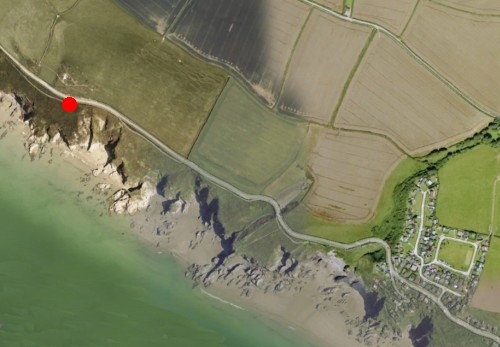
If you are looking for a place to try out, Google Maps is useful. The Google maps are not very good at showing contours or heights. But the jaggedness of a coast line is shown. If you convert the map to the Google “Earth” view you can get a satellite view of the coast. From that you can get quite a good idea of the terrain.

Google Earth - the satellite view provides a good idea of the type of coast.

• Whitsand Bay Cornwall •
The photo at the top of the page was taken from the position of the red dot. The view was taken along the rugged coast there. You can see from the Google Satellite view how rugged the coast is along there. It’s ideal for lots of different Beach views.


2. Beach views :: Checking out the light:
There are two times a day when the light is best for landscapes and vista shots. These are the Golden Hour just before sundown and the hour around sunrise. There is great light and low sun position at these times of the day. Why is low-sun position good? Because that causes long shadows to be cast off the rocks. Strong contrasts between the dark and light help define edges, shapes and form of the rocks and features. Shadows provide the defining depth in a picture too. Well defined shadows help the eye to see objects as more three dimensional.
• The Okta • The symbol for cloud cover on good weather maps.

• The Okta •
The symbol for cloud cover on good weather maps. A useful symbol to tell you the light conditions when checking for good beach views.
(Attribution: Wikipedia.org Beach views :: Oktas - cloud cover symbols | External link - opens new tab/page)


Of course we are not always able to take our photos at the best times of the day. So how do you check to see what the light will be like when you are there? Of course the starting point is the weather. Most good weather forecast web sites will tell you the amount of cloud cover. You can usually tell how much cloud cover is expected by the number of Oktas (or Octas) shown. The more cloud cover the more diffused the light will be. The actual types of clouds make a difference too – if they are dark and ominous they will make a great backdrop to your beach views. Seascapes really look great with heavy storm clouds. Make sure you have a tripod to hand. Dark clouds mean longer exposures.

3. Sun position: If it is a sunny day you might find the sun position is important. If the sun is up high, cliffs can still be in shadow. It depends exactly where in the sky the sun is at the time you want to take photos. There are websites to help with that too. Check out The Photographers Ephemeris Beach views :: Get the light right with . This really useful website “is a map-centric sun and moon calculator: see how the light will fall on the land, be it day or night, for almost anywhere on earth”. There is a web-based version. But usefully, there are versions for your mobile phone too. You will be able to work out where the sun will be at any time of the day. This will help you work out how to fit your beach view shot into your day.

Putting depth into your beach views shot

The shadows you are able to capture will help your beach views appear to have depth. But a longer distance view, especially in mid-day daylight, will need to have other perspectives. Here are a few ideas for you to introduce a feeling of depth into your shots…

  • Overlaps: When you are looking down a long beach you often find features of the beach itself will overlap in your sight. Mounds of beach stones; sand dunes; different rock layers at beach level; cliff top undulations; variations in the cliff face itself and even local vegetation all help. The ways that these features relate to one-another in the scene give you clues to depth in the photo.
  • Contrasts in colour: The colour of the beach stones, rock, sand and even vegetation can often be used to show variation. As you shoot down the length of the beach these can help to show depth to the eye.
  • Texture variation: The cliffs, dunes, rocks and any seaweed revealed by a low tide provide great variations in texture. Look for ways to bring all these into the shot. Textures often come out by slightly underexposing the shot. That may make the scene look darker than it actually is, but it will bring out the light and dark aspects effectively.
  • Lines of perspective: Strong lines are not often associated with beach views. However there are some strong ones that people often miss. The sea line itself is a strong line. You can look down the length of the beach and use the surf or water line where it meets the beach. Looking down on the beach from cliffs you can use wave lines (see below). If you are on the beach itself you beach views are often enhanced by cliff top lines. Although they often undulate they perspective is still distinct against the sky. On the beach itself, fences and other man-made features (groynes, buildings, paths, roads, beach walls etc.) provide lots of points of perspective you can use.
  • Distant points: If you have something in the distance that your viewer knows to be large they have a distance perspective. In the picture at the top of the page you can see a cloud line. These tiny clouds in the distance give a perspective for the viewer. Other things can be large shops towns on the coast, and even buildings.
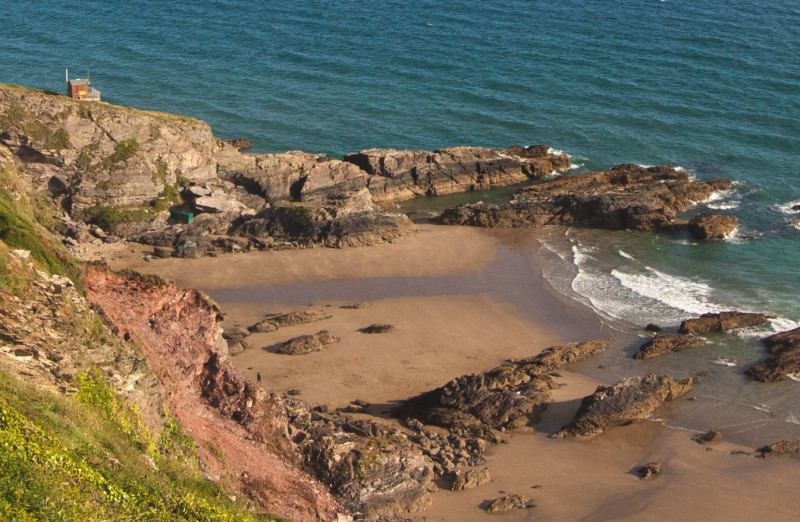
• Cornish beach view •

• Cornish beach view •
This view of the beach shown at the top of the page loses some perspective because the distances are reduced. The wave lines in the sea and the rock protruding from the cliffs gives back some of the perspective. The nearness of the grass close-up and smallness of the person and buildings also give depth to the shot.
(Click image to view large).

Check out other pictures of the location for your beach view

The most effective way to plan for your picture is to look up your destination and look for pictures done by other photographers. Try putting your intended location into Google Images. You will be able to pick out features in advance to help you give depth and perspective. You will also be able to see some good places to take shots. Here is the page for the bay where my pictures above were taken. You can see my shots are quite different from the others shown there. There is lots of scope to help you pick out some ideas.
Google Images: Beach views Whitsands Bay Cornwall Google Images: Beach views Whitsands Bay Cornwall | External link - opens new tab/page.

Comments, additions, amendments or ideas on this article? Contact Us
or why not leave a comment at the bottom of the page…

Like this article? Don’t miss the next — sign up for tips by email.

Damon Guy - Netkonnexion

Damon Guy (Netkonnexion)

Damon is a writer-photographer and editor of this site. He has run some major websites, a computing department and a digital image library. He started out as a trained teacher and now runs training for digital photogs.
See also: Editors ‘Bio’.
By Damon Guy see his profile on Google+.

Family day out – three tips to help you remember

Family day out :: Try not to take formal shots on the beach

• Family day out •
The memories are preserved better if you have relaxed shots. Don’t ruin the day obsessing about your photography – make a story. Forget the world class aesthetics and concentrate on the stuff of memories.

Capture the spirit of the day out.

The “Family day out” is one of the important bonding moments for a family. When you get to your destination the family relax and spend time doing what they enjoy. Memories are made of great days out. And, your pictures of the day make for wonderful memory-moments when you look back.

Often photogs out for the day tend to line people up in stiffly-posed formal positions. The informal clothing and location put these poses at odds with the scene. And it is not all about great aesthetics either. The family day out is more about people enjoying themselves than it is about achieving a world class image.

Here are three tips to help you get the most out of your family day out memory-shots.

Family day out – the candid moment

It’ll be fun, especially if you have the children there. So the most important thing is to get them doing what they enjoy. There is a problem though. You’ll never get a memorable family day out image if you spend the day fretting about getting it all just right.

Sometimes as photographers we get rather precious about poses, backgrounds, set up, simplifying scenes… It all has to be right. But does it really? Capturing a family scene is about your memory. Great aesthetics are one thing. Seeing your loved ones in a memory popping moment is another. So, relax your high principles – for the sake of a family memory moment.

Family day out :: candid moment

• A quiet moment at lunch •
Catch your loved ones in a candid moment. Tell a compelling story of your family day out.


There are lots of different aspects to photography. Instead of being an over-bearing photographer consider a different way. Just do something for you. You could make a great family day out miserable by regimenting them just so you can record it.

Alternatively, you could make the whole experience a vital and unique series of captures. Spend your time documenting what your family are doing. Catch them really enjoying themselves. Leave them be, spend your time getting the candid moments when they are most absorbed. That way you will see the deeper aspects of their character as well as making your shots tell a compelling story.

Capturing people doing what they enjoy

Doing what you enjoy on a day out is very character revealing. If you capture your subject in a moment that reveals their inner self then the shot is more memorable for you. It’s still in the spirit of the candid moment. Don’t interrupt them – capture them in action. It helps tell the story of the day. It also will help you remember the context of the shot and what you were doing at the time.

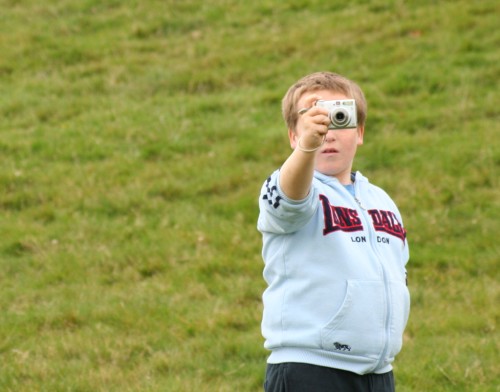
Family day out :: Capture your loved ones doing what they enjoy.

• Making pictures •
Capture your loved ones doing what they enjoy. It helps make the story of your family day out more compelling.

Family day out – vista shots – story continuity

As the family photog you can be happily engaged in your interest while the rest of the family pursue theirs. So don’t forget to have a good look around. There are plenty of things you can be photographing as well as your family. This is your chance to make your photographic skills come out. You can obsess all you like over the detail of things you photograph while you leave the rest of the family to have their fun.

Take in the vista too. Make sure you look at the surrounding area. Capture the things that interest you and others in your family. Think about how to put your “family day out” story in context. So make sure you take some shots of the scene and the surrounding areas or activities taking place. If you take the time to do this through the day you can build a story line with your pictures. It will make a great album for you all to remember your family day out for years to come.

Comments, additions, amendments or ideas on this article? Contact Us
or why not leave a comment at the bottom of the page…

Like this article? Don’t miss the next — sign up for tips by email.

Damon Guy - Netkonnexion

Damon Guy (Netkonnexion)

Damon is a writer-photographer and editor of this site. He has run some major websites, a computing department and a digital image library. He started out as a trained teacher and now runs training for digital photogs.
See also: Editors ‘Bio’.
By Damon Guy see his profile on Google+.

Snowflakes – a source of mystery and wonder

Snowflakes are intricate and beautiful.

• Snowflake crystal •
Snowflakes are intricate and beautiful. They are a source of interest to scientist – but photographers can make amazing pictures with them.
Image taken from SnowCrystals.com External link - opens new tab/page

Snowflakes are amazing!

Close up pictures of snowflakes show how intricate and beautiful they can be. And there are an infinite variety of them too. Here are a few ideas…

Some history about snowflakes

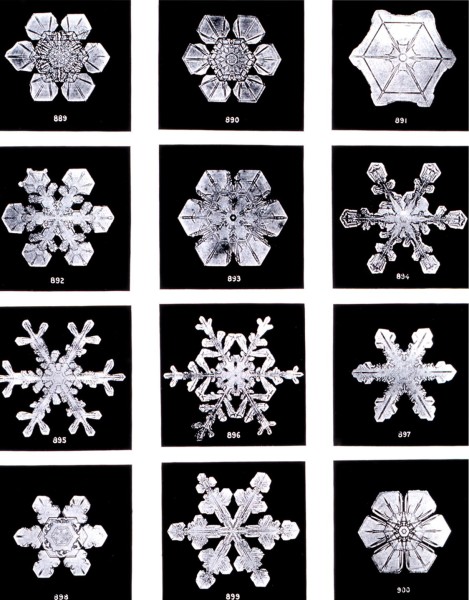
The perfect six-sided snowflake exists, but is not the only sort. Early snowflake pictures were taken by farmers’ son, Wilson “snowflake” Bentley  External link - opens new tab/page (February 9, 1865 – December 23, 1931) from Vermont. Aged 15 he was captivated by snowflakes. It started with looking down a microscope. But in 1885 he began experiments with a camera too. After struggling with the early camera technology he began to make some progress. During his life he made thousands of photos of snowflakes. His work still dominate our ideas today. In particular he was the first to claim snowflakes are unique and six sided. His pictures are also some of the best too.

Snowflake photographs by Wilson "snowflake" Bentley

• Snowflake Photographs by Wilson “Snowflake” Bentley •
Wilson “Snowflake” Bentley was famous for his snowflake photographs. Nearly a century after his death we are still using the images.

Research has shown how diverse snowflakes can be. They are not all perfect, regular shapes either. In fact according to “New Scientist  External link - opens new tab/page” (a weekly publication, UK) there are many types. The various forms are created under different conditions…

  • -2°C = Simple hexagons and star shapes
  • -5°C to -10°C columns
  • -15°C Six sided crystals (dendrites) form again
  • -22°C onward… complex plates and columns form again

Here is detailed morphology diagram for snowflakes Morphology Diagram for snowflakes - External link - opens new tab/page. It shows the relationship between the snowflakes’ type and temperature/humidity.

Snowflakes go through a range of temperature, humidity and other changes while falling. They have a unique and sometimes violent history. They clash together. They may ball-up with other flakes. It’s common for them to have multiple crystals joined in one flake. They may circulate in the clouds for long periods. They may also melt and refreeze before descending to the ground. It is not a surprise they are all so different. There is a great infographic on SnowCrystals.com External link - opens new tab/page showing snow crystal growth and the no-two-alike idea.

Capturing snowflakes on camera

You can’t easily photograph snowflakes on the ground. The overall white in a snow mass makes it difficult to distinguish individual flakes. The small size makes them a challenge too. The best approach to snowflakes is two-fold.

  • Use a macro lens or macro extension tubes.
  • Use a clean (new) long hair artists paint brush. Sable hair is best. Use a small black velvet cloth (about 500mm x 500mm) to see the snowflakes.

The aim with these is simple. Tease out individual snowflakes onto a black background. Then get in close with the lens. If you are working with a macro lens help yourself out and use a tripod.

The snowflakes themselves are easily destroyed. The trick is to use the artists brush to lift snowflakes onto the velvet. The brush and velvet have hairs that support the snowflake without damage. Be as gentle as you can to preserve its delicate nature of the crystal.

Sadly tiny ice crystals tend to go grey when on a black background surface. When shot on a dark background they are best converted to monochrome. This helps to increase the contrast and definition of the crystal.

To show the beauty of the refracted light use a well-lit background. If you can, place the snowflake onto a glass slide delicately lifting it off the velvet. You can buy Blank Slides – Microscope accessories External link - opens new tab/pageBuy microscope slides for your snowflake photos. from various places. Make sure you have left the slides to cool down to the snow temperature or the snow will melt on it.

Be sure to keep your cloth, brush and slides cold and dry. Make sure your breath is not directed at the snowflake. Even slightly raised temperature or humidity will affect the snowflake while you are trying to photograph it. More than once I have had them dissolve in front of my eyes.

If you are using an actual microscope, or if you are using a glass slide try to get some backlighting. To get the best refractive results try light at different angles on the snowflake. The best results are not necessarily when the light is directly from below. The angled light tends to create contrasts on the snowflakes. This brings out light and dark as well as some aesthetic colourations from refraction through the crystal.

For your interest here is an amazing camera-microscope…

Celestron Dual Purpose Amoeba Digital Microscope – Blue External link - opens new tab/page
This an affordable and well reviewed digital microscope. It will do detailed images direct from your computer. It’s a photography tool which provides an opportunity to develop your macro skills. Hours of fun too!

Masterful shots

One of the acknowledged masters of the art of shooting snowflakes is Kenneth G. Libbrecht External link - opens new tab/page. He’s a professor of physics who researches crystal growth. He also runs the SnowCrystals.com External link - opens new tab/page website. There are wonderful resources on the site including a “how to guide” External link - opens new tab/page and many hints about photography and equipment. There are some wonderful galleries of images External link - opens new tab/page. There is also a section on how to grow your own snowflakes. Although, the latter was a bit more complex than I think I would go… but who knows. People in this field seem to get obsessive about it. Snowflakes are extraordinarily beautiful.

Other sources of snowflake inspiration…

For a huge range of inspiring snowflakes images check out this search page on Google: Snowflakes photography  External link - opens new tab/page

Comments, additions, amendments or ideas on this article? Contact Us
or why not leave a comment at the bottom of the page…

Like this article? Don’t miss the next — sign up for tips by email.

Damon Guy - Netkonnexion

Damon Guy (Netkonnexion)

Damon is a writer-photographer and editor of this site. He has run some major websites, a computing department and a digital image library. He started out as a trained teacher and now runs training for digital photogs.
See also: Editors ‘Bio’.
By Damon Guy see his profile on Google+.

Using the sun to create shafts of light

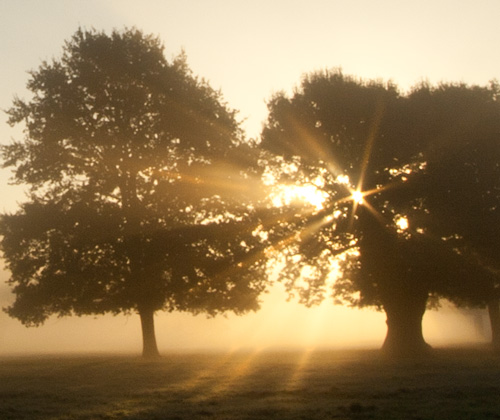
Golden Morning - Light shafts pierce the mist

Golden Morning – Light shafts pierce the mist

Atmospheric shots – look for light shafts

Look out for the early morning or evening mist that creeps across the landscape. If the mist is with a clear sky, you are in for a photographic treat. This is one of the most atmospheric shots you can take.

What are light shafts?

We are talking about those lovely rays that pass through the air highlighted by the mist. They often pick up the golden colours of morning or the wonderful oranges/reds of dusk.

Misty conditions can arise in lots of ways. Early morning or evening chill after a warm day often creates mist. It’s best as a ground mist. Up above the rising or falling sun is bright, golden and low. Under these conditions you have the perfect situation for light shafts. It is the shafts of light falling through the mist that create the effect. Although often there does not need to be much more than a hint of mist. Sometimes only a moist air is enough. This is especially so if you are in a dark forest with bright light penetrating deep between the dense canopy. The strong contrasts will often pick out the light shafts.

Misty Morning • Look for light shafts

• Misty Morning •
Look for the way the shafts of light cut through the mist

How do you capture light shafts

Actually, very easily. Be careful however, because you can damage your eyes or camera. Here is what you do…

Look for the shafts of light you can see with your eyes. If you can see them then you can often bring them out in-camera by slightly over exposing the light shafts. Set your camera focus to measure light using only the centre point of the viewfinder. Check your manual to find out how. Then, make sure you point it at a dark spot – like the trunk of a tree. The camera will measure for the darker areas of scene. This will brighten the scene and light shafts will stand out strongly. You will need to use one of the manual modes to do this.

You can also look for very bright spots coming through tree cover. This is often only the case if your camera is pointing directly at the sun. This can be dangerous so only do it if tiny points of light are coming through. NEVER look directly at the sun with your eyes or through your lens. If you can, use live view. Then you will not be looking directly at a bright light. If you are able to see a place where most of the light is blocked you could capture a few rays. Powerful as they are, they will cause strong lens flare. Often this will emphasis light shafts coming through the mist.

Light shafts – examples

You can check on this search on Google Images to see a whole page of light shafts. There are so many around the web that you cannot fail to be inspired…
Google Images :: Light shafts  External link - opens new tab/page about light shafts

Getting there on time

This is one of those techniques that work best with the Golden Hours of morning or evening. So you might need to get up early. Looking out for the right conditions is crucial. So is making sure you are in the right light/dark conditions. Forests and woodland are best. Most of all, be at one with nature. These shots make exciting images to look at. They are wonderful to experience too.

Comments, additions, amendments or ideas on this article? Contact Us
or why not leave a comment at the bottom of the page…

Like this article? Don’t miss the next — sign up for tips by email.

Damon Guy - Netkonnexion

Damon Guy (Netkonnexion)

Damon is a writer-photographer and editor of this site. He has run some major websites, a computing department and a digital image library. He started out as a trained teacher and now runs training for digital photogs.
See also: Editors ‘Bio’.
By Damon Guy see his profile on Google+.