

Getting your image sharp is more about your photography technique than where the pixel level is in the image.
Click image to view large.
Viewable images need sharpness.
Viewing an image on your computer is easy. Just open it up. Actually, that is not the full image in most cases. It’s a tiny version of it. A control on your image viewer will allow you to view it at 100%. It is at that resolution that you will know what the sharpness is really like.
What you see normally
When viewing a full image on a screen you normally see the picture reduced. Most people have the image viewer set to show the full picture. To fit it on the screen the computer does a throw-away exercise. It looks at the image file data. It finds as much detail as it can to discard but still leave a picture you would recognise. To do that it will lose some of the picture detail. But to compensate the image is sharpened up. That means the computer will emphasis any lines and edges it finds. This helps you to see detail and make up the rest.
We are very good at that – making up the rest. After all, every image we see is in two dimensions. But we still perceive it in three dimensions – because we make it up. So it is with the lost detail. We still see the image as pretty complete and can imagine it. The picture above was taken on a 21 mega pixel camera. The original picture is 5616 x 3744 pixels = 21,026304. So as you see it, at 800 × 488 pixels (scaled to 473px × 288px) it is pretty sharp. You can see it at 1000px wide if you click the image to get a larger version.
Most cameras take at least 8 mega-pixel images
What eight mega pixels means is that the sensor has approximately eight million photosites (sometimes pixelsites) on the digital image sensor. A pixel site is one individual sensor point. It senses the light. Each pixel site translates into an individual pixel in your image. You can see how to calculate the different mega-pixels on this page ![]() .
.
See the pixels as they are – get sharpness
A picture at one hundred percent of its size is at its proper resolution. It is the picture that the digital sensor was able to capture. If you view the picture at this resolution your image should be sharp. If it is not then your photography technique needs some work. Sharpness at the 100% size of an image is the tale-tell. It tells you if you are really getting a sharp result. Any smaller resolution and the sharpness is created by the computer, not your technique.
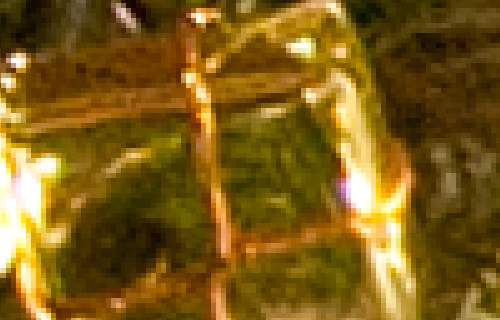
Seen at 100% resolution each pixel will fall into the visual position that you expect and the image will appear sharp. If on the other hand you are viewing the image at 100% and it is not sharp you will see lines and edges that are blurred. They will appear ‘soft’ – as if the lines and edges are not really as thin as they are when you see them in real life. The image below is a section of the image from the top of the page. It is shown at its 100% resolution. Of course it is cropped to fit the space. So you are not seeing the full picture. However, you should be able to see the detail.

A section of the Christmas tree from above showing the sharpness when viewing at 100% resolution. The detail is clear and recognisable.
When you blow them up pixels are messy
If you open an image up at more than one hundred percent you are asking the computer to lie to you. An image file can only reproduce an image at the resolution it was taken at. If you ask it to blow up the image further it will try to do it. What you actually see will be a best guess. Your computer will try to show the current pixels replicated outwards. Each pixel will be surrounded by replicas of itself. This will make your picture look blurry. If you continue to blow it up you will get a pixelated version of the picture. Squarish artefacts and lines appear. The picture will look increasingly blocky as it gets more blown up.
This image is blown up to 500% of the proper resolution. It is still taken from the image at the top of the page. You can see individual pixel points and the quality is lost
What is the point?
The point, that is what a pixel is. When blown up large enough it shows as a single point on the picture. It comes from one point on the image sensor – a pixel site. At normal resolution a pixel is too small for the eye to see individually. Mixed with all the other points it helps create a picture. The eye views all the different pixel positions as a mass. Not individually. Together they form an image. But that image is the result of your minds eye assembling them to resemble reality. That is what you see. It is an imagined facsimile of reality run together from a mass of dots.
When you next see an image you have made, stop. Change it to 100 percent view size. See if it is sharp. If it is not, work on your photography technique (see: The Zen of sharpness). If it is sharp, then bless your imagination because you have created a wonderful thing in your head. You have created a real image.
Comments, additions, amendments or ideas on this article? Contact Us
or why not leave a comment at the bottom of the page…
Like this article? Don’t miss the next — sign up for tips by email.
Photokonnexion Photographic Glossary – Definitions and articles.
Camera Mega-pixel Calculator
Photosites (sometimes pixelsites)
Definition: Digital image sensor
The Zen of sharpness – 12 easy ways to improve

Damon Guy (Netkonnexion)
See also: Editors ‘Bio’.
By Damon Guy see his profile on Google+.

