Tag Archives: Vocabulary

World Backup Day – save your files

The only safe files are ones in backup

World Backup Day  World Backup Day | External link - opens new tab/page
Make sure your files are safe. Back them up.

Backup, backup, backup!

March thirty-first 2014 was World Backup Day  World Backup Day | External link - opens new tab/page. “What’s that all about?” you might ask. Well, if you do ask that you probably have not experienced the anguish of losing all your files. For some people it can be devastating.

What if you don’t backup?

I spent fifteen years in managing IT services and image libraries. A job where backup is everything. Without it we might have lost thousands of precious files. Most could not be replaced.

In that time I’ve come across many people who lost files. The most common losses were simple delete mistakes. In most cases these lost files can simply be un-deleted.

However, if you lose your storage media or hard drive you lose everything stored on it. Theft, software failure, software infection, mechanical failure – all are equally devastating. Your files are gone.

I have often heard people say, “well, it could happen”. “But I have nothing precious to lose”. This indicates a state of mind. People often do not appreciate the value of the data they have on their computer. Photographers may appreciate our collection of files. They represent our cumulative photographic efforts. But most people have other valuable data too. Past emails from loved ones. Pictures sent to you. Medical information. Passwords. Personal banking and finance data. Personal correspondence and records. Insurance details; investment files… The list goes on.

Over the years I have so often seen people devastated by what they have lost. They just did not realise what they had on their computer. But when the data is gone it’s too late.

If you lose your data there are also many problems ahead. Finding information again after losing data takes months. Getting in contact with people to get new accounts set up takes time. In fact one or two people have told me that after losing a hard drive they spent years recovering from it. After you lose some information some Internet accounts may never be available again! Will you lose files that way?

The answer is simple – backup

Many photographers do not backup their photos. So what should you do to protect against loss?

Backup is easy. It requires a small investment and a mental commitment. First an important principle…

LOCKSS :: This stands for Lots of Copies Keep Systems Safe.

Of course you need to spread these copies across different storage media. If every file is on one hard drive this becomes a single point of failure.

So, the second thing you need is a second hard drive or storage medium. With a second drive you can back up your files onto it.

A USB drive is a bit unreliable for backup and and easily lost. An external hard drive is best. They have big capacities to hold all your files. Buy one which is the same size as your computer hard drive. They can be purchased at reasonable prices. You can check out a range of them easily – External USB hard drives for your computer  External USB hard drives for backup | External link - opens new tab/page.

A more secure backup system will involve two backup drives. Here is how it will work…

  • Working drive: this has your working files on it – it’s normally the hard drive on your computer.
  • Backup drive: Backup working files by copying them to this dedicated backup drive. Now if your computer hard drive fails you will have your files safe on a standby drive.
  • Third copy: On a regular basis, backup to a third drive.
  • Off-site storage: Take the third backup drive to a different location. Now if there is a fire or other loss (theft, virus etc). The other location represents a safe place for your files destroyed by the fire.

So you will have: two copies where you normally work and one off-site. This is a safe backup system. It will cover most file loss situations.

Backup time

It takes little time to copy files from one drive to another. However, it is easier when you use an automatic system. There are many file archive systems available. A good number of them are free.

One good example is the file backup system I use. Called Allway Sync Backup and archive software - AllwaySync | External link - opens new tab/page. I have found it a very flexible system to use and very easy to run.

There are other backup systems you can research…
Check this page on Google File backup software - Google search | External link - opens new tab/page.

As you can see from this search many of these systems are free software. You have chance with others to try “before-you-buy” too.

Another way to back up your data, photographs and files is to upload them to an online drive. Google has such a drive. Dropbox Dropbox - Online backup and file storage | External link - opens new tab/page is another… there are other versions too. All you do is have one drive to work on – and one drive on the Internet. That way you have a second drive that is off-site and safe.

This cloud-based backup system sounds good. But it can get expensive, and slow, once you start to accumulate lots of files. And, lets face it, photographers really do have lots of files. But it might suit you. So feel free to experiment or try out internet storage.

Backup commitment…

Earlier I said you need some commitment. Well that is needed to backup regularly. You really need to do it. Either have an automated system. Or, diary a date – say weekly. Then back up regularly. Do it daily if you need to do so. But make the commitment. If you don’t backup regularly you will pay for it later. Because, you will have a drive failure one day.

A state of mind

Doing regular backup work is a state of mind. You’ll need to spend a little money on drives or storage. You need to have some software or a regular date with your diary. And, you need to be aware of how much effort it takes to recover from a loss. Setting up a backup system for yourself now can save you a lot of time and pain recovering from losses later.

Make sure you commit. Make sure you backup regularly. I would hate you to be one of those people who spend years recovering from a major data loss.

Comments, additions, amendments or ideas on this article? Contact Us
or why not leave a comment at the bottom of the page…

Like this article? Don’t miss the next — sign up for tips by email.

Damon Guy - Netkonnexion

Damon Guy (Netkonnexion)

Damon is a writer-photographer and editor of this site. He has run some major websites, a computing department and a digital image library. He started out as a trained teacher and now runs training for digital photogs.
See also: Editors ‘Bio’.
By Damon Guy see his profile on Google+.

Panorama photography – an introduction

Panorama photography | Photokonnexion.com

• Panorama photography •
There are a few important essentials to think about.
(Image taken from the video)

Getting started is easy…

Panorama photography is a great way to extend your photography skills. To make a panorama you take a whole string of shots. Then later you match them up in software and “stitch” them together to make one long image. The photographic variables are all fixed. You take lots of photos. But, only have to set the camera up once. This means you can concentrate on the scene.

Examples of panorama photography on Google images xxxx | External link - opens new tab/page

The essentials of panorama photography

Like any aspect of photography you need to have some essentials. Your camera and a lens get you started. But a tripod will give you more consistent results. It provides you with a firm platform. One that you can use to line up all the shots. A tripod is recommended because hand holding the shots can leave you with a whole bunch of badly aligned frames. Panorama photography is all about getting the full range of a scene. If you miss bits or fail to get neat alignment the image will loose its continuity. The eye is drawn a way from the image to the imperfections of the stitching.

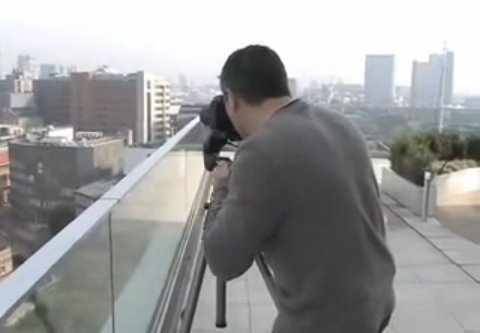
To use a tripod properly you should also use a good tripod head. Set the camera up to get the scene you want. In this composition phase you will need to sweep through the shot. Look through the viewfinder and pan around the full scene. Get the tilt of the camera right. Have a clear idea of your sweep. Then, fix your tripod head so the camera will sweep through an arc without moving up or down. It will only pan “left <---> right” as needed. In the video you will see him using a “pan and tilt” tripod head. Once the scene is selected the tilt aspect is fixed.

Using the tripod and head means you will get an aligned sweep through your scene. This makes it easy to line up (stitch) the pictures together later. The fixed camera angles helps make alignment easy. But fixing the other settings also helps get consistent results.

Settings for the shots

There are some things that make panoramic photography easy. To get the best effect make each shot simple. Each should have settings the same as its neighbour. Wide variations of settings between shots make colours, brightness, tone and even focus create bad matches. The joins between images will show where the settings change. This disturbs the flow of the eye through the image. Here is a list of steps you go through to set up the camera – and why.

Focal length: As with the other critical settings set focal length to a fixed position. You should switch your auto-focus to manual so the focus does not change in each shot. Then, manually focus into the scene at a place that will give you good sharpness and depth. Then this should be left unchanged throughout the panorama photography sequence.

The exposure dial: Auto exposure settings change as you pan across different light levels. To avoid each frame being a different exposure use the “M”, or manual setting. Set up the exposure for the first shot. Then, keep that exposure setting through the the entire string of images. This means you will need to fix the settings for the full range of shots.

Aperture: Panorama photography is mainly about wide sweeping scenes. Landscapes are ideal. To make the scene realistic it is best to have sharpness right through the scene. Picking F11 is a good option for that. Practice your panorama photography with that F-stop to start. Once you have the techniques you can get more creative later.

Shutter speed: Hold the shutter speed fixed too. Your shutter speed depends on how you set your ISO, and the aperture too. However, don’t just think about the first frame. Study the entire scene. Is there going to be any variations in light intensity across all the shots? You want all the shots to have a similar exposure level. So do some test readings or shots with your camera light meter. Work out how much the scene varies. Avoid big light variation. It will make consistent exposure levels difficult. Look for even light across the scene. Then, find a shutter speed that will work well for all the shots.

ISO: As with the other settings, you want to hold the ISO. Choose a setting which suits the scene and ambient light overall. Fix it for all the shots.

White balance: RAW or *.jpg this is one time you MUST set the white balance to a fixed setting. If you use auto-white balance you will NOT be able to match the frames later. While white balance is generally quite stable, a colour cast from one bright reflection can significantly change the colour. That would not matter too much on one image. But it will if you have to try to match ten images each with a different white balance. That will end up giving your panorama photography a patchwork effect. Choose a white balance setting and stick with it for all the shots.

Getting the shots

Panorama photography calls on more than just scene composition and settings. Also critical is “overlap”. You want to join the images so they match. That means overlapping them in a way that allows a good join.

The skill is in picking features in your landscape you can use in the matching process. I like to use patterns or textures where possible. In the software you are going to line up each image with its neighbour. Those patterns or textures allow you to make a join look seamless. So, as you go through the scene make a mental note of where you want the join to be. Rotate the camera on the tripod for each shot. Make enough overlap each side of the frame for those points to line up. This is clarified more in the video at the end.

Landscape or portrait shots can be used for panorama photography. All the pictures need to be taken in one or the other. If you use landscape format the panorama will be very long and thin. If you use portrait format the stitched image will not be so thin. But you will need to take more shots to get the whole scene. You might choose differently for each scene. It is your choice. These choices are a key skill in panorama photography. Think carefully about your composition.

Panorama photography video tutorial

Most of the above are explained in the context of the shot sequence in this video. Panorama photography is great fun, but it does require a little thinking ahead and planning your sequence. The video should help you to fix the method and settings in your head.
What Digital Camera

Stitching the image together

There are two basic methods of stitching the final image. Again this is one of the main skills in panorama photography. You can do the work manually in an image editor. This work can be a lengthy and detailed process. Each image needs to be lined up by the patterns or textures you chose on the image as the overlaps. Then you might need to clone the images together. Bit by bit and image by image you can build up your final sequence. If you enjoy detailed image editing it is very rewarding.

The second method of joining the images is to use stitching software. There are lots of different applications available. Which one you use is a matter of personal choice. Some image editors have panorama photography stitching built in. For more advanced users there is also specialist software. These applications are available with a range of functions and prices. You should do some experiments and research to pick your preferred software.

Comments, additions, amendments or ideas on this article? Contact Us
or why not leave a comment at the bottom of the page…

Like this article? Don’t miss the next — sign up for tips by email.

How digital cameras work – With James May

How Digital Cameras Work?

• How Do Digital Cameras Work •
You don’t have to know how your digital camera works to enjoy it. But knowing a little helps you to enjoy it better.
[Image taken from the video].

Understanding your camera better…

You don’t need an in-depth know how. Just enough to make it easy to learn more. Knowing a bit about how digital cameras work is really useful. Here is a quick and easy intro…

A few words from me

Those who know the world famous TV show, Top Gear How do digital cameras work: link to Top gear on Wikipedia - External link - opens new tab/page know James May External link - opens new tab/page. He has a zany sense of humour. Recently he’s been doing simple science videos. In the video he shows how digital cameras work. Off-hand jokes and jibes at Richard Hammond How do digital cameras work: Richard Hammond - Jibes - External link - opens new tab/page make the fast-paced video fun. Watch and learn how your camera works.

How digital cameras work. With James May.

Head Squeeze  How digital cameras work - from Head Squeeze :: External link - opens new tab/page

Some things to think about…

The history in the video is a bit misleading. How digital cameras work was worked out in the 1970s. By the 1980s sensors were quite advanced. But, it was not until the 1990s that digital image sensors became consumer items. Then camera makers made them small and cheap. To find out more see: A History of Photography (pt.6). The Digital Age.

Mr. May gets the idea of a pixel wrong too. He talks about pixels being on the sensor. Many people have this idea. Pixels are in images on screen. Data for digital images is collected on a digital image sensor. Each point where the data for each pixel is collected is called a photosite. Just remember, photosites collect data on the sensor. Pixels display the data in the image on the screen.

For more information about pixels check these links…
Definition: Pixel; Pixels
Definition: Photosite; Photosites
Definition: Sensor; Image Sensor; Digital Image Sensor

For some more context on pixels in your images check this: Getting down to pixel level.

Comments, additions, amendments or ideas on this article? Contact Us
or why not leave a comment at the bottom of the page…

Like this article? Don’t miss the next — sign up for tips by email.

Damon Guy - Netkonnexion

Damon Guy (Netkonnexion)

Damon is a writer-photographer and editor of this site. He has run some major websites, a computing department and a digital image library. He started out as a trained teacher and now runs training for digital photogs.
See also: Editors ‘Bio’.
By Damon Guy see his profile on Google+.
Portrait context is about the artist as well as the subject

Portrait context is important in photography

• Portrait context is important in photography •
[Image taken from the video].

Art in a portrait…

…includes much more than meets the eye. Photographers taking their first steps with portraits often see only the person in front of them. But the portrait context also includes the scene, the artist and their culture.

Portrait context – a historical boundary

Portrait art historically reflected the fashions and ideas of the time. For example early civilisations tended to depict people in profile. These flat two dimensional portraits were a mark of early Egyptian art. Much later, in the 14th century, the Renaissance masters did portraits as a three dimensional rendering on the canvas. They used artistic tools the Egyptians did not have.

Today the portrait context is still related to the knowledge and experience of the artist. And, they are partly bound by the conventions of their time, culture and so on. You can never fully be divorced from your context. But, we are free to take a wider, more context-free view of portraits. Artists and photographers are trained to take a broad, imaginative outlook. Art and photography schools give the imaginative freedom of students a wide scope. Breaking the bounds of traditional portraiture is a part of that freedom.

Breaking the bounds of portrait context takes careful thought

Portraiture starters often only see their subject through “everyday” eyes. Most of us are not trained in the ways of imaginative scene setting. So we tend to take portraits that represent our every day view of people. There is nothing wrong with that. Family, friends and others make a fun photograph. The images can be pleasing and satisfying.

Great portraiture goes deeper than that day-to-day view. To push the boundaries of your portraits, think in a different way. The portrait photog should consider their own vision and experience. They also need to think of the environment, cultural context, story and location of the shot. The photographer should understand who they are as well as knowing something of the portrait subject.

Of course knowing these things does not produce a great image. What makes a great portrait is pre-vision. It is how you bring out something in the subject, the scene or the portrait context that is remarkable. This takes a unique perspective.

The art of portrait photography

A strong portrait steps out of the everyday view. In the video we get the perspective of a number of portrait photogs. Each has looked into the portrait context in which they are working. With forethought and insight they have constructed artful portraits. They have also made driven and powerful images of their subjects. Each has a clear understanding of the portrait context. Each has a clear view of what they want to say.

The lesson is, look for a point to make. Understand both what you are working with and what you are working to express.
PBSoffbook  External link - opens new tab/page

Comments, additions, amendments or ideas on this article? Contact Us
or why not leave a comment at the bottom of the page…

Like this article? Don’t miss the next — sign up for tips by email.

Damon Guy - Netkonnexion

Damon Guy (Netkonnexion)

Damon is a writer-photographer and editor of this site. He has also run some major websites, a computing department and a digital image library. He started out as a trained teacher and now runs training for digital photogs.
See also: Editors ‘Bio’.
By Damon Guy see his profile on Google+.
Lag time – don’t miss the shot

Lag time - test one

• Lag time – test one •
There is a gap between pushing the button and the making the photo.
(image by Netkonnexion)

Every time you push the button…

There’s a period when not much happens. Lag time is the total time taken for the camera to complete the exposure process from the button push. In that process is a lot of detail. Here we look at lag time. With a simple test you can get a feel for the lag time in your camera.

Why is lag time important?

If you buy a camera for action shots you want minimal lag time. Otherwise you look and press, but the action has gone. Of course you can anticipate the action. This is how we all deal with lag time. But to know what time to anticipate you need a feel for the camera. A long lag time is likely to make your guess about when to press the shutter button less accurate. So it’s in your interest to know the lag time and practice with it. If you know the lag it makes it easer to guess the delay for shots.

Shutter lag – don’t misuse the term

Some people use the term shutter lag in a confusing way. They mean it to be the same as lag time. In the past this may have been the case. In early cameras most of the exposure process was completed by the shutter. Today we have a lot of other steps involved. The list of various time related things in the exposure process is quite long today…

  1. LCD activation of the picture (LCD display and electronic [mirrorless] viewfinders only).
  2. Thinking time between seeing a subject on the display and the finger push on the button.
  3. Time taken to get a focus.
  4. Aperture – time to calculate & set aperture size.
  5. Meter – time from light reading to exposure set up.
  6. Digital sensor start up to be ready.
  7. Shutter motor/mechanism actuation.
  8. Shutter opening.
  9. Digital capture of light data.
  10. Shutter closing.
  11. Data emptied from sensor ready for next exposure.

These items may overlap, run simultaneously or be in sequence. Some may not apply to some cameras. It depends on the camera model, design, efficiency and the components involved.

This list adds up to the total lag time. The first five items are not shutter related. They delay the firing of the shutter. They are shutter delay times. The other items are shutter lag items. They are responsible for the shutter and sensor capture of the exposure. They determine the shutter process from start to finish. These are the shutter lag items.

To be clear, lag time is the sum of all the lag items. Shutter lag is only those items related to the shutter-sensor system.

For a more detailed look at various components of lag times check out: Definition: Shutter lag; Shutter delay; Lag time; Processing lag;

Getting the shot – lag time explored

In order to know your camera better you can actually measure your lag time. So here is a method you can use at home. I have tested it using two different pieces of equipment and on two cameras with good results.

A word of warning. The on-board flash crosses all the other lag/delay times and may extend your total lag quite a lot. This is because it takes time to charge up ready for the flash. It will affect the results. Before testing turn off your flash. Check your manual if you are not sure how. Both these methods have back-lighting. You will get enough light without it.

Explanation/method: to measure the lag time we need to identify all the processes involved. I have done this for you above. This allows you to know what parts of the process are holding things up. You will see later that can help you save time.

Next we need to find a way to mark the start and end of the process. Fortunately the camera helps us. When the shutter button is pushed we know the exposure process is started. The clever part is that if we photograph a timer we know when the exposure process is finished because the clock will show the finish time.

To find out our lag time is easy. We activate a clock at the same time as we push the shutter button. We do this while photographing the clock. When the shot is taken the end of the the lag time is shown on the photograph.

Two methods to try out

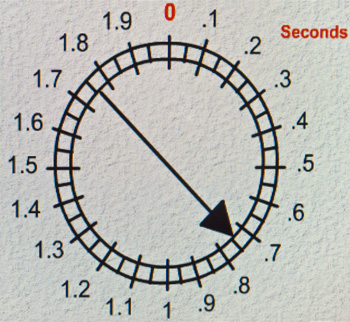
In the photo “Test one” above I have used this method with my smart phone. I set up the stop-watch app on my phone. Then I pushed “start” with my left hand. I simultaneously held the camera and pushed the shutter button. The key is to make sure you set off both the timer and shutter button at once. If you do, the the photograph will show the lag time. In the photo above it shows 69/100ths of a second. This is my lag time for a photo taken on my little Canon G12. Use a tripod or stand if holding your camera and pushing the button at once is not steady enough.

If you do not have a smart phone (or a stop watch) to photograph, try this web page…
This page will allow you to test your Digital Camera’s shutter lag… External link - opens new tab/page.
(Note: this page is about your total lag time even though it refers to the shutter lag).

Shutter Lag Test two

• Shutter Lag Test two •
Test your Digital Camera’s lag time External link - opens new tab/page.

Follow the instructions on that page. You will see a very slight retard on the clock at the ‘zero’ point. That gives you time to notice the top point and press the shutter button. The resulting photo will tell you the lag time on your camera.

I have run tests on my camera using both the web page and the stop-watch app method. They give consistent results. I feel confident you will find either test will work for you.

Pre-focus to get the shot

Notice on the second test page there are two tests. The second one shows you how you can shorten your lag time. If you pre-focus the camera that saves some pre-shutter time. Focus takes quite a bit of time. So if it is already focused when you take the shot your lag is reduced.

To reduce the delay with pre-focus press the button half way down while looking at the clock. The camera will focus and take meter reading. Then you can hold the half way position – this is called focus-lock. Hold your half-down position until, at zero. Then push the shutter button the rest of the way down. You will normally find your camera lag time is greatly reduced. Possibly by as much as a half. Something to bear in mind for future shots.

Accuracy

Of course you might take a totally bad reading for your fist shot. After playing I found that for both methods you need to practice a little to get consistent readings.

To ensure you get a good overall result I suggest taking ten readings after some practice. Here are readings from my run of ten… 0.53 + 0.53 + 0.69 + 0.98 + 0.89 + 0.66 + 0.74 + 0.65 + 0.66 + 0.74 = 7.07
If we divide the total by ten we will get an average reading. It will iron out any anomalous readings.
Thus: 7.07÷10 = 0.71 (rounded to two places). The lag time on this camera is therefore 71/100ths of a second.

This ‘average’ method provides us with a consistent standard over our readings. This is a more accurate method of gauging the lag time.

What have we done?

The things a modern camera does to take a picture has created a long lag. The lag time is the sum of all the different things that impact the exposure process. From button-press to complete capture-of-data is the lag time.

We have looked at two ways of testing the lag time: a stop watch app; and a web page timer. I have also suggested using an average reading to iron out anomalies.

If you go through this process you will know your camera much better. But more to the point you will have a new confidence. You will know how long it takes to complete an exposure. And, you will know how much time to delay for a shot.

Comments, additions, amendments or ideas on this article? Contact Us
or why not leave a comment at the bottom of the page…

Like this article? Don’t miss the next — sign up for tips by email.

Damon Guy - Netkonnexion

Damon Guy (Netkonnexion)

Damon is a writer-photographer and editor of this site. He has also run some major websites, a computing department and a digital image library. He started out as a trained teacher and now runs training for digital photogs.
See also: Editors ‘Bio’.
By Damon Guy see his profile on Google+.

Dictionary of photography – know the correct terms

We all love a good book.

Despite other reading technologies, books are still popular. For photographers we rely a lot on the Internet. But, there are great books for us. One such book is “The Visual Dictionary of Photography”.

A love of dictionaries

I am an unashamed collector of dictionaries. With over a hundred of them there is always a good definition around. Despite being so well served, I have never found a good dictionary of photography. An author for one needs to be a passionate photographer, a technician, an artist and a writer too. They have to be nerdy about the details. And, at the same time, they must be passionate communicators. David Präkel fulfils the above.

The dictionary of photography

I love this book. There are great diagrams and pictures. It is no surprise that there is one on nearly every page. In fact, to help keep us visually interested, the fonts themselves are also varied. It is refreshing to have a book that is NOT standardised. Dictionaries are usually very consistent. They are very uniformly laid out. They are SOooo… visually boring. This one is not. It has coloured pages. It has different fonts. There are pages of capitals. There are different styles of diagrams. There is LOTS of variety. It is an exciting book to browse. This book is about a visual view – as well as the photography.

But is this book any good? I think so. I love the impact filled text. It is on message and precise. Here is an example from the definition of texture…

Lighting that falls across any textured surface will highlight each protruding part of the material and cast a deep shadow behind. This micro contrast is what we see as texture.
The Visual Dictionary of Photography – David Präkel

That is the essence of ‘texture’ in photography. There is more explanation. There is also a great picture. But really that says it all.

Does size matter?

There are nearly 300 pages. There is a definition per page. So there is plenty of content. It is a small sized book. However, it punches over its weight in what it achieves. The explanations, the content and the visual presentation all make it a full featured visual dictionary of photography. It covers all the important things you need to know to learn photography… size does not matter.

A great present

With Christmas coming this book could make a great present. It would be a cool gift to yourself, or for a keen photographer in your life. Packed to the brim with information it’s fun and great value. It is definitely worth considering. It will be a useful addition to your essential photographic kit.

The Visual Dictionary of Photography is available on Amazon. There is a selection of pages for you to review. So you can make up your mind about it. Have a look now and see what you think. The Visual Dictionary of Photography.

Comments, additions, amendments or ideas on this article? Contact Us
or why not leave a comment at the bottom of the page…

Like this article? Don’t miss the next — sign up for tips by email.

Netkonnexion

Damon Guy (Netkonnexion)

Damon is managing editor of Photokonnexion.com with professional experience in photography, writing, image libraries, and computing. He is also an experienced, webmaster and a trained teacher. Damon runs regular training for digital photographers who are just starting out.
See also: Editors ‘Bio’
By Damon Guy :: Profile on Google+

Tripod myths – why are amateurs tripod shy?

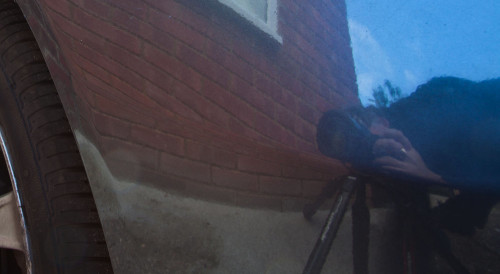
Me and my tripod - reflected in paintwork - tripod myths

• Me and my tripod – reflected in paintwork – tripod myths •
I use a tripod most days in some pretty tight situations. They are
quick, effective and give great results!
[Image by Damon Guy • Click to view large]

Tripods improve your results – fact!

Tripod myths can be heard regularly. Actually they make life a lot easier and faster. So, why are amateurs tripod shy? Why buy cheap? Why is simplicity apparently so difficult for tripod starters? Read on…

What are the tripod myths?

Over the years I have heard all the excuses. Here are some things I have heard…

  • I’ll miss the moment!
  • Tripods are too much bother.
  • I can shoot great shots hand-held.
  • It slows me up.
  • I like to walk the scene…
  • They are cumbersome, get in the way and heavy.
  • It’s not possible or easy to use it all the time.

I am sure there are other issues. But let’s look at these in detail.

Tripod myths: Missing the moment?

Every photographer gets lucky sometimes. They happen to point the camera pointing right and, snap, they got it.

Let’s be honest. How many times does that lucky capture happen? “Journalists?”, I hear you say? Actually, they rarely get lucky either. Photo-journalists train in preparation, planning and investigation. Being there and aware when the event happens is not an accident. They get the story time and time again.

If you plan for your tripod you will get the shot too. You won’t miss the shot getting your DSLR out either.

Forethought and planning are good photographic habits. Cultivate and develop these skills. You get the shot, and it’ll be sharper. If you are going to shoot, do it properly. Have both camera and tripod ready. Don’t be a victim of tripod myths, be in control of your photography.

Too much bother? One of the tripod myths that is just silly

What can be too much bother about getting a sharp, properly framed image? Loading a tripod is no more trouble than putting your camera in the car. It takes only 15 seconds to set up. The tripod will also give you time and scope to take a great shot. It holds your camera for lens changes and while scouting the next shot. Bother? Not really.

Bothered people think tripods are hard work. Do they realise how much the picture is improved? Attention to detail over your shots is what makes excellent images. Taking a quick snap may be no bother. Its unlikely to yield a great image either. This is one of the tripod myths that does not stand up!

Tripod myths: Great hand held shots

There are lots of situations where great light and a steady hand can get a sharp result. Congratulations. The time and effort you put into your photography is paying off. However, of all the situations I take pictures in, only about a third can be hand held. High ISO might help. More likely digital Noise would spoil the image. Better to take a longer exposure and use, say, ISO100. Quality is important.

Tripod myths will limit you to one third of your potential as a photog. It makes you a limited photographer. Tripods extend your shooting time, flexibility and quality of image.

Tripod myths: It slows me up

Yes, finally, a fact! Tripods make you think about your photograph. Perhaps not one of the tripod myths, more of a tripod mistake.

Since digital cameras became common I see a lot of machine-gun photography. A keen photog arrives, sprays off a hundred shots… Then, off they go. Wow.

Spend the first few minutes considering options. Proceed with a plan and with care. Cover all the shots you need. Sometimes you will get new ideas. Great, get more shots.

Once, at an aircraft museum with a keen photographer I was alone in minutes. My friend shot out of sight. We met up later. He had over 1000 pictures. He was elated. I had less than seventy shots. “Ah!”, he said. “You should’ve left the tripod at home!”

Later that week things turned around. He had eleven fair shots and one really good one. He had spent hours and hours in post-processing and missed lots of sleep. My more careful approach paid off. I had more than 40 quality images. As he looked at them he kept saying, “I took a picture of that too, but it didn’t come out”. And, “How did you get that one to look so good?”. My care, quality and composition paid off. The tripod helped me think about my photography and take care. I only spent about two hours in post-processing too. Most on simple tweaks. I had plenty of time for other shoots that week.

One question… Who was really slowed up here?

Tripod myths: Working the scene

One of my regular jobs involves 15 – 20 finished pictures of a scene. Picture order and camera height is important. We often work in low light. Space is restricted at many sites. We are not allowed to do any post-processing.

This is fast work. In 15 minutes I make up to 35 shots at a high enough standard to meet the needs of a court case.

Does a tripod hold me up or prevent me working the scene? Does it prevent my shots? On the contrary. I could not do the job without it. I would have to take many more shots. My shots would be less flexible. I would not achieve court-ready sharpness and detail. Without a tripod I could not work the scene properly.

Tripod myths: Cumbersome, heavy, intrusive?

Sometimes. A tripod can be badly adapted for what you are doing. So, if you are going to do something a lot, buy the right tripod. Travel a lot? Get a light one. Work on beaches a lot? Choose sealed feet to keep the sand out. Working special scenes? Get a special tripod. General photography? Buy general.

If you have the wrong equipment you can rightly claim it’s no good! So, buy the right equipment for the job. Make sure you get a quality piece of equipment. You spend thousands on your camera and lenses, so there is little point in spending only ten on your tripod. Quality workmanship and materials are important to producing quality images. You would not accept less with your camera so why with your tripod? This is one of the tripod myths that does stand up – if you have the wrong equipment. Get it right and you have a friend for life.

Sometimes ya gotta go with the flow…

I am not saying tripods are everything. In fact there are many situations where they are not suitable or you can’t use them. Also, we all enjoy the freedom and creativity of hand-held shots sometimes. If we fall prey to tripod myths we will never get past auto settings and bright daylight shots.

All I am saying is, don’t limit yourself. Get past the tripod myths. Buy a tripod and make sure you know how to use it. Your photography will improve if you use it a lot. Use it only a little and you’ll pay a penalty.

Why not look at some of the options now…

General tripods for DSLRs  External link - opens new tab/page
Manfrotto – Quality tripods for committed photographers  External link - opens new tab/page.

Also check out this post and recommendation…
Buy a good tripod – nothing beats it
Manfrotto 055XPROB Tripod Legs Only – Black External link - opens new tab/page

Comments, additions, amendments or ideas on this article? Contact Us
or why not leave a comment at the bottom of the page…

Like this article? Don’t miss the next — sign up for tips by email.

Netkonnexion

Damon Guy (Netkonnexion)

Damon is managing editor of Photokonnexion.com with professional experience in photography, writing, image libraries, and computing. He is also an experienced, webmaster and a trained teacher. Damon runs regular training for digital photographers who are just starting out.
See also: Editors ‘Bio’
By Damon Guy :: Profile on Google+