Tag Archives: Manual

Using the command dial to pick the right Mode

The Command or Modes dial

• The Command or Modes dial •
(Image taken from the video)

Setting up your shot.

The settings you use when taking a photograph affects the shot outcome. Before choosing camera control settings, first choose the camera mode. Here is an explanation on the ‘Command’ or ‘Modes dial’ where you make that choice.

Getting into manual mode

In “The Exposure Triangle” I looked at how you should balance…

These settings, when balanced, create an optimal exposure. You need to understand these settings to go manual with your camera.

What the dial offers

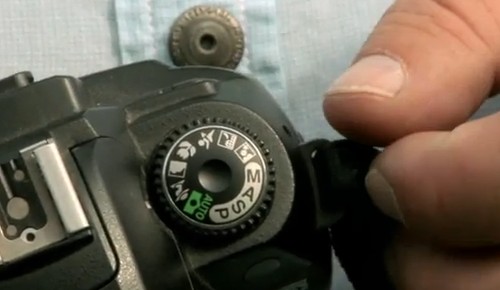
The Command or Mode dial sets the camera to use particular controls. You see a typical example of the command dial above.

‘Auto-mode’ or ‘Auto’ – the camera does everything for you. This setting is sometimes called the “green square” or Green mode. It’s normally green on the command dial. Using Auto you hand over full control to the camera. It provides a set of fairly average exposures. It’s used to snap basic shots in everyday situations.

To make your photography really effective you want full creative control. Learn to use the semi-manual modes and ‘Manual’ Mode. These give control to the three exposure factors. The picture shows these settings as ‘M’, ‘A’, ‘S’ and ‘P’ in a silver band.

  • M – the full Manual setting. You have full creative control over exposure.
  • A – Aperture – you set the aperture (f number) and the camera finds the right shutter speed for you.
  • S (or Tv) – the shutter speed setting or Time value. It sets the shutter opening time. The camera finds an aperture setting to match.
  • P – ‘Program’ allows some menu settings that ‘Auto’ will not allow. This auto setting gives only limited artistic control.
  • Also… B (not shown) means ‘Bulb’. It’s a setting for long exposures of more than 30 seconds. Bulb may not be available on all cameras.
Other modes

There are often other modes available. But these are really pre-sets. They do the same thing as manual and semi-manual modes. However, they give you less than full control over your shot. So I am not going into them here.

Camera Controls (intro) – command dial

Mike Browne goes through these settings (except ‘Bulb’). He explains the ideas and points out each mode. Remember, the command dial only sets the exposure controls for Auto-modes. The manual and semi-manual modes allow you to change the exposure factors from other controls.
Mike Browne  External link - opens new tab/page

Comments, additions, amendments or ideas on this article? Contact Us
or why not leave a comment at the bottom of the page…

Like this article? Don’t miss the next — sign up for tips by email.

Netkonnexion

Damon Guy (Netkonnexion)

Damon is managing editor of Photokonnexion.com with professional experience in photography, writing, image libraries, and computing. He is also an experienced, webmaster and a trained teacher. Damon runs regular training for digital photographers who are just starting out.
See also: Editors ‘Bio’
By Damon Guy :: Profile on Google+

Visual toolbox for photographers

Sharpen up your creative photography…

It’s easy when starting photography to over emphasis the importance of gear. In fact it’s ‘photographers eye’ that really makes the difference. Your vision and insight into a scene are critical to producing a wonderful image.

Sage advice from a world master

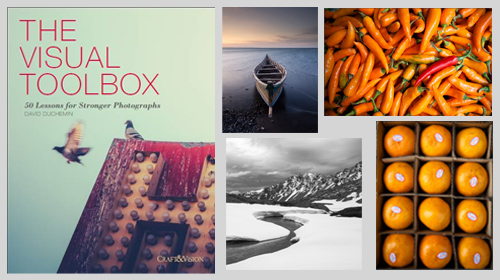
The Visual Tool Box by David duChemin is all about the skills of composition. He goes into depth around the background ideas which help you look at a scene. The ultimate success in photography is to make your image a pleasure to view. Aesthetics rule – it’s as simple as that. This book is dedicated to teaching you the tools you need to develop the ‘eye’.

David duChemin says,

These are the lessons I wish I’d learned when I was starting out.
The Visual Tool Box by David duChemin

This is my kind of book. He writes superbly, in simple, readable form. His examples are excellent and the pictures are just amazing. But most of all the book is organised for learners to extend their knowledge in easy, well structured steps. This book is all about putting new tools in your photographic tool box and it achieves that with an ease that any beginner will find a joy.

Composition

The book is packed with examples of the sort of compositional ideas that really work – for anyone. Just look at some of the topics covered…

  • Manual
  • Optimize Your Exposures
  • Master the Triangle
  • Slower Shutter Speed
  • Learn to Pan
  • Use Intentional Camera Movement
  • Use Wide Lenses to Create a Sense of Inclusion
  • Learn to Isolate
  • Use Tighter Apertures to Deepen Focus
  • Use Bokeh to Abstract
  • Consider Your Colour Palette
  • Lines: Use Diagonals to Create Energy
  • Lines: Patterns, Lead my Eye, Horizons
  • See the Direction of Light
  • Light: Front Light, Side Light, and Back Light
  • Quality of Light: Further Consideration
  • White Balance for Mood
  • Light: Reflections, Shadow, Silhouettes, Lens Flare
  • People
  • Experiment with Balance and Tension
  • Use Your Negative Space
  • Juxtapositions: Find Conceptual Contrasts
  • Orientation of Frame
  • Choose Your Aspect Ratio
  • Use Scale
  • Simplify
  • Shoot from the Heart
  • Listen to Other Voices (Very Carefully)

And there is plenty more content to complement and extends these ideas. What’s not shown in a list is the excellent and sage advice throughout the book. I will let David duChemin have the last word…

Pace your-self. Anyone can master a camera; that just comes with time. It’s the other stuff — learning to think like a photographer — that takes so much work and allows this craft to become the means by which you create art.
The Visual Tool Box by David duChemin

And it is thinking like a photographer that you will quickly learn from reading this book.

How to buy this great book

This book was originally published as an ebook. However, it is no longer available in that form. The book has moved into the real world. It will be available on Amazon as a Paperback From 31 Mar 2015.
The Visual Toolbox: 60 Lessons for Stronger Photographs (Voices That Matter)You can per-order the book from Amazon.

Comments, additions, amendments or ideas on this article? Contact Us
or why not leave a comment at the bottom of the page…

Like this article? Don’t miss the next — sign up for tips by email.

Damon Guy - Netkonnexion

Damon Guy (Netkonnexion)

Damon is a writer-photographer and editor of this site. He has run some major websites, a computing department and a digital image library. He started out as a trained teacher and now runs training for digital photogs.
See also: Editors ‘Bio’.
By Damon Guy see his profile on Google+.

Ten simple ideas to improve your photography (and a fun quiz)

Ten Tips

Ten Tips and 12 fun quiz questions.

Simple things help you…

We should all take a step back and think about the basics sometimes. It helps us remember essential techniques and keeps us on our toes. Here are the basics with some fun quiz questions too.

The simplest techniques in photography are often the most important ones. In this post we make sure we don’t forget them…

10 essential things to know; 12 fun quiz questions
  1. Not knowing your camera: This is really bad news. If you are hoping to improve your photography make sure you learn what every lump, bump, dial, screen, lens and twiddly bit does. Read your manual regularly. Practice with each function until you have got it right. Then practice it in the dark so you can do a night shoot.
    Quiz Question 1: How many lenses are there on a camera? Answers at the end!
  2. Poor stance: Most people when starting photography don’t realise that the way they stand and hold the camera creates all sorts of problems and poor performance. If you are a keen photographer a good stance can contribute to improved sharpness (hand-held shots), better focus, more steady hand and better shot timing. Learn to stand properly right at the start and you will save yourself lots of re-training time later.
    Quiz Question 2: At what point in the breath cycle is it best to take your shot?
  3. Not using a tripod: classic mistake. Tripods save you lots of time and give you pin sharp photographs. They give you an opportunity to set your camera up properly and ensures that your are ready for your shot.
    Quiz Question 3: A monopod has one leg, a tripod has three legs. What is, and how might you use, a bipod?
  4. Not giving the camera time to focus: When you press the shutter button halfway down it causes the auto-focus to cut in which focuses the camera. But if you punch straight through that to the shot the focus has not had time to do the full focus. This normally happens on the first focus attempt when the focus is right off. After that the lens in nearly focused and will adjust more quickly. So don’t make your first focus attempt too close to the shot or it will be blurred.
    Quiz Question 4: Why do you have two rings on a modern auto-focus/zooming photographic lens? What do you call each of them?
  5. Taking pictures against a bright light? Cameras don’t like very bright lights. Especially if there are also very dark spots nearby. Shooting indoors while looking at a window out to a bright sky will cause a strong white spot. This is very distracting and draws the eye away from the subject. Not good. There are Light and Lighting resource pages on Photokonnexion for you to learn more.
    Quiz Question 5: How many stops of light can healthy human eyes see (20:20 vision)? How many can the camera (rough generalisation) cope with?
  6. Relying on flash (especially pop-up flash): Pop up light has a very small concentrated source. It discolours faces, washes out colours, creates harsh, sharp-lined shadows and is badly placed (too close to the optical axis) creating nasty highlights on faces. Try to use natural light more. It is much more forgiving and does not produce such harsh shadows most of the time.
    Quiz Question 6: What is often the result of using pop-up flash with respect to two parts of the face?
  7. Dead centre subject: If you put the subject of your picture in the centre it will usually be boring. If you off-set your subject the eye will be looking to see why the symmetry is broken. That keeps the eye hunting around the screen. Learn about the “Rule of thirds” and other Composition principles. That will help you make the shot more compelling to the eye.
    Quiz Question 7: What type of compositional perspective would you be working with if you want to promote a three dimensional feel to your picture composition?
  8. Horizon control: Make sure your horizon is level, especially if it is a seascape. If you leave it on an angle the picture will be ruined because it will look like the sea is sliding off the page! Horizons also induce mid-picture viewer-stupor. Make a decision. Either shoot for the sky in which case place the horizon in the bottom third of the picture. Or, shoot for the ground in which case the horizon goes in the top third of the picture. An off-set horizon is more dynamic and keeps the viewers eye moving.
    Quiz Question 8: If your main choice is to shoot for the sky, where would you take your exposure from? (Where would you point your viewfinder focus point?) a. The sky? b. The ground?
    Quiz Question 9: Describe autofocus hunting and why it happens?
  9. Simplify, simplify, simplify: The most effective way to show a subject to your viewer is to de-clutter the picture. Take out of your composition everything that is nothing to do with the subject. The more you make the viewers eye go to the subject the more effective your shot will be.
    Did I mention that you should simplify your shot?
    Quiz Question 10: What is it called when you paint out something from your picture in post processing to simplify a shot?
    By the way, did I mention that you should work really hard to simplify your shots?
  10. Go manual: Auto-modes on your camera are really best guesses about what the manufacturer thinks will be suitable for the average shots most snappers will take. Buy you are a keen photographer. To get the camera to do exactly what you want, and to make discerning choices about your images you should work on improving your manual control. Your understanding of photographic principles will improve, your skill at exposure will improve and you will find yourself making informed choices about how you want your picture to come out. You will turn from a snapper into a photographer.
    Quiz Question 11: What does the ISO control do? a. Adjust the sensitivity of the digital image sensor or b. Change the aperture size?
    Quiz Question 12: Does ‘shutter speed’ or ‘aperture’ control movement blur?
Answers to quiz questions
  • Quiz Question Answer 1: I am talking about any camera that has a lens, not just DSLRs. the number of lenses is a matter of variation. If you are discussing photographic lenses then only that one will count (but read on). Some people think of each glass element in the photographic lens as an independent lens. Technically that is not true. They are optical lenses or glass elements, not photographic lenses. However, if the photographic lens (and elements if you included those) were all you counted you would be wrong. Here is a short list of Possible lenses on a camera of any sort…

    There may be others.

  • Quiz Question Answer 2: You should take a shot at the full inhale point or full exhale point before inhaling or exhaling in the next part of the cycle. You can choose which is best for you. All you do is delay the next part of the cycle while you take a shot. This is the point in the breath cycle when there is least movement of the shoulders/chest. Read more about it in Simple tips for a good stance
  • Quiz Question Answer 3: A bipod is photographically uncommon. Understandably, it has two legs. Find out more here… Definition: Bipod
  • Quiz Question Answer 4: The two rings on an auto-focussing photographic lens allow one ring to focus the image – the focus ring. The other ring is for zooming the lens. The latter changes the focal length and is called the focal length ring.
  • Quiz Question Answer 5: Human eyes can see about 18 to 20 stops of light when healthy. However, by contrast the best commercially available cameras have to operate with a dynamic range of 8 to 12 stops of light. Research is pushing the boundaries but there is still a big gap to meet the dynamic range of the human eye (in 2013).
  • Quiz Question Answer 6: Pop-up flash is very likely to cause red-eye.
  • Quiz Question Answer 7: To make things look three dimensional in your image you should be working with three point perspective. Look for lines in your image that promote cube-like structures. For example buildings, walls and other objects with lines and shapes that have a solid feel in real life. This will trick the eye into believing that there is a solid object in the picture. Read: Simple ideas about perspective in photography and: Definition: Perspective
  • Quiz Question Answer 8: If you shoot for the sky you will need to be taking your exposure from the sky as that is the brightest point. This will leave the ground darker in your exposure than you would see it with your eye. You can use one of a number of techniques to correct that later.
  • Quiz Question 9: Auto-focus hunting is when the auto-focus in the lens cannot focus and will keep going up and down the focus range trying to get a focus. This is a common problem at night, in darker conditions, low contrast conditions and clear or totally grey skies. You can read more about it in: Auto-focus ‘Hunting’ Definition: Hunting, Auto-focus

  • Quiz Question 10: when you paint out something from your picture in post processing to simplify a shot? You normally use a cloning tool. You can find out more in: Definition: Cloning; To Clone; Cloned; Clone Tool.
  • Quiz Question 11: What does the ISO control do? It adjusts the sensitivity of the digital image sensor allowing you to work in bright light (low ISO setting) or low light (high ISO setting). There is an article on ISO here: ISO.

  • Quiz Question 12: Shutter speed controls movement blur. Aperture controls blur (bokeh) created by the loss of sharpness outside the zone of acceptable sharpness. This is traditionally known as the depth of field. More reading on: Definition: Exposure and related to aperture: Definition: f number.

find out more...Photokonnexion tips by email
If you enjoyed this article please sign up for our
Tips by email service.
                                                 Find out more
#11030#

By Damon Guy (author and Photokonnexion editor)

Damon Guy - Netkonnexion

Damon Guy (Netkonnexion)

Damon is a writer-photog and editor of this site. He has run some major websites, a computing department and a digital image library. He started out as a trained teacher and now runs training for digital photographers.
See also: Editors ‘Bio’.

Inexpensive Close-Up Photography – Reverse Rings

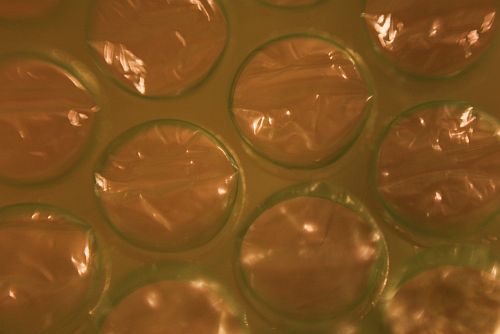
Bubble Wrap

Green bubble wrap shot with Canon 50 mm f/1.8 lens reversed.
Hand-held to the camera body.
• Bubble Wrap •
By Archaeofrog

Anyone can use reverse rings.

Close-up or macro photography is something every photographer should try. However, a macro lens can be an expensive investment. This series covers inexpensive ways to get great close-up results. The first article “Inexpensive Close-Up Photography – close-up rings” discussed using close-up lenses that attach to your existing photographic lens. A second way to achieve close-up results, surprising as it may sound, is to reverse your DSLR camera’s lens by mounting it on backward.

It is possible (but awkward) to simply handhold your lens backwards against your camera body, as in the top photograph. I don’t recommend it, as it can allow dust or other debris into your camera that may affect the sensor. The inexpensive alternative is to purchase a reverse ring camera mount adapter that fits your lens (based on its diameter) and the make and model of your camera body.
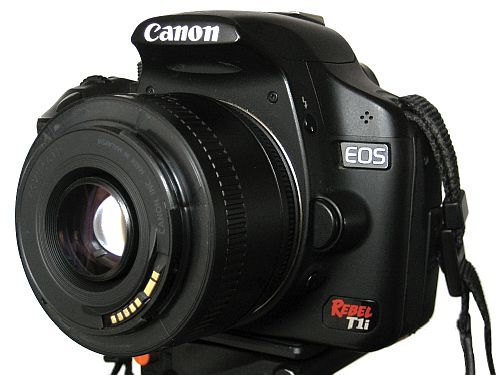
Canon Reversed Lens

Canon 50 mm f/1.8 lens attached backwards to a Canon T1i body using a reverse ring. The depth of field preview button is visible underneath the lens release button.
Click image to view large

How to use the reverse ring

First, remove any filters you have on your lens. To use a reverse ring, screw the ring securely on to the front of your camera lens filter thread. Hint, it is easiest to screw the ring on while the lens is in the camera body. After attaching the reverse ring to the lens, remove the lens from the camera body. Now reverse it and fit the lens-mount side of the ring into the camera body and lock it in place. You will no longer be able to use the autofocus function of your camera or adjust the aperture of the lens once it is reversed, but you will be able to adjust the shutter speed and ISO. Your camera may display an aperture value of F00 or other default. I recommend that you change the shooting mode on your camera to aperture priority or manual. In aperture priority mode, the camera will calculate and set the shutter speed for you, while in manual, you will set it yourself. Now you are ready to use the lens.
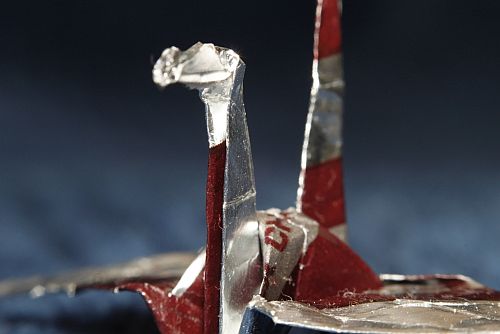
Origami Crane

• Origami Crane •
Click image to view large
Origami paper crane folded from a bite-sized Hershey wrapper.
Captured with a reverse-mounted Canon 50 mm f/1.8 lens

A reverse ring gives better results when used with a prime lens rather than a zoom lens. Prime lens are often faster, which means that they have a wider maximum aperture and can use a faster shutter speed, even in lower light.

You can use any type of lens, although light lenses are recommended. Very heavy lenses may damage the reverse ring mount adaptor or the lens filter thread.

Using a zoom lens, particularly when fully zoomed out, can be awkward to support. Because the lens is reversed, zooming the lens requires you to be further from the object you are photographing and does not give such a close-up view of the subject. The working distance (distance from the lens to the object in focus) is about five inches with the Canon 50 mm f/1.8 lens reversed. Using my Tamron 18-270 mm zoom lens at 18 mm, I have to be within about two inches to get an object in focus, while it is greater than six inches at 270 mm.

Adjusting the aperture

When your camera lens is not attached to a camera, its default position is to be open to its widest aperture. So, for the Canon 50 mm f/1.8 that would be f/1.8, which results in a very shallow depth of focus. In the crane picture above, the neck of the crane is in focus, while the beak and tail are not. When I reverse this lens on my camera, the aperture will still be f/1.8, and I will be unable to adjust the aperture value after the lens is reversed on the camera. But there is a work-around.

Most DSLR cameras have a ‘depth of field preview’ button. The purpose of this button is to allow you to look through the viewfinder and see exactly what your camera will see at the aperture that is set. When you press that button, the blades inside the camera lens close down to the selected aperture. This will allow you to set the aperture for your lens. (Please note: not all DSLRs have a depth of field preview button).
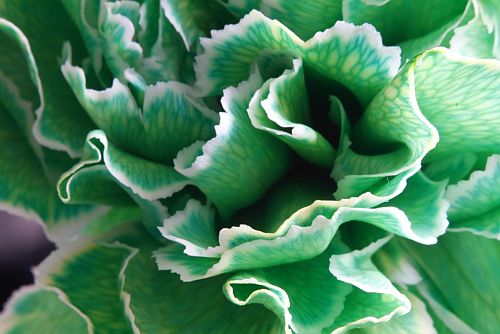
Carnation at F22

• Carnation at F22 •
By Archaeofrog

Here is the procedure. Using aperture priority or manual mode on your camera, dial in the aperture that you want to use for the shot. Next, depress and hold the depth of field preview button. While still holding down the button, press the lens release button and remove the camera lens. Then you can mount it on your camera body using the reverse ring. The camera lens will maintain whatever aperture you had selected. If you want to return to the default position or change the aperture again, simply put the lens back on the camera the regular way and repeat the process. Tip: if working outside, you may want to set your aperture first and reverse the lens indoors, to avoid dust getting into the camera body and on the sensor.

Advantages and limitations of reverse rings

The reverse ring is a fun and easy way to experiment with close-up photography. The ring itself is very inexpensive, usually less than $10 USD (around £7-£8 UK), and is small enough to fit in a purse or pocket. Depending on the lens that you reverse, you can get very close to macro-level results.
Ruler

• Ruler •
Click image to view large
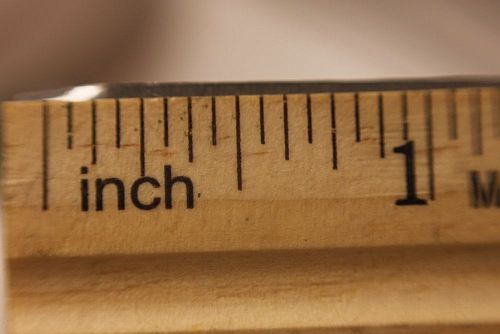
This photograph of a ruler demonstrates the scale of a reverse-mounted Canon 50 mm f/1.8 lens, which gets down to an image of about an inch and a quarter wide and has a working distance of about five inches.

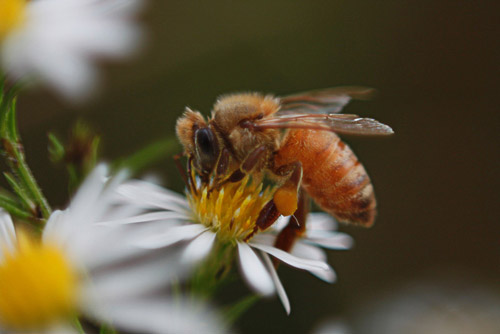
Like other close-up techniques, using a reverse ring does require you to be physically close to the objects you are photographing. Depending on your lens and your comfort level, however, you may still be able to capture detailed shots of slower moving insects, such as the bee below. A reverse ring is also ideal for indoor shots or other stationary details.
Bee

• Bee •
Click image to view large
Bee photographed using a reverse-mounted Canon 50 mm f/1.8 lens.

You will lose some of the automatic functions of your camera, including autofocus, with a reverse ring. The electrical contacts that normally carry signals to the lens are not in contact with a reversed lens. This is not that much of a disadvantage. Generally, with close-up shots, you get better results when using manual focusing.

While you can adjust the aperture (on some cameras), there is an additional step of setting the aperture using the ‘depth of field preview button’ before reversing the lens.

As with any close-up or macro technique, the depth of field (area in focus) will be very shallow. You can maximize sharpness by keeping the camera lens parallel to the object being photographed. In the photograph of the bee, above, the body of the bee is parallel to the camera lens and stays in focus. The flower is perpendicular to the lens and falls out of focus quickly.

Another technique to maximize sharpness is to use a smaller aperture like f/22, but this may require a longer shutter speed than you can easily hand-hold. You can solve this problem by using a tripod for stationary objects, which allows you to use a longer shutter speed to achieve the desired sharpness.

All close-up techniques benefit from the additional stability of a tripod. Although, as you can see from the shots above, you can get effective results from hand-held techniques.

A flexible option

Overall, a reverse ring is an inexpensive and portable way to use your existing lens for close-up photography. Depending on the lens you reverse, there is enough working distance to photograph insects, flowers, or any other small subjects that interest you. There is flexibility to adjust the aperture value before reversing the lens, which gives you a little control over the depth of focus. It is an inexpensive option to get you started in the tiny world of close-up photography.

Buyers guide

The inexpensive nature of these rings makes a quick purchase worthwhile. Remember that you will need to buy the ring that suits your specific camera mount (eg. Canon, Nikon etc). The size of the filter thread on your lens is important too. On the following link you can find a range camera mount types as well as thread sizes…
Reverse ring camera mount adapter products  External link - opens new tab/page

A great lens for doing close-up work is a 50mm prime lens. More information on buying 50mm prime lenses including product links can be found in…
Are your pictures distorted? Considered a 50mm?

For general reference: 50mm Prime lens product listing  External link - opens new tab/page

Lego

• Lego •
Click image to view large
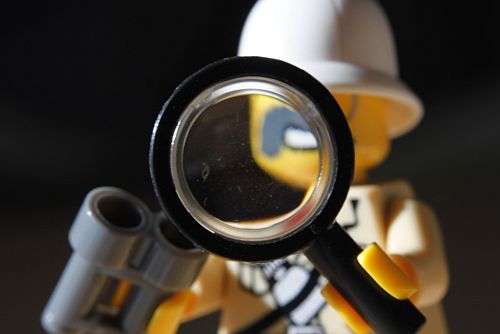
Lego explorer mini-figure.
Using a reverse-mounted Canon 50 mm f/1.8 lens at f/1.8.
• Lego • By Archaeofrog

Articles on Close-Up and Macro Photography
by Katie McEnaney

Part 1 of this series focused on using close-up lenses. Part 3 will cover extension tubes, and Part 4 will bring all these techniques together with a range of close-up ideas and tips.

Inexpensive Close-Up Photography – close-up rings
Inexpensive Close-Up Photography – Reverse Rings (this article)
Inexpensive Close-Up Photography – Extension Tubes
Inexpensive Close-Up Photography – Tips and Tricks

By Katie McEnaney (contributing author)

Katie is an elementary school teacher in Wisconsin, USA. She is an avid photographer with wide interests. She is always interested in learning more and growing in her photography.
By Katie McEnaney (Archaeofrog)

Can you write? Of course you can!
Write for Photokonnexion...

We would love to have your articles or tips posted on our site.
Find out more…
Write for Photokonnexion.
Simple mistakes to avoid in photography

The quick way to improve:

…Is undoubtedly to listen to the mistakes that others made. Here are some easy things you can do to improve your photography in leaps and bounds. Getting lots of practice is the first step. The more you shoot the more you will get to know what works and what does not. However, going further than that takes a little diligence. So here are some things to do for quick improvements…

1. Not reading the manual

Get the manual out. Learn a technique from the manual. Then go out and use that technique.

2. Not reading the manual again in six months

Repeat (1) in six months. Using your camera will become easier and your memory will be refreshed.

3. Not making friends

The most fun you can have in photography is with friends. Join a club, find some other camera owners, join a website that shares comments… whatever you do – get people to look at your photos and help you with tips and tricks.

4. The equipment you own

Read “Seven deadly photographic sins” and realise that you should concentrate on learning everything about the equipment you own. Once you are an excellent photographer with your current equipment then consider new stuff, but not before.

5. File resolution

Shoot with the largest file size and highest resolution. If you do not know how to do that consult the manual. This is important. Using tiny files and low resolution will really frustrate your improvement.

6. Not checking the image

Beginners often click away without checking the image. Shoot-and-hope mostly fails. Check your screen, check and check again. Reduce the number of shots you take. Concentrate on composition – make the images you do take higher quality. Read up on “Chimping” the gentle art of screen checking!

7. Deleting in camera

Do not delete in camera… There are many good reasons for this…

  • Constant deleting shortens the life of your memory card – only ever format the card.
  • Unless very experienced you are probably not qualified to say if a shot is good or bad.
  • You cannot possibly tell if an image is good enough in the low resolution of a camera screen.
  • As your ‘eye’ develops you will change your idea of what is a ‘delete’. I have seen an image voted Best-shot-of-the-day but listed as a deleter by the author before the vote.
8. Not looking at the image in full size

There is only one sure test of sharpness, look at the image in full resolution. When you pull the image up on screen it is reduced and sharpened. Expand it to 100% to see it as you took it. Read your software manual to see how.

9. Ignoring the light

Find out all you can about light – all types of light and all sorts of lighting situations. You can find a whole range of resources here… Light and Lighting – Resource pages on Photokonnexion. Your knowledge of light will make you a great photographer if you focus on that alone.

10. Not using a tripod

The best sharpness tool is using a tripod. Never forget your tripod and you will always have sharp images!

For more on this subject and some detail of how to get past these mistakes read: Mistakes beginners make and how to overcome them

Here is a short video with four more great tips for you to take on board…

Mistakes to Avoid as a Beginner Photographer

startphotography channel External link - opens new tab/page

find out more...Photokonnexion tips by email
If you enjoyed this article please sign up for our
daily email service.
                                                 Find out more
#11030#

By Damon Guy (author and Photokonnexion editor)

Damon Guy - Netkonnexion

Damon Guy (Netkonnexion)

Damon is a writer-photog and editor of this site. He has run some major websites, a computing department and a digital image library. He started out as a trained teacher and now runs training for digital photographers.
See also: Editors ‘Bio’.

Are you in control of your shots?

DSLR camera controls are simple to master

DSLR camera controls are simple to master. Learn to use them and you will have full control of your camera.

Part 1 of a series on going manual with your camera…

Today we are starting a short series on getting full control of your camera. “Going Manual” is about learning the essentials about how to control the settings you need to get a great exposure. This article examines why you should consider kicking the ‘auto’ habit and introduces the three controls you will be learning about.

Why you should consider going manual

“Auto settings” in modern digital SLR cameras are ‘averaged’ shots. In a full ‘auto’ shot the camera looks at the conditions in which it is taking the shot. After taking sensor readings it calculates an optimum exposure. Then the camera sets itself up to take the shot. Snap! The shot it takes is the result of its programming. What you get is an ‘averaged’ shot based on its optimisation. The only choice you get is to focus the shot on a subject. If you are using auto-focus, even the fine detail of the focus will be left up to the camera. So, the question is, did you take the photo? Or, was it the lab boffin who worked out the programming?

Modern digital SLRs also offer you a range of pre-set modes. These provide you with a ‘mode-choice’. You choose what type of ‘averaged’ shot you want. Taking a picture using a pre-set mode is telling the camera to set up the shot for you. You are asking the camera to create an exposure based on a few simple pre-set conditions. Programming boffins have looked at classic shots in particular situations. They have programmed the camera to reproduce those ‘types’ of shots in the pre-set modes. When you choose portrait mode you get an exposure that is frequently used in a classic portrait shot. If you choose landscape mode you get an exposure which is frequently used in classic landscape shots.

While these pre-sets create reasonable pictures, the camera controls the outcome. Creating the photograph you want is taken away from you. You are getting the exposure that is ‘frequently’ used by other people. It may not be ideal for the shot you want to make. It is simply how lots of people do portraits. To make your own, unique, picture you will need to take control.

An ‘exposure’ is the light-data recorded by the image sensor when it’s exposed to light. Controlling the light determines what the sensor records. The way the light is controlled gives you some unique artistic effects and results. When a camera takes an ‘auto’ or ‘mode’ picture the camera controls the exposure. Modes and auto are ‘averaged’ programmed shots based on a boffin’s view of common or classic exposures.

Taking control

Spend time learning to work with ‘modes’ and you will only get ‘averaged’ shots. Alternatively, you can go straight to the heart of the matter. You can learn to directly control the exposure. Learn the simple camera controls and you will be able to take unique pictures that reflect your idea of the shot. Your control will reflect your choice and match the way you want the shot to come out. It will be your creative choice.

Do you like the idea of controlling your camera? OK…

The trick is to set the controls to manage the light entering the camera. The aim is to create a balance of light the camera sensor can capture to produce a pleasing result.

You have three elements of control. You can control how sensitive the sensor is to the light. You can also control the amount of light entering the camera. And, you can control how much light the sensor sees. The three elements of control are:

  • ISO – the light-sensitivity of the camera sensor;
  • Aperture – the amount of light coming through the lens;
  • Shutter speed – how long the sensor is exposed to the light.

Over the next few posts we will be looking at how you can use these settings to control your exposure.