Category Archives: Camera control

Tips for Better Smartphone Photography

This article contributed by Liz Pekler(Bio).
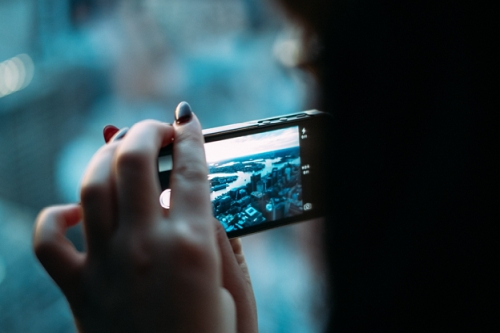
SmartPhone Photography is on an up-trend

Smartphone photography is the source of millions of images per day worldwide. It is not only an important aspect of social interaction, it is also a way to express yourself. Find out how to improve your shots and make the best of your smartphone photography.


Smartphone Photography is attracting more and more people. The number of images made on mobile devices exceeds the number taken on compact or DSLR cameras. Who could blame these keen users? Smartphones are easier to carry, cheaper to maintain, and are more user-friendly than the DSLR. And, with the constantly evolving smartphone camera apps and accessories, the future of smartphone photography seems assured. Indeed, smartphones and tablets are used in conventional photography too.

Is smartphone photography the new norm?

There’s no denying that DSLRs or mirrorless cameras are still the best types of cameras to have despite their larger size and weight. They have powerful sensors that offer the most megapixels. They allow complete user control over camera settings. However, more than that, they provide flexibility and freedom to use a range of accessories, like interchangeable lenses. The flexibility and control provided by a fully functioned DSLR can help you achieve the highest quality output.

Smartphone photography provides well for general image needs, like social media sharing and family records. Using mobile devices has become standard practice in recent years. Their hardware will need time to catch up on the quality and functions of more advanced cameras. However, there are many smartphone photography accessories available. These add-ons can enable your mobile device to get quite close to the high standard of DSLRs.

As long as smartphone manufacturers continue to develop higher specs and more powerful sensors smartphone photography will be likely to trend upward. However, no matter how good these mobile devices become, using the camera will require some user skill. The best photographs are not the product of the camera. They are a reflection of the vision and skill of the photographer – no matter what the device. Smartphone photography can be artistic, can be beautiful, can return great images.

You can get the best out of the built-in camera in your phones by practicing these helpful tips below:

Tips for Better Smartphone Photography

1. Pay Attention to the light levels

As with DSLRs, think, and make sure everything is good before touching the shutter button. Make sure the image is well-lit. One way to do so is to tap your subject on your phone’s display screen. In the smartphone camera on Auto mode, tapping on your subject will command the camera to focus on the area of the tap. Then the camera will make the exposure adjustment. That will ensure your subject is lit to its best advantage. The camera adjusts the overall image in proportion to the exposure. This shows the subject to its best advantage.

To manually adjust the scene’s brightness, swipe the ‘sun’ or ‘bulb icon’ after tapping on your subject. If you want to revert back to the default value, tapping anywhere on the screen of your smartphone usually does the trick.

Brightness changes are not the best way to lighten your scene. You can over-whiten highlights – leading to distracting white burnouts. Instead, try manually adjusting your ISO levels. Higher ISO means the sensor is more sensitive to light. A high ISO number gives a brighter scene in proportion to the ambient light in the rest of the picture. This helps you adjust your image to avoid burnt out highlights.

Raising the ISO has a penalty. High sensitivity to light levels can make your photos look grainy. It is called digital noise. Dimly lit areas brightened by higher ISO are especially likely to show noise if you boost the ISO too high. Practice with ISO a bit to get a feel for the way to use it.

The best way to avoid digital noise is to add light sources or work with natural light. Camera sensors work well with good light levels. So, think about how you can enhance the light rather than rely on high ISO, if you can.

2. Apply the Principles of Composition

Another thing to significantly improve your smartphone photography is to compose your image. This means taking photos to create a more visually appealing image. Try not to “shoot from the hip”. The quick snap often leads to poor shots.

It helps to keep these basic rules of composition in mind when taking photos:

  • The Rule of Thirds – Mentally divide the screen into a grid with 2 horizontal lines and 2 vertical lines. Then, align your subject with any of the guide lines or intersecting points to achieve a more natural-looking and attractive image.
  • The Golden Ratio Smartphone Photography | External link - opens new tab/page – When you compose your photo, leave 1.6 bits of empty space for every 1 bit of occupied space to achieve a balanced image.
  • Leading Lines – Using lines in your composition will help influence viewing behavior, draw your audience’s eyes across an image or towards a subject, and adds motion and dynamism.
  • Three-Layer Image – Having a foreground, a subject in the middle, and a background adds a sense of depth and interest to your photo. See “River Scene” below.
  • Rule of odds – multiple subjects in an image are more attractive if they are an odd number. The most famous case is to have three of something, but five and seven are often used too.
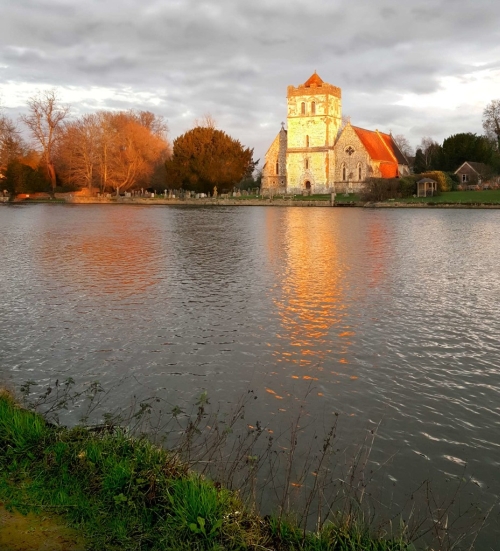
Smartphone photo showing three compositional layers

:: River Scene ::
This smartphone photograph shows three compositional layers. Introducing clear layers into your image helps to bring out a three dimensional depth and structure. Try to use foreground, mid-ground and distance layers in your images.
(Taken on a Galaxy S6 – Android phone)
(Click here to view large)


There are many ways you can use composition to improve your images. There is a whole page of composition links for you learn more here: Composition resources on Photokonnexion

3. Move as Close to your Subject as Possible

When using a smartphone to take photos, opt to move closer to your subject instead of using its zoom feature. Smartphone camera lenses usually have fixed focal lengths so they can’t zoom optically. Instead, it zooms digitally, which visibly distorts, pixelates, and lowers the quality of your images when overdone. Alternatively, you can use a compatible lens attachment that offers optical zoom capabilities.

4. Use Natural Light

The built-in flash on smartphones can sometimes be unflattering as it can wash out your subjects and produce harsh shadows. Harsh shadows with sharp lines create an angular appearance. This is particularly unflattering on faces.

To produce the best results, go for natural lighting. Natural light has an attractive quality for our eyes. We are naturally tuned to it. If you really need a flash there are some good attachments. You can use an attachable pocket spotlight or ring flash. Better still, use a more diffused light. An attractive diffused light provides just enough light for your subjects and creates flattering soft light with shadows. Shadows from soft light helps to create depth – giving a three dimensional feeling in the image.

5. Use A Third-Party Camera App

Your smartphone’s dedicated camera app can get the job done. However, third party apps allow you to do more with your phone’s built-in camera. Some of them offer better exposure adjustments, manual focus and camera settings (like shutter speed and aperture), or even integrated photo editing features so you can touch up captured photos instantly. If your interest is in better smartphone photography then use better editing too. Work to ensure you can navigate within the app and help you optimize its features for better photos.

Also familiarize yourself with the menu, settings, and features of your chosen camera app. If you’re a beginner, spend time and effort on learning photography basics. Think particularly about the shutter speed, ISO, and aperture. Also, think about how they relate to each other to create the exposure. Do some reading of this blog or other photography sites. Watch a YouTube tutorial on manual camera settings. Help yourself to develop a rounded approach to understanding both exposure and how best to take photos. Smartphone photography is as good for producing images as a DSLR. That is only true, providing, you know your tools and how to use them to produce a great image.

6. Take Advantage of the HDR Mode

The HDR mode on your camera phone allows it to take multiple shots of the same scene at different exposures, and then blend them together to create an image that pleases the eye. HDR mode blends the shots to create deeper contrasts in the image. This is particularly useful when shooting landscapes or high contrast scenes where there are obviously uneven highlights and dark areas. However, it must be used sparingly, as it can leave your images looking odd and overly edited. Don’t overuse it – try to work the editor so that your eye sees reality in the results. Trust your eye.

As a safety measure, also leave HDR on Auto. Then, you can manually pick out a better photo from the bunch of shots that were initially taken, in case the HDR blend goes badly. Apply the final result afterwards.

7. Post-Process Your Images

Post-processing can never replace good photography techniques. The best images stand alone for their beautiful content. However, it is also helpful to have editing skills. You can work to enhance a great image, or to work for the overall improvement of your photos. Take out spots, noise, or other irritations. Clean the image up so you show the beauty without distractions.

Photo editing apps like Instagram, VSCO, and Snapseed can be very helpful in making basic photo adjustments that will give you your desired result. Their photo filters are also great for setting or altering the mood of your images.

However, keep your edits at a minimum – especially processing ‘filters’. Instead, strive to make naturally beautiful images. This way, you don’t have to make too many adjustments later. After all, viewers can tell when you “cheat” your way to a good-looking image. Over-editing lowers the quality of your photos.

8. Keep Your Lens Clean and unscratched

This is something that is often overlooked by smartphone owners. It may not seem to be such a big deal for a small camera. However, a lens having oil, dirt, and moisture on it can slowly damage the glass. Leaving the lens on a tabletop can lead to scratching and marking. These ultimately affect image quality. Make sure you wipe the lens before use and use a protector or case, especially when doing a lot of outdoor shoots.

Can smartphone photography ever replace the DSLR?

Not all smartphones are capable of the more complex camera functions. However, many of the models some models currently on the market already have capabilities that mimic those found in DSLRs. In fact, many of them already allow control over the important camera settings, shutter speed, aperture, and ISO. These controls are native to some of the phones without having to use a third-party camera app.

Some of the latest smartphones, like the brand new iPhone and the latest Google Pixel, have more powerful and versatile cameras with more megapixels and other advanced features. Optical image stabilization for sharper photos and smoother videos is appearing, for example. The LG G6, released earlier this year, has great built in features. It carries a wide-angle lens that covers a larger area and is ideal for capturing group shots, magnificent architecture, and stunning landscapes. Many smartphone cameras from other brands offer other impressive features too. These advances are appearing just a few years after we thought such innovations wouldn’t be possible.

Smartphone photography is progressing fast. In a few years time, smartphone cameras are going to become even more sophisticated. For now, it’s safe to say that smartphones are definitely catching up, but whether they will ever surpass the DSLR remains to be seen. One thing is sure, the smartphone camera and DSLR are converging on each other. Furthermore, emergent technologies could take us anywhere. Camera technology still has a long way to go. Enjoy the ride!

Comments, additions, amendments or ideas on this article? Contact Us
or leave a comment at the bottom of the page…

Like this article? Don’t miss the next — sign up for tips by email.

Post contributed by :: Liz Pekler

I am a travel photographer with several years of experience in the field. Being a freelance blogger enables me to help photography beginners and enthusiasts to tell wonderful stories of their travels as seen through their lenses. It also allows me to share my thoughts about another advocacy of mine: social equality and change.
Connect with Liz Pekler: Linkedin :: Twitter: @liz_pekler

find out more...Photokonnexion tips by email
If you enjoyed this article please sign up for our
daily email service.
                                                 Find out more

Low light action shots – tips for getting them right

“Low light action shots” is contributed by Melanie Hyde (Bio) of PaintShopPro.com Low light action shots | External link - opens new tab/page.

Low light action shots need care to get them right.

Low light action shots need care to get them right.

Action photography itself can be extremely challenging. Being in the perfect place at just the right time, capturing that incredible moment. Then, hoping to transport anyone who sees your photo across time and space to take them back to the moment the image was taken. It’s a truly a magical experience, whether you’re taking the picture or the viewer.

Given the challenges that come with action photography, removing most of the light only makes it all the more difficult.

There is good news. The same principles of action photography and proper exposure apply. It’s just a little more challenging to get those low light action shots.

Light sources for your low light action shots

When it comes to taking low light action photos, you’ll need to combine the available light sources. This will help to make the most of the situation. First, take a look around and identify whether the lighting is constant or variable.

Constant Light

Constant light occurs within your setting when you can isolate out a source for a shot. Framing the shot is important so that the light is consistent for that shot. The next shot may have a different source – you need to isolate the light for that too. For example, if you were shooting a wedding reception, you might capture an image of the bride and groom on the dance floor. Then, you turn around and capture an image of the bride’s parents dancing across the room. Depending on the setting, the lighting may be different between the two subjects but consistent within each shot.

When lighting is consistent, operating your camera becomes much easier. The camera can adjust to meet the needs of the low light action shots. Here are a few points to keep in mind when shooting with constant low light:

  • Shoot in shutter priority mode so the camera can adjust.
  • Use Auto White Balance so the camera can adjust.
  • Manually control your ISO.
Variable light

Variable light occurs when light sources are constantly changing and are inconsistent across your field of view. Imagine you’re photographing the lead singer at a rock concert. You may have to deal with strobes, spotlights and pyrotechnics. The constant changes in light sources will cause your camera to struggle to automatically expose the image correctly.

Low light action shots with variable light sources can confuse your camera - go manual.

Low light action shots with variable light sources can confuse your camera – go manual.

When dealing with variable light conditions it’s usually best to go manual. In this situation, remember to:

  • Manually set your aperture and shutter speed.
  • Manually set your White Balance.
  • Manually set your ISO.
Balance aperture, shutter speed, and ISO

You have three ways to control the way your camera exposes an image. Aperture, shutter speed, and ISO. To successfully capture great low light action shots, you must be able to manipulate these elements. Select settings that allow you to capture the highest quality image for the ambient light conditions.

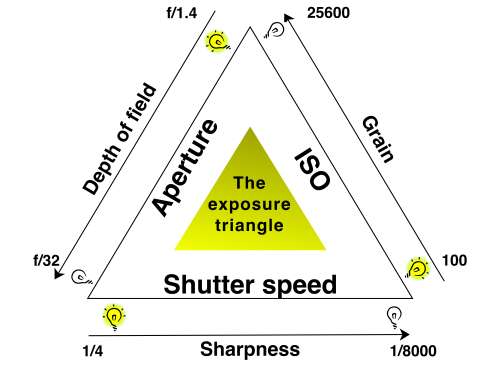
The exposure triangle helps you to keep your shot’s exposure within the capability of the camera and lens. So when going manual your settings should allow these three essentials to balance. Look in your viewfinder to get the needle settled in the centre for a proper exposure. For more detail check out The Exposure Triangle – An aid to thinking about exposure.

The exposure triangle is an idea that helps you balance aperture, shutter speed and ISO for a good exposure.

The exposure triangle is an idea that helps you balance aperture, shutter speed and ISO for a good exposure.

Start with shutter speed

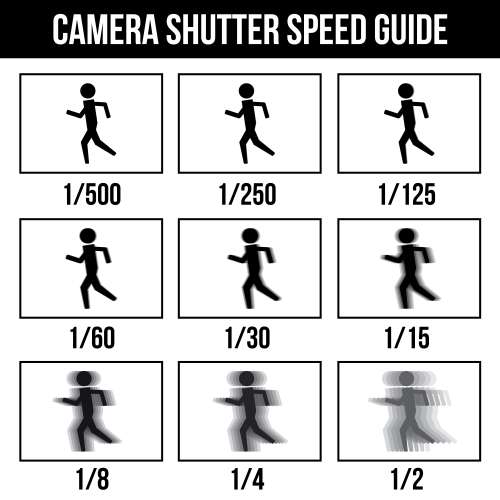
Low light action shots are by definition going to be in difficult light for your camera. Getting your shutter speed right can be tricky. However, it has a huge impact when shooting movement in low light. The following diagram will help you select the right setting.

Camera shutter speed guide.

Camera shutter speed guide :: Low light action shots need the right camera speed. If the shutter speed is too low you get blurring.

You have to select a speed that is fast enough to capture the motion clearly and without blur. The speed should still slow enough to deal with the lack of light. For action shots, it’s always best to use the fastest shutter speed that the light allows. It is a balancing act so you will need to practice.

Select the widest aperture for your low light action shots

In action photography, capturing crisp and clean images is usually the priority. When shooting with low light settings, it’s crucial to get as much light to your sensor in the small amount of time that your shutter is open as possible.

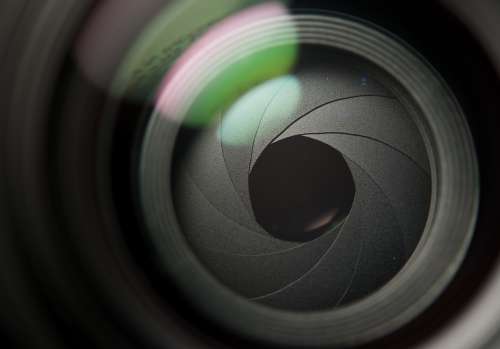
For low light action shots use a wide aperture to increase the incoming light.

The aperture sets the initial amount of light coming into the lens. For low light action shots use a wide aperture to increase the incoming light.

To accomplish this, use the widest aperture that your camera allows. While shooting in shutter priority mode, you allow your camera to do this automatically. Shooting in manual mode however, you’ll need to keep a close eye on your exposure. You need to make sure that your images are not underexposed in the low light.

Using high ISO

Are your images are consistently coming out blurry with your aperture is as wide as can be? Consider stepping up your ISO settings.

Your low light action shots can really win the day if you get your ISO right.

On the dance floor the light is almost always difficult. Your low light action shots can really win the day if you get your ISO right.

By changing your ISO, you alter your camera’s sensitivity to light. The higher the ISO, the more exposed your image will be. Just be cautious: using a higher ISO may introduce more “noise” to your photos. This noise can often be reduced or corrected in a post-processing software like PaintShop Pro Low light action shots | External link - opens new tab/page or Lightroom Low light action shots | External link - opens new tab/page. (Shooting in RAW is especially helpful with noise reduction).

Check your work as you go

Throughout the shoot, use your histogram. (See: Can you use the histogram on your camera?) It will help to make sure you’re exposing your images correctly. The histogram shows the distribution of the type of light in your shot. It aims to help you capture a consistent amount of light across the full spectrum of your image.

The histogram on your camera helps you ensure effective use of light in your exposure.

The histogram on your camera helps you ensure effective use of light in your exposure.

The histogram on your camera helps you ensure effective use of light in your exposure.

You’ll also want to make sure that your white balance looks good and adjust accordingly. In most cases, your camera is going to be able to set white balance automatically, but you may need to tweak it; especially if your lighting is wildly inconsistent.

Increase your odds

Low light action shots are all about being in the right place at the right time with the right equipment.

Use the fastest lens you can find. The wider the aperture, the more light your lens allows to strike your camera sensor. Anything higher than F2.8 will cause you to struggle with exposure.

Set the camera to continuous drive. This equips your camera to capture a burst of images every time you press the shutter release and gives you a better chance of capturing that perfect picture.

Use a fast memory card. Your camera can only capture images as fast as it can write them to the memory card. If you snap too many images in rapid succession, you’ll have to wait for the card to catch up with your camera and you might miss “the shot.”

Be prepared to shoot…a lot. You’re going to have a lot of images that are no good. So remember to keep tinkering with your settings. The key is shooting lots of images at different settings until you get the perfect mix.

Don’t forget to have fun

Low light action photography can be both challenging and fulfilling. As you refine your skills and your eye for lighting, action, and composition, remember to regularly experiment and try new settings.

Comments, additions, amendments or ideas on this article? Contact Us
or why not leave a comment at the bottom of the page…

Like this article? Don’t miss the next — sign up for tips by email.

Exposure changes the mood of your image

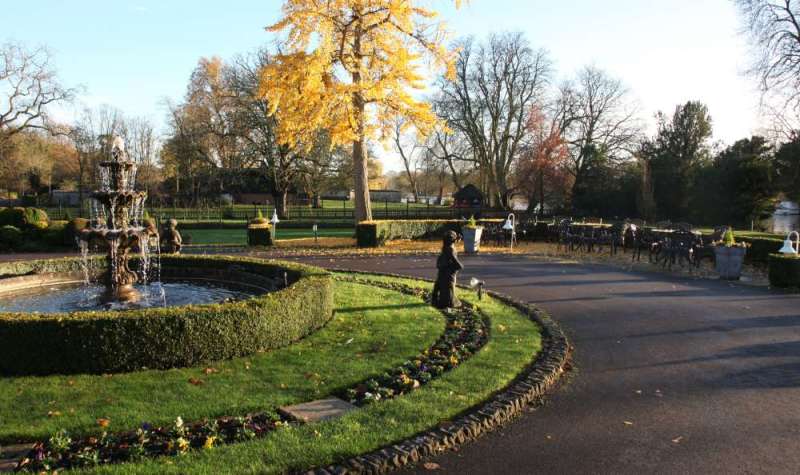
Exposure changes can affect many aspects of an image.

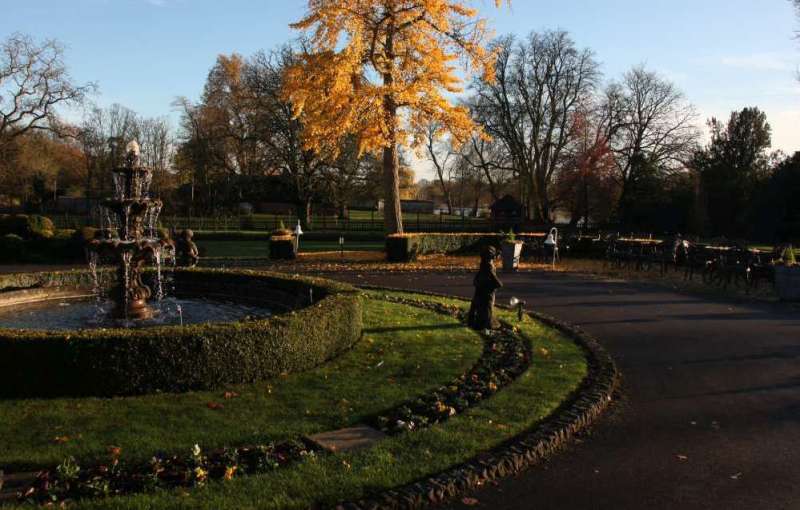
Exposure changes can affect many aspects of an image. Colour, mood, visual impact, contrast and others. The second image below show the differences.
Image better seen large. Click image to view large.

There is no such thing as a perfect exposure

The main goal of starter photographers is to control the exposure. The Exposure Triangle, or other models of balancing light, lead learners to pursue ‘perfection’. Once they grasp the concept of balancing ISO, Aperture and Shutter speed, the needle in the camera viewfinder is their guide.

In manual mode, that central needle is important. It shows that the three elements are balanced. The unwary learner is soon overwhelmed by that needle. They have learned how to keep it central. Now they are going to keep it there despite everything. They have learned that, if the exposure changes, the needle drifts off the middle position. When that happens it is no longer “perfect”.

That mid-position needle is useful. However, it is not ‘perfection’. It is just a guide. Modern camera manufacturers have made things easy for the camera user. The technology, sensors and controls on a modern camera mislead the unwary into a false position. Complex technology and controls give the user confidence that the camera must be right. They assume the central needle creates the perfect capture. That is simply not true.

The balance of light controls the quality of outcome you want. Your final image is created by that quality of light. The creative photographer uses exposure changes to to conjure up the result they want. A good photographer commands the camera to create the picture. The camera does not create the perfect exposure for the user. The user makes exposure changes to create the desired image. Deliberate under or overexposure is an important part of creating your image.

Exposure changes allow you to command the camera

In the image below we see (almost) the same picture as above…

A different quality of exposure changes the whole experience of the picture.

This second image shows same scene as above. But the different quality of exposure changes the experience of the picture. This outcome is no more correct than the top picture. However, when it was taken this one was 1 and 1/3 stops underexposed on the camera viewfinder scale. It was taken within seven seconds of the first image.
Image better seen large. Click image to view large.

Exposure changes allow the user to create the mood of the shot. This is clearly shown by the deeper contrasts, more saturated blues in the sky and reds in the Autumnal leaves. The low sunlight brings out the shadows and colours more. It all adds up. Together they create a very different view of this fountain scene. A twilight feel perhaps.

I was trying to create an Autumn evening view and the deliberate underexposure gave me the key. Yes, I deliberately underexposed to create the effect. I was commanding the camera to create my “perfect” scene for what I wanted.

Experienced photogs make exposure changes regularly

For me, the darker version was right for the reasons I needed that photograph. The control of the intensity of shadows, colours, contrasts, and so on, can be done many ways.

For example, High key shots often use exposure changes. They are created by deliberate overexposure. That brings out the intense whites in a high key image.

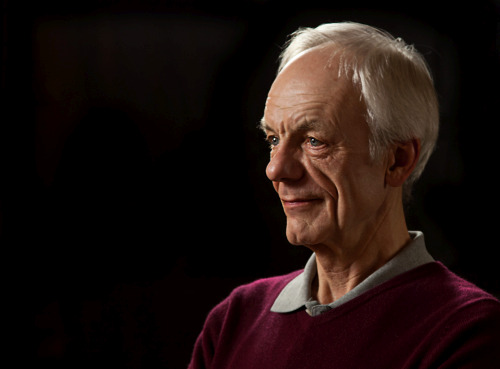
Many portraits are lit very brightly to the eye, but a very small aperture or fast shutter speed limits the light entering the camera. This will create an underexposure bringing out the facial features. This gives shadows a depth, without harshness, as can be seen in the next image. This use of exposure changes is a great mood enhancer.

Portrait shot in bright light but underexposed in-camera.

Portrait underexposed in-camera creates a tonally controlled result.

Create the exposure changes you want

How do you create this effect of under or overexposure? Simple. There is a control that can do it in auto or semi-auto modes. While in an auto-mode use the “exposure compensation” dial. You can add or subtract one or two stops of light. You can find out how to use the dial in your manual.

For the learner going fully manual it is even easier. That central needle position is your guide to what the camera calculates as an optimum light level for the shot. To create a manual over or underexposure simply dial the exposure-meter back or forward. Move the needle away from the central position. Shocking I know. You actually create exposure changes by deviating from the central needle position.

Exposure changes of one stop halves or doubles the light entering the camera. So be careful. Take several test shots. Dial one third of a stop or more at a time. Look at the result and check if you have created the right effect.

Create your image in mind – then make exposure changes to suit

The way you want your image is a creative decision. The camera should not be allowed to dictate the outcome.

You have two choices. If you go with the settings the camera gives you, the result is an optimum of the balance of the settings. If you can foresee what you want to achieve, then create your own result. In this case, make the balance of settings so the exposure changes to your choice. Your choice will be different to the result the camera would give you. But with care and practice it will be what you intend for your shot. You have taken control.

So next time you are taking a photo consider this. If you think your picture would be more effective as a darker or lighter representation, then make the exposure changes you need. Do it – create. Really make your images – don’t just capture what is there.

Comments, additions, amendments or ideas on this article? Contact Us
or why not leave a comment at the bottom of the page…

Like this article? Don’t miss the next — sign up for tips by email.

Damon Guy - Netkonnexion

Damon Guy (Netkonnexion)

Damon is a writer-photographer and editor of this site. He has run some major websites, a computing department and a digital image library. He started out as a trained teacher and now runs training for digital photogs.
See also: Editors ‘Bio’.
By Damon Guy see his profile on Google+.

Settings for overcoming hand-shake blur

Balance your settings to avoid hand-shake blur in low light.

First dance
Low light photography needs a careful balance of settings to ensure a sharp shot and avoid hand-shake blur.

Hand-shake blur and sharp results.

Hand held shots often return blurred results. While using auto-settings the problem does not seem to arise. What is going on and how do you overcome hand-shake blur?

Manual settings and auto

Your digital camera is a sophisticated computer. It has access to a range of powerful programs that make decisions about each shot. When you use auto settings you are handing the camera over to the control of its programming. The auto setting is selected with the green square on the program dial. It makes all the decisions and you just point and shoot. This ‘auto’ strategy is limited. It leaves you unable to make creative decisions about your shot. Depth of field, movement blur and the light or dark emphasis in a scene is beyond your control.

With any of the manual settings on the program dial things are different. Shutter speed (S or Tv), Aperture (A or Av) and ISO settings allow you to get control of the exposure. Once you control these settings you are able to make creative decisions about your shot. But if you get it wrong you might allow hand-shake blur to creep in. Equally, with the right strategy, you can also set up to prevent the effects of hand-shake blur.

What causes hand-shake blur

Low light, long shutter opening or low ISO can all contribute. Hand shake-blur is caused by hand movement while the shutter is open. To prevent it you shorten the time the shutter is open. With a shorter shutter opening any hand movement is not given time to impact on the shot. Very fast shutter opening, say 1000th of a second, freezes the shot. The hand has almost no time to move in that short period. So, no hand-shake blur.

However, short shutter opening time means less light reaches the sensor. A good exposure requires sufficient light. A shutter speed of 1000th of a second would leave the picture under exposed in low light conditions. On the other hand, if you select a 15th of a second, the shutter is open for a long time. Hey presto! Enough light. But, (boo!) hand-shake blur. The shutter is open too long. Your hands have plenty of time to move.

Over coming hand-shake blur is about balance

If you raise the ISO setting, the sensor becomes more sensitive to light. So, raise the ISO until you can set the shutter to around 200th of a second. At that speed it is easier to hold the camera steady.

Of course, if you have to raise the ISO a lot to allow 200ths sec. you will get a grainy picture. Raising the ISO reduces the quality of the shot. Ideally an ISO setting of 100 will give you the best quality photographic result. On an average day you may have to set your ISO at around 200 or 400 to get a 200ths of a second shutter speed. Up to about ISO 800 the quality from most good DSLRs will be fine. After that, the quality of the image will be affected more and more by grain or “Digital Noise”.

Pictures taken in a dark church, or at an evening dance will have very low light. So, as an example, an ISO of 1600 would possibly give you enough sensitivity to work with a shutter speed of, say, 160th of a second. That would allow you to get a hand-held shot without hand-shake blur, if you have a steady hand. But you might also get a little digital noise in the final image.

Getting the right settings between the ISO and shutter speed is a fine balance. You need to raise the ISO the right amount to give you the shutter speed you need. Too much ISO and you get bad quality in the picture. Too little ISO and you will be forced to use a shutter speed that’s too low. Hand holding under these low light conditions may cause hand-shake blur.

Hand-shake blur and aperture

With ‘auto’ shots the camera program takes account of the light conditions. The program sets the ISO, aperture and shutter speed to values that allow shorter shutter opening. So far we have only discussed shutter speed and ISO. But aperture has a part to play too.

If you open the aperture wider it lets in more light. So, you don’t need to raise your ISO so high if you also open your aperture. In our church example above, an ISO of 800 (not 1600), shutter speed of 200th sec. and an aperture of f4 (wide) could create a good exposure.

If your aperture is set at say f11 (small) less light will get through. So, again you are going to need to have higher ISO or long shutter opening (or both), depending on your light conditions. A small aperture, like f11, will give you a sharp picture to infinity. But, you may have to sacrifice picture quality (high ISO) or suffer hand-shake blur (from longer shutter opening).

The wide aperture does have a penalty too. As the aperture gets wider the depth of field gets shallower. So once again we are back to a balance. To hand-hold a camera we must make decisions about all three basic settings – Shutter speed, aperture and ISO.

Other strategies for avoiding hand-shake blur

Camera movement or hand-shake blur can be avoided in a lot of different ways. Sometimes you must work in situations where hand-shake blur is inevitable without more radical solutions. Then there are other things you can do to reduce hand-shake blur. Here are some of them…

  • Lens anti-vibration: Many quality lenses have anti-vibration systems. These sophisticated systems detect hand-shake blur as it happens and counteract it. This might extend your safe shutter speed down to quite slow shutter speeds (say a 60th of a second). While this many not solve all your problems it can help in less extreme light conditions.
  • Tripod: A steady platform will prevent camera movement. If you need a long shutter opening then work from a tripod to eliminate hand-shake blur.
  • Flash: If you are working in a low light situation you may need to raise light levels. A flash unit, on or off the camera, is one answer. An intense flash of light can raise the light high enough for you to work with settings that prevent hand-shake blur.
  • Studio lights: More controllable, but more expensive, these lights can accurately raise light levels to enable you to reliably avoid hand-shake blur and get a good exposure.
  • Reflectors: You can use these to bring more light to where you are working by, say, reflecting from another artificial light or natural light source. Reflectors are particularly useful in reducing the darker areas of a shot. You can reflect the light to just raise light levels in some areas bringing the over all light level up. As the light level across the shot is raised the hand-shake blur can be reduced since shutter speed can be faster.
  • Improve your stance: A better stance is a great way to improve your steadiness.
  • Go to the gym: “What? This is about photography not fitness”, I hear you say. Well, here is a revelation. If your arms are stronger you can hold the camera steadier. A DSLR is a heavy object. Especially after a long session your arms will not hold the camera steady. If your camera is too heavy for you – well, strengthen up. Actually, more strength gives you much better motor control of your hands in any case. You will be able to hold even a point and shoot camera or phone with a steadier hand after regular exercise. Photography, like all other pursuits benefits from a fit body. Improved fitness will reduce hand-shake blur.
The answer to avoiding hand-shake blur

The auto program in your camera may give good results and reduce hand-shake blur. However, it will only do so in average conditions. In more extreme conditions, or where you want to exert some creative control over your shot you need to go manual.

The use of manual settings gives you control. You can control depth of field, subject movement-blur and light vs. dark emphasis in your shots. But, to get the best out of your camera you will need to set it up to avoid hand-shake blur. In this article I have tried to help you understand that the settings you pick can help you control hand-shake blur. Overall, the answer lies in creating a balance between the basic settings of aperture, shutter speed and ISO so that your hand held shutter speed is around 200ths of a second or higher. Lower than 200ths of a second and hand-shake blur is liable to creep into your shots.

Of course there are other things you can do to help raise your shutter speed. I have mentioned some of them. But they all have the same effect. They either stabilise the camera (tripod) or allow you to get the shutter speed high enough so you can steady the camera. So, now you know. Get out there and try to get your settings so you have around a 200th of a second when you take the shot.

Comments, additions, amendments or ideas on this article? Contact Us
or why not leave a comment at the bottom of the page…

Like this article? Don’t miss the next — sign up for tips by email.

Damon Guy - Netkonnexion

Damon Guy (Netkonnexion)

Damon is a writer-photographer and editor of this site. He has run some major websites, a computing department and a digital image library. He started out as a trained teacher and now runs training for digital photogs.
See also: Editors ‘Bio’.
By Damon Guy see his profile on Google+.

Using polarising filters

The polarising filter helps reduce glare in the photograph| Photokonnexion.com

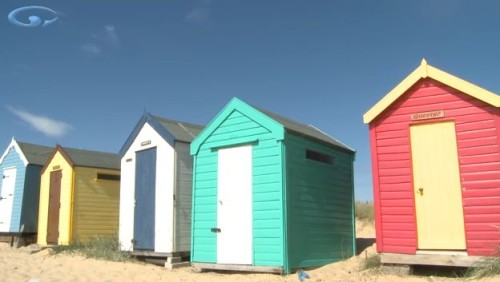
• Beach Huts •
Using polarising filters reduce glare, reflection and colour fade in your photograph. These filters are easy to use and produce great results.
[Image from the video]

Filter with a hidden impact

Photographic filters are light modifiers. They have a variety of different effects. Polarising filters are just one type of photographic filter. When you look at one it appears dark. It looks as if it would have no effect except to reduce the light in your image.

What does using polarising filters do for your photo? Light from the sun tends to be scattered by the atmosphere. The waves of light are out of alignment. When the light is very bright the glare causes a bright haze of light. This over-brightness can act to overwhelm a photograph. It especially tends to wash the colour out of the sky, whitening it. Using polarising filters helps reduce the glare. It filters out some of the light that is not aligned. Only the polarised light passes through the filter. This aligned light has reduced glare allowing the colours to come out. Skies are darkened. Reflections are reduced.

The results of using polarising filters

The result of darkened skies, reduced reflections and better colours can be dramatic. Here are a whole range of images on Google using polarising filters Images on Google using polarising filters | External link - opens new tab/page.

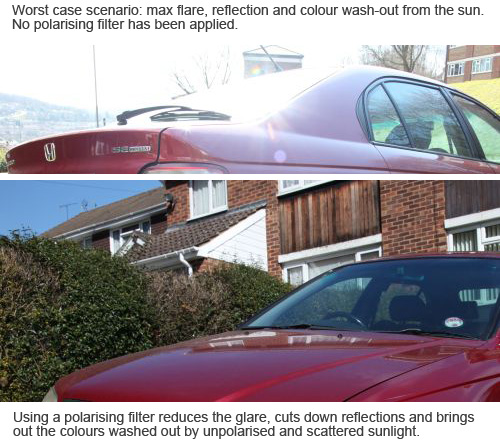
Worst and best case scenario for using polarising filters | Photokonnexion.com

• Worst and best case scenario for using polarised filters •
Careful positioning and using polarising filters dramatically affects the outcome.

Using polarising filters can have a dramatic effects on your image. The top picture shows the worst case scenario. Light is almost directly into the lens. It is bouncing off glass and polished surfaces into the lens too. The sky is very bright with scattered light from direct, harsh sunlight. There is a hazy glare from brightness. There is also flare and very bright spots from reflections. This photo was taken without using a polarising filter.

In the second (lower) photo the position is different. The direct sunlight is not directly entering the lens. Even so, without using a polarising filter there would be problems. Notice the bright blue sky. This would have been a very washed-out blue on this very sunny day. Notice the windscreen is almost transparent? The polarising filter has reduced the bright reflections and specular highlights. The reflections on the bonnet are also pleasant and not over-white. The car paintwork has a quality colour-depth. The whole quality of the lower photo seems better. All this despite the harsh direct light.

Actually using polarising filters

In the video Mike Browne shows how to use these useful filters. In particular you need to remember three things of particular interest…

  1. Using polarising filters is most effective when the light is coming at the lens from about 45° off the optical axis.
  2. While using polarising filters you will need to rotate the filter to find the most effective polarising position. You need to re-adjust it every shot. Each shot will have a different angle of light to the lens.
  3. Using polarising filters reduces the light able to enter the lens. Your light may be reduced by over two stops with a poor quality version.


Mike Browne

Quality

High quality Polarisers are more expensive. They are time consuming and expensive to make. They also use expensive materials. However, the better ones maintain photographic quality. So it is worth spending the extra money. Poor quality polorisers may increase the digital noise from light scatter in the filter. They may also create aberrations and distort the image.

All photographic filters reduce the light entering the lens. A quality polariser will also reduce the light. But, they will affect the light much less than a poor quality polariser. Using polarising filters of a low quality may reduce the incoming light by as much as three stops. A quality polariser will tend to reduce light by only two stops (or less). So think carefully about what you purchase.

Buy now…

When buying a circular polarising filter make sure you get one that is the right size. The filter size of your lens is normally written on the inside of the front of the lens.

Recommended!

Circular polarising filters  A range of circular polarisers on Amazon | External link - opens new tab/page

When using polarising filters buy the size that fits your lens. Also remember that the quality of the filter can affect the photo. High quality polarisers reduce aberrations. A higher quality filter will not reduce the light as much as a poor quality one.

Review a range of different filters here…
Circular polarising filters  A range of circular polarisers on Amazon | External link - opens new tab/page


Comments, additions, amendments or ideas on this article? Contact Us
or why not leave a comment at the bottom of the page…

Like this article? Don’t miss the next — sign up for tips by email.

Damon Guy - Netkonnexion

Damon Guy (Netkonnexion)

Damon is a writer-photographer and editor of this site. He has run some major websites, a computing department and a digital image library. He started out as a trained teacher and now runs training for digital photogs.
See also: Editors ‘Bio’.
By Damon Guy see his profile on Google+.

Camera grip – hold your camera correctly

Improving your camera grip.

Improving your camera grip is an important part of developing your skills.
[Image taken from the Joe McNally video below].

Your camera grip is a critical skill.

Do it wrong and you’ll have problems getting a sharp image in many situations. You may even give yourself bad posture and back pain. Learning to have a good camera grip will help develop your skills in many ways.

Camera grip and overall stance

The way you grip your camera works as part of your overall stance. You can get the grip perfect, but with a poor stance it will ruin the impact of a good camera grip. In Simple tips for a good photography stance I set out a detailed plan for a good stance. It will be worth reading that before you see the videos below.

Joe McNally – Da Grip

In this video Joe shows us how to properly hold the camera. He apologises for how this best suits a left-eyed shooter. However, the technique can apply to both left and right eye shots. So don’t be put off. Watch to the end. Joe makes many of the points I do in Simple tips for a good photography stance and this article. He shows you how to properly grip your camera. He also demonstrates how to control it from this grip too.

JoeMcNallyPhoto External link - opens new tab/page.

Sharpness and camera grip are close friends

When teaching I have often found that poor stance and grip go together. They result in soft shots and poor quality images. I try to help people to be more deliberate and use relaxed but firm control. Then, if they hold a good stance and a good grip the sharpness and image framing seem to come together.

In the next short video Gavin Hoey goes through his method for a camera grip. It is very similar to Joes grip and my camera grip too. Everyone has quirks and slightly different ways to do it. The important thing is to follow the basic plan and practice until your shots are sharp and controlled. Then you will see the benefit of good stance and camera grip.

Gavin spends time on some other aspects of sharpness too. This nicely shows how all these methods come together. Great stance, camera grip and control of your camera will develop your skills in leaps and bounds. For more on improving your sharpness check out this article :: The Zen of sharpness – 12 easy ways to improve.

No more blurred photo’s… Ever!

Gavin Hoey External link - opens new tab/page.

Comments, additions, amendments or ideas on this article? Contact Us
or why not leave a comment at the bottom of the page…

Like this article? Don’t miss the next — sign up for tips by email.

Damon Guy - Netkonnexion

Damon Guy (Netkonnexion)

Damon is a writer-photographer and editor of this site. He has run some major websites, a computing department and a digital image library. He started out as a trained teacher and now runs training for digital photogs.
See also: Editors ‘Bio’.
By Damon Guy see his profile on Google+.

Getting down to pixel level

Getting down to the pixel level in your pictures.

Getting your image sharp is more about your photography technique than where the pixel level is in the image.
Click image to view large.

Viewable images need sharpness.

Viewing an image on your computer is easy. Just open it up. Actually, that is not the full image in most cases. It’s a tiny version of it. A control on your image viewer will allow you to view it at 100%. It is at that resolution that you will know what the sharpness is really like.

What you see normally

When viewing a full image on a screen you normally see the picture reduced. Most people have the image viewer set to show the full picture. To fit it on the screen the computer does a throw-away exercise. It looks at the image file data. It finds as much detail as it can to discard but still leave a picture you would recognise. To do that it will lose some of the picture detail. But to compensate the image is sharpened up. That means the computer will emphasis any lines and edges it finds. This helps you to see detail and make up the rest.

We are very good at that – making up the rest. After all, every image we see is in two dimensions. But we still perceive it in three dimensions – because we make it up. So it is with the lost detail. We still see the image as pretty complete and can imagine it. The picture above was taken on a 21 mega pixel camera. The original picture is 5616 x 3744 pixels = 21,026304. So as you see it, at 800 × 488 pixels (scaled to 473px × 288px) it is pretty sharp. You can see it at 1000px wide if you click the image to get a larger version.

Most cameras take at least 8 mega-pixel images

What eight mega pixels means is that the sensor has approximately eight million photosites (sometimes pixelsites) on the digital image sensor. A pixel site is one individual sensor point. It senses the light. Each pixel site translates into an individual pixel in your image. You can see how to calculate the different mega-pixels on this page  Camera mega-pixel calculator - External link - opens new tab/page.

See the pixels as they are – get sharpness

A picture at one hundred percent of its size is at its proper resolution. It is the picture that the digital sensor was able to capture. If you view the picture at this resolution your image should be sharp. If it is not then your photography technique needs some work. Sharpness at the 100% size of an image is the tale-tell. It tells you if you are really getting a sharp result. Any smaller resolution and the sharpness is created by the computer, not your technique.

Seen at 100% resolution each pixel will fall into the visual position that you expect and the image will appear sharp. If on the other hand you are viewing the image at 100% and it is not sharp you will see lines and edges that are blurred. They will appear ‘soft’ – as if the lines and edges are not really as thin as they are when you see them in real life. The image below is a section of the image from the top of the page. It is shown at its 100% resolution. Of course it is cropped to fit the space. So you are not seeing the full picture. However, you should be able to see the detail.

The image from above at 100% resolution. (Pixels are not visible as individual points)

A section of the Christmas tree from above showing the sharpness when viewing at 100% resolution. The detail is clear and recognisable.

When you blow them up pixels are messy

If you open an image up at more than one hundred percent you are asking the computer to lie to you. An image file can only reproduce an image at the resolution it was taken at. If you ask it to blow up the image further it will try to do it. What you actually see will be a best guess. Your computer will try to show the current pixels replicated outwards. Each pixel will be surrounded by replicas of itself. This will make your picture look blurry. If you continue to blow it up you will get a pixelated version of the picture. Squarish artefacts and lines appear. The picture will look increasingly blocky as it gets more blown up.

A blown up section (500% resolution). Look carefully you can see individual pixel points. The quality is poor.

This image is blown up to 500% of the proper resolution. It is still taken from the image at the top of the page. You can see individual pixel points and the quality is lost

What is the point?

The point, that is what a pixel is. When blown up large enough it shows as a single point on the picture. It comes from one point on the image sensor – a pixel site. At normal resolution a pixel is too small for the eye to see individually. Mixed with all the other points it helps create a picture. The eye views all the different pixel positions as a mass. Not individually. Together they form an image. But that image is the result of your minds eye assembling them to resemble reality. That is what you see. It is an imagined facsimile of reality run together from a mass of dots.

When you next see an image you have made, stop. Change it to 100 percent view size. See if it is sharp. If it is not, work on your photography technique (see: The Zen of sharpness). If it is sharp, then bless your imagination because you have created a wonderful thing in your head. You have created a real image.

Comments, additions, amendments or ideas on this article? Contact Us
or why not leave a comment at the bottom of the page…

Like this article? Don’t miss the next — sign up for tips by email.

Damon Guy - Netkonnexion

Damon Guy (Netkonnexion)

Damon is a writer-photographer and editor of this site. He has run some major websites, a computing department and a digital image library. He started out as a trained teacher and now runs training for digital photogs.
See also: Editors ‘Bio’.
By Damon Guy see his profile on Google+.