Tag Archives: Composition

Tips for Better Smartphone Photography

This article contributed by Liz Pekler(Bio).

SmartPhone Photography is on an up-trend

Smartphone photography is the source of millions of images per day worldwide. It is not only an important aspect of social interaction, it is also a way to express yourself. Find out how to improve your shots and make the best of your smartphone photography.


Smartphone Photography is attracting more and more people. The number of images made on mobile devices exceeds the number taken on compact or DSLR cameras. Who could blame these keen users? Smartphones are easier to carry, cheaper to maintain, and are more user-friendly than the DSLR. And, with the constantly evolving smartphone camera apps and accessories, the future of smartphone photography seems assured. Indeed, smartphones and tablets are used in conventional photography too.

Is smartphone photography the new norm?

There’s no denying that DSLRs or mirrorless cameras are still the best types of cameras to have despite their larger size and weight. They have powerful sensors that offer the most megapixels. They allow complete user control over camera settings. However, more than that, they provide flexibility and freedom to use a range of accessories, like interchangeable lenses. The flexibility and control provided by a fully functioned DSLR can help you achieve the highest quality output.

Smartphone photography provides well for general image needs, like social media sharing and family records. Using mobile devices has become standard practice in recent years. Their hardware will need time to catch up on the quality and functions of more advanced cameras. However, there are many smartphone photography accessories available. These add-ons can enable your mobile device to get quite close to the high standard of DSLRs.

As long as smartphone manufacturers continue to develop higher specs and more powerful sensors smartphone photography will be likely to trend upward. However, no matter how good these mobile devices become, using the camera will require some user skill. The best photographs are not the product of the camera. They are a reflection of the vision and skill of the photographer – no matter what the device. Smartphone photography can be artistic, can be beautiful, can return great images.

You can get the best out of the built-in camera in your phones by practicing these helpful tips below:

Tips for Better Smartphone Photography

1. Pay Attention to the light levels

As with DSLRs, think, and make sure everything is good before touching the shutter button. Make sure the image is well-lit. One way to do so is to tap your subject on your phone’s display screen. In the smartphone camera on Auto mode, tapping on your subject will command the camera to focus on the area of the tap. Then the camera will make the exposure adjustment. That will ensure your subject is lit to its best advantage. The camera adjusts the overall image in proportion to the exposure. This shows the subject to its best advantage.

To manually adjust the scene’s brightness, swipe the ‘sun’ or ‘bulb icon’ after tapping on your subject. If you want to revert back to the default value, tapping anywhere on the screen of your smartphone usually does the trick.

Brightness changes are not the best way to lighten your scene. You can over-whiten highlights – leading to distracting white burnouts. Instead, try manually adjusting your ISO levels. Higher ISO means the sensor is more sensitive to light. A high ISO number gives a brighter scene in proportion to the ambient light in the rest of the picture. This helps you adjust your image to avoid burnt out highlights.

Raising the ISO has a penalty. High sensitivity to light levels can make your photos look grainy. It is called digital noise. Dimly lit areas brightened by higher ISO are especially likely to show noise if you boost the ISO too high. Practice with ISO a bit to get a feel for the way to use it.

The best way to avoid digital noise is to add light sources or work with natural light. Camera sensors work well with good light levels. So, think about how you can enhance the light rather than rely on high ISO, if you can.

2. Apply the Principles of Composition

Another thing to significantly improve your smartphone photography is to compose your image. This means taking photos to create a more visually appealing image. Try not to “shoot from the hip”. The quick snap often leads to poor shots.

It helps to keep these basic rules of composition in mind when taking photos:

  • The Rule of Thirds – Mentally divide the screen into a grid with 2 horizontal lines and 2 vertical lines. Then, align your subject with any of the guide lines or intersecting points to achieve a more natural-looking and attractive image.
  • The Golden Ratio Smartphone Photography | External link - opens new tab/page – When you compose your photo, leave 1.6 bits of empty space for every 1 bit of occupied space to achieve a balanced image.
  • Leading Lines – Using lines in your composition will help influence viewing behavior, draw your audience’s eyes across an image or towards a subject, and adds motion and dynamism.
  • Three-Layer Image – Having a foreground, a subject in the middle, and a background adds a sense of depth and interest to your photo. See “River Scene” below.
  • Rule of odds – multiple subjects in an image are more attractive if they are an odd number. The most famous case is to have three of something, but five and seven are often used too.
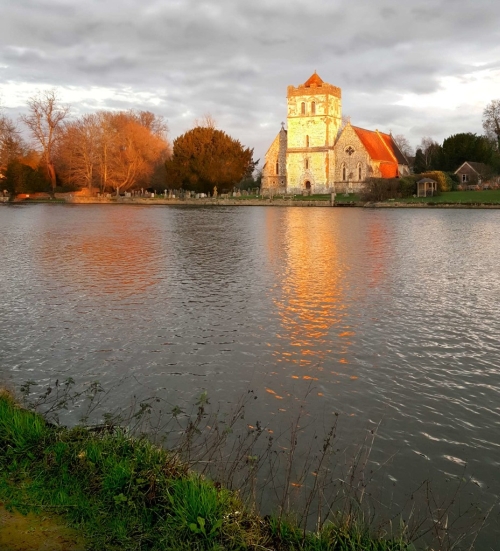
Smartphone photo showing three compositional layers

:: River Scene ::
This smartphone photograph shows three compositional layers. Introducing clear layers into your image helps to bring out a three dimensional depth and structure. Try to use foreground, mid-ground and distance layers in your images.
(Taken on a Galaxy S6 – Android phone)
(Click here to view large)


There are many ways you can use composition to improve your images. There is a whole page of composition links for you learn more here: Composition resources on Photokonnexion

3. Move as Close to your Subject as Possible

When using a smartphone to take photos, opt to move closer to your subject instead of using its zoom feature. Smartphone camera lenses usually have fixed focal lengths so they can’t zoom optically. Instead, it zooms digitally, which visibly distorts, pixelates, and lowers the quality of your images when overdone. Alternatively, you can use a compatible lens attachment that offers optical zoom capabilities.

4. Use Natural Light

The built-in flash on smartphones can sometimes be unflattering as it can wash out your subjects and produce harsh shadows. Harsh shadows with sharp lines create an angular appearance. This is particularly unflattering on faces.

To produce the best results, go for natural lighting. Natural light has an attractive quality for our eyes. We are naturally tuned to it. If you really need a flash there are some good attachments. You can use an attachable pocket spotlight or ring flash. Better still, use a more diffused light. An attractive diffused light provides just enough light for your subjects and creates flattering soft light with shadows. Shadows from soft light helps to create depth – giving a three dimensional feeling in the image.

5. Use A Third-Party Camera App

Your smartphone’s dedicated camera app can get the job done. However, third party apps allow you to do more with your phone’s built-in camera. Some of them offer better exposure adjustments, manual focus and camera settings (like shutter speed and aperture), or even integrated photo editing features so you can touch up captured photos instantly. If your interest is in better smartphone photography then use better editing too. Work to ensure you can navigate within the app and help you optimize its features for better photos.

Also familiarize yourself with the menu, settings, and features of your chosen camera app. If you’re a beginner, spend time and effort on learning photography basics. Think particularly about the shutter speed, ISO, and aperture. Also, think about how they relate to each other to create the exposure. Do some reading of this blog or other photography sites. Watch a YouTube tutorial on manual camera settings. Help yourself to develop a rounded approach to understanding both exposure and how best to take photos. Smartphone photography is as good for producing images as a DSLR. That is only true, providing, you know your tools and how to use them to produce a great image.

6. Take Advantage of the HDR Mode

The HDR mode on your camera phone allows it to take multiple shots of the same scene at different exposures, and then blend them together to create an image that pleases the eye. HDR mode blends the shots to create deeper contrasts in the image. This is particularly useful when shooting landscapes or high contrast scenes where there are obviously uneven highlights and dark areas. However, it must be used sparingly, as it can leave your images looking odd and overly edited. Don’t overuse it – try to work the editor so that your eye sees reality in the results. Trust your eye.

As a safety measure, also leave HDR on Auto. Then, you can manually pick out a better photo from the bunch of shots that were initially taken, in case the HDR blend goes badly. Apply the final result afterwards.

7. Post-Process Your Images

Post-processing can never replace good photography techniques. The best images stand alone for their beautiful content. However, it is also helpful to have editing skills. You can work to enhance a great image, or to work for the overall improvement of your photos. Take out spots, noise, or other irritations. Clean the image up so you show the beauty without distractions.

Photo editing apps like Instagram, VSCO, and Snapseed can be very helpful in making basic photo adjustments that will give you your desired result. Their photo filters are also great for setting or altering the mood of your images.

However, keep your edits at a minimum – especially processing ‘filters’. Instead, strive to make naturally beautiful images. This way, you don’t have to make too many adjustments later. After all, viewers can tell when you “cheat” your way to a good-looking image. Over-editing lowers the quality of your photos.

8. Keep Your Lens Clean and unscratched

This is something that is often overlooked by smartphone owners. It may not seem to be such a big deal for a small camera. However, a lens having oil, dirt, and moisture on it can slowly damage the glass. Leaving the lens on a tabletop can lead to scratching and marking. These ultimately affect image quality. Make sure you wipe the lens before use and use a protector or case, especially when doing a lot of outdoor shoots.

Can smartphone photography ever replace the DSLR?

Not all smartphones are capable of the more complex camera functions. However, many of the models some models currently on the market already have capabilities that mimic those found in DSLRs. In fact, many of them already allow control over the important camera settings, shutter speed, aperture, and ISO. These controls are native to some of the phones without having to use a third-party camera app.

Some of the latest smartphones, like the brand new iPhone and the latest Google Pixel, have more powerful and versatile cameras with more megapixels and other advanced features. Optical image stabilization for sharper photos and smoother videos is appearing, for example. The LG G6, released earlier this year, has great built in features. It carries a wide-angle lens that covers a larger area and is ideal for capturing group shots, magnificent architecture, and stunning landscapes. Many smartphone cameras from other brands offer other impressive features too. These advances are appearing just a few years after we thought such innovations wouldn’t be possible.

Smartphone photography is progressing fast. In a few years time, smartphone cameras are going to become even more sophisticated. For now, it’s safe to say that smartphones are definitely catching up, but whether they will ever surpass the DSLR remains to be seen. One thing is sure, the smartphone camera and DSLR are converging on each other. Furthermore, emergent technologies could take us anywhere. Camera technology still has a long way to go. Enjoy the ride!

Comments, additions, amendments or ideas on this article? Contact Us
or leave a comment at the bottom of the page…

Like this article? Don’t miss the next — sign up for tips by email.

Post contributed by :: Liz Pekler

I am a travel photographer with several years of experience in the field. Being a freelance blogger enables me to help photography beginners and enthusiasts to tell wonderful stories of their travels as seen through their lenses. It also allows me to share my thoughts about another advocacy of mine: social equality and change.
Connect with Liz Pekler: Linkedin :: Twitter: @liz_pekler

find out more...Photokonnexion tips by email
If you enjoyed this article please sign up for our
daily email service.
                                                 Find out more

Artwork images – record or new art?

Artwork images are not as easy to photograph as they seem.

Artwork images are not as easy to photograph as they seem.
Image of paper art by Peter Gentenaar
More from this artist on: http://www.gentenaar-torley.nl/  Artwork images: Link to Peter Gentenaar | External link - opens new tab/page

Artwork images are sometimes questionable as art

Most photographers look at work by an artist they like and feel compelled to take a picture. Of course it serves to remind them of the art they saw. That is reasonable. The keen photographer thinks differently. They like to see the artwork. They also like to produce photographic art of their own. But more often than not the picture they take is actually a record shot.

It is often said by judges in photographic competition that a sculpture photograph is a record shot. I have said it myself when judging. A pure record is not a piece of art by the photographer. Just exactly what do we mean by that?

Artwork images: Record verses interpretation

An example of a record shot is the photo at the top of this article. This work is by the wonderful paper artist Peter Gentenaar. His work is stimulating and interesting to the eye. Photos of his work bring out the splendour of his art. That is the point. They are less about the photographers interpretation of the art. Instead, they are about repeating the work in its fullness to show the work itself. It is a record. As such, it will show off the skill of the original artist.

Record shots are a legitimate photographic form. But they are often a record of the exhibit - not new photographic artwork images in their own right.

Record shots are a legitimate photographic form. But they are a record of the exhibit – not new photographic artwork in their own right.

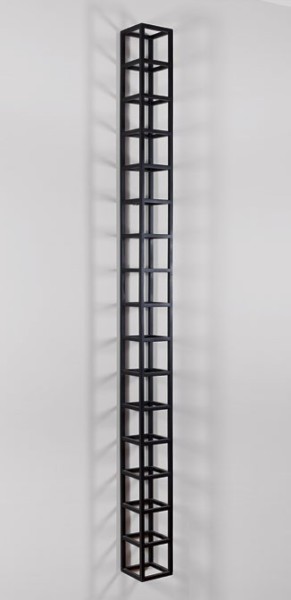
[Seen on www.starr-art.com/ on 30/05/2015
Sol LeWittWall Piece,
1988 Painted wood,
76 x 5 x 5 inches
Published by Edition Schellmann,
Munich and New York.]


Reproduction of artworks in a record style is a proper photographic form. For remembrance, or sales purposes, it is fine. For those seeking to make their own art there is something more needed than simply snapping someone else’s work.

That something extra is a new re-interpretation of the work. The photographer has to invest something of their own into the picture. They have to make more of the original artwork than is presented solely by the work itself. There are a number of ways to do this.

A new interpretation may not be a complete image of the work. It may include the full work, or only be a part of it. The environment of the image, how it is presented, or its framing are all important. Overall there will be something in the new artwork images that the photog makes their own.


How can you make new artwork images from an art piece?

Abstract from a piece of art

In this abstract of another piece by Peter Gentenaar the photographer has not shown the whole piece of work. They have taken a piece of the work that shows the wonderful lines and curves, but as a whole it creates a taste for seeing more.
See: Peter Gentenaar–Paper Magician Artwork images:  | External link - opens new tab/page.

• Abstract artwork images: One way to get something new out of a piece of art is to create an abstract of some sort. Abstract photos can be deeply satisfying to create and provide an interesting image for the viewer to consider. Most of the time abstracts are about making an image of a part of the artwork. An example is shown on the left. There can be a lot more to creating abstract photos than simply framing a bit of the total. The power of abstract is to create the essence of the total.

Abstracts require an eye for what works when the whole is not seen. For more on abstracts see our Abstracts Resources Page.

• Creating an new environment: The environment where sculptures are displayed is often important to the sculpture. Sometimes images are still record shots even if they are not on a simple white background. This link is an example of a Henry Moore sculpture record shot (Author unknown).. The author has displayed the sculpture just as it is with little enhancement. In fact it is almost devoid of its environment. The sky serves only as a backdrop.

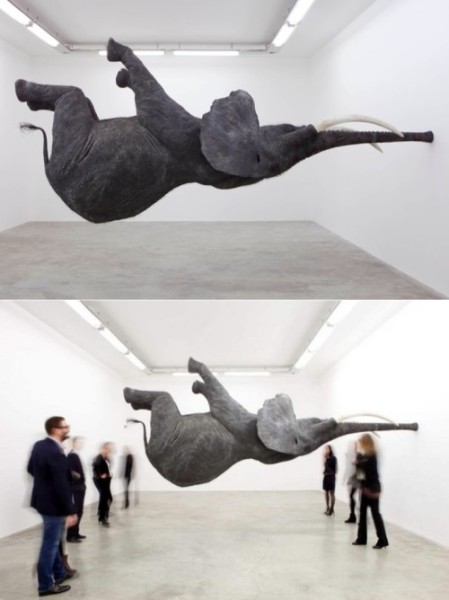
The same could be said of this picture of an elephant sculpture (below). The artist has created a superb piece which mimics the body of an elephant defying gravity. The first shot is a pure record shot. But, the second is a superb interpretation of the sculpture in it entirety with an audience, depersonalised by movement blur. Very clever. Both images are taken by the sculptor himself, Daniel Firman. A simple but excellent reinterpretation. Such re-inventions are in themselves artistic. As such they are creating artwork images in their own right.

Gravity-Defying Elephant Sculpture

Gravity-Defying Elephant Sculpture by Daniel Firman.
Images by Daniel Firman.

Published in: Gravity-Defying Elephant Sculpture.
(Seen on WordlessTech Artwork Images: Gravity-Defying Elephant Sculpture by Daniel Firman | External link - opens new tab/page 29/05/2015).


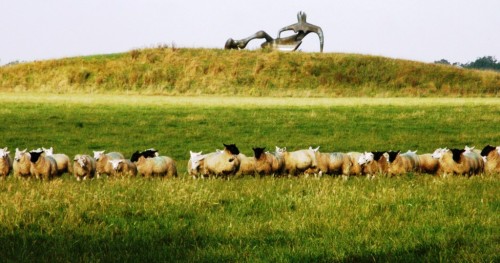
Another Henry Moore Sculpture is shown below. This image makes as much of the environment as the sculpture. The artist has created a great panoramic picture using a letter-box crop. The length of the principle subject (the sculpture) is complemented by the almost central position. But, it is highlighted by the mundane, but important line of sheep. The latter gives the eye an excellent weighted contrast to the sculpture in the background. Clever compositional devices like this often create great great artwork images. There is no way this is a record shot.
Artwork images: The compositional devices in this image make it an interesting example.

The compositional devices in this image make it an interesting example of artwork images – definitely not a record shot.
(Seen on: Backstrap Weaving Artwork Images: Henry Moore sculpture on Backstrap Images blog. | External link - opens new tab/page.
(Click the image to see full size).

• Adding something: Another way to make something new of a piece of art is to put something new into, or onto, the piece. I leave the artwork images to your imagination here.

I have often heard judges say about record shots, of say a sculpture, “this needs your hat on it”. Alternatively they might say something like, “a cat just here would make the image something different”. What the judge is saying is, the author has created a shot that does not have anything from the photographer in the image. Whereas, with a little thought, or a little prop, or even a person – the picture could be transformed. Instead of the simple (and boring) representation, the author could have added that little extra that makes the image into a reinterpretation – something different. It would be something created uniquely by the photographer.

Works by you are artwork images

The uniqueness of a photograph is something that makes photography interesting. But, make the main subject a simple representation of somebody else’s work, then the uniqueness is lost. A simple record is created. But with simple compositional thoughts, re-frameing, or the addition of some new aspect, you create a new synthesis. One that is unique to you. One that is a real contribution to the body of artwork images. That is what makes photography so special.

The main point to take from this is simple. Think, plan and consider the composition when taking pictures of other peoples art. A subtle treatment of the art piece can transform it into an image only you could make.

Artwork images – further thinking

Which of these are record shots of Henry Moore Sculptures and which are artwork images by the author…
Henry Moore sculpture on Google Images Artwork images - further thinking | External link - opens new tab/page

Comments, additions, amendments or ideas on this article? Contact Us
or why not leave a comment at the bottom of the page…

Like this article? Don’t miss the next — sign up for tips by email.

Damon Guy - Netkonnexion

Damon Guy (Netkonnexion)

Damon is a writer-photographer and editor of this site. He has run some major websites, a computing department and a digital image library. He started out as a trained teacher and now runs training for digital photogs.
See also: Editors ‘Bio’.
By Damon Guy see his profile on Google+.

Backdrops – make them yourself

Create your own backdrops.

Here is a quick and simple way to create a great backdrop. You can produce your own great designs with a little creativity.
Image from the video below.

The shots and the props can be creative

Great backdrops often make a picture. The simple ones are the best. They do not pull the viewers eye from the subject of the shot. Instead they focus your viewer on your subject. A backdrop should create an environment for the shot that both completes the scene and brings out the best in the subject.

Photography is creative and the backdrops should be too

There are a million creative things you can do with your pictures. Making backdrops can be equally as creative. In addition they add a new spin and level of creativity to your shots.

You can make backdrops out of wood, canvas, sheets, paper, metal… well millions of things. Be careful they are not too heavy. If they fall and hit someone they might be injured. Don’t make backdrops too flimsy. They might fall apart during the shoot. Apart from that the sky is the limit!

Here are some ideas I have seen used to good effect.

  • Autumnal leaves densely stuck to an old sheet.
  • Spaghetti stuck to an old sheet.
  • Chinese lettering enlarged in a copier and stuck on white wall paper liner.
  • Wallpaper of many designs.
  • Hundreds of pieces of string hanging down.
  • Dozens of electric lights hanging down.
  • Hundreds of Wooden scraps nailed to five planks in a random fashion.
  • White back drop paper with lightly pencilled circles drawn all over it.
  • A white sheet “tie and dyed” with various patterns.

I am sure you can think of many more creative ways to enhance your shoot with DIY backdrops. Just take a little time to think over what you need for your shoot.

Here is a Google search for “Creative backdrops images“. Plenty of ideas there to stimulate your thinking!

Some simple principles for good backdrops

Some backdrops are simply not right for the shot. Of course there are those artists who seem to make anything work. For those of us who need a little guidance, here are some principles to help you design your backdrop:

  • Do not make the backdrop stronger or brighter than the subject.
  • Choose colours that bring out the colours in your subject.
  • Use colours and designs that almost fade into obscurity allowing the subject to blossom.
  • Allow your backdrops to complement the subject – not clash with it.
  • Use texture, tonality and hue to vary the background so it appears to be slightly 3D.
  • Be careful that patterns do not emerge unless they are deliberate.

These are not rules. They are guidelines to get you started. Of course as your skill as a photographer and backdrop-maker develop you can make or break these principles. Have fun. Make great shots!

How to make your own studio photography backdrop – video

In the video below there is a quick and simple method of setting up a canvas backdrop. It can be done in a few hours. If you don’t have much space you can make it out of doors. Enjoy this video short and let it help your mind be creative.

Comments, additions, amendments or ideas on this article? Contact Us
or why not leave a comment at the bottom of the page…

Like this article? Don’t miss the next — sign up for tips by email.

Damon Guy - Netkonnexion

Damon Guy (Netkonnexion)

Damon is a writer-photographer and editor of this site. He has run some major websites, a computing department and a digital image library. He started out as a trained teacher and now runs training for digital photogs.
See also: Editors ‘Bio’.
By Damon Guy see his profile on Google+.

Images should make a point… photographic meaning

No Image Today - put photographic meaning in every image you make.

• No Image Today •
There should be a point to every image you make. An image is a communication. Without meaning it is just a picture.

What is a true image?

If your picture has succeeded it has to conjure an image in the mind of the viewer. But if your picture is just that, a picture, it will not succeed. For the genuine photographer, nice is not good enough. A picture should have a meaning, a point, something that makes it a communication. It should have something that makes it an image in the viewers mind.

Photographic meaning… the punch in the picture

Uncertainty about the validity of an image is a necessary part of creativity. Especially in the sense that you should always question, “Have I actually said anything in this picture?” Photographic meaning is an important idea. To really comprehend it, ask yourself if your picture says anything. Be sure you have really transformed it into an image.

I remember once sitting by an autumnal birch tree. It had lovely little yellow leaves and was a nice shape. I took a picture of it. But in the end that picture was simply a nice tree. It spoke to me because of the few minutes pleasure it gave me as I admired it. The picture had nothing to say to anyone else. I never showed it to anyone else, ever. It was about my feelings. It said nothing and was of no benefit to anyone else. It had no photographic meaning. It’s now lost in the obscurity of hundreds of thousands of my other images. ‘Nice’ is simply not good enough to achieve photographic meaning.

We could be picky and obtuse. “Well, it had a non-fatalistic statement to make about the environmental impact of an autumnal tree in its cardinal state, doing what birch trees do… etc.”. Actually, saying anything about it would be mere fluff on the wind. It was a non-picture. Devoid of photographic meaning, it satisfied nothing in the viewer.

You could say the picture now has a ‘raison d’etre’ following this blog. But that was not a necessary, or sufficient, reason for the picture. It’s a post hoc justification for its existence.

The Photographer’s Eye: Composition and Design for Better Digital Photos

When I first read this I wondered how useful it would be. But I learned the importance of photographic meaning. Composition in all its forms is critical to great image-making. Read this book. It is a visual treat as well as a great insight to the power of design and composition in your photography.
The Photographer’s Eye: Composition and Design for Better Digital Photos

Communication

Think of all photographs you make as a way to communicate something. That birch tree picture did not speak to an audience. I remember it now because I sat and stared at the picture for ages thinking, “What was I thinking about to take this picture?”. As an image it conjured nothing in the mind of the viewer. As a picture it failed to pass the photographic meaning test.

Nice is not good enough – images must carry photographic meaning

The ‘birch tree’ incident, not the picture, serves as a reminder. Creativity should have a point – be an actual communication. Otherwise it will have no photographic meaning and little else to commend its existence.

A dedication – Photographic Meaning

This is dedicated to my friend Alison. She struggles to understand her own significance as a communicator. Actually, her astute photo-observations convey a lot of photographic meaning.

Comments, additions, amendments or ideas on this article? Contact Us
or why not leave a comment at the bottom of the page…

Like this article? Don’t miss the next — sign up for tips by email.

Damon Guy - Netkonnexion

Damon Guy (Netkonnexion)

Damon is a writer-photographer and editor of this site. He has run some major websites, a computing department and a digital image library. He started out as a trained teacher and now runs training for digital photogs.
See also: Editors ‘Bio’.
By Damon Guy see his profile on Google+.

Ansel Adams – a photography legend

A documentary about Ansel Adams.

• Ansel Adams – a documentary •
[Image from the video]

Images that expressed the majesty in nature.

Ansel Adams became a legend in his own lifetime. He saw something special in landscapes. That “something” bought alive the majesty we feel when we are awed by natural landscapes. Yet he was much more than a photographer. He was a musician, thinker, energetic conservationist AND an extraordinary photographer.

Special talents defined Ansel Adams

From early in life Ansel Adams was fascinated by music. He taught himself to play the piano. His father saw an extraordinary talent emerging. He took him out of school to concentrate on his music skills. He was home educated using some of the best instructors and teachers available. His musical skill developed and he exhibited great talent. Then in 1916, he encountered a book which excited an interest in the big landscapes that became his life’s work. His father took him to Yosemite with the rest of the family. He later said of the this experience…

“…the splendour of Yosemite burst upon us and it was glorious… One wonder after another descended upon us… There was light everywhere… A new era began for me.”
Ansel Adams

During the first visit to Yosemite Ansel Adams was given a Kodak “Box Brownie” camera. From that moment his approach to the extraordinary landscapes that he loved so much was changed. He became transfixed by his photography. However, his love of music came first. For a number of years during his 20’s he pursued a career as a concert pianist.

Ansel Adams met the woman who later became his wife in a small studio where he was practising his piano while on his summer sojourn in the Sierra Mountains. The affair was on-and-off for a number of years. Ansel Adams struggled to reconcile the two passions of his life – music and the great landscapes of the Sierra Mountains.

In the summer of 1923 Ansel Adams, then 21, had, what he later described as, a “transcendental experience” while out in the mountains. He struggled for another seven years with his artistic inclinations and his ambition to become a musician. But finally the mountains drew him back and he had grown tired of the the petty politics of the life of a musician. From that time on he dedicated his life to trying to capture the wonder and sharp detail of his earlier transcendental experience.

Comments, additions, amendments or ideas on this article? Contact Us
or why not leave a comment at the bottom of the page…

Beach views – ideas for a seaside photoshoot

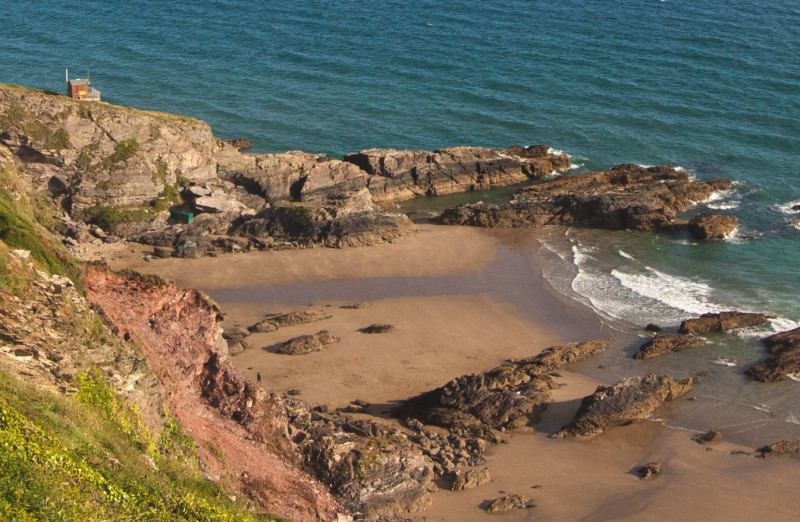
Beach views are really worth planning out.

• Cornish Afternoon •
The great British beach experience is based on our long history of holidays by the sea. The beach views that come with it are worth pursuing too.
(Click image to view large).

Work up a great coastal vista shot.

Beach views can be magnificent and there is always something worth photographing. Sea makes a magical subject in almost any weather. In the right place the views can be magnificent. Here are a few ideas for you to help you get a great photo from your visit to the seaside.

Beach views :: great vista shots

Photographers should be aware of the opportunities for great vista shots. Here are three tips to help you get the shot and the right light…
1. Spotting a rugged coast: Scout out the maps near your destination. Most good maps will show contours and the coastal shape. If you are looking for interesting coastline check out the height of the land beside the sea. Cliffs and hills indicate harder, more resistant rocks. This helps build up a range of rugged landscapes. Also, the more jagged edges the map shows along the sea/beach line the more likely the coast will have an interesting viewpoint.

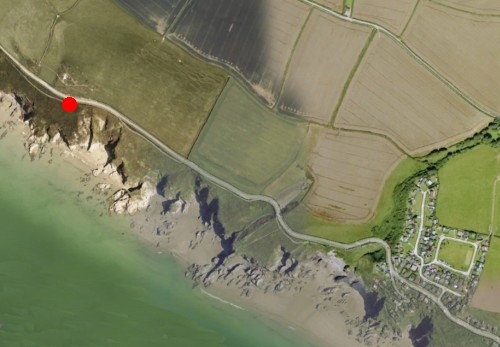
If you are looking for a place to try out, Google Maps is useful. The Google maps are not very good at showing contours or heights. But the jaggedness of a coast line is shown. If you convert the map to the Google “Earth” view you can get a satellite view of the coast. From that you can get quite a good idea of the terrain.

Google Earth - the satellite view provides a good idea of the type of coast.

• Whitsand Bay Cornwall •
The photo at the top of the page was taken from the position of the red dot. The view was taken along the rugged coast there. You can see from the Google Satellite view how rugged the coast is along there. It’s ideal for lots of different Beach views.


2. Beach views :: Checking out the light:
There are two times a day when the light is best for landscapes and vista shots. These are the Golden Hour just before sundown and the hour around sunrise. There is great light and low sun position at these times of the day. Why is low-sun position good? Because that causes long shadows to be cast off the rocks. Strong contrasts between the dark and light help define edges, shapes and form of the rocks and features. Shadows provide the defining depth in a picture too. Well defined shadows help the eye to see objects as more three dimensional.
• The Okta • The symbol for cloud cover on good weather maps.

• The Okta •
The symbol for cloud cover on good weather maps. A useful symbol to tell you the light conditions when checking for good beach views.
(Attribution: Wikipedia.org Beach views :: Oktas - cloud cover symbols | External link - opens new tab/page)


Of course we are not always able to take our photos at the best times of the day. So how do you check to see what the light will be like when you are there? Of course the starting point is the weather. Most good weather forecast web sites will tell you the amount of cloud cover. You can usually tell how much cloud cover is expected by the number of Oktas (or Octas) shown. The more cloud cover the more diffused the light will be. The actual types of clouds make a difference too – if they are dark and ominous they will make a great backdrop to your beach views. Seascapes really look great with heavy storm clouds. Make sure you have a tripod to hand. Dark clouds mean longer exposures.

3. Sun position: If it is a sunny day you might find the sun position is important. If the sun is up high, cliffs can still be in shadow. It depends exactly where in the sky the sun is at the time you want to take photos. There are websites to help with that too. Check out The Photographers Ephemeris Beach views :: Get the light right with . This really useful website “is a map-centric sun and moon calculator: see how the light will fall on the land, be it day or night, for almost anywhere on earth”. There is a web-based version. But usefully, there are versions for your mobile phone too. You will be able to work out where the sun will be at any time of the day. This will help you work out how to fit your beach view shot into your day.

Putting depth into your beach views shot

The shadows you are able to capture will help your beach views appear to have depth. But a longer distance view, especially in mid-day daylight, will need to have other perspectives. Here are a few ideas for you to introduce a feeling of depth into your shots…

  • Overlaps: When you are looking down a long beach you often find features of the beach itself will overlap in your sight. Mounds of beach stones; sand dunes; different rock layers at beach level; cliff top undulations; variations in the cliff face itself and even local vegetation all help. The ways that these features relate to one-another in the scene give you clues to depth in the photo.
  • Contrasts in colour: The colour of the beach stones, rock, sand and even vegetation can often be used to show variation. As you shoot down the length of the beach these can help to show depth to the eye.
  • Texture variation: The cliffs, dunes, rocks and any seaweed revealed by a low tide provide great variations in texture. Look for ways to bring all these into the shot. Textures often come out by slightly underexposing the shot. That may make the scene look darker than it actually is, but it will bring out the light and dark aspects effectively.
  • Lines of perspective: Strong lines are not often associated with beach views. However there are some strong ones that people often miss. The sea line itself is a strong line. You can look down the length of the beach and use the surf or water line where it meets the beach. Looking down on the beach from cliffs you can use wave lines (see below). If you are on the beach itself you beach views are often enhanced by cliff top lines. Although they often undulate they perspective is still distinct against the sky. On the beach itself, fences and other man-made features (groynes, buildings, paths, roads, beach walls etc.) provide lots of points of perspective you can use.
  • Distant points: If you have something in the distance that your viewer knows to be large they have a distance perspective. In the picture at the top of the page you can see a cloud line. These tiny clouds in the distance give a perspective for the viewer. Other things can be large shops towns on the coast, and even buildings.
• Cornish beach view •

• Cornish beach view •
This view of the beach shown at the top of the page loses some perspective because the distances are reduced. The wave lines in the sea and the rock protruding from the cliffs gives back some of the perspective. The nearness of the grass close-up and smallness of the person and buildings also give depth to the shot.
(Click image to view large).

Check out other pictures of the location for your beach view

The most effective way to plan for your picture is to look up your destination and look for pictures done by other photographers. Try putting your intended location into Google Images. You will be able to pick out features in advance to help you give depth and perspective. You will also be able to see some good places to take shots. Here is the page for the bay where my pictures above were taken. You can see my shots are quite different from the others shown there. There is lots of scope to help you pick out some ideas.
Google Images: Beach views Whitsands Bay Cornwall Google Images: Beach views Whitsands Bay Cornwall | External link - opens new tab/page.

Comments, additions, amendments or ideas on this article? Contact Us
or why not leave a comment at the bottom of the page…

Like this article? Don’t miss the next — sign up for tips by email.

Damon Guy - Netkonnexion

Damon Guy (Netkonnexion)

Damon is a writer-photographer and editor of this site. He has run some major websites, a computing department and a digital image library. He started out as a trained teacher and now runs training for digital photogs.
See also: Editors ‘Bio’.
By Damon Guy see his profile on Google+.

What you can learn from candid photography

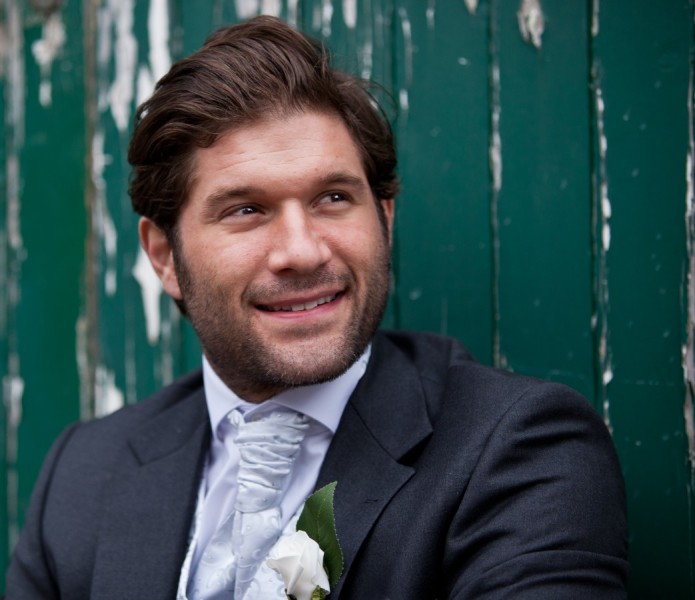
Groom • Candid photography :: getting the shot is a pressure.

• Groom •
Candid photography – getting the shot is a pressure. Weddings are times when you need to work particularly fast and accurately. •

Responding is a skill.

When starting on the path to disciplined photography we’re told to slow down. Take careful, measured and pre-visualised shots. We are told to stop trying to frantically pepper the scene with shots. Take time. Take stock. Think everything through. The aim is to get the shot under control.

A good photographer often needs to respond rapidly. The careful, measured approach still applies. They still have to get the picture. However, the pace of a situation demands swift shots. The practised photog can respond with speed and accuracy. Practice at candid photography is a great way to realise those skills for yourself.

Candid photography and practice

The aim is to make a clean, sharp, well composed image. The nature of a candid shot makes that difficult. While trying to make a success of your candid photography some conditions may apply. Some of those may contradict each other…

  • The subject may not know you are going to take a picture.
  • The subject could know you are going to take a picture.
  • The subject may be unpredictable.
  • You will need to be very quick.
  • You will need to be able to get a sharp image despite speedy working.
  • You may have to take several shots (eg. not dozens).
  • Your subject should be in an interesting position.
  • The subject needs to to be in an interesting context in the scene.
  • You should anticipate the shot (rather than getting lucky).
  • You will have your camera ready and settings correct for the shot.
  • You will have only a microsecond to compose the shot.

You just do not know what you are going to encounter until you have to deal with it.

Dealing with all that may seem a tall order. Especially if you are told not to machine-gun the scene with shots. Haste and frantic bursts rarely lead to good luck. Actually, it is not about doing all that at super speed. Like everything you do in photography, candid photography requires preparation, practice and control.

Equipment – knowing what you can do

NO! Do not go out and buy yourself a micro-weight, super-camera. Up-to-date bells and whistles are not the point. Instead, look for simplicity. Sometimes the best camera is an old and familiar one. What we want for this exercise is knowledge.

The best possible way to get fast with a camera is to know what it can do. The lens too. If you are familiar and well versed in using your equipment you will automatically respond to the scene. Here is an example.

In candid photography control of depth of field is essential

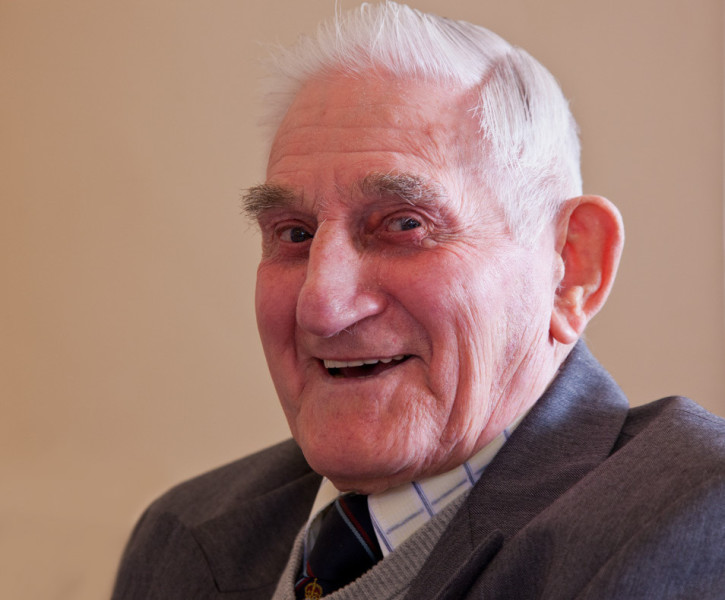
• Impish grin •
Keep the subject in focus but the background is frosted out.
In candid photography control of depth of field is essential
(Click to view large)

This shot was captured as this lovely man turned from a conversation. He was talking to someone on his right. I was ready for his turn toward me. His impish grin as he saw me really made the shot.

I wanted a depth of field that had his head and face sharp. I also wanted the background indistinct. Notice the sharpness is lost just on the far shoulder. My lens was set up to have a depth of field of about 400mm (about 15in to 16in). But there was no measurement involved. This was an estimate. It involved knowing the depth of field at my distance from the man, and using the right aperture. This capture is the result of knowing the lens and camera combo really well. It was a practised shot using very familiar equipment. The successful candid photography came out of the practice and familiarity.

Equally, it is easy to get the shot wrong. Depth of field, especially at close range, is fickle. It is easy to get the tip of the nose out of focus, the eyes and face in focus, and the hair out of focus. It is important to look at the variables involved. The aperture size and distance-from-subject control the depth of field. So, try the exercise below using manual settings.

Take a bright coloured builders tape measure. Place a small object beside a mid-point on the measure. Take a photo of the object down the measures’ length. Use a wide aperture. Check out the depth of field by looking at the measurements that are sharp. Now by varying your distance from the object see how much you change the depth of field. Do this for a wide range of apertures. With experience you will get a feel for controlling the depth of field. With twenty or thirty variations you should get a feel for the depth of field.

Settings

Aperture is one setting. ISO and shutter speed are important too. Getting a feel for your equipment means getting familiar with how these settings work.

Candid photography often involves working in darker lighting. Parties and indoor sessions, weddings in churches and in evening light all require wide apertures. You might use flash. But in a lot of situations that may not be practical or desirable. So using a high ISO setting (more sensitive sensor) will allow you to work effectively in lower light. So, lower the light where you are working with the tape measure. Raise the ISO and repeat the exercises. Get a feel for how you can vary the exposure by changing the ISO.

Needless to say you can vary the shutter speed in similar ways. Try the exercise again. This time keep the aperture and ISO fixed and change the shutter speed up and down through a range of shots. [More on varying shutter speed].

Learning to use your settings manually takes more than one session. That is important. You can gain a lot by training yourself to be sensitive to the settings. Working toward good quality candid photography can really help you gain that sensitivity. Poor photographs of faces and people are immediately obvious! You get great feedback from the experience of poor shots.

Composition – seizing the moment

Candid photography is about seizing the moment. You need to use good settings. You also need some understanding of composition. This means working to get your subject in the right environment. They will have an appropriate pose and possibly the right context or behaviour too. Without all these coming together the moment is lost. Setting it all up takes some thought.

Normally people do candid photography with some idea of what they want to achieve. Random wanderings are normally unproductive. Luck follows more often from preparation and forethought than stumbling upon a notable event.

So, have a good think about your scene composition….

  • Set yourself up in a viable position ahead of the shot.
  • Think about how the light is placed in the scene overall.
  • Place yourself for the right background on the far side of the shot.
  • Fix the camera settings for the composition ahead of the shot.

In other words be prepared. Then, when the right moment comes along, you will have the minimum to do. A little composition, framing the shot, is essential. A tweak of the focus possibly… But essentially – you should be ready.

Now you stand the best possible chance of getting the shot.

Candid photography is successful when it all comes together

All this preparation and practice is about getting you to the moment when you take the shot. Making a success of your candid photography is about three things…

  • Knowing your settings.
  • Practice with and knowing your equipment.
  • Forethought about the scene.

Having everything ready is the key. Then when all the elements of the scene come together all you do is frame it and capture. If you succeed in that, you will also make a swift shot. Because, in fact, you have little to do. Speed and accuracy is about being ready with everything and having the minimum to do when the right events pull the shot together.

Comments, additions, amendments or ideas on this article? Contact Us
or why not leave a comment at the bottom of the page…

Like this article? Don’t miss the next — sign up for tips by email.

Damon Guy - Netkonnexion

Damon Guy (Netkonnexion)

Damon is a writer-photographer and editor of this site. He has run some major websites, a computing department and a digital image library. He started out as a trained teacher and now runs training for digital photogs.
See also: Editors ‘Bio’.
By Damon Guy see his profile on Google+.