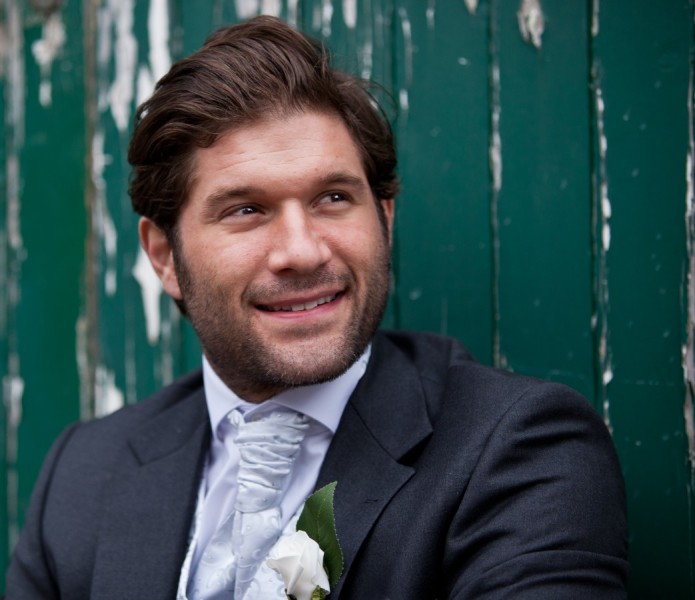
Tag Archives: Portraits

Headshot poses – make your portrait right

Headshot poses :: Keep it simple.

• Headshot poses •
Keep the shots simple and try to reduce any distracting elements in the shot.
(Image from the video)

Your portraits need to be suitable for your subject…

When you want to do a portrait your subject will often not know what to do. Headshot poses are usually pretty simple. But the subject will look to you for direction. You will need to help them pick the right pose.

What inexperienced photogs forget is that male and female poses are different. So they tell their subject to pose how they do when feeling good. That may not be right for someone of the opposite sex to you.

Think about the gender of the subject in headshot poses

If you are a female, think carefully about your headshot poses for a male. Maleness tends to be angular, more aggressive in stance. Males are often better seen head on where their size seems a little more imposing. A hard, upright position indicates maleness. So does harder shadow lines on the face and angular light direction.

If you are a male photographer, you may think in male terms. Female headshot poses are better as more rounded poses than male shots. Inclined heads and slightly turned bodies are best – not looking directly at the camera. Find ways to pose your women subjects in a smaller more understated pose. Remember, shadows on a female face are more flattering when they are soft and give a more rounded appearance.

Circumstances may effect the headshot poses too

There are a lot of different reasons to take a headshot portrait. They may have particular poses attached to those circumstances. For example business poses still have a masculine and feminine aspect. However, they would tend to be more understated than a free posing session. The same might be said of guests at a wedding – and so on. So you need to consider why the headshot poses are being taken.

Clothing is important too. Headshot poses tend to include only the upper body. So if the clothing is distracting it can draw the eye away from your subjects face. Don’t try to get your subject to do a heavy make-up or high-quality hair do if you are trying for a natural shot. Let the inner person come out. Headshot poses are best done in as simple way as possible. There is going to be a high proportion of face in the shot. Overdoing other things will detract from that.

Setting the mood for your headshot poses

Here are a few extras for you…

  • Relax. Sometimes you can get very uptight when shooting portraits. This will get your subject uptight too. So before you start shooting, take a deep breath, breath out slowly. Then spend a few moments talking to your subject to put them at ease.
  • Jokes help to relax an uptight subject. If you tell a light-weight joke it will help set a light mood.
  • Subjects often have a very uptight face to start with. Sometimes all the expression goes of their face. It is fun and will lighten things up if you tell them to pull a few faces – do it with them. That will help get a few giggles and they will have more expression after doing it.
  • When doing the poses make sure you complement your subject. Headshot poses are best done with natural facial expressions. Reward those with a complement. “Lovely smile”, “Nice eyes”, “love that expression”, and so on. This builds a rapport with your subject. It helps them feel comfortable as they pose too.
How to Pose someone for Headshots

In this five minute “headshot poses” tutorial you are lead through a range of things to consider…
Tony Northrup

Comments, additions, amendments or ideas on this article? Contact Us
or why not leave a comment at the bottom of the page…

Like this article? Don’t miss the next — sign up for tips by email.

Damon Guy - Netkonnexion

Damon Guy (Netkonnexion)

Damon is a writer-photographer and editor of this site. He has run some major websites, a computing department and a digital image library. He started out as a trained teacher and now runs training for digital photogs.
See also: Editors ‘Bio’.
By Damon Guy see his profile on Google+.

What you can learn from candid photography

Groom • Candid photography :: getting the shot is a pressure.

• Groom •
Candid photography – getting the shot is a pressure. Weddings are times when you need to work particularly fast and accurately. •

Responding is a skill.

When starting on the path to disciplined photography we’re told to slow down. Take careful, measured and pre-visualised shots. We are told to stop trying to frantically pepper the scene with shots. Take time. Take stock. Think everything through. The aim is to get the shot under control.

A good photographer often needs to respond rapidly. The careful, measured approach still applies. They still have to get the picture. However, the pace of a situation demands swift shots. The practised photog can respond with speed and accuracy. Practice at candid photography is a great way to realise those skills for yourself.

Candid photography and practice

The aim is to make a clean, sharp, well composed image. The nature of a candid shot makes that difficult. While trying to make a success of your candid photography some conditions may apply. Some of those may contradict each other…

  • The subject may not know you are going to take a picture.
  • The subject could know you are going to take a picture.
  • The subject may be unpredictable.
  • You will need to be very quick.
  • You will need to be able to get a sharp image despite speedy working.
  • You may have to take several shots (eg. not dozens).
  • Your subject should be in an interesting position.
  • The subject needs to to be in an interesting context in the scene.
  • You should anticipate the shot (rather than getting lucky).
  • You will have your camera ready and settings correct for the shot.
  • You will have only a microsecond to compose the shot.

You just do not know what you are going to encounter until you have to deal with it.

Dealing with all that may seem a tall order. Especially if you are told not to machine-gun the scene with shots. Haste and frantic bursts rarely lead to good luck. Actually, it is not about doing all that at super speed. Like everything you do in photography, candid photography requires preparation, practice and control.

Equipment – knowing what you can do

NO! Do not go out and buy yourself a micro-weight, super-camera. Up-to-date bells and whistles are not the point. Instead, look for simplicity. Sometimes the best camera is an old and familiar one. What we want for this exercise is knowledge.

The best possible way to get fast with a camera is to know what it can do. The lens too. If you are familiar and well versed in using your equipment you will automatically respond to the scene. Here is an example.
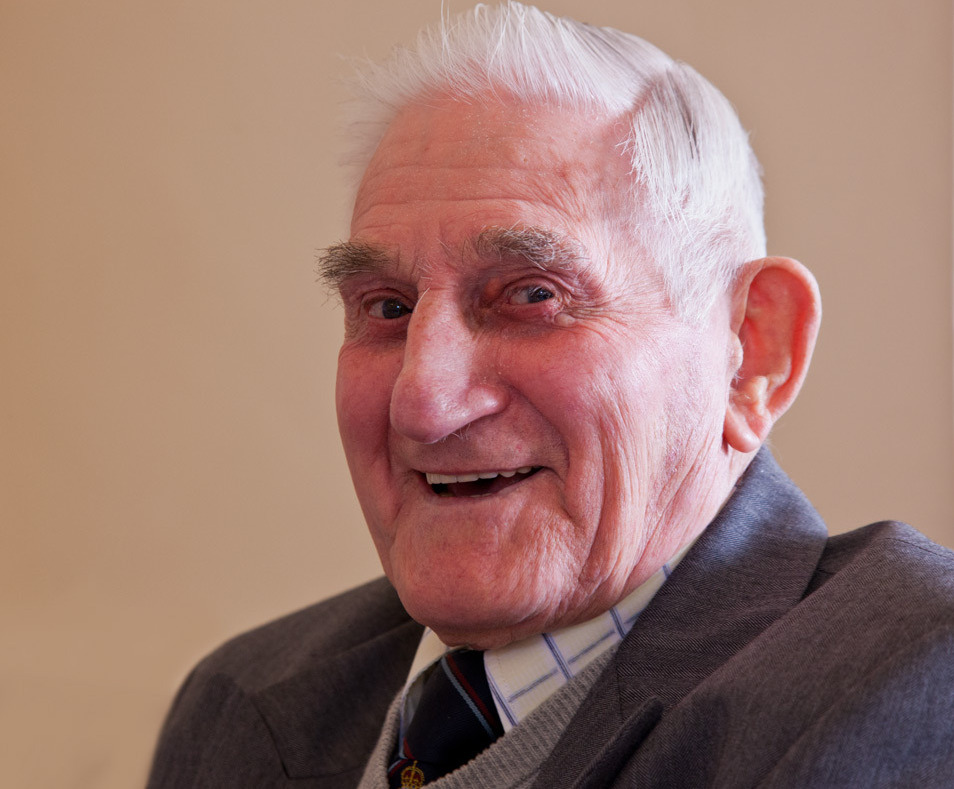
In candid photography control of depth of field is essential

• Impish grin •
Keep the subject in focus but the background is frosted out.
In candid photography control of depth of field is essential
(Click to view large)

This shot was captured as this lovely man turned from a conversation. He was talking to someone on his right. I was ready for his turn toward me. His impish grin as he saw me really made the shot.

I wanted a depth of field that had his head and face sharp. I also wanted the background indistinct. Notice the sharpness is lost just on the far shoulder. My lens was set up to have a depth of field of about 400mm (about 15in to 16in). But there was no measurement involved. This was an estimate. It involved knowing the depth of field at my distance from the man, and using the right aperture. This capture is the result of knowing the lens and camera combo really well. It was a practised shot using very familiar equipment. The successful candid photography came out of the practice and familiarity.

Equally, it is easy to get the shot wrong. Depth of field, especially at close range, is fickle. It is easy to get the tip of the nose out of focus, the eyes and face in focus, and the hair out of focus. It is important to look at the variables involved. The aperture size and distance-from-subject control the depth of field. So, try the exercise below using manual settings.

Take a bright coloured builders tape measure. Place a small object beside a mid-point on the measure. Take a photo of the object down the measures’ length. Use a wide aperture. Check out the depth of field by looking at the measurements that are sharp. Now by varying your distance from the object see how much you change the depth of field. Do this for a wide range of apertures. With experience you will get a feel for controlling the depth of field. With twenty or thirty variations you should get a feel for the depth of field.

Settings

Aperture is one setting. ISO and shutter speed are important too. Getting a feel for your equipment means getting familiar with how these settings work.

Candid photography often involves working in darker lighting. Parties and indoor sessions, weddings in churches and in evening light all require wide apertures. You might use flash. But in a lot of situations that may not be practical or desirable. So using a high ISO setting (more sensitive sensor) will allow you to work effectively in lower light. So, lower the light where you are working with the tape measure. Raise the ISO and repeat the exercises. Get a feel for how you can vary the exposure by changing the ISO.

Needless to say you can vary the shutter speed in similar ways. Try the exercise again. This time keep the aperture and ISO fixed and change the shutter speed up and down through a range of shots. [More on varying shutter speed].

Learning to use your settings manually takes more than one session. That is important. You can gain a lot by training yourself to be sensitive to the settings. Working toward good quality candid photography can really help you gain that sensitivity. Poor photographs of faces and people are immediately obvious! You get great feedback from the experience of poor shots.

Composition – seizing the moment

Candid photography is about seizing the moment. You need to use good settings. You also need some understanding of composition. This means working to get your subject in the right environment. They will have an appropriate pose and possibly the right context or behaviour too. Without all these coming together the moment is lost. Setting it all up takes some thought.

Normally people do candid photography with some idea of what they want to achieve. Random wanderings are normally unproductive. Luck follows more often from preparation and forethought than stumbling upon a notable event.

So, have a good think about your scene composition….

  • Set yourself up in a viable position ahead of the shot.
  • Think about how the light is placed in the scene overall.
  • Place yourself for the right background on the far side of the shot.
  • Fix the camera settings for the composition ahead of the shot.

In other words be prepared. Then, when the right moment comes along, you will have the minimum to do. A little composition, framing the shot, is essential. A tweak of the focus possibly… But essentially – you should be ready.

Now you stand the best possible chance of getting the shot.

Candid photography is successful when it all comes together

All this preparation and practice is about getting you to the moment when you take the shot. Making a success of your candid photography is about three things…

  • Knowing your settings.
  • Practice with and knowing your equipment.
  • Forethought about the scene.

Having everything ready is the key. Then when all the elements of the scene come together all you do is frame it and capture. If you succeed in that, you will also make a swift shot. Because, in fact, you have little to do. Speed and accuracy is about being ready with everything and having the minimum to do when the right events pull the shot together.

Comments, additions, amendments or ideas on this article? Contact Us
or why not leave a comment at the bottom of the page…

Like this article? Don’t miss the next — sign up for tips by email.

Damon Guy - Netkonnexion

Damon Guy (Netkonnexion)

Damon is a writer-photographer and editor of this site. He has run some major websites, a computing department and a digital image library. He started out as a trained teacher and now runs training for digital photogs.
See also: Editors ‘Bio’.
By Damon Guy see his profile on Google+.

Portrait context is about the artist as well as the subject

Portrait context is important in photography

• Portrait context is important in photography •
[Image taken from the video].

Art in a portrait…

…includes much more than meets the eye. Photographers taking their first steps with portraits often see only the person in front of them. But the portrait context also includes the scene, the artist and their culture.

Portrait context – a historical boundary

Portrait art historically reflected the fashions and ideas of the time. For example early civilisations tended to depict people in profile. These flat two dimensional portraits were a mark of early Egyptian art. Much later, in the 14th century, the Renaissance masters did portraits as a three dimensional rendering on the canvas. They used artistic tools the Egyptians did not have.

Today the portrait context is still related to the knowledge and experience of the artist. And, they are partly bound by the conventions of their time, culture and so on. You can never fully be divorced from your context. But, we are free to take a wider, more context-free view of portraits. Artists and photographers are trained to take a broad, imaginative outlook. Art and photography schools give the imaginative freedom of students a wide scope. Breaking the bounds of traditional portraiture is a part of that freedom.

Breaking the bounds of portrait context takes careful thought

Portraiture starters often only see their subject through “everyday” eyes. Most of us are not trained in the ways of imaginative scene setting. So we tend to take portraits that represent our every day view of people. There is nothing wrong with that. Family, friends and others make a fun photograph. The images can be pleasing and satisfying.

Great portraiture goes deeper than that day-to-day view. To push the boundaries of your portraits, think in a different way. The portrait photog should consider their own vision and experience. They also need to think of the environment, cultural context, story and location of the shot. The photographer should understand who they are as well as knowing something of the portrait subject.

Of course knowing these things does not produce a great image. What makes a great portrait is pre-vision. It is how you bring out something in the subject, the scene or the portrait context that is remarkable. This takes a unique perspective.

The art of portrait photography

A strong portrait steps out of the everyday view. In the video we get the perspective of a number of portrait photogs. Each has looked into the portrait context in which they are working. With forethought and insight they have constructed artful portraits. They have also made driven and powerful images of their subjects. Each has a clear understanding of the portrait context. Each has a clear view of what they want to say.

The lesson is, look for a point to make. Understand both what you are working with and what you are working to express.
PBSoffbook  External link - opens new tab/page

Comments, additions, amendments or ideas on this article? Contact Us
or why not leave a comment at the bottom of the page…

Like this article? Don’t miss the next — sign up for tips by email.

Damon Guy - Netkonnexion

Damon Guy (Netkonnexion)

Damon is a writer-photographer and editor of this site. He has also run some major websites, a computing department and a digital image library. He started out as a trained teacher and now runs training for digital photogs.
See also: Editors ‘Bio’.
By Damon Guy see his profile on Google+.

Perfect pictures, perfect lies

Thoughts of the past • Perfect pictures, perfect lies

• Thoughts of the past •
Beauty shines through in a persons character.

The inner person…

A portrait should capture something special about the person. That special thing comes out in many ways. A different way in everyone. It’s always there. You cannot edit it in. But you can sure edit it out. Perfect lies are created when your edits make a deception of the original picture.

Perfect pictures

I love working with older people. Their characters are full and their faces tell you a lot about that inner person. Through their face they shine out as people who have experience and depth. That complements the story they tell you in words. At a recent shoot I was lucky enough to meet a large number of veterans.

We talked and I made photos of them. It was a lunch held in their honour. Many of them talked about what they did in the war. There was pride in the service they did. They talked less about what happened to them. I sensed a deep sense of melancholy in some of the words I heard. It was clear that these people remembered much more than they told.

Beautiful people are much more than just lovely faces. In our modern culture we shy away from imperfection. Every magazine shouts about the perfect in something. Faces, homes, products and many more things show some aspect of the perfect. Other media are the same.

In the faces of these veterans I saw perfection of a different kind. A completeness that comes with age. It is not the wrinkles or the blemishes. Those are surface things. It is about the roundness of experience, the depth of feeling and an acceptance of the world.

The images I made of these lovely people will not be found in magazines. They were not perfect pictures. These beautiful people showed the many imperfections we all know come with age. The point is, to me, that makes them all the more beautiful and interesting.

Perfect lies

The modern media that sell perfection create a world of perfect lies. The beauty in a person is swapped out for the false beauty made in Photo editor applications. My gentle adventure at the veterans lunch is the opposite of the smooth perfection found in the media today.

I have nothing against skilled editing. Photography today demands precise editing. Perhaps to a greater degree than in the past. To develop a photograph always involved a certain amount of editing. Today, photo editors give us much more editing power than the people using chemical films had. It is this power that allows the creation of perfect lies.

It is a shame that the power of photo editors has taken the art to beyond the true story of the photograph. I use edits in my photography. It is an important way to bring out the best in an image in post processing. However, I draw the line at creating a fiction. For me everyone has a beauty that can be shown in some way or another. You don’t need to create a fiction to bring that out. Perfect lies are told by the creation of a deceptive fiction by editing.

In the video below we can see this fiction emerging with every stroke of the brush. I question the validity of such work. It is not photography. It raises questions about how the media manipulate our view of women in particular. And other aspects of our everyday lives are affected too.

I know there are arguments for and against extreme edits. In some cases they create art. But the perfect lies are there when there is deliberate deception. Once a picture tells a story to deceive with intent, actual damage can be done. Modern media would have young people believe that gaunt is good. So many women hate their own bodies because they do not fit the size zero myth. Those same women have beauty of their own. They have had it all along. It is just taken away from them. It is flushed away by unreasonable expectations and the perfect lies of modern photo editing. That is a very sad thing.

How perfect lies are created

In the video below is an extreme make-over sequence. While it shows great skill, it tells a story that is a clear deception. It is important not blame people for this work. There is no conspiracy. This work is a cultural mindset. It is one we need to be aware of in our own photography. For me it is one I would like us to leave behind.

asdesigns1

If you are interested in some other extreme makeover videos there are plenty. YouTube has pages of them. Here is a sample of perfect lies in the making… PhotoShop extreme makeover videos.

Reflecting on ways to work with the best light

Reflectors

• Reflectors •
A session with reflectors is a way to control the sun
and get the lighting you want on your subject.
[Image taken from the video]

The control of light is not always obvious.

Reflectors and other shapers of light make a big difference to the scene. Often photographers go to great lengths to work with reflectors. Here are a few simple tips to bear in mind when you want to shape light – particularly outside.

When you need a reflector

You can use reflectors in any type of environment. They are best used where you need to even out the light on your subject. Remember that if you are using a reflector the source light is the main or key light. The reflection from your reflective surface is in proportion to the power of the key light. This proportionality is important. Often, more than one light is difficult to balance. Using only one light source you can create a natural balance with the reflectors. It is difficult to get reflected light out of proportion. There is always some loss in the reflection. This ensures that the light on your subject will be less intense than the key light but related to it by its proportion. The result looks more natural.

Shade is as important as light

When you are working in the fullness of light it is common to be confronted with strong reflections from the subject itself. Specular highlights, reflections off of curved surfaces and shiny areas are the most difficult to control. However, bright reflections on larger areas like flat areas of glass or even areas of flesh like bare arms can also be really difficult to control.

If you have these sorts of reflections you can reduce the worst of them using a polarising filter. Of course the only sure way is to reduce the intensity of light overall. This means creating shade. Again, the most important issue here is to reduce the light in proportion to the ambient light around you. This helps the light to remain looking natural because it is derived from the main light once again.

Don’t spend a fortune

For most of us expensive reflectors and shade creators are out of reach. As with most things however, the amateur can create the same effects as the professional without the expenditure.

Reflectors can be created from white sheets, curtains, even large pieces of card. These things can be purchased inexpensively and propped up easily to create the effect you want. What is more important than the material that creates the reflection is the way you use the reflections themselves. It is important in very bright light that the reflections are used to infill darker areas of shadow to even out the contrasts. Then your camera can cope and you will see a more controlled light on your subject.

Shade too can be created easily. Use solid card sheets or even blankets on poles. I do quite a lot of car photography. Often specular highlights can be eliminated by hanging a thin white sheet on two poles in the line of the light. The main light – normally the sun – will penetrate a thin sheet so that a proportion of the light will continue to illuminate the subject. Again, the proportionality is important. Things always look more natural if the light is proportional to the surrounding ambient light.

Using Reflectors – Photography & Video Tutorial

In the video J.P. Morgan, a successful photographer, uses lots of resources and equipment to manipulate light in all sorts of ways. First, he looks at how the light is best exposed to the subject. He uses the light to create a rim light. This helps to reduce large, strong areas of reflection and helps to define the body shape.

When he has the light direction right and well controlled he uses a gold reflector to give the light a pleasant colour – an evening sunlight yellow. This lifts the colour of the faces in the shot.

The other thing that J.P. Morgan does is use the shade and reflectors to create fill. The sun provides the main light but the levels of light off the reflectors allows a lower level light intensity creating a natural light. This does not look like it has been deliberately projected at the subjects. It is a soft light that beautifully wraps around the children. It evens out the contrast between the brighter light and the darker areas.

Look at the way the equipment is used in the video. But spend your time afterwards thinking about how you can substitute affordable reflector materials and ways to create shade. Making your own kit can be fun and just as effective brand equipment.

The video is just over six minutes.

The Slanted Lens DSLR Lighting Tutorials  External link - opens new tab/page

If you want to buy an affordable reflector set, here is the one I use. These reflectors work very well and are flexible in the way they can be used. The whole set also folds away into a great compact bag. The pack contains five effects (silver, gold, white reflector/diffuser, grey and black)…

42″ Photographic light reflector set (5 in 1)
Ex-Pro 5 -in- 1 Photographic Light Reflector – 42″ (110cm) Silver, Gold, Black, White & Translucent, Collapsible.
This is an excellent reflector set, robust and effective as well as easy to store. I highly recommend this as a standard piece of equipment.


Comments, additions, amendments or ideas on this article? Contact Us
or why not leave a comment at the bottom of the page…

Like this article? Don’t miss the next — sign up for tips by email.

By Damon Guy (author and Photokonnexion editor)

Damon Guy - Netkonnexion

Damon Guy (Netkonnexion)

Damon is a writer-photog and editor of this site. He has run some major websites, a computing department and a digital image library. He started out as a trained teacher and now runs training for digital photographers.
See also: Editors ‘Bio’.

Visual toolbox for photographers

Sharpen up your creative photography…

It’s easy when starting photography to over emphasis the importance of gear. In fact it’s ‘photographers eye’ that really makes the difference. Your vision and insight into a scene are critical to producing a wonderful image.

Sage advice from a world master

The Visual Tool Box by David duChemin is all about the skills of composition. He goes into depth around the background ideas which help you look at a scene. The ultimate success in photography is to make your image a pleasure to view. Aesthetics rule – it’s as simple as that. This book is dedicated to teaching you the tools you need to develop the ‘eye’.

David duChemin says,

These are the lessons I wish I’d learned when I was starting out.
The Visual Tool Box by David duChemin

This is my kind of book. He writes superbly, in simple, readable form. His examples are excellent and the pictures are just amazing. But most of all the book is organised for learners to extend their knowledge in easy, well structured steps. This book is all about putting new tools in your photographic tool box and it achieves that with an ease that any beginner will find a joy.

Composition

The book is packed with examples of the sort of compositional ideas that really work – for anyone. Just look at some of the topics covered…

  • Manual
  • Optimize Your Exposures
  • Master the Triangle
  • Slower Shutter Speed
  • Learn to Pan
  • Use Intentional Camera Movement
  • Use Wide Lenses to Create a Sense of Inclusion
  • Learn to Isolate
  • Use Tighter Apertures to Deepen Focus
  • Use Bokeh to Abstract
  • Consider Your Colour Palette
  • Lines: Use Diagonals to Create Energy
  • Lines: Patterns, Lead my Eye, Horizons
  • See the Direction of Light
  • Light: Front Light, Side Light, and Back Light
  • Quality of Light: Further Consideration
  • White Balance for Mood
  • Light: Reflections, Shadow, Silhouettes, Lens Flare
  • People
  • Experiment with Balance and Tension
  • Use Your Negative Space
  • Juxtapositions: Find Conceptual Contrasts
  • Orientation of Frame
  • Choose Your Aspect Ratio
  • Use Scale
  • Simplify
  • Shoot from the Heart
  • Listen to Other Voices (Very Carefully)

And there is plenty more content to complement and extends these ideas. What’s not shown in a list is the excellent and sage advice throughout the book. I will let David duChemin have the last word…

Pace your-self. Anyone can master a camera; that just comes with time. It’s the other stuff — learning to think like a photographer — that takes so much work and allows this craft to become the means by which you create art.
The Visual Tool Box by David duChemin

And it is thinking like a photographer that you will quickly learn from reading this book.

How to buy this great book

This book was originally published as an ebook. However, it is no longer available in that form. The book has moved into the real world. It will be available on Amazon as a Paperback From 31 Mar 2015.
The Visual Toolbox: 60 Lessons for Stronger Photographs (Voices That Matter)You can per-order the book from Amazon.

Comments, additions, amendments or ideas on this article? Contact Us
or why not leave a comment at the bottom of the page…

Like this article? Don’t miss the next — sign up for tips by email.

Damon Guy - Netkonnexion

Damon Guy (Netkonnexion)

Damon is a writer-photographer and editor of this site. He has run some major websites, a computing department and a digital image library. He started out as a trained teacher and now runs training for digital photogs.
See also: Editors ‘Bio’.
By Damon Guy see his profile on Google+.

The power of light and shadow

Facial shadows

• Facial shadows •
Image taken from the video.

Great portraits rely on shadows

Shadows define a portrait. So it is no surprise that good lighting to get the shadows right is a wonderful idea. But what most people don’t realise is that, almost every time, more lights make things more complicated. One light is almost all you will ever need to get a face right. The rest can be done with a reflector.

Shadow work

In the video Mark Wallace shows us how the face can be properly illuminated, how to do it and more important how to make it look beautiful. He looks at ugly shadows and hard light and explains how to remove them and subdue them using soft light. In all, this is one of the best best portrait lighting tutorials I have seen on video. Enjoy it. There is some really useful stuff presented in a simple and understandable way.

Adorama TV  External link - opens new tab/page

Comments, additions, amendments or ideas on this article? Contact Us
or why not leave a comment at the bottom of the page…

Like this article? Don’t miss the next — sign up for tips by email.

By Damon Guy (author and Photokonnexion editor)

Damon Guy - Netkonnexion

Damon Guy (Netkonnexion)

Damon is a writer-photog and editor of this site. He has run some major websites, a computing department and a digital image library. He started out as a trained teacher and now runs training for digital photographers.
See also: Editors ‘Bio’.