Tag Archives: Safety

Twelve Simple tips for atmospheric candlelight shots

Candles put out a wonderful light…

Everyone feels the atmospheric impact of candlelight. The colour and the low light seems to draw you in. Capturing that light is easy with a few simple hints. Lets look at what is needed…

Tripod…

There is nearly always low light associated with candle photography. That means working with longer exposures. A tripod is excellent for that. Indoors, beware of a wooden floor, any move you make can be transferred to the tripod. Floor vibrations can ruin a shot or make it soft. For sharpness remember to use the camera timer for the shot or a remote shutter release.

Lighting…

The best way to view candles is by their own light. Because they don’t use a tripod many people are tempted to use flash. Unfortunately flash will over-power the candlelight. It will take out the colour from the light and tend to create hard, sharp shadows. It will ruin the atmosphere of the candlelight. Make sure you switch off your flash. If you need more light the you can use as many candles as you need to raise light levels. They don’t need to be in the shot, but they will keep the light the same throughout the shot.

Composition…

First decide if your candle or candles are the subject or are props. This decision will affect your focus and how you lay out your scene. Candles can create a strong bright spot in the scene. If it is too bright the flame will form a burnt out white spot. Once you have arranged your scene, ensure that the candle will only draw the eye a small amount unless it is the subject. You should consider the placement of the candle in a way that might minimise the impact of the bright flame spot.

Positioning…

If all your candles are close together the light will tend to act as one light source. This will tend to act as a hard light creating more defined shadows. If you want the light to be softer and the shadows with less well defined edges set your candles further apart. If the light is to be cast on a face then soft light will be more flattering.

Movement…

One of the peculiarities of working with candles is that the flames are subject to the slightest air movement. Unfortunately candle flicker is attractive to the eye in real-time; but looks like a loss of sharpness in a still image. It is quite useful in close focus shots with a candle to use an air break of some kind nearby to stop air movement. In a table-top study use a large sheet of card to one side out of shot. That will help prevent air movements. If not, keep an eye on the flames when shooting. Try to capture the flame upright or, if using more than one flame, make sure they are all going the same way. They look more natural that way.

Since candle light is low intensity, make sure you also prevent other sources of movement in the shot. They will inevitably be blurred as the shot will be using a long exposure. This will look like a distraction against still flames.

Can you write? Of course you can!
Write for Photokonnexion...

We would love to have your articles or tips posted on our site.
Find out more…
Write for Photokonnexion.

Light intensity…

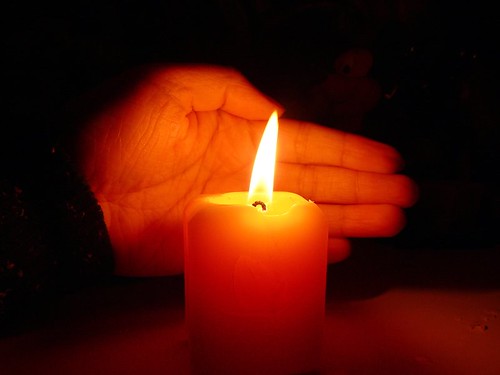
The light from a candle can be made much more intense if you use something to catch the light from the candle. A face, hand or other objects bring alive the picture and complements the candle. The presence of the object acts to reflect the candlelight. Light flesh tones are particularly good in this respect since the flesh colour is tonally close to the candlelight hues and they act as a reflector to bring out the light.
From

From “Candle Series” by Spicedfish
From “Candle Series” by Spicedfish on Flickr External link - opens new tab/page

Using reflectors in a candle scene is a great way to raise the light intensity. You can find other types of surface than the one in this picture in most scenes. Walls, ceilings and even off-shot reflectors are all good. Be careful to use neutral colours. Colour reflectors will affect the colour of the scene. If you are using a big card out-of-shot make it white. This will reflect the same colour light back into the scene, filling in the light.

Shadows…

The other side of light intensity is the shadows. The darker tones and strong contrasts of candle shots create most of the atmosphere. Spend time studying the shadows created in your scene. Strong contrasts are great subjects. If you create shadows that fall badly across your scene it will impact on the overall effect. The best use of shadows is often to the edges of the shot. If the light fades out to edges this holds the scene into the shot – naturally focusing the eye. Work with shadows to ensure the mood is harmonious.

Additional lights…

If you want to use fill light in the scene try to match the quality of light from your candles. Use soft light sources and natural light with hues matching the candles. Natural light will fill the scene well but tend to neutralise the colour of the candle light. The warm glow of candles is a great mix with evening, low-intensity light.

Some people use light with gels to give a warm glow. Warming gels can also be used with a flash. However, beware the power of flash. The candles will lose their soothing effect if all the shadows are taken away around the base of the candle and harsh shadows are introduced from one side. Typically use a diffused flash on the lowest setting – it also helps to be a distance away from the candles as well.

Multiple candles…

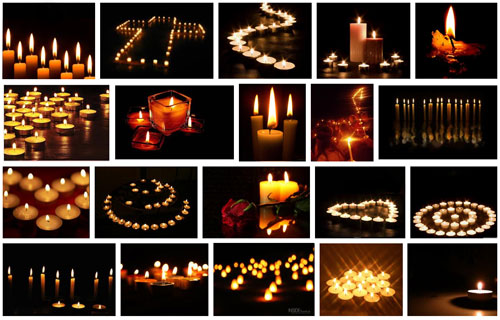
When working with one candle as subject the main focus of the shot is clear. However, there is a lot of scope for creativity. Consider two main issues. How to layout your candles and how to use the overall light with the layout. Using candles for making patterns is great fun and can produce excellent shots.

Patterns with candles

Making patterns with candles
Click to view Google Images “Candle Light” search

Try to keep the scene simple. Overlapping candles or indistinct objects in the pattern are confusing. Work with the sharp contrasts and keep your pattern well defined.

Exposure…

How long should you make your exposure? This depends, like any scene, on your light levels. To get more light in the exposure a long shutter speed is suitable for most candle shots. A range of 1/15 second down to 2 seconds is a good starting range with an ISO of 100. Camera settings vary significantly with reflectors, multiple candles or fill lights. Experiment to get it right. Aim to make the shot moody or atmospheric while providing detail for the eye to look at around the candle flame(s).

The main exposure concern with dark or shadowy shots is digital noise. If ISO is too high you will get more noise. It is better to use a low ISO, say 100 and have longer shutter opening. This reduces noise and means more detail is visible.

Lenses…

A fast lens allows a wider aperture. Faster lenses will allow a quicker exposure than a smaller aperture. Nevertheless, when experimenting check the depth of field. With big candle patterns, or larger subjects, a very wide aperture will give a very shallow depth of field. Too shallow and you will lose a lot of detail. On the other hand, lots of candles in the background with a shallow depth of field will produce pleasing bokeh. For choosing your lens, more than other aspects of your set-up, you need to have a clear vision of what you want your final shot to look like. Then do some “Chimping” to check results.

Prime lenses, especially the 50mm, will give an approximation to the human eyes. To capture the mood of a scene a 50mm will help. A wide angle lens close-up can provide great exaggerations of candle tallness or broadness – depending on lens orientation. There is great scope for artistic interpretation. Also remember that zoom lenses tend to foreshorten, reducing the apparent depth of the shot. With a zoom lens place your candles to give an impression of depth.

White balance…

The warm glow of candles is attractive. If you change the white balance you will change the characteristics of the warm glow. Candlelight shots are about moodiness and atmosphere. It is worth playing with the white balance to influence the shot and increase moodiness, but be careful you don’t remove it. You only need to adjust white balance when shooting in *.jpg as it will be fixed once the shot is taken. If you are shooting in RAW you have more flexibility with settings in post processing to control colours and the final exposure. If you cannot shoot in RAW then, again, make sure you do some “chimping” to get the colours right.

Being safe…

Although fun, candles are naked flames. It is all too easy in low light to leave something close to the candle. Fires start quickly and spread fast too. Feel free to experiment but make sure you don’t accidentally knock over candles, touch wall paper with one or do something else to set off a fire. Never leave candles alight and unattended. Always blow them out and wait for the smoke stop raising before leaving.

find out more...Photokonnexion tips by email
If you enjoyed this article please sign up for our
daily email service.
                                                 Find out more
#11030#

By Damon Guy (author and Photokonnexion editor)

Damon Guy - Netkonnexion

Damon Guy (Netkonnexion)

Damon is a writer-photog and editor of this site. He has run some major websites, a computing department and a digital image library. He started out as a trained teacher and now runs training for digital photographers.
See also: Editors ‘Bio’.

A quick look at ruins and countryside

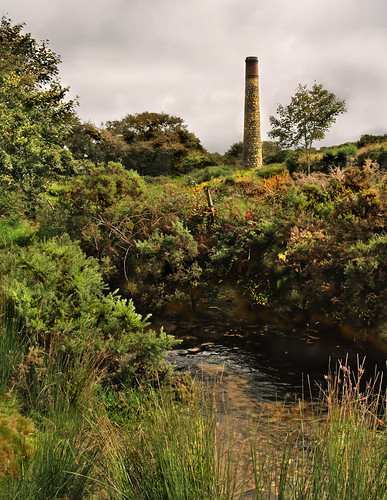
• Lonely Bodmin Chimney •

• Lonely Bodmin Chimney •
Click image to view large
• Lonely Bodmin Chimney • By Netkonnexion on Flickr External link - opens new tab/page

The influence of man on the countryside is worth photographing.

For centuries we’ve created substantial buildings in open country. Today, these have become an intimate part of the rural scene. For photographers they provide an interesting focus for landscapes. Sometimes quaint, sometimes aesthetically pleasing, these old relics can provide great interest for the eye. They draw the viewer into the scene and provide a starting point for the appreciation of the rest of the image.

Finding ruins and old buildings

In the UK the Ordinance Survey  External link - opens new tab/page sell maps that carry a key which marks out old, derelict and protected buildings. Other countries have similar mapping systems. Surprisingly some online mapping systems are not so good at highlighting these features of our history. Unless, that is, they are part of some sort of commercial or historic leisure opportunity on the site.

I was crossing Bodmin Moor in the West Country, UK, one day and came across the chimney above in a tiny country lane. Well off the beaten track. Bodmin Moor, with many other places in Cornwall and Devon, was once a thriving mining area. The locals extracted tin. Sadly the workings bring little prosperity to either county now. But many of the old mine buildings, and especially the distinctive chimneys, bring many tourists. In the parks and moors these mines are preserved and they provide brilliant photographic opportunities. The ones that are away from the crowds are best. A lonely feature in a landscape is always more attractive than a solitary chimney surrounded by heavily trodden ground, tourists and coaches.

So how do you find these hidden gems? Here are some things you can do…

  • At walkers/backpackers shops ask the staff. They often know local interest spots.
  • Get to know some local people in places you stay.
  • Tourist information offices are found world wide and often know of hidden places.
  • Study maps and aerial views of places you are going to visit.
  • Ask in local camera shops.
  • Contact the local camera club to your destination before your trip.
  • Search out ‘interest’ booklets written by local people for local people – often found in walkers/backpackers shops
  • Contact historical and walkers societies in advance of your trip
How should you photograph ruins?

There are some basics you should think about…

Use perspective to exaggerate depth: Find a long wall or fence, even ancient pathways/hedges to shoot along and use these to create perspectives and lines to draw the eye into the picture and create depth.

Rule of thirds: In the picture above the chimney is on a third. The rule of thirds always helps with a more dynamic placement of solid objects in the landscape.

Foreground, mid-ground, distance: These help create layers in the picture. Picture something close to you as detailed and tail off the detail on the other side of some breakpoint in the image. My little steam in the foreground (above) not only provides detail, but acts to break up the picture into fore and mid-ground too. Nearer the horizon the chimney provides interest drawing in the eye and creating depth.

• Rock backdrop •

• Rock backdrop •
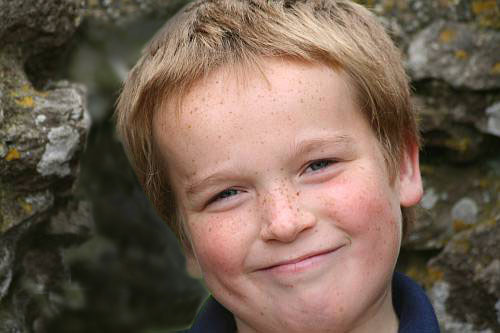
The textures on the sites of ruins are often great for portraits


Detail and texture: Some great things can be found around ruins, derelict buildings, mines and old industrial sites. Think of old spillways, waterways, old machinery, the wonderful textures, rocks, farm animals, heaps of mine spoils, rust, old beams of wood… the list is endless. They all provide great photographic opportunities.

People! ruins and derelict sites make great places for portraits. The textures and variations of the scene both make great backdrops. Look for surfaces that have high contrast. Lots of mid-tone highlights and darks mixed so that the texture stands out. If the light is no good then you can side light with an off-camera flash to exaggerate the texture in the rocks.

Light painting: There are some brilliant opportunities for lighting up these sorts of places fat night with all sorts of exotic lights, colours and fun light painting shots. You can find out more about light painting in this post: Night photography – let the sparks fly!. Be mindful of your safety – some of these places are dangerous and make sure you get any permissions you need before invading a site with bizarre night lights. Someone may object, especially on private ground.

Opportunities

Ruins and the like provide great opportunities for landscapes, portraits, studies in texture and fun shots. Be on the look out for local situations for you to get to know and plan ahead for when you are away.

find out more...Photokonnexion tips by email
If you enjoyed this article please sign up for our
daily email service.
                                                 Find out more
#11030#

By Damon Guy (author and Photokonnexion editor)

Damon Guy - Netkonnexion

Damon Guy (Netkonnexion)

Damon is a writer-photog and editor of this site. He has run some major websites, a computing department and a digital image library. He started out as a trained teacher and now runs training for digital photographers.
See also: Editors ‘Bio’.

Some quick tips for still life inspiration and shots

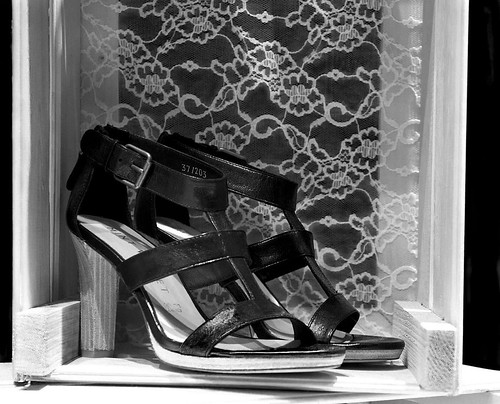
You can find some surprisingly artistic displays in shop windows.

You can find some surprisingly artistic displays in shop windows. It is easy to get some great ideas for still life work later. Or, you can just photograph them in the shop.
Click to view this image in full size.

Get some easy but creative still life shots

I love shop windows. I especially like those boutique type shops where the owner has a sense of art. Shop window displays are by nature well designed, artistic and attractive. Well, they are if the owners want to entice people into the shop. Here is an idea to help you out with your still life shots.

Still life inspiration

Window displays are usually simple and attractive. The shop owner doesn’t want to spend a lot of money on the display. They do want it to draw customers into the shop. Take advantage of this artful situation. Look at the the picture above. It’s a simple box constructed from rough wood, lined at the back with a scrap of net curtain. Wow. Effective. You could display all sorts of things in this. There are also dozens of ways to light it. Here is a simple and effective way to really emphasize your product, your still life, your collection… you name it. Great inspiration. So, take a walk up the high street and see what still life shots you can think of from peering into shops. (More after the jump…)

Display photography

The shot above, ‘Shoes in a box’, was actually taken in a shop window. I do quite a lot of these. The shots are easy to do. They give you great ideas too. More to the point, if you take them after dark they are usually under pretty good lighting too. One walk up the high street after dark about every month and you will come back with a crop of great still life photographs. Everyone will think you have great creative skills. In fact you are getting ideas from shops and getting some great practice.

Here are some points to help you and some things to consider…

  • Remember to be properly prepared for night photography.
  • Turn off auto-focus – focus manually. Auto-focus will focus on the window glass if reflections get in the way.
  • If you use a flash make sure that you know how to turn it’s power down. Shop window shots are quite close-up and flash is pretty intense. It is possible to overpower the shops’ display lights. This will seriously change the character of your shot.
  • Use a diffuser on a flash to make sure you don’t get hard light flashes off the shop window.
  • Reflections from street lamps on the glass? Hang your coat on a tripod to block the light beams or get your friend to hold the coat up.
  • Use off-camera flash. It is best when shooting through glass. You can angle the flash away from the axis-of-light to your camera. Camera mounted flash tends to give a strong flash-reflection right in front of you.
  • Shoot from the side (at an angle), not straight at the glass. You will be less likely to see your own reflections in your shot.
  • If you do this at night make sure you have a friend for safety and help.
  • Don’t look suspicious. If you work openly and tell people what you are doing if asked everyone will laugh and be on their way. I have done this for a number of years and never had an ‘incident’.
  • If you are accosted or you appear to have upset someone then stop what you are doing, apologise and move on.
  • No-one, including the police can make you delete a photograph. See: The Right to Take Photographs (UK relevant).

I have had some great fun and some great ideas with window-shooting over the years and you will too.

By Damon Guy (author and Photokonnexion editor)

Damon Guy - Netkonnexion

Damon Guy (Netkonnexion)

Damon is a writer-photog and editor of this site. He has run some major websites, a computing department and a digital image library. He started out as a trained teacher and now runs training for digital photographers.
See also: Editors ‘Bio’.