Category Archives: Tips Tutorials & Techniques

A teaching or tips and tricks article.

Creative slump? Just cannot get going? Try thinking inside the box!

Creative slump? It is easy to get into one…

Often, as photographers, we seem to lapse into a state of almost mindless snapping. For some reason we simply cannot get into a productive frame of mind. Creative thoughts just do not surface.

In A Creative Slump? Get out of it by thinking "Inside" the box!

In A Creative Slump? Get out of it by thinking “Inside” the box!
Image taken from the video – see below.

Photography is no different to any other creative activity. To break the Creative Slump mind-set, you need to find a technique that gets you out of it. There are three things that I sometimes find helps me to get more creative. They are simple…

  • Get more sleep!
  • Start a new project;
  • Work with someone else on something.

Of course these do not always work. Sometimes it is just easier to vegetate. The problem with that is, you may never get out of the slump. It is better to have some active way to refocus and get out of the creative slump.

Trick your mind into being creative

The video helps you to get into a new way of thinking. It reviews a time-honoured way of describing creative potential. However, it changes the way you approach the actual problem of lack of creativity. A very simple idea. But, WOW, so powerful. So, do watch this video. Then next time you feel a Creative Slump coming on, use this technique.


Uploaded by TED Talks In a creative slump? Trick your mind into being creative - Video. | External link - opens new tab/page – an excellent resource for self-developers, thinkers and innovators.

Comments, additions, amendments or ideas on this article?
Contact Us or leave a comment at the bottom of the page…

Like this article? Don’t miss the next — sign up for tips by email.

find out more...Photokonnexion tips by email
If you enjoyed this article please sign up for our
daily email service.
                                                 Find out more

Damon Guy - Netkonnexion

Damon Guy (Netkonnexion)

Damon is a writer-photog and editor of this site. He has run some major websites, a computing department and a digital image library. He started out as a trained teacher and now runs training for digital photographers.
See also: Editors ‘Bio’.
See also: Profile on Google+.

Making an abstract image – opening your eyes

A personal path to making an abstract by Alison Bailey
Interplay By Alison Bailey.

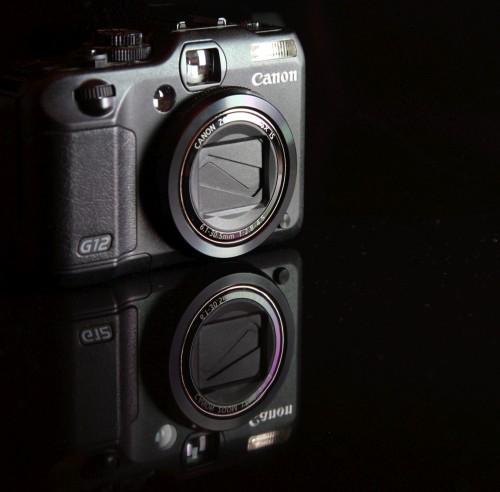
Abstract image :: Interplay.
By Alison Bailey.
Seen on: 365project.org Interplay By Alison Bailey | External link - opens new tab/page
Dated: 15/01/2017
Click picture to see full size image.

I became serious about photography through doing a 365 project My 365Project | External link - opens new tab/page in 2011. I got my first DSLR camera for Christmas that year and have been happily obsessed ever since.

At the end of 2014 I had a eureka moment: abstract photography was for me. It’s ideal for depicting what moves me most in my world – the aesthetics of the characteristics of things. Abstract photography’s exciting, exasperating, exhausting and exhilarating. I love it. I hope you will too.

Making an abstract image

Abstraction is intensely personal and one of the most imprecise art forms. There are no recommended settings or specific lenses that will produce an ‘ideal result’. The accepted ‘rules’ of composition are often deliberately broken or disregarded. There’s no magic formula that will guarantee success. This article aims to provide you with thoughts, ideas and suggestions, along with information about how I work. These may help you to make an abstract image or gain experience to make many of them.

Groundwork

I began my journey by researching exactly what is meant by ‘abstract’. I didn’t find a universally accepted definition. The definition of abstract photography in the Photokonnexion glossary hits the spot for me. It is easy to understand and includes a list of the different aspects of abstraction. It makes a great reference guide for use in the field. I re-read it occasionally for revision.

When I think about an abstraction, what I see in front of me is not manifested in my mind’s eye. Well, not as a picture. I don’t ‘see’ – I experience. Things come to me as impressions with verbal descriptions. I have recently learned that when people say they ‘see’, it’s not shorthand for a thought process that’s like mine. They really do make pictures in their heads. I first thought we all imagine in the same way. It seems that is not true. ‘Seeing’ an abstract is an intensely personal thing. You have to do it your own way.

Studying, analysing and commenting other people’s work teaches you a lot. So, I researched the idea of the ‘abstract image’ on the internet. I viewed many abstracts, examining their composition. I had fun, gained insight into what abstracts can look like and developed ideas and personal preferences too.

The next step toward making an abstract image

I began habitually looking everywhere for shapes, structures, patterns, lines and textures. I looked for them whether I was taking photos or going about daily life.

Then it was time to put what I’d learned into practice.

If you’re unsure where to begin, here are some ideas to get you started. Three dimensional artworks can be inspirational. They are a good choice for the abstract image novice. Less representational work is particularly suitable. Find a piece you like and can legitimately photograph. The artist’s concept and execution of it will give you some useful pointers. However, your appreciation of the work is key to how you interpret it. Beyond works of art, here are some other sources…

  • Look at items in your house. The kitchen is a great source of inspiration.
  • Is there a type of photography you are especially enthusiastic about?
  • Architecture: plenty of lines, shapes and patterns, often textures too.
  • Street scenes (people and/or transport) have many abstract sides.
  • Wildlife and fast-action sports photography lend themselves to expressing movement through abstraction.
  • Macro photography shares an emphasis on detail so it too lends itself to abstract image work.

Keeping an open mind and expecting to find a promising subject is a good recipe for success. The more you look for subjects, the more you will see, sometimes in unlikely places. Whatever you choose, it is important it moves you in some way. A way that makes you care about it.

Rhythmic - I spotted this chair stack in an out-of-the-way corner of an historic cathedral.

Abstract Image :: “Rhythmic”
I spotted this chair stack in an out-of-the-way corner of an historic cathedral. Their lines caught my eye. I felt they had a rhythmic quality.
Breaking the pattern, a compositional device often used to focus the eye, wasn’t appropriate here. The rhythm – the whole point of the image – would have been lost.
By Alison Bailey.
Seen on: 365Project.org Abstract Image :: Rhythmic | External link - opens new tab/page
Dated: 10/07/2015.
Click picture to see full size image.

Studying the details

Once you find something meaningful to you, examine it closely from all angles. You are looking for a way to portray it.

This is a process that cannot be rushed or forced. It is important to be relaxed and receptive. Take a long, leisurely look, soaking up the details. Ask yourself:

  • What do I feel about this?
  • What visual aspects – lines, shape, texture, etc – make me feel that way?
  • How can I present, compose, those aspects to engage viewers and tell them what I saw?

Look carefully. Allow the answers to those questions, and any other ideas that might occur, time to form in your mind. For the best results, keep these answers and ideas in mind at all stages of making an image.

I study a subject via the camera’s viewfinder to remove distractions from the periphery of my vision. I often take photos at this stage too; the act of pressing the shutter button helps me think.

Layers upon layers :: Detail of a sculpture comprising seven pillars of piles of slates.

Abstract Image :: “Layers upon layers”
Detail of a sculpture comprising seven pillars of piles of slates. The profusion of layers and the arrangement of the slates are wonderful. I spent nearly an hour looking and studying them. The light – bright, midday sunshine – cast hard shadows that define and separate the slates and augment the idea of profusion. I composed to create opposing diagonals that prevent a jumbled confusion of lines by drawing the elements together.
By Alison Bailey.
Seen on: 365Project Abstract Image :: Layers upon layers | External link - opens new tab/page
Date: 20/11/2016.
Click picture to see full size image.

Making the abstract image

Choice of lenses, use of light, camera settings and how close you can get to your subject are all factors to take into account when composing your abstract image.

It’s usually not possible for me to use a tripod or flash. I prefer natural or constant, artificial light, anyway. So I have to work round resulting restrictions. You should consider how best to make use of light, depth of field, angle, and point of focus. A good angle and an appropriate focal point can make or break the flow of a composition. That is especially true with a shallow depth of field.

I have discarded many shots owing to poor choice of focal point. I still struggle with it. However, an effective composition is important. So it is worth the effort to get the focal point right.

Once you are satisfied with your composition, take a photo, maybe several. It is good to experiment with other settings and angles, you might discover another approach to your subject that is more meaningful to you than your original idea.

Abstract image :: “Thorny subject”.

I had intended to compose for the spiral created by the arrangement of the leaves of this plant but realised I was more taken with its thorns. I angled to emphasise them whilst, again, looking for a cohesive composition. To emphasise the spikiness of the thorns stronger tonal contrasts were created in processing.
By Alison Bailey.
Seen on: 365Project Abstract Image :: Thorny Subject | External link - opens new tab/page
Date: 30/09/2016.
Click picture to see full size image.

Assessing your work

After you download your photographs, consider and critique them. Take time to do this.

Don’t delete a shot straight away; experience might alter your opinion of it. If I am uncertain, I reassess a photo periodically, sometimes processing it, until I feel sure about it. I’m still mulling over a few taken a year or more ago.

Got a keeper? Then it’s time to add the finishing touches.

From photograph to abstract image

Thoughtful processing will take your photograph to another level. How this is achieved is very much a matter of personal taste.

I almost always process in black and white. Colour isn’t usually what my images are about. For me it will distract the viewer’s eye from the aesthetic aspects that I want to express, weakening the image’s impact. Other authors may take a different avenue. Final processing is very much a personal style.

I often choose to use high tonal contrasts to accentuate, even exaggerate, detail (see Thorny Subject above). My preferred method is to enhance clarity in the image processor’s ‘raw’ filter when developing the image for *.jpg. Then I adjust contrast, brightness and light levels in the main editor.

Whatever you do, the aim is to enhance your composition for maximum impact. You should work to help engage viewers with the aesthetics of your subject and give them the best chance of understanding the artistic intent of your image.

More after this…

The Edge of Vision: The Rise of Abstraction in Photography The Edge of Vision. A book about abstract photography. External link - opens new tab/page
There are few good books on abstract photography. So this historical view is welcome. It brings together the concepts and the art in abstract photography. Spanning the earliest images to modern processes with quality colour pictures too, the book includes up-to-date work from well known abstract photographers. The book gives readers an all-round view.
What readers said:
» Great buy! :: 5*
» A lovely book :: 5*
» Be educated and stimulated :: 5*
» …filled with deep and insightful articles and ideas to inspire. :: 5*
The Edge of Vision: The Rise of Abstraction in Photography The Edge of Vision. A book about abstract photography. External link - opens new tab/page


Completing the abstract image

Abstract image :: “Internal structure”
A macro image and a personal favourite. High contrast wasn’t appropriate here. I love the the way this whelk shell is constructed. The fragility of its exterior (suggested by the light tones) belies the strength of the internal structure, brought out by contrast created with natural, diffused light.
On reassessing, I felt the right-hand curve was drawing my eye down out of the frame, so I cropped the bottom of the image to draw the eye back to the pillar.
By Alison Bailey.
Seen on: 365Project Abstract Image :: Internal structure | External link - opens new tab/page
Date: 02/11/2016.
Click picture to see full size image.

After a day or two, I reassess my image. I take time to let the initial pride of authorship fade. Then, if needed, I do whatever is necessary to improve it. Any processing you want is allowable. It could even mean scrapping the image and starting again. It’s frustrating but not daunting; mistakes are excellent teachers and I want to learn and improve.

If that sounds serious, it is. But, it’s seriously tremendous fun. Happy abstraction!

Comments, additions, amendments or ideas on this article? Contact Us
or leave a comment at the bottom of the page…

Like this article? Don’t miss the next — sign up for tips by email.

Post contributed by :: Alison Bailey

Alison is a veteran participant in 365Project.org 365project.org | External link - opens new tab/page. She worked as an assistant librarian and a Civil Servant before becoming a traditional housewife and mother. She enjoys life with her retired husband – and her camera. Alison has at last realised that photography is the medium best suited to her artistic abilities. She is having serious fun striving to express, through her images, her love of, and fascination with, the world around her.

Using tablets in photography

[Todays article comes from contributing author, Honest Blossom]

Photo of a camera taken with a tablet as a light source.

Taking shots in soft light is so easy with a soft light source. A tablet can provide just that.
{Image by Damon Guy}

Mobile devices give us new tools

Mobile photography is on the rise. Yet despite high usage of smart phones and tablets many believe nothing beats photos produced on a DSLR.

Mobile devices do have a place in the photogs bag. Many pros use mobiles Tablets in photography | External link - opens new tab/page effectively. Photographer-author Anne Hamersky used her iPhone 5 to take photos for her book, “Farm Together Now Tablets in photography: Link to Amazon | External link - opens new tab/page (jointly authored with Amy Franceschini and Daniel Tucker)”.

Apart from being used as cameras, smart phones and tablets in photography have huge potential. They can assist with simple lighting, easy viewing of images, and controlling cameras.

1. Simple Lighting

You don’t need professional lighting equipment to create a soft light. Your tablet can create shadow graduations on your subject. How? Use a bright-white image on your screen (Download white-screen image here). Point the display toward your subject. It will create soft light and shadows. You can also use your smart phone to light smaller objects. The screen illumination produces white light. It’s a source of localized soft light in your image.

Table-top studio photo showing how to use a tablet as a soft light source.

The camera image at the top of this article was taken using the table-top studio set up in this image. Simple to do and simple to set up.

Use tablets in photography to create direct light too. Devices with built-in flash can be used as a photographic light. Use a flashlight (torch) app. There are also some LED light apps. that you can use on your tablet to create coloured light sources.

2. Camera Controller

Want to control your camera functions via your tablet? Try the Chainfire app for Android devices. You can use your tablet as a Canon EOS camera controller. Here is how to do it:

  1. Install the Chainfire app Tablets in photography: Chainfire app. | External link - opens new tab/page.
  2. Connect your DSLR to the tablet via a USB OTG connector line and a mini USB cable for the camera. {Tip: It’s best to get a longer USB cable}.
  3. Turn on the camera and the app to view the subject.

Navigating through the app is easy, as it uses the controls of your camera. Photos taken using the camera can also be saved to the memory card of the tablet. I suggest downloading photos to your computer later. Photos take a lot of space and are safer on a PC.

View a guide on how to use the Chainfire app Tablets in photography: Chainfire app guide. | External link - opens new tab/page. Also read more details on the Chainfire website Tablets in photography: Chainfire website | External link - opens new tab/page.

3. Field or Preview monitor

It’s advisable to opt for a tablet with at least a 9-inch display. The main purpose of using a tablet is as an extended monitor. You will get a better preview of the subject than the small display on your DSLR. According to O2, tablets such as the Apple’s iPad Air (9.7-inch screen) and ‘Samsung Galaxy Tab S’ (10.5-inch screen) are the best preview monitors you can use on a photo shoot Tablets in photography | External link - opens new tab/page. They allow more space to view and work with the images. You are less likely to strain your eyes with decent sized screens.

Using tablets in photography to control the camera uses the same procedure as any shoot. Taking the shot is set up and released from the mobile. You will need a USB OTG connector to use the tablet as a preview monitor. Applications such as the DSLR Controller, GoPro, CamCap, Helicon Remote, and DslrDashboard are the advisable software to use.

Tablets in photography – top devices

What are the top tablets for photographers? There are various devices to choose from. They offer many features and functions. Choosing one can be quite confusing when picking the best to help your shoots.

To make it easier, consider the other reasons you’re buying the tablet. Email and editing photos or other uses are also important. This will help narrow down your list of choices, as most devices have their own strengths. It will also help to opt for a tablet that has been recommended by other photographers. Here are some examples:

  1. Apple iPad with Retina Display
  2. Samsung Galaxy Note Pro 12.2
  3. Sony Xperia Z2 Tablet
  4. Microsoft Surface 2
  5. Lenovo Yoga Tab

Mobile devices have found their way into DSLR photography because of powerful camera lenses and relevant apps. These assist professional and amateur alike. The changes have come about because using tablets in photography helps and simplifies our work.

Comments, additions, amendments or ideas on this article? Contact Us
or why not leave a comment at the bottom of the page…

Like this article? Don’t miss the next — sign up for tips by email.


Contributing author: Honest Blossom

Honest Blossom is a seasoned blogger and practising photographer from the UK. She has written various articles ranging from the latest technology and innovation, travelling spots, mobile and digital photography and more.

Exposure changes the mood of your image

Exposure changes can affect many aspects of an image.

Exposure changes can affect many aspects of an image. Colour, mood, visual impact, contrast and others. The second image below show the differences.
Image better seen large. Click image to view large.

There is no such thing as a perfect exposure

The main goal of starter photographers is to control the exposure. The Exposure Triangle, or other models of balancing light, lead learners to pursue ‘perfection’. Once they grasp the concept of balancing ISO, Aperture and Shutter speed, the needle in the camera viewfinder is their guide.

In manual mode, that central needle is important. It shows that the three elements are balanced. The unwary learner is soon overwhelmed by that needle. They have learned how to keep it central. Now they are going to keep it there despite everything. They have learned that, if the exposure changes, the needle drifts off the middle position. When that happens it is no longer “perfect”.

That mid-position needle is useful. However, it is not ‘perfection’. It is just a guide. Modern camera manufacturers have made things easy for the camera user. The technology, sensors and controls on a modern camera mislead the unwary into a false position. Complex technology and controls give the user confidence that the camera must be right. They assume the central needle creates the perfect capture. That is simply not true.

The balance of light controls the quality of outcome you want. Your final image is created by that quality of light. The creative photographer uses exposure changes to to conjure up the result they want. A good photographer commands the camera to create the picture. The camera does not create the perfect exposure for the user. The user makes exposure changes to create the desired image. Deliberate under or overexposure is an important part of creating your image.

Exposure changes allow you to command the camera

In the image below we see (almost) the same picture as above…

A different quality of exposure changes the whole experience of the picture.

This second image shows same scene as above. But the different quality of exposure changes the experience of the picture. This outcome is no more correct than the top picture. However, when it was taken this one was 1 and 1/3 stops underexposed on the camera viewfinder scale. It was taken within seven seconds of the first image.
Image better seen large. Click image to view large.

Exposure changes allow the user to create the mood of the shot. This is clearly shown by the deeper contrasts, more saturated blues in the sky and reds in the Autumnal leaves. The low sunlight brings out the shadows and colours more. It all adds up. Together they create a very different view of this fountain scene. A twilight feel perhaps.

I was trying to create an Autumn evening view and the deliberate underexposure gave me the key. Yes, I deliberately underexposed to create the effect. I was commanding the camera to create my “perfect” scene for what I wanted.

Experienced photogs make exposure changes regularly

For me, the darker version was right for the reasons I needed that photograph. The control of the intensity of shadows, colours, contrasts, and so on, can be done many ways.

For example, High key shots often use exposure changes. They are created by deliberate overexposure. That brings out the intense whites in a high key image.

Many portraits are lit very brightly to the eye, but a very small aperture or fast shutter speed limits the light entering the camera. This will create an underexposure bringing out the facial features. This gives shadows a depth, without harshness, as can be seen in the next image. This use of exposure changes is a great mood enhancer.

Portrait shot in bright light but underexposed in-camera.

Portrait underexposed in-camera creates a tonally controlled result.

Create the exposure changes you want

How do you create this effect of under or overexposure? Simple. There is a control that can do it in auto or semi-auto modes. While in an auto-mode use the “exposure compensation” dial. You can add or subtract one or two stops of light. You can find out how to use the dial in your manual.

For the learner going fully manual it is even easier. That central needle position is your guide to what the camera calculates as an optimum light level for the shot. To create a manual over or underexposure simply dial the exposure-meter back or forward. Move the needle away from the central position. Shocking I know. You actually create exposure changes by deviating from the central needle position.

Exposure changes of one stop halves or doubles the light entering the camera. So be careful. Take several test shots. Dial one third of a stop or more at a time. Look at the result and check if you have created the right effect.

Create your image in mind – then make exposure changes to suit

The way you want your image is a creative decision. The camera should not be allowed to dictate the outcome.

You have two choices. If you go with the settings the camera gives you, the result is an optimum of the balance of the settings. If you can foresee what you want to achieve, then create your own result. In this case, make the balance of settings so the exposure changes to your choice. Your choice will be different to the result the camera would give you. But with care and practice it will be what you intend for your shot. You have taken control.

So next time you are taking a photo consider this. If you think your picture would be more effective as a darker or lighter representation, then make the exposure changes you need. Do it – create. Really make your images – don’t just capture what is there.

Comments, additions, amendments or ideas on this article? Contact Us
or why not leave a comment at the bottom of the page…

Like this article? Don’t miss the next — sign up for tips by email.

Damon Guy - Netkonnexion

Damon Guy (Netkonnexion)

Damon is a writer-photographer and editor of this site. He has run some major websites, a computing department and a digital image library. He started out as a trained teacher and now runs training for digital photogs.
See also: Editors ‘Bio’.
By Damon Guy see his profile on Google+.

Headshot poses – make your portrait right

Headshot poses :: Keep it simple.

• Headshot poses •
Keep the shots simple and try to reduce any distracting elements in the shot.
(Image from the video)

Your portraits need to be suitable for your subject…

When you want to do a portrait your subject will often not know what to do. Headshot poses are usually pretty simple. But the subject will look to you for direction. You will need to help them pick the right pose.

What inexperienced photogs forget is that male and female poses are different. So they tell their subject to pose how they do when feeling good. That may not be right for someone of the opposite sex to you.

Think about the gender of the subject in headshot poses

If you are a female, think carefully about your headshot poses for a male. Maleness tends to be angular, more aggressive in stance. Males are often better seen head on where their size seems a little more imposing. A hard, upright position indicates maleness. So does harder shadow lines on the face and angular light direction.

If you are a male photographer, you may think in male terms. Female headshot poses are better as more rounded poses than male shots. Inclined heads and slightly turned bodies are best – not looking directly at the camera. Find ways to pose your women subjects in a smaller more understated pose. Remember, shadows on a female face are more flattering when they are soft and give a more rounded appearance.

Circumstances may effect the headshot poses too

There are a lot of different reasons to take a headshot portrait. They may have particular poses attached to those circumstances. For example business poses still have a masculine and feminine aspect. However, they would tend to be more understated than a free posing session. The same might be said of guests at a wedding – and so on. So you need to consider why the headshot poses are being taken.

Clothing is important too. Headshot poses tend to include only the upper body. So if the clothing is distracting it can draw the eye away from your subjects face. Don’t try to get your subject to do a heavy make-up or high-quality hair do if you are trying for a natural shot. Let the inner person come out. Headshot poses are best done in as simple way as possible. There is going to be a high proportion of face in the shot. Overdoing other things will detract from that.

Setting the mood for your headshot poses

Here are a few extras for you…

  • Relax. Sometimes you can get very uptight when shooting portraits. This will get your subject uptight too. So before you start shooting, take a deep breath, breath out slowly. Then spend a few moments talking to your subject to put them at ease.
  • Jokes help to relax an uptight subject. If you tell a light-weight joke it will help set a light mood.
  • Subjects often have a very uptight face to start with. Sometimes all the expression goes of their face. It is fun and will lighten things up if you tell them to pull a few faces – do it with them. That will help get a few giggles and they will have more expression after doing it.
  • When doing the poses make sure you complement your subject. Headshot poses are best done with natural facial expressions. Reward those with a complement. “Lovely smile”, “Nice eyes”, “love that expression”, and so on. This builds a rapport with your subject. It helps them feel comfortable as they pose too.
How to Pose someone for Headshots

In this five minute “headshot poses” tutorial you are lead through a range of things to consider…
Tony Northrup

Comments, additions, amendments or ideas on this article? Contact Us
or why not leave a comment at the bottom of the page…

Like this article? Don’t miss the next — sign up for tips by email.

Damon Guy - Netkonnexion

Damon Guy (Netkonnexion)

Damon is a writer-photographer and editor of this site. He has run some major websites, a computing department and a digital image library. He started out as a trained teacher and now runs training for digital photogs.
See also: Editors ‘Bio’.
By Damon Guy see his profile on Google+.

Get down to eye level with animals

Work at the eye level of the animal - get into their world

Work at the eye level of the animal – get into their world.

The world at eye level…

Photography can be wonderful because of the alternative views we can get. Often the best photographs are the ones that show us new views, or ones we don’t see from our normal standing position. The world of animals is a particular case in point. Use the eyes as a guide. Work at eye level.

Photographing animals

There is a whole range of animals involved in our lives. Domestic animals and others make great photo-subjects and there is a huge number of different ways to photograph them. Inexperienced photogs often make the mistake of taking the shot from the normal upright standing position. This does two things. It renders the subject “normal” in the eyes of the viewer – because this is the angle they see it normally. This upright position also tends to make the animal seem small and subservient. Both these viewpoints can make your shot look mundane or worse, flat. It will probably be uninteresting to the viewer.

Get down to the eye level of the animal. All of a sudden you are in the animals own world. By engaging directly with the animal at its eye level you create a correspondence with it. Eye-to-eye communication is an excellent way to get to the story of the animal. You see it at its own height. You can also see its world the way the animal does.

The point about this is that you are telling the viewer a new story. It is one they normally stand above. The viewer will have a much better insight from the animal you have pictured. More to the point you will be developing the eye level contact between the pictured animal and the viewer themselves. That contact brings the viewer into the picture. Eye to eye pictures are very powerful.

Eye level contact

Getting eye level contact with an animal is very powerful. The line of sight view the animal has, and the impact of the stare, can all be used to good advantage. If your animal has particularly amazing eyes you are also going to gain from the directness of the shot.

Eye level contact with animals and birds is a very powerful way to draw viewers into your picture.

Eye level contact with animals and birds is a very powerful way to draw viewers into your picture.
(Click image to view large)


Of course you can do the same for animals, in many situations. I enjoy doing photography in zoos. When you try to picture animals there, try to get them at eye level too. To do that you may need to get up a little higher. For example monkeys may be above your head height. I have often found a light ladder or folding step useful when photographing this way. It gets you up to their level.

Getting down low is important too. So be ready to lie down or at least bend for some shots. Try to get your shot right into the eyes of the animal subject you are imaging.

Bring the eyes alive

Eyes tend to look dead if they don’t reflect light. So when possible arrange the light or take the shot to see these reflections. They are called catchlights. If the eyes look alive the dynamic feel of the catchlights will add to the drama of the shot. Catchlights are more easily captured at eye level. So taking a picture on a direct line of sight will help to capture the feel of a penetrating eye.

Eye to eye level

All living subjects have eyes. You will always find that they are most important in the power of your shot. If you get your shot with an eye to eye level correspondence you will connect with that power. Animal or human subject, that power will be there. Your photography will benefit from emphasising it when ever you can.

Comments, additions, amendments or ideas on this article? Contact Us
or why not leave a comment at the bottom of the page…

Like this article? Don’t miss the next — sign up for tips by email.

Damon Guy - Netkonnexion

Damon Guy (Netkonnexion)

Damon is a writer-photographer and editor of this site. He has run some major websites, a computing department and a digital image library. He started out as a trained teacher and now runs training for digital photogs.
See also: Editors ‘Bio’.
By Damon Guy see his profile on Google+.

What you can learn from candid photography

Groom • Candid photography :: getting the shot is a pressure.

• Groom •
Candid photography – getting the shot is a pressure. Weddings are times when you need to work particularly fast and accurately. •

Responding is a skill.

When starting on the path to disciplined photography we’re told to slow down. Take careful, measured and pre-visualised shots. We are told to stop trying to frantically pepper the scene with shots. Take time. Take stock. Think everything through. The aim is to get the shot under control.

A good photographer often needs to respond rapidly. The careful, measured approach still applies. They still have to get the picture. However, the pace of a situation demands swift shots. The practised photog can respond with speed and accuracy. Practice at candid photography is a great way to realise those skills for yourself.

Candid photography and practice

The aim is to make a clean, sharp, well composed image. The nature of a candid shot makes that difficult. While trying to make a success of your candid photography some conditions may apply. Some of those may contradict each other…

  • The subject may not know you are going to take a picture.
  • The subject could know you are going to take a picture.
  • The subject may be unpredictable.
  • You will need to be very quick.
  • You will need to be able to get a sharp image despite speedy working.
  • You may have to take several shots (eg. not dozens).
  • Your subject should be in an interesting position.
  • The subject needs to to be in an interesting context in the scene.
  • You should anticipate the shot (rather than getting lucky).
  • You will have your camera ready and settings correct for the shot.
  • You will have only a microsecond to compose the shot.

You just do not know what you are going to encounter until you have to deal with it.

Dealing with all that may seem a tall order. Especially if you are told not to machine-gun the scene with shots. Haste and frantic bursts rarely lead to good luck. Actually, it is not about doing all that at super speed. Like everything you do in photography, candid photography requires preparation, practice and control.

Equipment – knowing what you can do

NO! Do not go out and buy yourself a micro-weight, super-camera. Up-to-date bells and whistles are not the point. Instead, look for simplicity. Sometimes the best camera is an old and familiar one. What we want for this exercise is knowledge.

The best possible way to get fast with a camera is to know what it can do. The lens too. If you are familiar and well versed in using your equipment you will automatically respond to the scene. Here is an example.

In candid photography control of depth of field is essential

• Impish grin •
Keep the subject in focus but the background is frosted out.
In candid photography control of depth of field is essential
(Click to view large)

This shot was captured as this lovely man turned from a conversation. He was talking to someone on his right. I was ready for his turn toward me. His impish grin as he saw me really made the shot.

I wanted a depth of field that had his head and face sharp. I also wanted the background indistinct. Notice the sharpness is lost just on the far shoulder. My lens was set up to have a depth of field of about 400mm (about 15in to 16in). But there was no measurement involved. This was an estimate. It involved knowing the depth of field at my distance from the man, and using the right aperture. This capture is the result of knowing the lens and camera combo really well. It was a practised shot using very familiar equipment. The successful candid photography came out of the practice and familiarity.

Equally, it is easy to get the shot wrong. Depth of field, especially at close range, is fickle. It is easy to get the tip of the nose out of focus, the eyes and face in focus, and the hair out of focus. It is important to look at the variables involved. The aperture size and distance-from-subject control the depth of field. So, try the exercise below using manual settings.

Take a bright coloured builders tape measure. Place a small object beside a mid-point on the measure. Take a photo of the object down the measures’ length. Use a wide aperture. Check out the depth of field by looking at the measurements that are sharp. Now by varying your distance from the object see how much you change the depth of field. Do this for a wide range of apertures. With experience you will get a feel for controlling the depth of field. With twenty or thirty variations you should get a feel for the depth of field.

Settings

Aperture is one setting. ISO and shutter speed are important too. Getting a feel for your equipment means getting familiar with how these settings work.

Candid photography often involves working in darker lighting. Parties and indoor sessions, weddings in churches and in evening light all require wide apertures. You might use flash. But in a lot of situations that may not be practical or desirable. So using a high ISO setting (more sensitive sensor) will allow you to work effectively in lower light. So, lower the light where you are working with the tape measure. Raise the ISO and repeat the exercises. Get a feel for how you can vary the exposure by changing the ISO.

Needless to say you can vary the shutter speed in similar ways. Try the exercise again. This time keep the aperture and ISO fixed and change the shutter speed up and down through a range of shots. [More on varying shutter speed].

Learning to use your settings manually takes more than one session. That is important. You can gain a lot by training yourself to be sensitive to the settings. Working toward good quality candid photography can really help you gain that sensitivity. Poor photographs of faces and people are immediately obvious! You get great feedback from the experience of poor shots.

Composition – seizing the moment

Candid photography is about seizing the moment. You need to use good settings. You also need some understanding of composition. This means working to get your subject in the right environment. They will have an appropriate pose and possibly the right context or behaviour too. Without all these coming together the moment is lost. Setting it all up takes some thought.

Normally people do candid photography with some idea of what they want to achieve. Random wanderings are normally unproductive. Luck follows more often from preparation and forethought than stumbling upon a notable event.

So, have a good think about your scene composition….

  • Set yourself up in a viable position ahead of the shot.
  • Think about how the light is placed in the scene overall.
  • Place yourself for the right background on the far side of the shot.
  • Fix the camera settings for the composition ahead of the shot.

In other words be prepared. Then, when the right moment comes along, you will have the minimum to do. A little composition, framing the shot, is essential. A tweak of the focus possibly… But essentially – you should be ready.

Now you stand the best possible chance of getting the shot.

Candid photography is successful when it all comes together

All this preparation and practice is about getting you to the moment when you take the shot. Making a success of your candid photography is about three things…

  • Knowing your settings.
  • Practice with and knowing your equipment.
  • Forethought about the scene.

Having everything ready is the key. Then when all the elements of the scene come together all you do is frame it and capture. If you succeed in that, you will also make a swift shot. Because, in fact, you have little to do. Speed and accuracy is about being ready with everything and having the minimum to do when the right events pull the shot together.

Comments, additions, amendments or ideas on this article? Contact Us
or why not leave a comment at the bottom of the page…

Like this article? Don’t miss the next — sign up for tips by email.

Damon Guy - Netkonnexion

Damon Guy (Netkonnexion)

Damon is a writer-photographer and editor of this site. He has run some major websites, a computing department and a digital image library. He started out as a trained teacher and now runs training for digital photogs.
See also: Editors ‘Bio’.
By Damon Guy see his profile on Google+.