Tag Archives: soft light

Five simple composition tips for great snow images

Snow in the deep South - Vestavia Hills

Snow in the deep South – Vestavia Hills
Loosing detail in the whites is a big problem in snow photography. Lack of contrast is the main cause. Look for subjects that have contrasts or ensure you have an exposure that pulls all the detail out of the whites.
Snow in the deep South – Vestavia Hills – IMG_5382 by Bahman Farzad, on FlickrExternal link - opens new tab/page

Snow images requre special compositions.

As you can see from the photo above, snow photography can present special problems. In the case of this photograph the lack of contrast could have spoilt the image. Loosing detail in the whites is a big problem in the snow.

In the photograph (above) the author has made a good exposure and the whites are well defined and detail is not lost even with a white building in the scene. However, be careful with your snow compositions. You can lose a lot of detail and normal compositional features because of the way the snow obscures many of the normal features in the landscape that we use to draw the eye.

# Tip one: Contrasts – Make sure you are able to see the details. Too much white and the detail is lost. Too little white and the snow looks grey. Use exposure compensation or full manual mode to make sure you have the right whiteness without losing the detail. See: Correct snow scenes using exposure compensation. (Photo above).

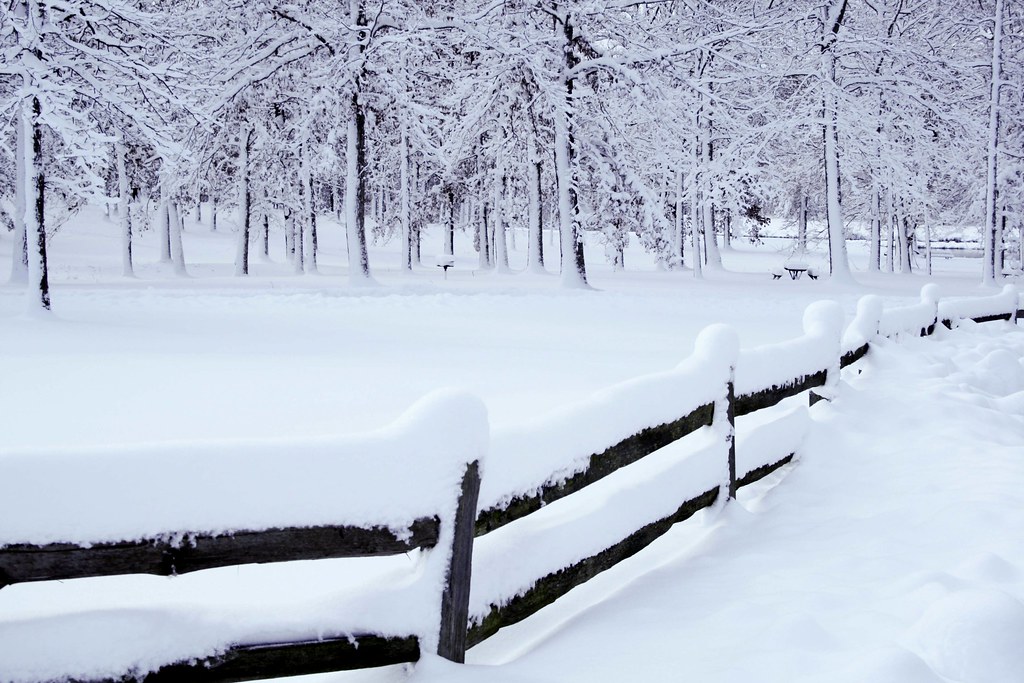
# Tip Two: New compositional and curvey lines – Find a scene where strong lines are well defined. Snow often covers major lines in the scene. Look for new lines. Snow is great for creating curvy lines. As it settles on a fence or wall top, the snow creates great shapes presenting different lines to the ones you normally see. Search out new types of snow defined lines and tracks to help define your composition. “Fencing” By tgroeger_canada  External link - opens new tab/page.

# Tip three: – When you have a strong line make the most of it. Try to make the scene simple so it stands out without confusing things with other features. Snow is a notoriously soft environment to compose a shot within so try to work with soft compositions. Gentle curves and easy lines are inviting to the eye and promote a sense of peace and well-being.

“Snow”
Click image to view large
“Snow” by Kathy~, on FlickrExternal link - opens new tab/page

# Tip four: – Rule of thirds Of course the general principles of composition apply in snow. The rule of thirds and the rule of odds are both strong contenders to helping to improve your snow shots. Just because everything is lost under the snow don’t lose sight of these old compositional tools.

# Tip five: Tonal variations – With snow being so white it is easy to make the picture too bland. In fact the light you shoot in has a big effect on snow. There is nothing more exciting than a snow scene in a golden sunset. Sunset and Snow External link - opens new tab/page. Snow is especially good at reflecting tonal changes in light. One way to bring those out is to look for changes in light locally. A road disappearing into the trees, or snowy mountainsides with different angles to the light both cause exciting variations in the colour and tone of the snow.

Snowy morning, golden light

Snowy morning, golden light
Click image to view large
Snowy morning, golden light by Mike Thomas, on FlickrExternal link - opens new tab/page

Finally, try to make your composition as different as possible. Don’t just do landscapes. Snow changes the shapes of everything. So try to find things that are barely recognisable under snow because the snow has created unusual or unexpected shapes. Then you will have the viewer guessing… that will draw them into the picture.

Have fun! Snow photography is not something we can all do daily so make the most of the great opportunities.

find out more...Photokonnexion tips by email
If you enjoyed this article please sign up for our
daily email service.
                                                 Find out more…
#11030#


By Damon Guy (author and Photokonnexion editor)

Damon Guy - Netkonnexion

Damon Guy (Netkonnexion)

Damon is a writer-photog and editor of this site. He has run some major websites, a computing department and a digital image library. He started out as a trained teacher and now runs training for digital photographers.
See also: Editors ‘Bio’.

Six things to consider for starting portraiture

A dear friend

• A dear friend •
Click image to view large
• A dear friend • By Netkonnexion on Flickr External link - opens new tab/page

Portraiture – the photographers passion.

Starting in portraiture can be daunting. We are going to look at the important things to consider when getting started with photographing portraits. There are also links to some of the portraiture resources available on Photokonnexion.

This post is aimed at introducing the portraiture resources found here…

Location

Choice of location can make or break a portrait. If you choose an outdoor location you have to consider a range of issues like the weather, how to pose your subject and exactly what you will be putting in the background. The problem with outdoor portraits is that there is potentially a huge number of composition decisions to make. Taking the shot can be quick. Deciding on what background is right can take a lot of effort and research.

If you are just starting out with portraits it might be better to focus on indoor shots. The environment and light is potentially simpler and the lighting more controllable. The essence of good indoor shots is to reduce the composition to a very simple background and lighting and to focus your attention on the subject. This gives you time to practice the posing, including expressions, and the lighting set up.

Lighting

Light and Lighting can be as simple or complicated as you make it. My advice is to make it as simple as possible. Most great portraits are done with one simple source light. Working with one light gives you the ability to try out shadow casts and hard light vs. soft light. Practice with simple ideas will help develop your skills more than working with confusing multiple light sources.

Background

This is not the same as the location (which is really more about the surroundings). When you are considering the background this could be as simple as a blanket suspended behind your subject. It could also be as complicated as a workbench that your subject works at. What you have to do is decide how to set it up, how to light it and how to place your subject in front of the background. You have to make a decision as to whether you are taking an environmental portrait (a large amount of the background is visible) or a simple portrait where the background is a minimalist setting, where you show very little of the environment and make it as simple as possible.

It is better to start simple. Placing your subject in front of a coloured, white or black background is a great way to get started. You will be able to focus on posing your subject and spend less time worrying about what to include or exclude in more complex backgrounds.

Posing

The best advice for starters is to work with your subject. He or she will be comfortable with certain poses. Get them to start the posing. Then, when you see how they like to pose, you can ask them to vary it to get your light right and get them showing their best side (the left side of the face is best).

Remember that that definition of the features of the face are defined by light and dark. Your poses should be aimed at using the shadow/light relationship to bring out your subjects facial and body features.

find out more...Photokonnexion tips by email
Enjoying this article? Please sign up for our
daily email service.
                                                Find out more…
#11030#

Props

It is difficult to provide resources about props. There are as many props as there are things people can hold, wear, sit on, stand next or or play with. Yes, props can be pretty much anything you want. However, one thing is certain. Your portrait subject will suddenly come alive when they have a prop to distract them from the daunting prospect of the camera. Try to get them to work with a prop they are familiar with – get them to tell you about it or show you how they use it while you photograph. These things will make the comfortable and help them to relax. It will also show you the character of the person they are.

Camera settings and lenses

Some people will tell you this is the most important point. Others will say the posing, still others will focus on the other things above. How you set up your camera, and how you place your subject are very closely related. But there is a lot to learn here. Start simple so you can feel in control. If you are not yet working with manual controls then be comfortable with auto mode – try to become aware of the types of settings that seem to work.

Exposure settings are an important study. There are some exposure links in the link box below. However, you should be concentrating on natural colours. The type of light you use is important to your exposure. I have one piece of adice on this. Beginners at portraiture almost always over-light. Keep your lighting soft and your exposure moderate and not over-bright to start. If you are using flash, turn it down. Bright flash always washes out flesh colours and sometimes causes nasty highlights on the face. It is worth reading up about how you can ruin your shots with flash.

I hope that this article has provided you with some options for getting started in portraiture. Please spend some time going through the links on the portraiture resources page to get more detailed information.

By Damon Guy (author and Photokonnexion editor)

Damon Guy - Netkonnexion

Damon Guy (Netkonnexion)

Damon is a writer-photog and editor of this site. He has run some major websites, a computing department and a digital image library. He started out as a trained teacher and now runs training for digital photographers.
See also: Editors ‘Bio’.

Eight ways to bring out texture in your photographs

• Medieval Prison •  Bring out the texture in your shots

• Medieval Prison •
A dismal dungeon! Bring out the texture in your shots.
Click image to view large
• Medieval Prison • By Netkonnexion on Flickr External link - opens new tab/page

Texture is essential for a 3D effect.

If you want a realistic feel you need to work at it. Convincing texture lies in the fine detail – your picture must look like it feels. Here are eight things you can do to increase the texture from capture to printing…

What is texture?

Texture is the fine detail in your photograph. I am sure you would know what it feels like to run your finger over the surface of a brick. If a photograph of a brick convinces you that touching the photograph would feel like a brick, your depiction of texture has been successful. The term texture is a fine art concept which applies to photography [texture definition].

More after this…

Get Photokonnexion tips by email!
We send you tips daily – find out more…

Start email subscription now!
#11030#

Eight ways to enhance texture
  1. Pick your subject to ensure it will show texture. Close ups are easiest as you can work large. If you are with a large subject like a person and want to show fine texture on the background you should ensure the background surface you pick is well defined. Look for the largest contrast in shades of colour and in light/dark. Look for shadow areas and bright areas. Make sure that the physical texture (roughness) is roughest where you will be taking the shot. These are the features of texture the camera will pick up.
  2. Hard light on your texture will give it a sharp, unyielding feel, a sandpaper type effect. Soft light will give it a rounded less harsh look, more like weathered stone surfaces. Arrange your light to emphasis the character of the texture you are photographing.
  3. When taking your photograph arrange the light coming at your texture from the side. A shallow angle of light creates light/shadow areas which define the texture. When these little contrasts can be seen they make the texture stand out. If light comes from where you are shooting from these shadows are not created and the texture will be flat (eg. pop-up flash or sun from behind you).
  4. Consider very slightly over-exposing your shot. This will give you room to exaggerate the contrast in the post processing.
  5. In the developing module of your processing (RAW only) use the contrast tool to maximise the contrast potential in your texture. If working in *.jpg enhance the contrast in the normal picture editing view.
  6. Consider making your picture a grey-scale shot in post processing. If possible do not do a direct colour to black & white conversion. Use colour control methods to enhance the contrasts in each colour. You will need a more advanced image editing application for this (PhotoShop, or Elements for example).
  7. Use the ‘burn’ in post processing to deepen the dark areas of the shot. Set it to emphasis shadow. Manually pick out the shadow/darker areas and give them a very slight darkening. Try working at about 10% (or less) ‘burn’ exposure. Similarly, use the ‘dodge’ tool to brighten the highlights. Set the tool to pick out highlights at about 8%-18% exposure.
  8. When printing use paper that has a texture appropriate to the texture you want to bring out. You will need to print a test print. Then hold the test texture up against several paper surfaces to compare the textures. Paper with softer, uneven texture will take the edge off textures in the print. Harder textures with more regular surface will tend to sharpen the depicted texture. However, the eye must be your final guide. There is great skill involved in picking the right paper texture for specific pictures when printing. So you might need to make several tests with different paper textures to get the most emphasis for your texture.

Enhancing the contrast between light and dark or between colours will emphasis texture, but the most effective impact will be what you achieve in the actual shot. Try to ensure you use the light to gain the best advantage from your texture as you do the shooting. It will look more realistic and you will have to spend less time at the computer.

By Damon Guy (author and Photokonnexion editor)

Damon Guy - Netkonnexion

Damon Guy (Netkonnexion)

Damon is a writer-photog and editor of this site. He has run some major websites, a computing department and a digital image library. He started out as a trained teacher and now runs training for digital photographers.
See also: Editors ‘Bio’.

Can you write? Of course you can!
Write for Photokonnexion...

We would love to have your articles or tips posted on our site.
Find out more…
Write for Photokonnexion.

Ten obvious reasons to change your approach and how to do it

Your photograph is not perfect.

You see good quality photographs every day. Why does your photo not match up to the photographic quality in a publication? What can you do? The answer is simple. You need to look at your overall technique.

Things add up…

Assuming a great idea and composition – what can go wrong? In photography every step of the process counts. The more you get right the better the result.

Professional photographers often repeat a shot tens of times to get it right, sometimes more. They aspire to excellence. Care, dedication, persistence and attention to detail add up to technical quality.

What can go wrong?
  1. Bad lighting: There’s no substitute for suitable, interesting light that’s sympathetic to the subject. If the light is wrong, your shot will not work either.
    Solution: Learn everything about the quality of light, hard light, soft light, the colour of light and the properties of light.
  2. The whole picture is soft: You moved the camera while shooting.
    Solution: Pros use tripods – good ones. They use them fast and efficiently because they practice.
  3. The whole picture is soft: You had to hand-hold the shot.
    Solution: Professionals know how to set up a manual exposure that suits the light. Learn to shoot in manual modes. Know what shutter speed/ISO combinations you can use without movement.
  4. The exposure is too dark/light: Common when learning manual camera control.
    Solution: Use RAW, then you can compensate. With RAW you can deliberately manage your exposure too. There is no ‘perfect exposure’ – there is only the result you want. To get the result you want you have to adjust your exposure. (Hint: you can’t adjust your exposure effectively in *.jpg unless you use exposure compensation).
  5. Colours off: If you are shooting in *.jpg you deserve all you get. The white balance is probably wrong. The manufacturers settings are limited. You can’t fix it in processing. Remember, *.jpg is a RAW file developed in-camera to manufacturers settings, not yours. The settings are applied to your shot blind. No wonder they are not what you want.
    Solution: Get it right. It’s easier to shoot in RAW and develop the shot yourself. It gives you fine control and you can develop your shot work the way you want. Something *.jpg cannot do.
  6. Poor focus: Focus is critical to the right technical and artistic result.
    Solution: Learn about: Depth of Field; aperture, Bokeh, Circle of confusion and how they relate to your lenses. Pros know these things intuitively. You can too with practice.
  7. Poor or soft focus from movement: Focus mode is on the wrong setting.
    Solution: Learn to use the correct focus mode (eg. single shot or continuous etc). Also, learn to focus manually. There are situations where auto-focus is poor (eg. in poor-contrast light). Switch off auto-focus to get better results.
  8. The shot is not sharp: A suspect, poor quality or broken lens.
    Solution: Buy decent lenses. All lenses have sweet and sour spots – even professional ones. Cheap lenses have a poorer optical quality and have more sour than sweet spots.
    Solution: Quality costs money. However, look after a good lens it will last longer than your camera. If you choose right, it’ll fit your next camera. It pays to buy the best quality lens you can afford.
  9. Great lens and tripod! My shot’s still not sharp: Sharpness requires attention to the above and these specific details too…
    Solutions:
    one: Turn off vibration reduction functions. On a tripod motors cause vibration, not stop it.
    two: Turn off auto-focus (another motor), or at least the continuous-focus setting (use the ‘one-shot’ setting).
    three: Use ‘mirror lock-up’ (DSLRs). Mirrors clunk up causing tripod vibration.
    four: Keep out of wind, away from vibration and keep your tripod low (don’t fully extend legs).
    five: Use a remote shutter trigger. Button pushing causes vibration.
  10. I did all this and it’s still not right!
    Solutions:
    one: Practice – putting this together takes time and effort.
    two: Return to locations many times to get the right light and conditions.
    three: Post processing! RAW users, this is where you polish the shot up. Since the earliest photography developing the shot has been a key process. RAW processing is another skill to learn. It’s essential, so learn it. Only *.jpg’ers should worry because they have disabled files. If you used *.jpg there is no hope of properly completing the job.

There is a lot to do! Follow the links and keep at it – you WILL succeed.

By Damon Guy (author and Photokonnexion editor)

Damon Guy - Netkonnexion

Damon Guy (Netkonnexion)

Damon is a writer-photog and editor of this site. He has run some major websites, a computing department and a digital image library. He started out as a trained teacher and now runs training for digital photographers.
See also: Editors ‘Bio’.

Simple, basic rules of lighting anyone can use

Every time you take a photograph you use light.

It’s no surprise that a few simple rules apply to getting a good understanding of light. Knowing more about how certain light conditions work is a great insight. It’s simple too…

In this great video Ed Verosky looks at the basic ways that light can be understood and used. Using some really simple graphics the video takes us through the basics. Great work Ed… more after the video.

Published on Aug 13, 2012 by Ed Verosky

Of course you can find many other light resources here at Photokonnexion to supplement this video. Here are some ‘must reads’ to go with what you have just seen in the video.

A simple challenge to use your new knowledge…

Take a portrait of someone lying down. Use only the light from one window (daylight). You poser should have feet pointing toward the window, head pointing away. The idea of this is to see how you can vary the light intensity with distance from the window. We want to see how the softness of shadows on curves change along the length of the body.

Now repeat the exercise with your pop-up flash or off-camera flash. See how much harder the light is and how sharp the boundaries between light and dark.

I hope that has proved fun and easy to do. I would love to see the results. So if you can post your shots online and leave a link in the comments below I will comment back on your shots. Have fun!

Easy introduction to light modifiers – don’t miss out (pt 2)

Light modifiers manipulate light.

Photographic lights are shaped and controlled by the light modifier. With it you create the lighting you need. Use the right modifiers and you create the scene you want. Knowing which one to use is crucial. The resources set out here aim to help you understand what light modifiers are and what they can do.

In a previous post, Easy introduction to light modifiers (pt 1), we examined:

In this post we are looking at more of these useful tools for controlling light.

Grids

Much more open than the honeycomb are a variety of other types of grid. They are used in front of many different types of light source. The aim of a grid is to…

Beauty dish

The beauty dish is widely used in fashion industry. Photographers love it’s flattering light. Using this dish creates…

Barn doors

Originally used on film sets barn door light modifiers have a special function. They are normally fitted to…

New resource pages

Part one and part two (this post) have added a number of new resources about light modifiers to the photographic glossary. However, as a group of resources they can also be reached from the page of light resources…
Light and Lighting – Resource pages on Photokonnexion
Light modifier resources on Photokonnexion – A new page linked from the Light and lighting page.

Easy introduction to light modifiers – don’t miss out (pt 1)

The "Honeycombe Grid" is a simple device to direct the light in a tight beam.

The “Honeycombe Grid” is a simple device to direct the light in a tight beam. It is an example of a range of grids used in front of lights to harden the light source and prevent the light from spreading out into a wider, more diffused beam.

We use light modification all the time.

Light bounces off everything. The unique light found in every location is from this bounce effect. We also deliberately modify light to create the right light for photography. Look at the options we have available…

Honeycombe

Shown above the honeycombe is a tightly arranged grid. It’s affixed to a studio strobe or an off-camera flash. The light shines through…

Softbox

There are very many different types of soft boxes. However, they have a lot in common. They create a really great soft light…