Tag Archives: Settings

Using the command dial to pick the right Mode

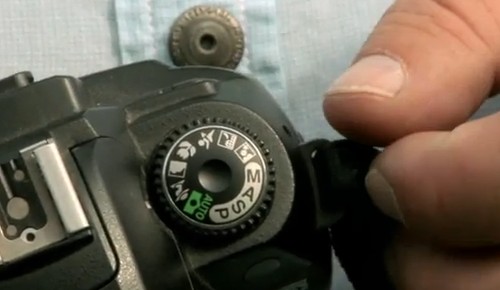
The Command or Modes dial

• The Command or Modes dial •
(Image taken from the video)

Setting up your shot.

The settings you use when taking a photograph affects the shot outcome. Before choosing camera control settings, first choose the camera mode. Here is an explanation on the ‘Command’ or ‘Modes dial’ where you make that choice.

Getting into manual mode

In “The Exposure Triangle” I looked at how you should balance…

These settings, when balanced, create an optimal exposure. You need to understand these settings to go manual with your camera.

What the dial offers

The Command or Mode dial sets the camera to use particular controls. You see a typical example of the command dial above.

‘Auto-mode’ or ‘Auto’ – the camera does everything for you. This setting is sometimes called the “green square” or Green mode. It’s normally green on the command dial. Using Auto you hand over full control to the camera. It provides a set of fairly average exposures. It’s used to snap basic shots in everyday situations.

To make your photography really effective you want full creative control. Learn to use the semi-manual modes and ‘Manual’ Mode. These give control to the three exposure factors. The picture shows these settings as ‘M’, ‘A’, ‘S’ and ‘P’ in a silver band.

  • M – the full Manual setting. You have full creative control over exposure.
  • A – Aperture – you set the aperture (f number) and the camera finds the right shutter speed for you.
  • S (or Tv) – the shutter speed setting or Time value. It sets the shutter opening time. The camera finds an aperture setting to match.
  • P – ‘Program’ allows some menu settings that ‘Auto’ will not allow. This auto setting gives only limited artistic control.
  • Also… B (not shown) means ‘Bulb’. It’s a setting for long exposures of more than 30 seconds. Bulb may not be available on all cameras.
Other modes

There are often other modes available. But these are really pre-sets. They do the same thing as manual and semi-manual modes. However, they give you less than full control over your shot. So I am not going into them here.

Camera Controls (intro) – command dial

Mike Browne goes through these settings (except ‘Bulb’). He explains the ideas and points out each mode. Remember, the command dial only sets the exposure controls for Auto-modes. The manual and semi-manual modes allow you to change the exposure factors from other controls.
Mike Browne  External link - opens new tab/page

Comments, additions, amendments or ideas on this article? Contact Us
or why not leave a comment at the bottom of the page…

Like this article? Don’t miss the next — sign up for tips by email.

Netkonnexion

Damon Guy (Netkonnexion)

Damon is managing editor of Photokonnexion.com with professional experience in photography, writing, image libraries, and computing. He is also an experienced, webmaster and a trained teacher. Damon runs regular training for digital photographers who are just starting out.
See also: Editors ‘Bio’
By Damon Guy :: Profile on Google+

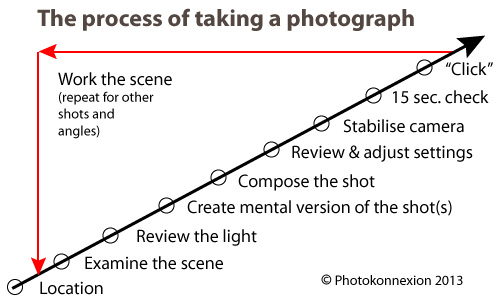
How to take photos – each important step in making a photograph

Infographic download - How to take photos

• Infographic showing the various steps in how to take photos •
A guide to what you should doing to make great images.
• Click to download printable full page version

Getting down to the detail…

Yesterdays article was How to take photos – each important step in making a photograph. Today I want to share the detail behind each step. Be warned! You might need to think again about your existing knowledge. Unlearning old ideas will help you to move forward and improve.

How to take photos – The location

Lots of people think you can just turn up and take pictures. Well you can, but often they are not good ones. Getting the best out of your location involves understanding what you’ll find there. Find out about the weather on the day. An idea of light levels and times of sunset and sunrise etc. is useful too. There have probably been lots of visits by others at popular destinations. Check “Google Images” for that site. Google will help with other details too.

When you arrive don’t just fire off loads of shots. Settle down and get into the location. Don’t make photography mistakes that mean you miss great shots. The first time you do this consider a variety of shots. Think about more than one shot, think about the whole shoot.

How to take photos – Examine the scene

Considering the scene is an important part of the work-flow on site. Unless you have been there before you need to get to know it. Use all your knowledge about camera angles, composition, lighting, camera settings and so on. Take the time to examine your location while thinking of these things. Consider your feelings about the scene too. How you feel will help your shot be an impassioned response to the location. What you feel about the scene is the best guide on how to take photos at that location.

How to take photos – Review the light

Most photographers forget this step. They are too wrapped up in the scene and the camera settings or the passion of it all. This step will make or break your shot. Look at the light. If you don’t know what I mean read these:

Ask yourself some simple questions about the light…

  • Is it hard or soft?
  • Is it coloured or more neutral?
  • Is it at the right angle to best capture the location/scene?
  • What is the best time for the right light?
  • Is it very bright and intense or dull and diffused?
  • Do I need any artificial illumination (flash, diffusers etc)?
  • Is the shadow hardly defined (sun up high) or strongly defined (sun to the side)?

Lean about the properties and vocabulary of light. It helps give you a greater understanding of photography. These questions, and others, help you make decisions about lighting for your scene. For more on “How to take photos – Light and Lighting” see the resource page in the SUBJECTS/ARTICLES menu at the top of every page.

How to take photos – Create a mental version of the the shot

If you want to make a great image – have a great picture in your head of your intended outcome. Visualisation has helped athletes, artists, thinkers, inventors and others to achieve amazing things. Train your mind to visualise in detail. If you see what you want to achieve it will guide you when setting up your camera. Take the time to create that mental picture – in detail. Consider how you are going to make the best of the light when you consider how to take photos. More about visualisation… 80 year old secret of world class photographers revealed.

How to take photos – Compose the shot

By now you have an intimate photographic knowledge of your scene. Composing the shot is about realising that potential. Long-time followers of this blog already know something about composition. For first-timers you can get lots of information from our Composition resources page in the SUBJECTS/ARTICLES menu at the top of every page. Composition is a skill that evolves as you develop as a photographer. Knowing more about composition helps your awareness and skill develop. Read about it to gain insight. Think about it every shot.

How to take photos – Review and adjust the camera settings

Now you have a picture in mind, composed, and are ready to set up your exposure. The exposure is defined by your camera settings. Camera makers will have you believe that the auto-setting on your camera is the perfect exposure. The fact is they made informed guesses to arrive at that exposure. It is different for every model of image sensor. Modern cameras do make a good representation of the scene. It is not always what you want however. You can change the exposure by under-exposing, over-exposing and by using different apertures, ISO levels and shutter times. That is your interpretation of the shot. When you think about how to take photos, plan how you want the image to come out.

Having a visualisation in your head helps you set the camera up to make that mental image. You do it using ISO, Aperture and Shutter speed. Even using one of the ‘mode’ settings is still a way of regulating your exposure. They all adjust those three basic facets of the exposure.

Here are some other links to pull together ideas about exposure:

How to take photos – Stabilise the camera

You want the photo to be sharp, crisp and clear. The faster the shutter speed the easier it is to get a sharp shot. But often, especially for a good quality shot, longer exposures are better. You need a good stance to hand-hold the camera. You will need a tripod (or other method) to steady it for longer exposures.

Stance is down to basic technique and comfort. The stance you use will be a personal thing for you. I have found many photogs have to relearn their stance after many years of a poor stance. It is best to learn a good one early. Here is my recommendation: Simple tips for a good stance

The use of tripods or other supports is a wide subject. It is also one that many learners tend to ignore- at least at first. When learning how to take photos sharpness is vital. Become acquainted with a tripod (preferably a good one) as early as you can. Your images will improve a huge amount. Here is some advice about tripods:

And, here is some basic advice about improving sharpness overall – The Zen of sharpness – 12 easy ways to improve

How to take photos – 15 second check

OK, that may seem like a long time. However, it is actually the time you need. You can get faster at it, but if you are taking a serious attitude to your shot then give it the time. You can find out all about the the 15 second check by reading these in order:

  1. An old sailors trick to improve your photography
  2. The fifteen second landscape appraisal
How to take photos – “Click”

This is where you press the shutter button. How you press that button can make a difference to your sharpness. Earlier, I mentioned this link, Simple tips for a good stance. It also gives advice on pushing the button without affecting sharpness.

An essential element of your shot is about confidence in what you have done. Today we are lucky. We just look at the back of our camera. Your first “click” may be a test shot. If your settings need adjustment then a simple technique called “Chimping” will help. Chimp and adjust. You will only need to do it a few times to get the shot right. You will not need to machine-gun the site with hundreds of “just in case” shots.

How to take photos – Work the scene

Chimping helps you set up for the shot and compose it. To get other possible shots you visualised earlier, you should work the scene. Repeat all the steps you have just done for each of the shots you foresaw. Working the scene is a skill and takes practice.

How to take photos – Time line

What is not obvious from the diagram is that the diagonal arrow is also a time-line of the shot. Of course it is a different length for every shot. You will have different problems to solve and ideas to consider for every shot. That’s fine. You have just learned a more careful, precise method for how to take photos. As you practice will quickly get faster at taking shots. But you will also make better images.

A promise

I can guarantee that if you follow the steps on this page you will…

  • Take less shots;
  • Get a better hit-rate (more usable shots per shoot);
  • Spend less time in post-processing;
  • Have better composition;
  • Improve your photography overall.

What is less obvious is that you will also save a lot of time.

By Damon Guy (author and Photokonnexion editor)

Damon Guy - Netkonnexion

Damon Guy (Netkonnexion)

Damon is a writer-photog and editor of this site. He has run some major websites, a computing department and a digital image library. He started out as a trained teacher and now runs training for digital photographers.
See also: Editors ‘Bio’.
Simple videos showing how camera settings work

Understanding the relationship between ISO, Aperture and Shutter speed…

These are the three critical factors in the exposure relationship. Getting a feel for how they work together is the essence of controlling your camera. Several people asked me to find a simple explanation for the way this relationship works after seeing this post yesterday: How to work with your camera settings – a simple, fun lesson.

The key point

The three settings, ISO, Aperture or Shutter Speed are set up on your camera in stops, or fractions of stops. The stop is a photographers way of measuring light in the camera.

The most important thing to remember is that a stop of aperture is the same as a stop of ISO, and in turn a stop of shutter speed. As they equal each other, you can keep them in balance. If you put one setting up a stop (or fraction of a stop) you can put one of the others down a stop (or fraction) and you will get the same exposure. This allows you to change your settings to get a different result (more bokeh, less movement blur etc) but retain the same exposure levels.

The two videos below will help you to understand the way the settings work. I have given you two versions of the same information. They both present differently, and they both have snippets of information that are different from the other. However, they both cover the same material. I hope that one or both of them will help you to see how the settings work. Enjoy!

Aperture Shutter Speed and ISO, Photography 101

The second video covers almost identical material but shows some of the points through the camera viewer. This helps you to see the context of the settings easier.

Exposure (Aperture, Shutter Speed, ISO)

Now try out your new knowledge…

Now you can try out CameraSim in yesterdays post. Try varying the settings for yourself like they did in the videos and see how they work together to get an exposure balance.

By Damon Guy (author and Photokonnexion editor)

Damon Guy - Netkonnexion

Damon Guy (Netkonnexion)

Damon is a writer-photog and editor of this site. He has run some major websites, a computing department and a digital image library. He started out as a trained teacher and now runs training for digital photographers.
See also: Editors ‘Bio’.

Can you write? Of course you can!
Write for Photokonnexion...

We would love to have your articles or tips posted on our site.
Find out more…
Write for Photokonnexion.

Get your settings right with all file types

File-formats and settings

The power of the file format you use…

Most photographers don’t think about settings and file formats when starting. First off, most people just want to take pictures. Down the road you need to think about what you are doing more carefully. You will need to get into RAW processing to overcome the shortcomings (but also, see my comment after this article)

File formats

When you think about settings and file formats it appears very technical. It’s not easy to work out what you need to know. Here are the basics. There are two in-camera file types for photographers…

  • RAW = a file type for capturing all the data from your camera, but which needs developing (post processing) after the file is downloaded. There are many manufacturer-specific versions of the RAW format.
  • *.jpg = a specific file type created in-camera from a RAW file. It is processed by the camera. The *.jpg format was originally designed only for transmitting and displaying files. It is extremely limited for post processing and easily degraded.

Both file types are useful for certain things. The RAW format is ultimately the most useful for photographers because it is so flexible. It allows you to develop the image you want from the picture you have taken. The *.jpg file on the other hand is processed for you, in a limited auto-processing system over which you have little control. It is confusing for beginners because *.jpg files create reasonably good images. But it is difficult to make them do what you intend. Beginners eventually find they cannot create the excellent images that RAW users produce. Nevertheless, starters use *.jpg because they don’t understand RAW and processing – they are stuck without help.

The processing is already done for *.jpg files by the time they are downloaded. Most beginners think they have something special when they get a great image straight out of the camera. Actually they are getting something processed according to someone else’s ideas. So it is not entirely their creation.

How do you break out of this situation?

The easiest way is to do a course or join a club or both. Then you can gain the experience and techniques you need to learn while having fun with others who share your interests. There are lots of courses and clubs around. More specifically you will have three goals. You need to learn how to…

  • Control your camera to get the picture you want.
  • Do post processing to produce great images.
  • See great scenes and compose them to create great images.
Along the way…

At some point every aspiring photographer is told, “why not try moving to RAW, that format gives you greater control over your processing”. This is true and a worthwhile pursuit.

What most beginners also hear along the way is something like this… “It is easier to shoot in RAW because you don’t need to worry about your settings so much”. “You can sort it out in post processing”.

This whole “sort it out later” attitude is a recipe for disaster. Here is my reasoning…
Most beginners:

  • Have an underdeveloped sense of colour.
  • Are not sensitive to light intensity or brightness variations.
  • Have an underdeveloped sense of the quality of light.

And crucially…

  • Cannot properly remember the colours shades, tones and brightness levels at a scene until they can start the post processing hours or days later.

The result is that during processing colours, brightnesses, tones and shades get over/under processed owing to no reference point. The resultant image is often a long way from reality. Incidentally, as your eye/mind system develops the “photographers eye” you begin to remember these details much more.

I urge you to cultivate the habit of fine control of your camera. Every shot, or at least every set of similar shots, should be set up individually. Be obsessive about it. Then, when you get your work into the computer, your post processing has a realistic starting point. It is easier, and more realistic, to process a picture that starts out very close to your intended image.

There is another reason to be obsessive and accurate about controlling settings from the start. Bad habits are really, really difficult to break. If you get into the habit of sloppy settings from the start you will almost certainly be a lazy photographer. I can assure you that will condemn you to many hours in front of the computer doing menial development tasks. It is much easier to get it right in-camera from the start. Then you can slightly tweak it later. Breaking a sloppy habit to get fine control of your camera later is a long, hard road.

Professional photographers are obsessive about getting the settings right. They know that the difference between an amateur and a professional is getting EXACTLY the image they want. And, they know they will not get that exact image by being sloppy. Precise, accurate and pre-set control is the name of the game if you want to create sharp, and realistic images.

So, forget about ‘rescuing images later’. Do your photography correctly from the start and do it using RAW files.

Addendum:
It is important to consider the tools you work with. If your camera does not offer the opportunity to save RAW files you have to work with what you have got. Nothing wrong with that. It is worth reading my comment after this article.

By Damon Guy (author and Photokonnexion editor)

Damon Guy - Netkonnexion

Damon Guy (Netkonnexion)

Damon is a writer-photog and editor of this site. He has run some major websites, a computing department and a digital image library. He started out as a trained teacher and now runs training for digital photographers.
See also: Editors ‘Bio’.

Night photography – let the sparks fly!

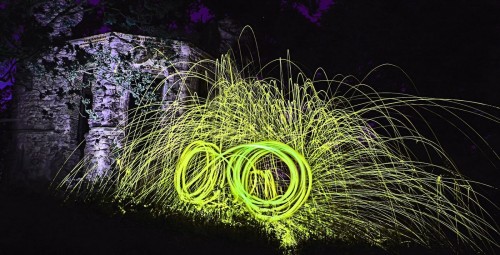
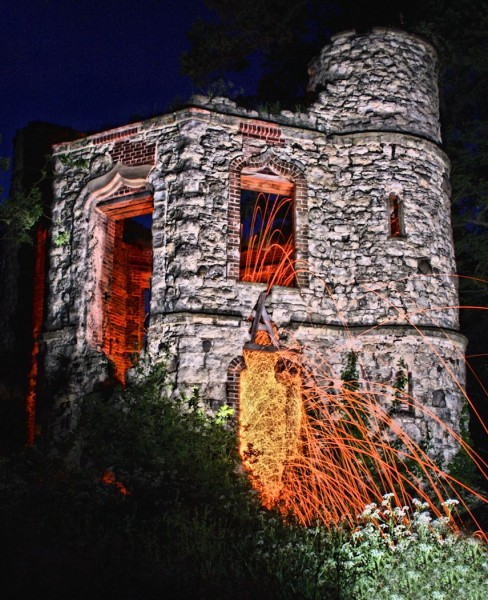
• Steel wool spinning •  by Steve Maidwell

• Steel wool spinning • In the tutorial you will see how to create images like this.
Click image to view large.
[Steel wool spinning • by Steve Maidwell]

Photography at night is an intense experience.

Not only is darkness powerful but the shock of light is even more invigorating. Put the two together and you have a formula for great impact. In this article Steve Maidwell gives us the tools to create incredible light shows.

What you will need
  • Steel wool – Get this get from any DIY store. I bought six bags, you will use a lot. Get Grade 0, 00, 000, or 0000. Don’t get anything at or above Grade 1, it won’t burn properly
  • Steel cable, rope or metal chain – Approx 1.5 M long, DIY store again. You could also use a metal dog lead with a clip at the end of the cable. I used the clip as a handle, but you can do whatever you wish. If you use a chain you won’t need the whisk or rope. Just poke the steel wool around the loops in the chain; it just takes longer to do that.
  • Whisk – I bought mine at a DIY store for £1. Make sure it is all metal, no plastic parts for obvious reasons.
  • Any D-SLR Camera and Tripod
  • A Lighter or 9 Volt battery – Use this to light the wool.
  • LED light or torch
  • Remote release for your camera (desirable, not essential).
  • All your clothes should be black if possible and you will need a hat or hoodie.

Next you need to build your cage to hold the steel wool. I attached the whisk to a steel cable. I looped the cable through the hole at the top of the whisk handle and then securely taped it on with duct tape. This cloth type tape is very strong so will not pull off when whisk is swung. Cut the cable/rope to about 1.5M long. I stripped the plastic covering leaving only the metal cable, again for obvious reasons. Then put two balls of steel wool into the balloon part of the whisk. Tease the steel wool apart to fill the whisk. This creates air pockets that allow more sparks to be generated. Put this to one side then set up the location in which you will take your images.

Out on location – ready to go

Set up the camera with the tripod, then…

  • Set camera dial to Manual (M)
  • Take the LED light or torch (flash light) and place it in the middle of the location you will be spinning your steel wool. Turn it on and point it so your camera will be able to focus on it.
  • Walk back to your camera, focus on the LED, then turn off auto-focus. This prevents the focus from changing when you start to expose the image.
  • Set a medium aperture F8-F11 and ISO at 100.
  • Set shutter at around 15secs. This may vary due to how dark it is when you take these. A good time is when you can just see light still in the sky but dark on the ground.
  • If you do not have a remote release button set the camera timer to give you a few seconds to move to the point of focus. You may need to practice this a few times before you light the wool.
  • Go to the torch (flash light) where you focussed your camera. Turn off the torch.
  • Push the remote shutter button (or wait for the camera to click on with the timer) and quickly ignite the wire wool with a lighter or battery terminals.
  • Spin the whisk. The faster you spin, the more sparks are generated.

If you have a partner helping out they can set off the camera or spin the whisk.

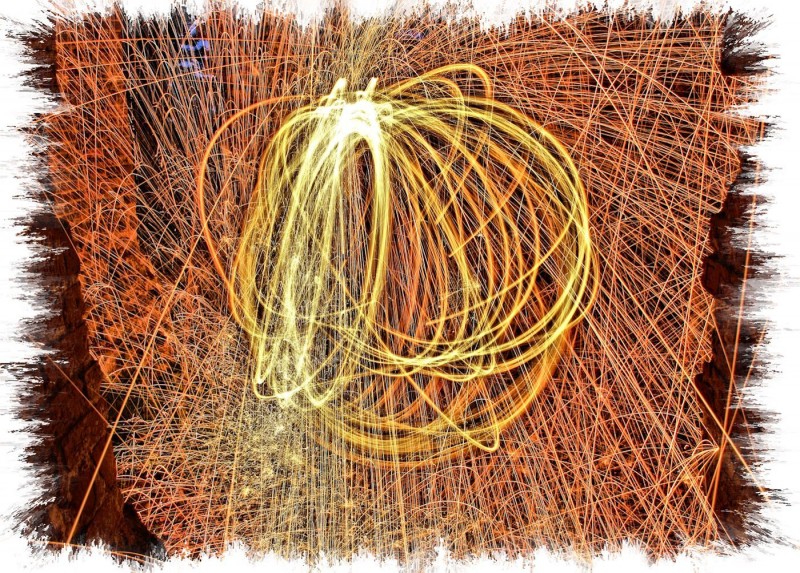
WhizThatWireWool - by Steve Maidwell

• Whiz That Wire Wool • by Steve Maidwell •
Shutter Speed: 16 Seconds
Aperture: F9.5
ISO: 100
White Balance: Auto
Click image to view large

In order to create the orb shape, spin the cable around in a circle. Then, while spinning, start rotating your body around the pivot point.

Spinning the wool in a circle without rotating around the pivot point will make a two dimensional Circle. It does tend to also light up the person doing the spinning. This creates a ghost image of the spinner. These are just as effective as the three dimensional orbs. Trying out different things is what it is all about!

You will need to test, and change, the settings on the camera to get the exposure right. It may take a few shots to get it the way you want it, but it is worth the effort. Don’t expect to get a correct exposure or final shot with the first try. After the first three or four shots you will get the hang of it.

Sparking Tower by Steve Maidwell

• Sparking Tower • by Steve Maidwell •

Camera settings for this image…
Shutter Speed: 30 Seconds
Aperture: F8
ISO: 100
White Balance: Auto
Click image to view large

Safety

Your safety is very important! For safety, wear a hat or hoodie, long sleeves, long trousers, shoes, gloves and goggles. This prevents your hair or clothes catching alight.

Allow the whisk to cool down before touching it, it will be very hot.

Have a fire extinguisher and a jerry can of water near-by, just in case a spark accidentally lands on a patch of dry grass. It can and WILL catch fire, especially if you are doing this in dry conditions. Very wet conditions are much safer.

Spinning wool in remote places helps because it draws less attention to yourself. You could attract unwanted attention from the authorities in public places.

Happy Spinning!

By Steve Maidwell (contributing author)

Steve Maidwell is a keen amateur photographer and active member of Marlow Camera Club. He has some superb images to his name and enjoys working with special effects. His website is imageinnation.com  External link - opens new tab/page. You can also see his images on his 365Project  External link - opens new tab/page

Simple facts about successful birds-in-flight shots

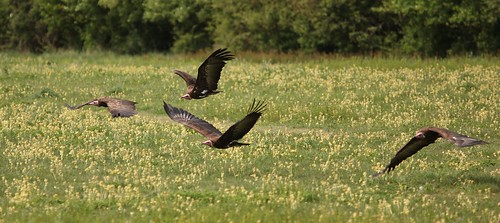
Vultures on the wing

Vultures on the wing – the capture of these birds needs the same panning techniques as any other moving objects.
Click image to view large. “Vultures on the wing” By Netkonnexion on Flickr External link - opens new tab/page

The capture of birds in flight is fun.

Birds rarely stay still for long and move fast when flying. The techniques here will provide basic ways for you to master birds-in-flight photography. The ideas build on techniques used in other areas of photography.

Panning techniques

Bird-in-flight shots are about movement. With any moving thing the only way to capture a sharp shot is to pan with the subject as it moves. Bird-in-flight panning uses the same techniques as other action shots. To learn panning techniques check out this series Action shots – How to….

As with any photographic technique, mastery comes with practice. If you are learning panning to photograph birds, start by panning cars. They are big targets and move with consistent speeds. They come past at regular intervals so practice is easy. You can practice almost anywhere and you will learn to pan quickly. Then, when you are ready, move onto smaller bird targets when you have mastered the simple movements and turning speeds.

Camera settings

Applying simple panning techniques is easy but the detail is important. The speed at which the birds are flying is critical. The focus you need to use is equally as critical. Here are some simple steps to set up the shots…

  1. Take a photograph of your subjects using automatic mode. You will use this as a starting point. Note down the settings for:
    ISO,
    Shutter speed and
    aperture.
  2. Next, set the camera to manual mode.
  3. Set your manual settings to those you noted from your auto-mode shot. You are going to gradually vary the settings until you get them right.
  4. The ISO setting will need to be fixed (for now). Leave it as you set it from your first (automatic) shot.
  5. Aperture is going to be an artistic decision. If you need to have the background sharp then you can tend toward higher F.stop numbers – say F11. If you need it soft (with bokeh) then use a wider aperture (F 4.0 to F5.6).
  6. Shutter speed is going to dictate how much movement you will see in the wings. To be safe, start with a faster shutter speed to freeze the action (500th, or 200th with flash).

You will be making changes to these settings from your original setting you noted from the auto-mode shot. Just remember, all settings are related. They balance. A change one way with a setting will need a compensation with another setting. If you need to move toward a faster shot to freeze the action you need to…

  1. Change the manual setting for shutter speed by one click toward a faster setting. This will be one third of a stop on most DSLRs.
  2. Then, to balance the settings, move the aperture setting one click off toward a larger aperture. This is because if you have less light coming in (faster shutter) you will need to open the aperture to compensate.
  3. You can repeat this process until you get the bird to freeze in its movement.

If you set a faster shutter speed, you need to open the aperture to compensate for less light getting in. A wider aperture reduces your depth of field. If you want to keep the depth of field as it was, then you need to increase the ISO by one third of a stop instead.

In other words, to move a setting towards your desired position you need to keep the balance of the other settings by equal amounts.

Focus and framing

When capturing birds-in-flight the focus is critical because the bird is moving. Set your camera focus to “continuous auto focus”. Continuous focus mode adjusts the focus as the bird moves. This allows your camera to maintain some focus control for the moving target.

You also need to set your focal length to approximately where you are going to capture the bird in flight. This means being ready with the approximate focal length to capture the incoming flight path of the bird(s). You may have no idea where the next bird is going to come from. However, you can make some approximate guesses based on experience and your location. The rest is up to you.

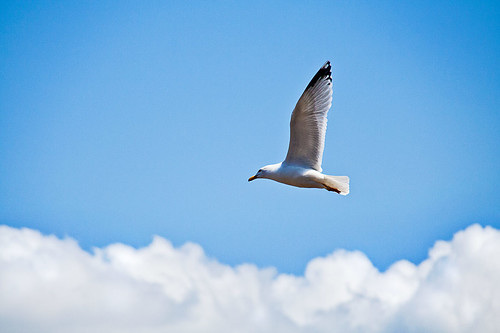
Zoom out from the shot leaving enough room to hold the bird in the frame while panning

Zoom out from the shot leaving enough room to hold the bird in the frame while panning. Click image to view large.
“Seagull in flight” By Netkonnexion on Flickr External link - opens new tab/page


Setting up the framing is the critical final step.

You need to be able to confidently place the bird in the frame for the shot. However, it is not easy to frame the bird so it fills the frame because they move so fast and are a small target. If you fill the frame when panning you will find it very difficult to get the subject consistently in the frame throughout the pan. So, zoom out. You will have to crop the shots later to bring the bird up to size. Yes, this probably means you are going to have to take more shots and do more post-processing. Unfortunate, but it is in the nature of these types of shots.

You should also consider leaving some room in front of the subject so it looks like it has some space to fly into. If your bird is right up against the edge of the picture in the direction it is going it looks like it is about to fly into something. The viewers eye naturally follows the line of flight and they will be distracted by that line if it is about to fly directly out of the frame.

Applying the techniques

So now you have the settings and you have the location/focus/framing worked out. The rest is practice. Now it’s shoot and wait – shoot and wait. It is time to apply yourself, to try out the techniques.

My personal experience with birds has involved plenty of practice and trial and error. What you read here will give you the essentials. Applying them is about doing some photography and learning as you go along. Enjoy it, panning and photographing birds in flight is great fun.

#11030#

How to take quick and easy photographs of fire

There is something deeply compulsive about fire.

It is almost a primal urge to be fascinated by it. Yes, it is fun to photograph it too. Fire provides all sorts of patterns, colours tones and light intensities. Here are some quick tips and tricks with a method to help you start experimenting with fire.

Three problem with fire…

1. Of course there is an issue with health and safety. Any bare flame is a danger. So try to be very careful to isolate your fire work area so you are not likely to catch anything alight near were you are working. I would advise working outside, or at least on a concrete-floored outhouse so you do not threaten your home, or set off alarms. Do not allow children near you when working with bare flames.

2. The main problem with fire for a photographer is that the fire creates its own brightness. You need to expose your shot for the direct brightness of the flame itself. This will allow the fire to be exposed correctly. However it leaves the surroundings very dark as they are not a light source. So, normally we would not point our camera directly at a light source. Ideally, we need to create a situation where the surrounding of the fire is actually dark, with no detail that we want in the picture. Then we can set our camera to take an exposure using only the brightness of the flame. No additional lighting is needed.

3. Fire spreads! So make sure that you have a fire extinguisher available if you try this exercise. Better safe than sorry.

On with the video

While I am a great believer in using your camera in manual mode most of the time there are ways you can use auto-mode too. In this video watch how he uses the ‘P’ mode (program mode). He takes a few exposures using the program setting so that he can get a reasonable idea of the settings the camera considers appropriate. Then, once the camera has helped him set a base line he can start working with manual to get the exposure he wants.

One other point before we get to the video. It is darkness which makes this shot work. Make the room completely dark while doing the shot. You will notice that the photographer has set up the background with black matte board. It is possible to use other subdued colours. However the black creates a very high contrast which is ideal for shooting a light source like fire.

Enjoy the video…

Video provided by LearnMyShot on Apr 22, 2010 [http://learnmyshot.com] Presented by Robert Grant.

Can you write? Of course you can!
Write for Photokonnexion...

We would love to have your articles or tips posted on our site.
Find out more…
Write for Photokonnexion.