Tag Archives: Landscape

Panorama photography – an introduction

Panorama photography | Photokonnexion.com

• Panorama photography •
There are a few important essentials to think about.
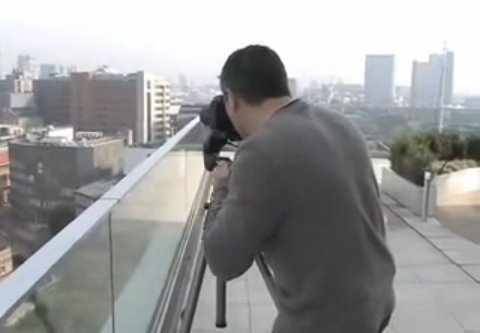
(Image taken from the video)

Getting started is easy…

Panorama photography is a great way to extend your photography skills. To make a panorama you take a whole string of shots. Then later you match them up in software and “stitch” them together to make one long image. The photographic variables are all fixed. You take lots of photos. But, only have to set the camera up once. This means you can concentrate on the scene.

Examples of panorama photography on Google images xxxx | External link - opens new tab/page

The essentials of panorama photography

Like any aspect of photography you need to have some essentials. Your camera and a lens get you started. But a tripod will give you more consistent results. It provides you with a firm platform. One that you can use to line up all the shots. A tripod is recommended because hand holding the shots can leave you with a whole bunch of badly aligned frames. Panorama photography is all about getting the full range of a scene. If you miss bits or fail to get neat alignment the image will loose its continuity. The eye is drawn a way from the image to the imperfections of the stitching.

To use a tripod properly you should also use a good tripod head. Set the camera up to get the scene you want. In this composition phase you will need to sweep through the shot. Look through the viewfinder and pan around the full scene. Get the tilt of the camera right. Have a clear idea of your sweep. Then, fix your tripod head so the camera will sweep through an arc without moving up or down. It will only pan “left <---> right” as needed. In the video you will see him using a “pan and tilt” tripod head. Once the scene is selected the tilt aspect is fixed.

Using the tripod and head means you will get an aligned sweep through your scene. This makes it easy to line up (stitch) the pictures together later. The fixed camera angles helps make alignment easy. But fixing the other settings also helps get consistent results.

Settings for the shots

There are some things that make panoramic photography easy. To get the best effect make each shot simple. Each should have settings the same as its neighbour. Wide variations of settings between shots make colours, brightness, tone and even focus create bad matches. The joins between images will show where the settings change. This disturbs the flow of the eye through the image. Here is a list of steps you go through to set up the camera – and why.

Focal length: As with the other critical settings set focal length to a fixed position. You should switch your auto-focus to manual so the focus does not change in each shot. Then, manually focus into the scene at a place that will give you good sharpness and depth. Then this should be left unchanged throughout the panorama photography sequence.

The exposure dial: Auto exposure settings change as you pan across different light levels. To avoid each frame being a different exposure use the “M”, or manual setting. Set up the exposure for the first shot. Then, keep that exposure setting through the the entire string of images. This means you will need to fix the settings for the full range of shots.

Aperture: Panorama photography is mainly about wide sweeping scenes. Landscapes are ideal. To make the scene realistic it is best to have sharpness right through the scene. Picking F11 is a good option for that. Practice your panorama photography with that F-stop to start. Once you have the techniques you can get more creative later.

Shutter speed: Hold the shutter speed fixed too. Your shutter speed depends on how you set your ISO, and the aperture too. However, don’t just think about the first frame. Study the entire scene. Is there going to be any variations in light intensity across all the shots? You want all the shots to have a similar exposure level. So do some test readings or shots with your camera light meter. Work out how much the scene varies. Avoid big light variation. It will make consistent exposure levels difficult. Look for even light across the scene. Then, find a shutter speed that will work well for all the shots.

ISO: As with the other settings, you want to hold the ISO. Choose a setting which suits the scene and ambient light overall. Fix it for all the shots.

White balance: RAW or *.jpg this is one time you MUST set the white balance to a fixed setting. If you use auto-white balance you will NOT be able to match the frames later. While white balance is generally quite stable, a colour cast from one bright reflection can significantly change the colour. That would not matter too much on one image. But it will if you have to try to match ten images each with a different white balance. That will end up giving your panorama photography a patchwork effect. Choose a white balance setting and stick with it for all the shots.

Getting the shots

Panorama photography calls on more than just scene composition and settings. Also critical is “overlap”. You want to join the images so they match. That means overlapping them in a way that allows a good join.

The skill is in picking features in your landscape you can use in the matching process. I like to use patterns or textures where possible. In the software you are going to line up each image with its neighbour. Those patterns or textures allow you to make a join look seamless. So, as you go through the scene make a mental note of where you want the join to be. Rotate the camera on the tripod for each shot. Make enough overlap each side of the frame for those points to line up. This is clarified more in the video at the end.

Landscape or portrait shots can be used for panorama photography. All the pictures need to be taken in one or the other. If you use landscape format the panorama will be very long and thin. If you use portrait format the stitched image will not be so thin. But you will need to take more shots to get the whole scene. You might choose differently for each scene. It is your choice. These choices are a key skill in panorama photography. Think carefully about your composition.

Panorama photography video tutorial

Most of the above are explained in the context of the shot sequence in this video. Panorama photography is great fun, but it does require a little thinking ahead and planning your sequence. The video should help you to fix the method and settings in your head.
What Digital Camera

Stitching the image together

There are two basic methods of stitching the final image. Again this is one of the main skills in panorama photography. You can do the work manually in an image editor. This work can be a lengthy and detailed process. Each image needs to be lined up by the patterns or textures you chose on the image as the overlaps. Then you might need to clone the images together. Bit by bit and image by image you can build up your final sequence. If you enjoy detailed image editing it is very rewarding.

The second method of joining the images is to use stitching software. There are lots of different applications available. Which one you use is a matter of personal choice. Some image editors have panorama photography stitching built in. For more advanced users there is also specialist software. These applications are available with a range of functions and prices. You should do some experiments and research to pick your preferred software.

Comments, additions, amendments or ideas on this article? Contact Us
or why not leave a comment at the bottom of the page…

Like this article? Don’t miss the next — sign up for tips by email.

Visual toolbox for photographers

Sharpen up your creative photography…

It’s easy when starting photography to over emphasis the importance of gear. In fact it’s ‘photographers eye’ that really makes the difference. Your vision and insight into a scene are critical to producing a wonderful image.

Sage advice from a world master

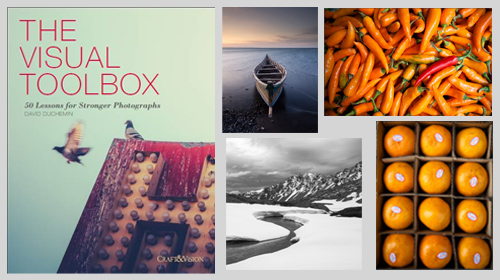
The Visual Tool Box by David duChemin is all about the skills of composition. He goes into depth around the background ideas which help you look at a scene. The ultimate success in photography is to make your image a pleasure to view. Aesthetics rule – it’s as simple as that. This book is dedicated to teaching you the tools you need to develop the ‘eye’.

David duChemin says,

These are the lessons I wish I’d learned when I was starting out.
The Visual Tool Box by David duChemin

This is my kind of book. He writes superbly, in simple, readable form. His examples are excellent and the pictures are just amazing. But most of all the book is organised for learners to extend their knowledge in easy, well structured steps. This book is all about putting new tools in your photographic tool box and it achieves that with an ease that any beginner will find a joy.

Composition

The book is packed with examples of the sort of compositional ideas that really work – for anyone. Just look at some of the topics covered…

  • Manual
  • Optimize Your Exposures
  • Master the Triangle
  • Slower Shutter Speed
  • Learn to Pan
  • Use Intentional Camera Movement
  • Use Wide Lenses to Create a Sense of Inclusion
  • Learn to Isolate
  • Use Tighter Apertures to Deepen Focus
  • Use Bokeh to Abstract
  • Consider Your Colour Palette
  • Lines: Use Diagonals to Create Energy
  • Lines: Patterns, Lead my Eye, Horizons
  • See the Direction of Light
  • Light: Front Light, Side Light, and Back Light
  • Quality of Light: Further Consideration
  • White Balance for Mood
  • Light: Reflections, Shadow, Silhouettes, Lens Flare
  • People
  • Experiment with Balance and Tension
  • Use Your Negative Space
  • Juxtapositions: Find Conceptual Contrasts
  • Orientation of Frame
  • Choose Your Aspect Ratio
  • Use Scale
  • Simplify
  • Shoot from the Heart
  • Listen to Other Voices (Very Carefully)

And there is plenty more content to complement and extends these ideas. What’s not shown in a list is the excellent and sage advice throughout the book. I will let David duChemin have the last word…

Pace your-self. Anyone can master a camera; that just comes with time. It’s the other stuff — learning to think like a photographer — that takes so much work and allows this craft to become the means by which you create art.
The Visual Tool Box by David duChemin

And it is thinking like a photographer that you will quickly learn from reading this book.

How to buy this great book

This book was originally published as an ebook. However, it is no longer available in that form. The book has moved into the real world. It will be available on Amazon as a Paperback From 31 Mar 2015.
The Visual Toolbox: 60 Lessons for Stronger Photographs (Voices That Matter)You can per-order the book from Amazon.

Comments, additions, amendments or ideas on this article? Contact Us
or why not leave a comment at the bottom of the page…

Like this article? Don’t miss the next — sign up for tips by email.

Damon Guy - Netkonnexion

Damon Guy (Netkonnexion)

Damon is a writer-photographer and editor of this site. He has run some major websites, a computing department and a digital image library. He started out as a trained teacher and now runs training for digital photogs.
See also: Editors ‘Bio’.
By Damon Guy see his profile on Google+.

Documentary… Ansel Adams

Ansel Adams

• Ansel Adams •
One of the all time greats in photography. This video is about his life, thoughts and work.
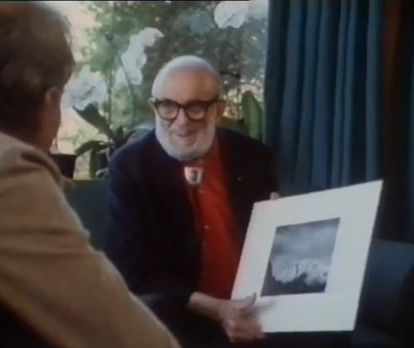
Image taken from the video.

The thinker-photographer…

There is a great deal to be said about Ansel Adams. He was a great photographer, thinker and artist. He was also an accomplished musician.

This post was about Ansel Adams.

Unfortunately the video was taken down from YouTube.

We have other Ansel Adams Resources on Photokonnexion.

At the time the video was removed it did not appear available online in another place. However, the subtext for the video as it was published is below. You may find it useful to use the text in case this video becomes available again at a later date.

Subtext for the video

Published on 29 May 2013
“The American Experience” Sierra Club Productions – Steeplechase Films
Ansel Adams is the intimate portrait of a great artist and ardent environmentalist — for whom life and art, photography and wilderness, creativity and communication, love and expression, were inextricably connected. ANSEL ADAMS, a ninety-minute documentary film written and directed by Ric Burns, and broadcast on national public television in April 2002, provides an elegant, moving and lyrical portrait of this most eloquent and quintessentially American of photographers. Written by Joshua Mueller
Category: Education
Licence: Standard YouTube Licence

Comments, additions, amendments or ideas on this article? Contact Us
or why not leave a comment at the bottom of the page…

Like this article? Don’t miss the next — sign up for tips by email.

By Damon Guy (author and Photokonnexion editor)

Damon Guy - Netkonnexion

Damon Guy (Netkonnexion)

Damon is a writer-photog and editor of this site. He has run some major websites, a computing department and a digital image library. He started out as a trained teacher and now runs training for digital photographers.
See also: Editors ‘Bio’.

Ansel Adams – Master Photographer

Ansel Adams Video

• Ansel Adams BBC Master Photographers (1983 •
Ansel Adams speaks about his photography and his development.
Picture taken from the video.

Exquisite insights to a legend.

The videos I show are usually for you to quickly watch and learn. This one’s different. It’s longer (34 mins.). And, there is so much in it that you will want to watch it over and over again. The wonderful insights run deep and some show us how much photography has changed.

Ansel Adams’ ideas, photographic insights and depth of feeling is magnetic. He was probably one of the first philosophers of photography. He was one of the undoubted masters too. I hope you enjoy this video as much as I did.

Ansel Adams – “BBC Master Photographers” (1983)

Uploaded by: Rob Hooley External link - opens new tab/page

Can you write? Of course you can!
Write for Photokonnexion...

We would love to have your articles or tips posted on our site.
Find out more…
Write for Photokonnexion.

By Damon Guy (author and Photokonnexion editor)

Damon Guy - Netkonnexion

Damon Guy (Netkonnexion)

Damon is a writer-photog and editor of this site. He has run some major websites, a computing department and a digital image library. He started out as a trained teacher and now runs training for digital photographers.
See also: Editors ‘Bio’.

Give your holiday landscapes a little extra punch

How to make a digital camera

How to make a digital camera

Do something different with your summer shots.

Holiday times always give us a chance to capture a few landscapes. Often they are a more difficult to get right than is appreciated. In fact a little thought can make all the difference. Think about your composition and your colours. The key to a good landscape is to find impact and contrast. In the video below Gavin Hoey shows you two things. First he shows how to think about your composition and colours. Next in the context of colours he shows how to turn your landscape into black and white in Photoshop (actually you can use any full featured image editor to do the same thing).

B&W Landscape Tips


AdoramaTV

Making black and white images

In the video Gavin Hoey made a great point about shooting in RAW. Landscape pictures often look great to the eye when in the field but they lose their appeal when the image is created on-screen. So in order to make your landscape pop some post processing is essential.

This video shows how to bring out contrasts to make the scene look great in black and white. However, he makes an important point about shooting in RAW. You don’t lose the original colour, it is retained in a RAW file. Then you convert to black and white afterwards. This is not possible in *.jpg. That format does not have the colours stored like the RAW format. If your black and white *.jpg is less than successful you lose the colour option too.

Gavin Hoey points out that you should test that your camera will process a RAW file in monochrome mode on its screen, but still leave a full colour RAW file. It is possible your camera converts the RAW file to a *.jpg file in the colour scene mode. So cover your options and try it before going in the field.

Gavin showed the conversion method to black and white using the colour sliders. Most image editors have two basic ways to create monochrome shots. Your shot can be simply colour converted to shades of grey, or you can use the colour slider method where you have some control over the intensity of colour which greys are created from. This latter method gives you much greater control over the contrasts in the picture. When working in monochrome that is the most effective way to ensure the picture has visual impact. So always choose the colour slider method to get better control of the conversion.

There are some additional links below to show how to improve your black and white shots in other ways.

Comments, additions, amendments or ideas on this article? Contact Us

find out more...Photokonnexion tips by email
If you enjoyed this article please sign up for our
Tips by email service.
                                                 Find out more

By Damon Guy (author and Photokonnexion editor)

Damon Guy - Netkonnexion

Damon Guy (Netkonnexion)

Damon is a writer-photog and editor of this site. He has run some major websites, a computing department and a digital image library. He started out as a trained teacher and now runs training for digital photographers.
See also: Editors ‘Bio’.

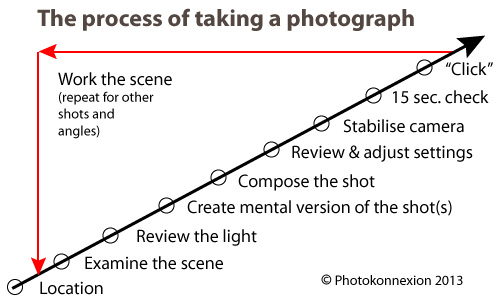
How to take photos – each important step in making a photograph

Infographic download - How to take photos

• Infographic showing the various steps in how to take photos •
A guide to what you should doing to make great images.
• Click to download printable full page version

Getting down to the detail…

Yesterdays article was How to take photos – each important step in making a photograph. Today I want to share the detail behind each step. Be warned! You might need to think again about your existing knowledge. Unlearning old ideas will help you to move forward and improve.

How to take photos – The location

Lots of people think you can just turn up and take pictures. Well you can, but often they are not good ones. Getting the best out of your location involves understanding what you’ll find there. Find out about the weather on the day. An idea of light levels and times of sunset and sunrise etc. is useful too. There have probably been lots of visits by others at popular destinations. Check “Google Images” for that site. Google will help with other details too.

When you arrive don’t just fire off loads of shots. Settle down and get into the location. Don’t make photography mistakes that mean you miss great shots. The first time you do this consider a variety of shots. Think about more than one shot, think about the whole shoot.

How to take photos – Examine the scene

Considering the scene is an important part of the work-flow on site. Unless you have been there before you need to get to know it. Use all your knowledge about camera angles, composition, lighting, camera settings and so on. Take the time to examine your location while thinking of these things. Consider your feelings about the scene too. How you feel will help your shot be an impassioned response to the location. What you feel about the scene is the best guide on how to take photos at that location.

How to take photos – Review the light

Most photographers forget this step. They are too wrapped up in the scene and the camera settings or the passion of it all. This step will make or break your shot. Look at the light. If you don’t know what I mean read these:

Ask yourself some simple questions about the light…

  • Is it hard or soft?
  • Is it coloured or more neutral?
  • Is it at the right angle to best capture the location/scene?
  • What is the best time for the right light?
  • Is it very bright and intense or dull and diffused?
  • Do I need any artificial illumination (flash, diffusers etc)?
  • Is the shadow hardly defined (sun up high) or strongly defined (sun to the side)?

Lean about the properties and vocabulary of light. It helps give you a greater understanding of photography. These questions, and others, help you make decisions about lighting for your scene. For more on “How to take photos – Light and Lighting” see the resource page in the SUBJECTS/ARTICLES menu at the top of every page.

How to take photos – Create a mental version of the the shot

If you want to make a great image – have a great picture in your head of your intended outcome. Visualisation has helped athletes, artists, thinkers, inventors and others to achieve amazing things. Train your mind to visualise in detail. If you see what you want to achieve it will guide you when setting up your camera. Take the time to create that mental picture – in detail. Consider how you are going to make the best of the light when you consider how to take photos. More about visualisation… 80 year old secret of world class photographers revealed.

How to take photos – Compose the shot

By now you have an intimate photographic knowledge of your scene. Composing the shot is about realising that potential. Long-time followers of this blog already know something about composition. For first-timers you can get lots of information from our Composition resources page in the SUBJECTS/ARTICLES menu at the top of every page. Composition is a skill that evolves as you develop as a photographer. Knowing more about composition helps your awareness and skill develop. Read about it to gain insight. Think about it every shot.

How to take photos – Review and adjust the camera settings

Now you have a picture in mind, composed, and are ready to set up your exposure. The exposure is defined by your camera settings. Camera makers will have you believe that the auto-setting on your camera is the perfect exposure. The fact is they made informed guesses to arrive at that exposure. It is different for every model of image sensor. Modern cameras do make a good representation of the scene. It is not always what you want however. You can change the exposure by under-exposing, over-exposing and by using different apertures, ISO levels and shutter times. That is your interpretation of the shot. When you think about how to take photos, plan how you want the image to come out.

Having a visualisation in your head helps you set the camera up to make that mental image. You do it using ISO, Aperture and Shutter speed. Even using one of the ‘mode’ settings is still a way of regulating your exposure. They all adjust those three basic facets of the exposure.

Here are some other links to pull together ideas about exposure:

How to take photos – Stabilise the camera

You want the photo to be sharp, crisp and clear. The faster the shutter speed the easier it is to get a sharp shot. But often, especially for a good quality shot, longer exposures are better. You need a good stance to hand-hold the camera. You will need a tripod (or other method) to steady it for longer exposures.

Stance is down to basic technique and comfort. The stance you use will be a personal thing for you. I have found many photogs have to relearn their stance after many years of a poor stance. It is best to learn a good one early. Here is my recommendation: Simple tips for a good stance

The use of tripods or other supports is a wide subject. It is also one that many learners tend to ignore- at least at first. When learning how to take photos sharpness is vital. Become acquainted with a tripod (preferably a good one) as early as you can. Your images will improve a huge amount. Here is some advice about tripods:

And, here is some basic advice about improving sharpness overall – The Zen of sharpness – 12 easy ways to improve

How to take photos – 15 second check

OK, that may seem like a long time. However, it is actually the time you need. You can get faster at it, but if you are taking a serious attitude to your shot then give it the time. You can find out all about the the 15 second check by reading these in order:

  1. An old sailors trick to improve your photography
  2. The fifteen second landscape appraisal
How to take photos – “Click”

This is where you press the shutter button. How you press that button can make a difference to your sharpness. Earlier, I mentioned this link, Simple tips for a good stance. It also gives advice on pushing the button without affecting sharpness.

An essential element of your shot is about confidence in what you have done. Today we are lucky. We just look at the back of our camera. Your first “click” may be a test shot. If your settings need adjustment then a simple technique called “Chimping” will help. Chimp and adjust. You will only need to do it a few times to get the shot right. You will not need to machine-gun the site with hundreds of “just in case” shots.

How to take photos – Work the scene

Chimping helps you set up for the shot and compose it. To get other possible shots you visualised earlier, you should work the scene. Repeat all the steps you have just done for each of the shots you foresaw. Working the scene is a skill and takes practice.

How to take photos – Time line

What is not obvious from the diagram is that the diagonal arrow is also a time-line of the shot. Of course it is a different length for every shot. You will have different problems to solve and ideas to consider for every shot. That’s fine. You have just learned a more careful, precise method for how to take photos. As you practice will quickly get faster at taking shots. But you will also make better images.

A promise

I can guarantee that if you follow the steps on this page you will…

  • Take less shots;
  • Get a better hit-rate (more usable shots per shoot);
  • Spend less time in post-processing;
  • Have better composition;
  • Improve your photography overall.

What is less obvious is that you will also save a lot of time.

By Damon Guy (author and Photokonnexion editor)

Damon Guy - Netkonnexion

Damon Guy (Netkonnexion)

Damon is a writer-photog and editor of this site. He has run some major websites, a computing department and a digital image library. He started out as a trained teacher and now runs training for digital photographers.
See also: Editors ‘Bio’.

Pure white featureless skys? How to tone them down…

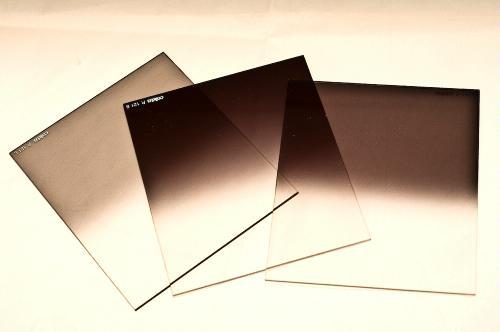
• Cokin neutral density filters (graduated) •

• Cokin neutral density filters (graduated) •
A quality set of filters that can be adapted to fit any lens size.
Buy: Cokin H250A ND Grad Kit

When your sky is too bright its a problem!

You lose all or most of the detail and your foreground is starkly highlighted by the blown out sky. The way to overcome blow out like this is to use various techniques with neutral density filters. All landscapers come across this problem at some time. The best way to overcome the issue is to tackle it head on in-camera. The best way to do that is to use “graduated neutral density (ND) filters”.

What are ND filters?

Neutral density filters are glass filters that you reduce the incoming light. They do this without affecting the colours in your shot. For blown out skies you want to reduce only the incoming sky light and allow the foreground to expose properly. The Graduated ND filter will allow you to achieve that.

In the picture above you can see the top half of each filter is dark. The bottom half is uncoloured glass. The trick is to place the filter in front of your lens. Place it in such a way that the line separating the dark and light lies on the horizon between the ground (proper exposure) and the bright sky which will be toned down by the filter.

If the sky is blown out in your picture the light is brighter than the camera can cope with. Normally that will be two stops of light or more above your exposure of the ground. The ND grads. normally come in three strengths. ND2 (two stops), ND4 (four stops) and ND8 (eight stops). Each stop of filtration is equal to half of the total light. An ND2 reduces the light by a quarter. An ND8 will cut down the incoming light to 1/16th of the light.

Video – Graduated ND filters for Landscape Photography

In this short video Tony Sweet demonstrates how he balances the dynamic range of a landscape composition using a graduated ND grad. filter working in a wooded valley. He wants to brighten the foreground with a long exposure. This would lead to the distant trees being too bright and would show burnt out spots. He uses a great technique to make the right light conditions…

Recommended purchase

I have been using Cokin filters for years. They are high quality filters that fit into a filter mount screwed onto the front of your lens. I prefer this type of fitting. It is simple to change filters and you can adapt graduated filters to the position you want quite easily. Round filters are far less adaptable and tend to be much more expensive.

If you want to buy an ND grad set of filters here is the kit I recommend…
Cokin H250A ND Grad Kit

You will also need to buy an adaptor for your lens to fit the filter mount. You can buy them singly…
Cokin filter mounts and lens adaptors

You can also buy a complete adaptor kit so you can adapt your filters to fit any one of your lenses…


If you feel like going the the whole way you can buy a kit that will cater for all your filter needs (including mount and adaptors) try this great kit…


By Damon Guy (author and Photokonnexion editor)

Damon Guy - Netkonnexion

Damon Guy (Netkonnexion)

Damon is a writer-photog and editor of this site. He has run some major websites, a computing department and a digital image library. He started out as a trained teacher and now runs training for digital photographers.
See also: Editors ‘Bio’.

Can you write? Of course you can!
Write for Photokonnexion...

We would love to have your articles or tips posted on our site.
Find out more…
Write for Photokonnexion.