Tag Archives: Birds

Shutter speeds – An easy guide

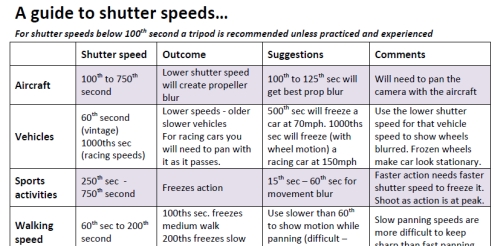
Shutter Speeds Cheat Sheet

• Shutter Speeds Cheat Sheet •
Click on image to download full .pdf cheat-sheet.

Shutter speed is easier with a start point.

One of the difficulties with shutter speeds is knowing what sort of setting to use with various speeds of an event in the real world.

Here is a short guide to get you started :: A guide to shutter speeds.

There are no rules about shutter speed

The actual speeds of real world events vary a great deal. In a race one car may move at 90 miles per hour (mph) and another at only 70mph. You should vary the shutter speeds depending on the objects speed, light intensity and the aperture you are using. Remember, the download cheat sheet is a guide not a set of rules. It’ll get you started, then it’s down to good old experimentation.

There is no substitute for experience

I do a lot of panning with race vehicles. I have learned to assess the speed and light then make quick guesses to set my camera up for a few test shots.

Once I took an experienced bird watcher to a drag race event. He was used to panning fast moving birds in flight. It took him time to adjust his eye for working with cars at up to 250mph. The best way to get good at doing shutter speed settings is to practice with a wide variety of moving objects so that you can get a general feel for the shutter speeds at each speed of your object.

Experience is the best master. So practice different settings a lot to get the settings and speeds for your interest properly fixed in your mind. This gives you a head start when setting up for a new subject.

Test shots

If you are going on a shoot where shutter speed is important, practice at the likely shutter speed for a few days before going. Try out different light conditions too. This will get your eye into the subject and help you know what variations you can use to get the best shots on the day. This post might help too… How to overcome frozen movement in panning.

The difference between freeze and blur

If you freeze the action you show some amazing stuff the eye does not normally see. Facial expressions and body movements as well as other details can be stunning. It can also look a little artificial. It is strange to see, for example, water droplets fixed in mid-air or a fast car with its wheels not blurry.

You can lower the shutter speed off the peak-action speed for freezing until you get some very slight blur in critical areas. Wheels on moving vehicles or propellers on aircraft are typical examples. They look artificial as frozen features, but give life and movement to an otherwise sharp rendering of high speed action.

Work your blur in naturally and show it as you would see it. Be especially careful where you have a lot of blur. Ensure there are still sharp elements in the picture. If everything is blurred it looks like a bad case of hand-shake.

The key

The key to controlling blur or freezing and other shutter speed effects is… practice! Lots of it. So, just get out there and have a go. Gradually you’ll forget the cheat sheet, you will have it in your head from practice.

Comments, additions, amendments or ideas on this article? Contact Us
or why not leave a comment at the bottom of the page…

Like this article? Don’t miss the next — sign up for tips by email.

By Damon Guy (author and Photokonnexion editor)

Damon Guy - Netkonnexion

Damon Guy (Netkonnexion)

Damon is a writer-photog and editor of this site. He has run some major websites, a computing department and a digital image library. He started out as a trained teacher and now runs training for digital photographers.
See also: Editors ‘Bio’.

Easy bird pictures in your own back yard

• Bird Compilation •

• Bird Compilation •
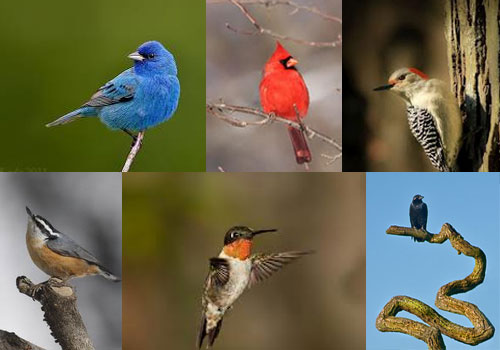
You can have a great time with these simple tips – a world of birds in your own back yard.

Birds offer endless photographic opportunities.

I’ve been fascinated by birds since boyhood, particularly birds of prey. Recently I’ve followed some keen bird photographers. I find that the small birds in my back yard are facinating too. Lets get started on some backyard photography. This will be a fun project for starting over the weekend.

This video gives down to earth, simple advice about working with birds close to home. Getting started in Feeding and attracting the birds mid-Winter gives a lead for the birds nesting in the spring. I am going to get started now. It’s Winter here and I am looking forward to spring.

How to Photograph Garden Birds


How to Photograph Garden Birds – RandoMnBest  External link - opens new tab/page – Uploaded on 28 Jan 2011

find out more...Photokonnexion tips by email
If you enjoyed this article please sign up for our
daily email service.
                                                 Find out more
#11030#

By Damon Guy (author and Photokonnexion editor)

Damon Guy - Netkonnexion

Damon Guy (Netkonnexion)

Damon is a writer-photog and editor of this site. He has run some major websites, a computing department and a digital image library. He started out as a trained teacher and now runs training for digital photographers.
See also: Editors ‘Bio’.

Can you write? Of course you can!
Write for Photokonnexion...

We would love to have your articles or tips posted on our site.
Find out more…
Write for Photokonnexion.

Simple facts about successful birds-in-flight shots

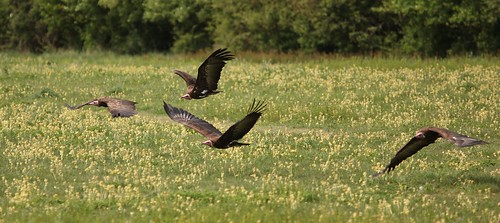
Vultures on the wing

Vultures on the wing – the capture of these birds needs the same panning techniques as any other moving objects.
Click image to view large. “Vultures on the wing” By Netkonnexion on Flickr External link - opens new tab/page

The capture of birds in flight is fun.

Birds rarely stay still for long and move fast when flying. The techniques here will provide basic ways for you to master birds-in-flight photography. The ideas build on techniques used in other areas of photography.

Panning techniques

Bird-in-flight shots are about movement. With any moving thing the only way to capture a sharp shot is to pan with the subject as it moves. Bird-in-flight panning uses the same techniques as other action shots. To learn panning techniques check out this series Action shots – How to….

As with any photographic technique, mastery comes with practice. If you are learning panning to photograph birds, start by panning cars. They are big targets and move with consistent speeds. They come past at regular intervals so practice is easy. You can practice almost anywhere and you will learn to pan quickly. Then, when you are ready, move onto smaller bird targets when you have mastered the simple movements and turning speeds.

Camera settings

Applying simple panning techniques is easy but the detail is important. The speed at which the birds are flying is critical. The focus you need to use is equally as critical. Here are some simple steps to set up the shots…

  1. Take a photograph of your subjects using automatic mode. You will use this as a starting point. Note down the settings for:
    ISO,
    Shutter speed and
    aperture.
  2. Next, set the camera to manual mode.
  3. Set your manual settings to those you noted from your auto-mode shot. You are going to gradually vary the settings until you get them right.
  4. The ISO setting will need to be fixed (for now). Leave it as you set it from your first (automatic) shot.
  5. Aperture is going to be an artistic decision. If you need to have the background sharp then you can tend toward higher F.stop numbers – say F11. If you need it soft (with bokeh) then use a wider aperture (F 4.0 to F5.6).
  6. Shutter speed is going to dictate how much movement you will see in the wings. To be safe, start with a faster shutter speed to freeze the action (500th, or 200th with flash).

You will be making changes to these settings from your original setting you noted from the auto-mode shot. Just remember, all settings are related. They balance. A change one way with a setting will need a compensation with another setting. If you need to move toward a faster shot to freeze the action you need to…

  1. Change the manual setting for shutter speed by one click toward a faster setting. This will be one third of a stop on most DSLRs.
  2. Then, to balance the settings, move the aperture setting one click off toward a larger aperture. This is because if you have less light coming in (faster shutter) you will need to open the aperture to compensate.
  3. You can repeat this process until you get the bird to freeze in its movement.

If you set a faster shutter speed, you need to open the aperture to compensate for less light getting in. A wider aperture reduces your depth of field. If you want to keep the depth of field as it was, then you need to increase the ISO by one third of a stop instead.

In other words, to move a setting towards your desired position you need to keep the balance of the other settings by equal amounts.

Focus and framing

When capturing birds-in-flight the focus is critical because the bird is moving. Set your camera focus to “continuous auto focus”. Continuous focus mode adjusts the focus as the bird moves. This allows your camera to maintain some focus control for the moving target.

You also need to set your focal length to approximately where you are going to capture the bird in flight. This means being ready with the approximate focal length to capture the incoming flight path of the bird(s). You may have no idea where the next bird is going to come from. However, you can make some approximate guesses based on experience and your location. The rest is up to you.

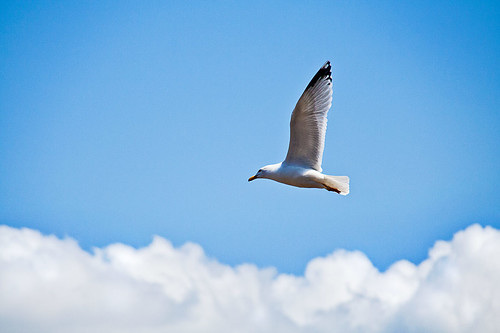
Zoom out from the shot leaving enough room to hold the bird in the frame while panning

Zoom out from the shot leaving enough room to hold the bird in the frame while panning. Click image to view large.
“Seagull in flight” By Netkonnexion on Flickr External link - opens new tab/page


Setting up the framing is the critical final step.

You need to be able to confidently place the bird in the frame for the shot. However, it is not easy to frame the bird so it fills the frame because they move so fast and are a small target. If you fill the frame when panning you will find it very difficult to get the subject consistently in the frame throughout the pan. So, zoom out. You will have to crop the shots later to bring the bird up to size. Yes, this probably means you are going to have to take more shots and do more post-processing. Unfortunate, but it is in the nature of these types of shots.

You should also consider leaving some room in front of the subject so it looks like it has some space to fly into. If your bird is right up against the edge of the picture in the direction it is going it looks like it is about to fly into something. The viewers eye naturally follows the line of flight and they will be distracted by that line if it is about to fly directly out of the frame.

Applying the techniques

So now you have the settings and you have the location/focus/framing worked out. The rest is practice. Now it’s shoot and wait – shoot and wait. It is time to apply yourself, to try out the techniques.

My personal experience with birds has involved plenty of practice and trial and error. What you read here will give you the essentials. Applying them is about doing some photography and learning as you go along. Enjoy it, panning and photographing birds in flight is great fun.

#11030#