Category Archives: Projects

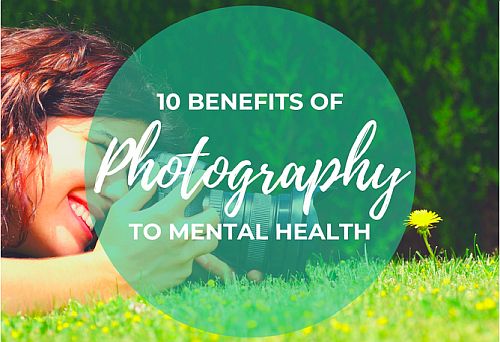
10 Ways Photography Can Positively Contribute To Your Mental Health During the Pandemic

10 Ways Photography Can Positively Contribute To Your Mental Health During the Pandemic

Mental health is important to all of us. Undoubtedly, the best way to keep yourself positive is to do something you enjoy. Do some more photography during the pandemic. It can be a big benefit to your outlook.

Mental health is something everyone should, literally, keep in mind. With the COVID-19 pandemic, communities at large are facing plenty of life-altering effects. The immediate concerns are the physical effects of the virus and its complications. Furthermore, there is wide spread evidence of a rapid increase of psychological distress globally. Any sustained pressure in society leads to difficult behaviour. Consequently, the most common mental health issues arising from the outbreak include stress, anxiety, uncertainty, frustration and depression.

In a study made by QJM International Journal of Medicine QJM International Journal of Medicine | External link - opens new tab/page, the escalating new mental health problems are associated with the general fear and long lasting public anxiety over the spread of COVID-19. In addition, inadequate information provided by the media also increases the feelings of hopelessness and desperation. The abnormally elevated levels of anxiety are further associated with negative consequences. These include harboring of desperate thoughts and suicidal behavior.

Tough restrictions take their toll

Strict quarantine protocols have lead to feelings of frustration and made a lot of people feel frail and helpless. The data on the same study by QJM revealed more. Among individuals who were quarantined, frustration, boredom and loneliness are thought to cause an impairment of the subjective well-being and the overall quality of life. Furthermore, other Medical Journals have noted mental health concerns. These include sleep disturbances and even Post-Traumatic Stress Disorder (PTSD) Post-Traumatic Stress Disorder | External link - opens new tab/page. Unfortunately, these Mental health impacts can last, not only during the quarantine period, but even into the long-term.

The impact on mental health brought about by the rapid spread of the pandemic is enough to clearly recognize it as a major health priority. What should we do about it? There are still no official behavioral strategies to help reduce the dramatic mental health problems induced by the pandemic. Nevertheless, you are encouraged to take personal measures that can somehow alleviate the mental health consequences.

What can we do about it?

Thousands of studies have revealed different methodologies to care for people suffering from mental health problems. Unfortunately, the current Covid-19 protocols make it difficult to easily access mental health treatment options. So how does one cope with a personal mental health issue?

Reducing the stress is difficult. However, it does seem to be a most effective way to fight mental health issues. During the initial lockdown, and since then, relaxing activities at home were encouraged. An absorbing hobby or interest is said to reduce boredom and uplift your spirits. A study by Lancaster University researchers found that Engaging in photography significantly improves a person’s well-being Engaging in photography significantly improves a person’s well-being | External link - opens new tab/page. The visual arts have long been studied for their positive effects on both the physical and psychological health. Photography is a form of self-expression in the visual arts. Consequently, photography can contribute to your ability to maintain or reconstruct a positive outlook.

The benefits

Taking up more of your time with photography will have effects on improving both physical and mental health. To illustrate how photography can be a great benefit to those facing mental health struggles, especially during the pandemic, we have identified these benefits of photography…

1. Photography improves self-care habits

Dr. Liz Brewster of Lancaster University and Dr. Andrew Cox from the University of Sheffield have done a study that revealed how taking pictures daily and sharing them with others can actually improve self-care. Doing something new develops into a new habit. The process is therapeutic and makes a person feel refreshed. Furthermore, it keeps the brain busy by making it think about creative photos to take every day. (See: Daily photography improves well-being – Brewster & Cox, 2018)

2. Photography encourages community interaction

Making valuable connections significantly improves a person’s well-being. Taking pictures and sharing them to a community, like a social media group, helps you to meet new people with the same interests. Photography becomes a common ground that can spark conversations, make connections, and eventually find support to fight loneliness and boredom.

3. Photography makes an individual reminisce

Photographs capture unique moments. The pictures you take can help bring back memories from the past. At the same time, your photos bring back the positive thoughts that go with those moments. This is one reason why people who are feeling sad or depressed look through old pictures. It is an effective method to, somehow, lift the mood. The point is, photography is a lovely way to make memories as well as, looking back, to remember them in a positive light.

4. Photography provides a beautiful vision of the world

Every picture tells a different story. Taking pictures lets you see a unique beauty all around you. As you review your shots you will get to appreciate those things you once took for granted. You discover your environment with a renewed vision without even meaning to. The greatest thing about it is that photos let you freeze the beauty that you see as you take photos of the world around you.

5. Photography keeps the brain in great shape

The brain, like other body parts, gets old. Photography is a good exercise to keep the brain healthy. According to research by Professor Denise C. Park from the University of Texas, photography is an activity that demands high-cognition. In her study, participants who engaged in digital photography are able to enhance and improve their episodic memory and reasoning skills. In short, photography can help you ‘use it’, rather than ‘lose it’.

“Although there is much more to be learned, we are cautiously optimistic that age-related cognitive declines can be slowed or even partially restored if individuals are exposed to sustained, mentally challenging experiences.”
Mentally challenging activities key to a healthy aging mind Mentally challenging activities key to a healthy aging mind | External link - opens new tab/page

6. Photography can help the body get moving

Photography typically encourages exercise. If you go out and walk around in the hope of taking great pictures of the outdoors – you are exercising. This allows the body to burn calories, especially when you need to climb a tree, get closer to a subject, or do any physical activity that helps you find a good shot. Walking, especially in the hills, is great exercise and a great photo-opportunity too. Moreover, while getting fitter, you are improving your mental health.

7. You get to enjoy what you love even more

It is natural for a photographer to take photos of something that is of interest to him or her. The interest keeps you more engaged. As you become absorbed in an enjoyable experience you also see your interests in a different perspective. Absorption and engagement gives you a rewarding feeling that can boost your happiness.

8. Photos are positive mood stimulants

A study titled The Connection Between Art, Healing, and Public Health: A Review of Current Literature The Connection Between Art, Healing, and Public Health: A Review of Current Literature | External link - opens new tab/page, art therapy can help reduce cortisol, a hormone that can cause stress in the human body. Photography is a form of art. Taking a good picture, therefore, makes a person feel relaxed. Consequently, taking positive photos helps you see the world differently and will keep you motivated.

9. Photography improves creativity

Activating the brain through photography is possible because it does not only awaken creativity. It actually lets the brain process different thoughts and encourages the body to translate its emotions into photos. The activity also promotes curiosity and gives you the courage to try out different techniques to improve every shot. As mentioned above, sustained, mentally challenging experiences help keep your mental processes active or even improve them. Of course, photography includes lots of challenging mental experiences – learning, observing and creating – to name but a few.

10. Photography gives you a sense of direction

Especially during the pandemic, people worry about the uncertainty of the coming days. Photography somehow eases you out of the daunting thoughts by making you look forward to what you will photograph next. Instead of brooding about what is in store, taking photos lets you enjoy each moment, guiding you to be positive. Think about your photography and get excited about the next day – that is a great step toward positive mental health.

Additional Tip:

How to Take Photos & Be Creative During Quarantine

By picking up a camera, you instantly challenge yourself to get creative. The problem, however, is that there are limitations set to maintain social distancing and lockdown protocols. Because taking outdoor shots may be challenging for some, here are some practical tips for photographers that you can do to enjoy photography while in quarantine…

Photo editing

Explore different methods of photo editing. For those who are working from home or are taking online classes, you may have a bunch of time in your hands. Use it to learn about improving your photos. You may enroll in online classes or explore any photo editing app that you currently have. This will allow you to revisit old photos and have you attempt to enhance them using what you have learned. Remember, learning is great for your mental health.

Photograph food

There’s no better time to actually appreciate the chance to enjoy cooking and eating than being in quarantine. Get creative with your meals and transform them into fine art photos. Eating AND photography – what could be better!

Go black & white

One way to develop your photography skills is by shooting in black & white. Most digital cameras have a setting for monotone shots. Try it with your family or pet as the model and try to hone your skills with this technique. Alternatively, you could try converting old photos to black & white in a photo editor. Your photography will improve by looking at your photos in a different way. In addition, new ideas and approaches is good for your mental health.

Take a photo scavenger hunt

This is a fun challenge that you can do at home to help occupy your time. Make it a contest. Get your family and friends and create a social media group where you can upload and see each others’ shots. Mix and match your ideas with others. In short, have a great time, and improve your mental health and well-being. (Download: Prepare a Photo Scavenger Hunt).

Get creative with a free background remover

Instead of brooding about not being able to get out, you can use a background remover to edit your photos. You can bring the outdoors into your pictures. Lighten the mood by editing yourself into travel destinations. Get a good laugh by having a virtual group picture with your friends and make it look real with a new background. There are tons of creative things you can do once you remove the background from the image. Once again, laughing and community are great for your mental health.
 

The value of photography is greater than just the pictures

Photography can help you to express yourself. However, it has become a lot more valuable during this pandemic. It can help you personally focus on positive life experiences, reduce stressors, and enhance self-worth. Photography is absorbing and interesting. The engagement you get from this hobby is important, especially as the world has gone through so many changes in the months since the outbreak started. Focusing on photography somehow gives the mind and body a sense of balance. As a result, you are ready to face the day with positive thoughts and attitude.

Comments, additions, amendments or ideas on this article?
Contact Us or leave a comment at the bottom of the page…

Like this article? Don’t miss the next — sign up for tips by email.

Post contributed by :: Jenn Pereira

Jenn Pereira is the Product Designer of Removal.AI, an AI technology used to remove background from images. This tool also comes with a free online photo editor that allows users to create diverting graphics, banners and images. She is passionate when it comes to designing and creating new ideas to help brands and small businesses realize and achieve their goals through innovative product, UI/UX design application and strategic digital marketing.
Website: Removal.AI Website: Removal.AI | External link - opens new tab/page

find out more...Photokonnexion tips by email
If you enjoyed this article please sign up for our
daily email service.
                                                 Find out more


Three creative jump start ideas

Post by Ann H. LeFevre

A creative jump start – get going again.

It happens to all of us at least once. Our creativity runs down and we feel uninspired. Those are the times when our cameras feel like they weigh a thousand pounds and our brains seem like they are stuffed with cotton. There are many ways to combat such a slump. What you need is a creative jump start. Here are three suggestions to help you the next time you come up against that photographic brick wall.

The 30 second game

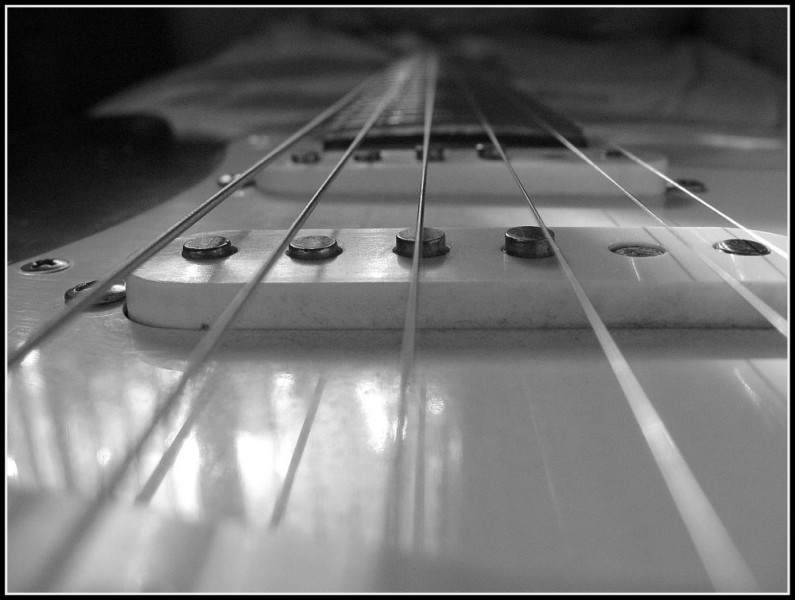
Pick a room in your home at random to try the first creative jump start. With camera in hand, walk into the room. Select a subject (perhaps the first thing you see) and start shooting. Don’t “think” about it; just do it. Make it quick and no longer than 30 seconds. The idea here is to be loose.

The Strat • By Ann H. LeFevre • Three creative jump start ideas

• The Strat •
By Ann H. LeFevre (Click to view large)


Creativity can be blocked by over-thinking about the “next shot”. This little game helps to bring back some spontaneity into your picture taking.

Take Another Look

We get used to seeing things the way we always see things. In this exercise the object is to take something common, perhaps something you see all the time. Then, to look at it from a different perspective.

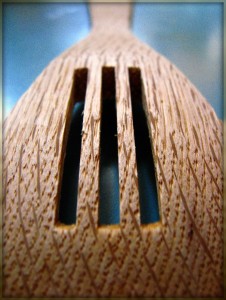
• Wooden Spoon • <br />By Ann H. LeFevre • Three creative jump start ideas

• Wooden Spoon •
By Ann H. LeFevre (Click to view large)


Look at your chosen object from all different angles. Take a shot from each one. Look up. Look down. Look close. Look all around, taking pictures as you go. Looking at a common object from a new vantage point can loosen up the creativity block. A creative jump start works best with a simple views of things.

Play with Processing

Take one of those “Why did I even take this picture?” photos. Make a copy of the original. Put it into your photo processing program and play around with some special effects. Go all out and experiment. Don’t worry about whether or not you’ll actually keep the picture when you’ve finished. Simply spend time playing around on it for as long as you want. Let your processing ideas flow.

• Sunflowers •<br />By Ann H. LeFevre •  Three creative jump start ideas

• Sunflowers •
By Ann H. LeFevre (Click to view large)


Laugh at what you create. Laughter loosens up your creativity. And who knows? One of those crazy effects may trigger an idea! Processing can also transform an ordinary picture into something that is visually pleasing. Playing with the way a photo looks is a great way to charge up your creativity.

Beyond routine and distraction

Shooting slumps occur because we become anchored to routine or distracted by our busy lives. A creative jump start serves to break those habits and change our perspective. Try one out the next time you’re in a rut and see what happens!

Ann H. LeFevre – contributing author

Ann holds a B.A. in Fine Arts from Bethany College. She is a member of the Pocono Photo Club Pocono Photo Club | External link - opens new tab/page, and participates in the 365 Project Ann H. LeFevre - contributing author on 365Project.org | External link - opens new tab/page an on-line photographic community. She has enjoyed the artistic aspects of photography for many years and enjoys exploring a variety of photographic subjects in her work.

Top ^

Comments, additions, amendments or ideas on this article? Contact Us
or why not leave a comment at the bottom of the page…

Like this article? Don’t miss the next — sign up for tips by email.

Can you write? Of course you can!
Write for Photokonnexion...

We would love to have your articles or tips posted on our site.
Find out more…
Write for Photokonnexion.

Using your photos – ten ideas for crafts and gifts

Using your photos for gifts and crafts

• Using your photos •
Putting your photos to good use as gifts and crafts.

Why do you take photos? Most of them are never used.

We all like to see our shots when they are finished. But the vast majority go unused. They’re left in a folder for storage. What about actually using your photos? Artists have many different ways of using their shots. But most of us do not.

Using your photos – get motivated…

There is more to art than its existence. It must be seen too. We put a lot into our photography. Shame! All that work and energy – then nothing. Maybe it’s time to think about what we can achieve with our photos. This is a chance to get motivated for something more.

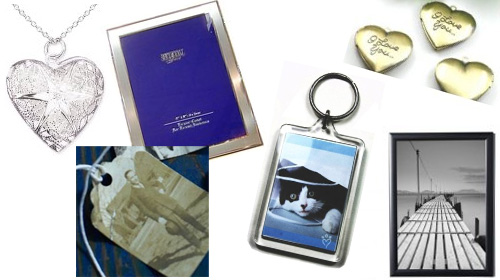
Some ideas for using your photos

Using your photos for positive things can be really satisfying. It’s a really great outcome for your interest. With some simple ideas you can produce some lovely things. Here are some ideas…

A host of projects for using your photos

You’ve seen some ways you can use your photos for craft projects and for great gifts.You will get great satisfaction for using your photos to make others feel good.

There are many other ways you could also use this craft idea. You can help some people who are not as privileged as you. These ideas make great revenue raisers for charity and care organisations. If you work for an organisation that needs to raise funds think of ways you can use these inexpensive methods of making things to sell. Benefits and fund raisers are great places to raise extra cash. Charities are ever grateful for such support.

There are probably many more crafts, and ways you can help others by using your photos. Have fun. Help people feel good. Check out some of the links above and come up with some ideas of your own.

Comments, additions, amendments or ideas on this article? Contact Us
or why not leave a comment at the bottom of the page…

Like this article? Don’t miss the next — sign up for tips by email.

Netkonnexion

Damon Guy (Netkonnexion)

Damon is editor of Photokonnexion. He has professional experience in photography, writing, image libraries, and computing. He is an experienced, webmaster and a trained teacher. Damon runs regular training for digital photographers.
See also: Editors ‘Bio’
By Damon Guy :: Profile on Google+.

The Minimalist Guide to Successful Photography

• Being a successful photographer is about doing things that are different •

• Being a successful photographer is about doing things that are different •
Photograph by Joe McNally

Work hard – do things to get noticed.

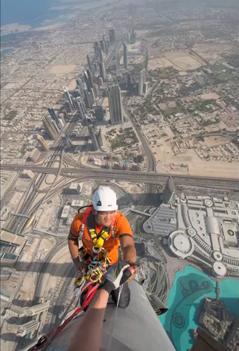
OK, it is not as simple as that. But it is a time-honoured route to success. Famous photographers go for the stunning shot. The video shows a world class photographer going to extraordinary lengths to get the shot. And, he certainly does that. Wow. Stomach churning stuff.

I just had to show you this video for its sheer tenacity. Joe McNally is an exceptional and successful photographer. He is also, after many years in the business, still getting the shots. This is the stuff that impressive photography is about. This personal project is how people like him stay at the top of the photography business… and the top of the world – literally.

Climbing the Burj Khalifa (The World’s Tallest Building)


joemcnallyphoto  External link - opens new tab/page

If you can keep cool under any circumstances, get the quality of shots that capture the eye and run a business you can be like Joe McNally. See… I did say a minimalist guide to success in photography!

find out more...Photokonnexion tips by email
If you enjoyed this article please sign up for our
Tips by email service.
                                                 Find out more

Ten simple ideas to improve your photography (and a fun quiz)

Ten Tips

Ten Tips and 12 fun quiz questions.

Simple things help you…

We should all take a step back and think about the basics sometimes. It helps us remember essential techniques and keeps us on our toes. Here are the basics with some fun quiz questions too.

The simplest techniques in photography are often the most important ones. In this post we make sure we don’t forget them…

10 essential things to know; 12 fun quiz questions
  1. Not knowing your camera: This is really bad news. If you are hoping to improve your photography make sure you learn what every lump, bump, dial, screen, lens and twiddly bit does. Read your manual regularly. Practice with each function until you have got it right. Then practice it in the dark so you can do a night shoot.
    Quiz Question 1: How many lenses are there on a camera? Answers at the end!
  2. Poor stance: Most people when starting photography don’t realise that the way they stand and hold the camera creates all sorts of problems and poor performance. If you are a keen photographer a good stance can contribute to improved sharpness (hand-held shots), better focus, more steady hand and better shot timing. Learn to stand properly right at the start and you will save yourself lots of re-training time later.
    Quiz Question 2: At what point in the breath cycle is it best to take your shot?
  3. Not using a tripod: classic mistake. Tripods save you lots of time and give you pin sharp photographs. They give you an opportunity to set your camera up properly and ensures that your are ready for your shot.
    Quiz Question 3: A monopod has one leg, a tripod has three legs. What is, and how might you use, a bipod?
  4. Not giving the camera time to focus: When you press the shutter button halfway down it causes the auto-focus to cut in which focuses the camera. But if you punch straight through that to the shot the focus has not had time to do the full focus. This normally happens on the first focus attempt when the focus is right off. After that the lens in nearly focused and will adjust more quickly. So don’t make your first focus attempt too close to the shot or it will be blurred.
    Quiz Question 4: Why do you have two rings on a modern auto-focus/zooming photographic lens? What do you call each of them?
  5. Taking pictures against a bright light? Cameras don’t like very bright lights. Especially if there are also very dark spots nearby. Shooting indoors while looking at a window out to a bright sky will cause a strong white spot. This is very distracting and draws the eye away from the subject. Not good. There are Light and Lighting resource pages on Photokonnexion for you to learn more.
    Quiz Question 5: How many stops of light can healthy human eyes see (20:20 vision)? How many can the camera (rough generalisation) cope with?
  6. Relying on flash (especially pop-up flash): Pop up light has a very small concentrated source. It discolours faces, washes out colours, creates harsh, sharp-lined shadows and is badly placed (too close to the optical axis) creating nasty highlights on faces. Try to use natural light more. It is much more forgiving and does not produce such harsh shadows most of the time.
    Quiz Question 6: What is often the result of using pop-up flash with respect to two parts of the face?
  7. Dead centre subject: If you put the subject of your picture in the centre it will usually be boring. If you off-set your subject the eye will be looking to see why the symmetry is broken. That keeps the eye hunting around the screen. Learn about the “Rule of thirds” and other Composition principles. That will help you make the shot more compelling to the eye.
    Quiz Question 7: What type of compositional perspective would you be working with if you want to promote a three dimensional feel to your picture composition?
  8. Horizon control: Make sure your horizon is level, especially if it is a seascape. If you leave it on an angle the picture will be ruined because it will look like the sea is sliding off the page! Horizons also induce mid-picture viewer-stupor. Make a decision. Either shoot for the sky in which case place the horizon in the bottom third of the picture. Or, shoot for the ground in which case the horizon goes in the top third of the picture. An off-set horizon is more dynamic and keeps the viewers eye moving.
    Quiz Question 8: If your main choice is to shoot for the sky, where would you take your exposure from? (Where would you point your viewfinder focus point?) a. The sky? b. The ground?
    Quiz Question 9: Describe autofocus hunting and why it happens?
  9. Simplify, simplify, simplify: The most effective way to show a subject to your viewer is to de-clutter the picture. Take out of your composition everything that is nothing to do with the subject. The more you make the viewers eye go to the subject the more effective your shot will be.
    Did I mention that you should simplify your shot?
    Quiz Question 10: What is it called when you paint out something from your picture in post processing to simplify a shot?
    By the way, did I mention that you should work really hard to simplify your shots?
  10. Go manual: Auto-modes on your camera are really best guesses about what the manufacturer thinks will be suitable for the average shots most snappers will take. Buy you are a keen photographer. To get the camera to do exactly what you want, and to make discerning choices about your images you should work on improving your manual control. Your understanding of photographic principles will improve, your skill at exposure will improve and you will find yourself making informed choices about how you want your picture to come out. You will turn from a snapper into a photographer.
    Quiz Question 11: What does the ISO control do? a. Adjust the sensitivity of the digital image sensor or b. Change the aperture size?
    Quiz Question 12: Does ‘shutter speed’ or ‘aperture’ control movement blur?
Answers to quiz questions
  • Quiz Question Answer 1: I am talking about any camera that has a lens, not just DSLRs. the number of lenses is a matter of variation. If you are discussing photographic lenses then only that one will count (but read on). Some people think of each glass element in the photographic lens as an independent lens. Technically that is not true. They are optical lenses or glass elements, not photographic lenses. However, if the photographic lens (and elements if you included those) were all you counted you would be wrong. Here is a short list of Possible lenses on a camera of any sort…

    There may be others.

  • Quiz Question Answer 2: You should take a shot at the full inhale point or full exhale point before inhaling or exhaling in the next part of the cycle. You can choose which is best for you. All you do is delay the next part of the cycle while you take a shot. This is the point in the breath cycle when there is least movement of the shoulders/chest. Read more about it in Simple tips for a good stance
  • Quiz Question Answer 3: A bipod is photographically uncommon. Understandably, it has two legs. Find out more here… Definition: Bipod
  • Quiz Question Answer 4: The two rings on an auto-focussing photographic lens allow one ring to focus the image – the focus ring. The other ring is for zooming the lens. The latter changes the focal length and is called the focal length ring.
  • Quiz Question Answer 5: Human eyes can see about 18 to 20 stops of light when healthy. However, by contrast the best commercially available cameras have to operate with a dynamic range of 8 to 12 stops of light. Research is pushing the boundaries but there is still a big gap to meet the dynamic range of the human eye (in 2013).
  • Quiz Question Answer 6: Pop-up flash is very likely to cause red-eye.
  • Quiz Question Answer 7: To make things look three dimensional in your image you should be working with three point perspective. Look for lines in your image that promote cube-like structures. For example buildings, walls and other objects with lines and shapes that have a solid feel in real life. This will trick the eye into believing that there is a solid object in the picture. Read: Simple ideas about perspective in photography and: Definition: Perspective
  • Quiz Question Answer 8: If you shoot for the sky you will need to be taking your exposure from the sky as that is the brightest point. This will leave the ground darker in your exposure than you would see it with your eye. You can use one of a number of techniques to correct that later.
  • Quiz Question 9: Auto-focus hunting is when the auto-focus in the lens cannot focus and will keep going up and down the focus range trying to get a focus. This is a common problem at night, in darker conditions, low contrast conditions and clear or totally grey skies. You can read more about it in: Auto-focus ‘Hunting’ Definition: Hunting, Auto-focus

  • Quiz Question 10: when you paint out something from your picture in post processing to simplify a shot? You normally use a cloning tool. You can find out more in: Definition: Cloning; To Clone; Cloned; Clone Tool.
  • Quiz Question 11: What does the ISO control do? It adjusts the sensitivity of the digital image sensor allowing you to work in bright light (low ISO setting) or low light (high ISO setting). There is an article on ISO here: ISO.

  • Quiz Question 12: Shutter speed controls movement blur. Aperture controls blur (bokeh) created by the loss of sharpness outside the zone of acceptable sharpness. This is traditionally known as the depth of field. More reading on: Definition: Exposure and related to aperture: Definition: f number.

find out more...Photokonnexion tips by email
If you enjoyed this article please sign up for our
Tips by email service.
                                                 Find out more
#11030#

By Damon Guy (author and Photokonnexion editor)

Damon Guy - Netkonnexion

Damon Guy (Netkonnexion)

Damon is a writer-photog and editor of this site. He has run some major websites, a computing department and a digital image library. He started out as a trained teacher and now runs training for digital photographers.
See also: Editors ‘Bio’.

Inexpensive Close-Up Photography – Extension Tubes

• Water Icicle •

• Water Icicle •
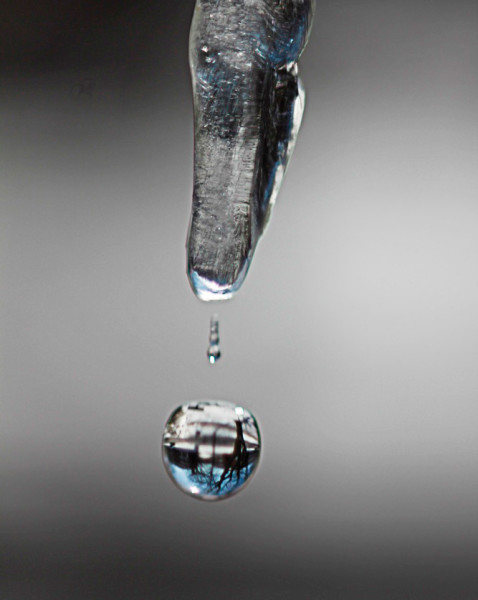
Fig 1: Water dripping from an icicle. The drip was shot with
a 7 mm extension tube on an old manual lens.
Click image to view large

Simple tubes bring remarkable results.

Macro photography allows you to capture images of small subjects, detail and pattern. Unfortunately, macro lenses are expensive. In the last two articles I looked at inexpensive ways to do close-up photography. These showed how to avoid buying a new macro lens. We looked at close-up rings and rReverse Rings.

Another way to do macro photography without special lenses is to use extension tubes.

• Extension Tubes •

• Extension Tubes •
by ArchaeoFrog
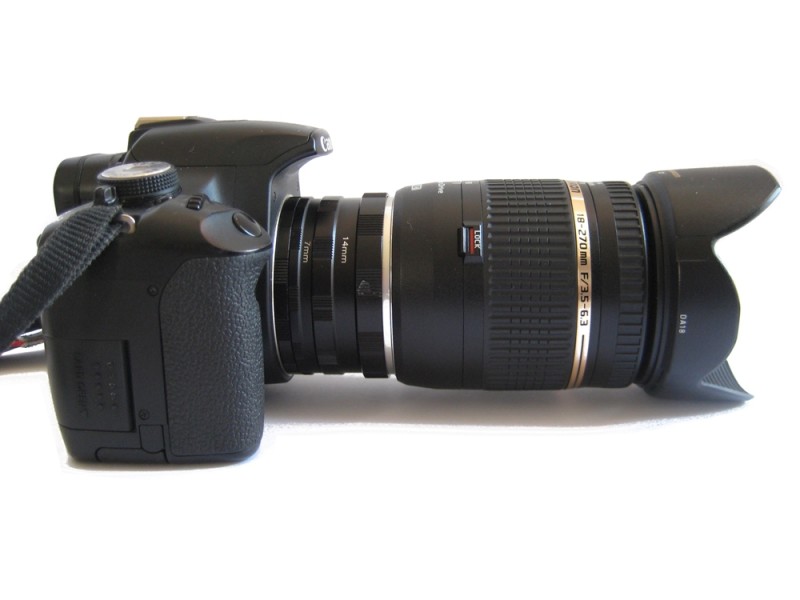
7mm and 14mm extension tubes between a Canon T1i body
and Tamron 18-270mm lens.
Click image to view large


Extension tubes are hollow metal rings. They attach between your DSLR camera body and an ordinary lens. An example is shown in the image above. The further your lens is moved away from the digital image sensor by extension tubes, the closer you can get to your photographic subject. At the same time the subject is enlarged.

Visualization of the effect of an extension tube at the image sensor.

Visualization of the effect of an extension tube.
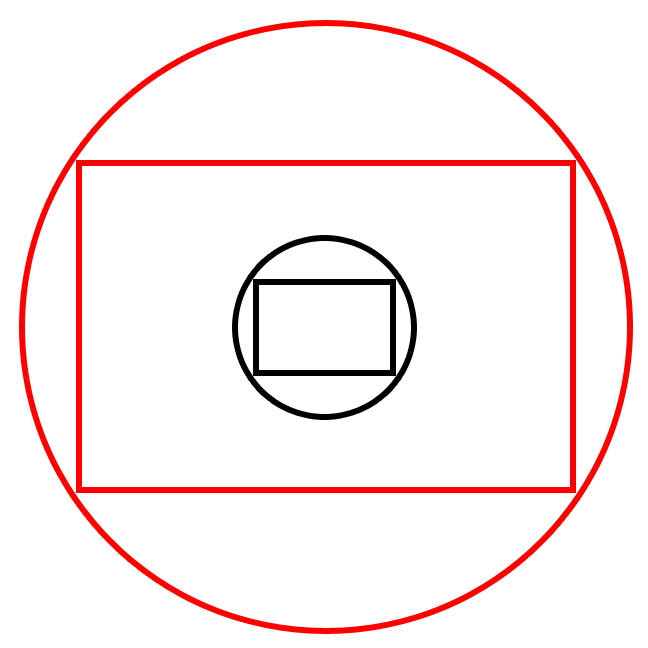
The diagram shows in black the actual size of the image circle and the rectangular sensor size inside it. The red lines show how a 7 mm extension tube casts a larger image circle (red). The image sensor (black rectangle) records the enlarged section in the middle and ignores the rest of the circle outside the rectangle. •

The camera’s sensor is a rectangle, but your lens is round. When your camera records an image, it is only recording the rectangular portion of the light that falls on the sensor. This is indicated by the black rectangle (the sensor) and black circle (the image circle) in the diagram. An extension tube moves the lens further away from the sensor, which makes the image circle (red) larger. Now the sensor is recording an area less than a ninth of the original image (compare the black and red rectangles). The longer the extension tube, the further your lens is from the sensor. And, the more detail you are able to capture.

Using extension tubes

There are two types of extension tubes. One type is a set of generic metal tubes, usually packaged as a set of three allowing you various enlargements. This type is made from bare metal tubes. They do not carry the signals that the camera uses to tell the lens to change aperture and focus. This means your lens has to be adjusted manually. This can be an advantage. Macro lenses have a very shallow depth of field. Manual focus is often more accurate in that situation.

The second type is also a tube but maintains the electrical connections between the camera and the lens. This allows you to use all the functions of your lens, including autofocus and aperture adjustment. These expensive versions are sold as one piece. You do not have the option to vary the enlargement factor. There is a big difference in price between the two. You will pay around ten times as much to maintain those lens functions.

The directions below apply to the cheaper version of extension tubes.

The generic metal ring extension tubes are often sold in sets of three lengths with 7 mm, 14 mm, and 28 mm being common. In addition to the three rings, you will receive two additional pieces: a piece that mounts the extension tube to the camera body and a piece that mounts the lens to the extension tubes. You will need to buy a lens mount that fits your camera brand.

• Extension tube set •

• Extension tube set •
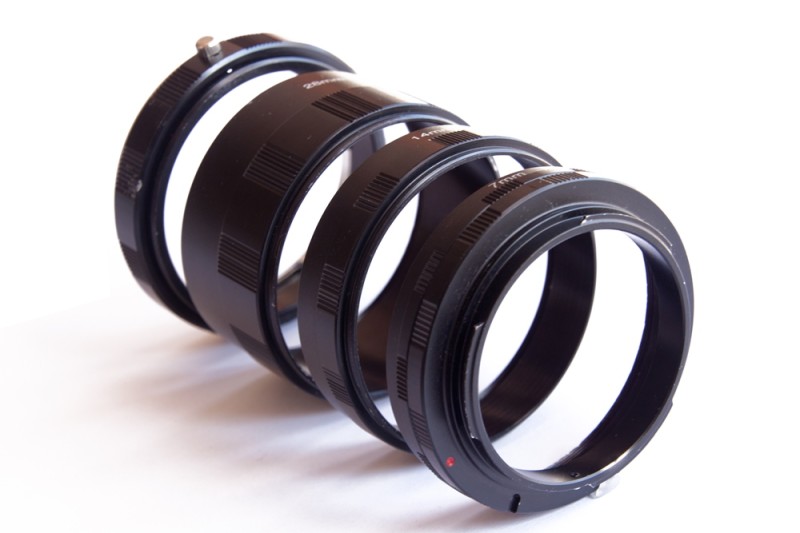
A set of three extension tubes and mounting pieces. The camera mount piece (near end) and the 7 mm extension tube are already screwed together. The lens mounting piece is visible in the back.
Click image to view large


Decide which extension tube (or tubes) you want to use. Each length can be used independently or combined to create a longer extension (eg. closer images). Screw the extension tube(s) onto the camera mount and onto the lens mount. Then, you can screw the extension tubes onto the camera and screw the lens onto the extension tubes. There are red and white circles as indicators on the mounts to help you align them when attaching. To detach the lens, push down on the silver knob on the lens mounting piece and unscrew the lens. To detach the extension tubes, push the lens release button on your camera body. If you have trouble unscrewing the extension tubes from each other or from the mounts, wrap a rubber band around one section for increased grip.

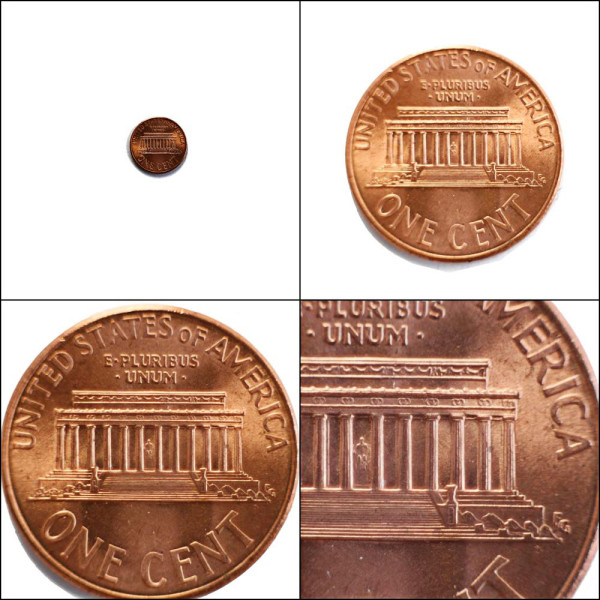
• Views of the back of a penny (Cent). • Click image to view large • Views of the back of a penny (Cent). • By ArchaeoFrog

• Views of the back of a penny (Cent). •
These four images were shot with a Canon 50 mm f/1.8 lens alone (top left), with a 7 mm extension tube (top right), with 7 mm and 14 mm extension tubes (bottom left) and with 7 mm, 14 mm, and 28 mm extension tubes (bottom right). Each image was cropped to a square but not resized
Click image to view large

Adjusting the aperture

The full connection extension tubes connect directly to your camera body. Aperture settings are carried out as with any other ordinary photograph. The generic metal ring style requires a work-around to adjust the aperture. A detailed explanation of the process is available in the previous article: Inexpensive Close-Up Photography – Reverse Rings.

If you want to use an aperture other than the widest default of your lens, first dial in that aperture in aperture priority or manual mode. Then, depress and hold the depth of the field button while pressing the lens release button and removing the lens. (Please note: not all DSLR cameras have a depth of field preview button.) Next mount the extension tubes to the camera and the lens to the extension tubes. Then the lens will maintain the chosen aperture until reconnected directly with the camera body. I suggest you only do this where you can avoid getting dust or debris entering the camera body.

• Detailed rose •

• Detailed rose •
This rose was shot with a Canon 50 mm f/1.8 lens and a 7 mm extension tube. The aperture was set at f/22, resulting in a shutter speed of 30 seconds at ISO 100. A tripod was used.
Click image to view large
• Detailed rose • By ArchaeoFrog

Advantages and limitations of extension tubes

Extension tubes are a versatile and simple way to achieve macro or close-up results. The generic metal ring style is very inexpensive. The pricier full-function tubes gives you full control over your camera for less than a dedicated macro lens. Both styles are small and portable. However, the generic tube-sets give you three tube lengths to achieve a variety of enlargement factors which is more flexible. They are also much cheaper.

If you choose the cheaper extension tubes, you will lose autofocus. Manual focusing often results in better images in close-up photography. Manual focus need not be intimidating. A little practice will make you quite accurate especially with a tripod.

Using an extension tube does change the minimum focusing distance of your lens and requires you to be physically close to the objects you are photographing. If you put too many extension tubes together on a long zoom lens, you may find than an object would have to actually be located somewhere inside your lens to be in focus. I cannot put all three tubes together on my Tamron 18-270 mm at 270 mm for this reason. All three tubes can be used on my 50 mm lens, however, to give a reasonable working distance of a few inches The image below is taken like that. This makes extension tubes ideal for flowers, indoor shots and other static subjects.

• Extension tubes in action •

• Extension tubes in action •
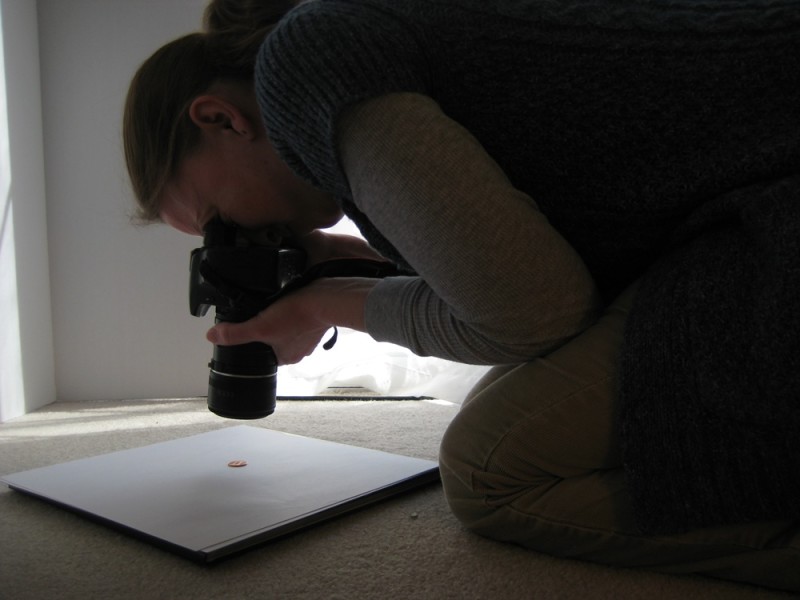
In this image, I am using a Canon 50 mm f/1.8 lens with the 7 mm, 14 mm, and 28 mm extension tubes to photograph the penny (one Cent piece) seen previously.


Strong lighting is a benefit to all close-up photography. As the lens moves further from the camera, the area being captured becomes smaller, and the amount of light reaching the sensor becomes less. Strong indoor lighting or bright, natural daylight can provide enough light for you to maintain a good shutter speed, even when hand-held. Better results come from using a tripod. Then you can use longer shutter speeds to brighten the image.

Flexibility and price win the day

Extension tubes are an excellent way to try close-up or macro photography. You use your existing lenses. The inexpensive generic tubes give great results. You also receive a variety of widths to broaden the scope of how close or how far you can get to your subject and what level of detail you can achieve. On balance the generic metal tubes will provide you with a full macro experience. They are flexible and at a reasonable price. Everyone will find them affordable and they will get you started. Try them for yourself. Then decide later if you want to upgrade to the fully-functional tube version or a full macro lens.

Buying options

The generic extension tubes can purchased from Amazon. This extension tube search provides most of the options…
Extension tube list for various camera brands  External link - opens new tab/page


Articles on close up and macro photography
By Katie McEnaney

Part 1 of this series focused on using close-up lenses, and Part 2 covered reversing lenses using reversing rings. Part 4 will bring all these techniques together with a range of close-up ideas and tips.

Inexpensive Close-Up Photography – close-up rings
Inexpensive Close-Up Photography – Reverse Rings
Inexpensive Close-Up Photography – Tips and Tricks

By Katie McEnaney (contributing author)

Katie is an elementary school teacher in Wisconsin, USA. She is an avid photographer with wide interests. She is always interested in learning more and growing in her photography.
By Katie McEnaney (Archaeofrog)

Can you write? Of course you can!
Write for Photokonnexion...

We would love to have your articles or tips posted on our site.
Find out more…
Write for Photokonnexion.

This one peculiar idea can transform your photography

Compositional elements :: Look at a large number of photographs every day

Everything you see in a photograph is a composition. Looking at lots of photos every day, particularly good ones, helps you appreciate good images. The article shows you how to identify simple Compositional elements.

Involve yourself to improve

Every day, expose yourself to great images. The mind soaks up the goodness. But to make it effective you should also be seeing into the image. It is surprising, but the the good things about a photograph are seen with the first glances. Compositional elements in a photo jump out at you, even if you can’t tell me about them. I am going to show you how to find them with a simple exercise.

What is in an image? Compositional elements

When we look at an image it is often difficult to see what is good about it. Obviously our personal taste plays a part. Often however, other people who do not share our taste, also like it. The common appeal comes from the compositional elements of the image. Often these elements are very simple structural lines or edges. They help the eye through the image or lead the eye to the key subject. Composition is all about helping the eye to appreciate the main point of the image.

How do we pick out the compositional elements?

Knowing about composition is important. The “Rule of Thirds” and other simple rules help you to analyse a scene. You can use them to understand ways the eye uses compositional elements in a scene. Find out more about composition from our page: “Composition resources on Photokonnexion”. There are lots of posts there to help you with composition.

You can already spot basic compositional elements

The main compositional elements can be picked out by eye. Anyone can do it. This is what you do…

  1. Take a small piece of paper – postcard size is ideal.
  2. You are going to draw on the small piece of paper…
  3. Pick out a photo – any picture.
  4. Study it for five seconds.
  5. Put the picture out of sight.
  6. Using simple curved and straight lines make a skeleton sketch of the picture. Do it from memory take no more than thirty seconds.

That’s it. You have simply isolated the elements of the compositional structure.

Here is an example. Click this link and follow the short procedure above. to create the skeleton sketch.
Test Picture

Here is a good example of what you should see when you have finished your sketch: Test Picture Compositional Skeleton. It was done by my wife, who is not a photog or artist. Despite that, she has successfully isolated the major compositional elements in the picture. It shows how effectively this exercise can work

More after this…

find out more...Photokonnexion tips by email
Enjoying this article? Please sign up for our
daily email service.
                                                Find out more
#11030#

Analysis

The test image is of Honister Pass in the English Lake District. All the lines lead the viewer to one point. The exit in the hills in the distance is dynamically off-centre. That keeps your search for symmetry. You feel like you know where the road is going. It draws the eye into the picture. Your eye does not exit upward – the clouds hold the eye into the valley. You are drawn along the road into the image, giving it depth. The picture has a 3d structure and a strong mood.

The strong lines and balance of this picture make it simple to pick out compositional elements. With practice this procedure will help you analyse complex examples. With a few practice examples you will be able to pick out compositional elements by eye. If you do this in your head you’re on the way to doing compositional analysis through the viewfinder.

As you learn new compositional ideas you will pick out more compositional elements. Use them as tools of analysis. They will help you understand and compose in the frame while taking a shot. Soon you will compose to draw the viewer into the picture.

Rules don’t make things beautiful

Rules of composition are limited in many ways. They are more guidelines than rules really. So do not fear to break them. Instead, know the things that work well for the eye. Develop harmony and balance, learn to appreciate beauty. Look at as many great images you can every day. Knowing a little about why they are attractive will help you to create more beautiful and effective images of your own.

By Damon Guy (author and Photokonnexion editor)

Damon Guy - Netkonnexion

Damon Guy (Netkonnexion)

Damon is a writer-photog and editor of this site. He has run some major websites, a computing department and a digital image library. He started out as a trained teacher and now runs training for digital photographers.
See also: Editors ‘Bio’.

Can you write? Of course you can!
Write for Photokonnexion...

We would love to have your articles or tips posted on our site.
Find out more…
Write for Photokonnexion.