Tag Archives: Stance

Camera grip – hold your camera correctly

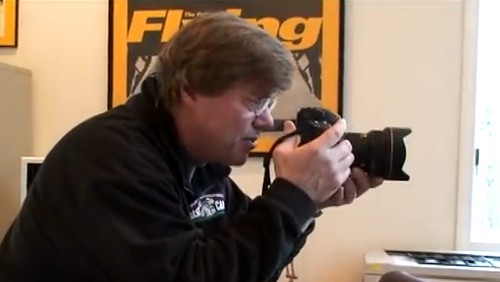
Improving your camera grip.

Improving your camera grip is an important part of developing your skills.
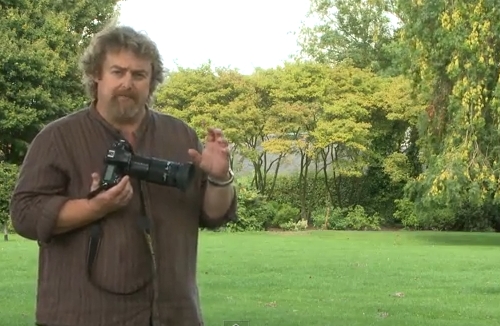
[Image taken from the Joe McNally video below].

Your camera grip is a critical skill.

Do it wrong and you’ll have problems getting a sharp image in many situations. You may even give yourself bad posture and back pain. Learning to have a good camera grip will help develop your skills in many ways.

Camera grip and overall stance

The way you grip your camera works as part of your overall stance. You can get the grip perfect, but with a poor stance it will ruin the impact of a good camera grip. In Simple tips for a good photography stance I set out a detailed plan for a good stance. It will be worth reading that before you see the videos below.

Joe McNally – Da Grip

In this video Joe shows us how to properly hold the camera. He apologises for how this best suits a left-eyed shooter. However, the technique can apply to both left and right eye shots. So don’t be put off. Watch to the end. Joe makes many of the points I do in Simple tips for a good photography stance and this article. He shows you how to properly grip your camera. He also demonstrates how to control it from this grip too.

JoeMcNallyPhoto External link - opens new tab/page.

Sharpness and camera grip are close friends

When teaching I have often found that poor stance and grip go together. They result in soft shots and poor quality images. I try to help people to be more deliberate and use relaxed but firm control. Then, if they hold a good stance and a good grip the sharpness and image framing seem to come together.

In the next short video Gavin Hoey goes through his method for a camera grip. It is very similar to Joes grip and my camera grip too. Everyone has quirks and slightly different ways to do it. The important thing is to follow the basic plan and practice until your shots are sharp and controlled. Then you will see the benefit of good stance and camera grip.

Gavin spends time on some other aspects of sharpness too. This nicely shows how all these methods come together. Great stance, camera grip and control of your camera will develop your skills in leaps and bounds. For more on improving your sharpness check out this article :: The Zen of sharpness – 12 easy ways to improve.

No more blurred photo’s… Ever!

Gavin Hoey External link - opens new tab/page.

Comments, additions, amendments or ideas on this article? Contact Us
or why not leave a comment at the bottom of the page…

Like this article? Don’t miss the next — sign up for tips by email.

Damon Guy - Netkonnexion

Damon Guy (Netkonnexion)

Damon is a writer-photographer and editor of this site. He has run some major websites, a computing department and a digital image library. He started out as a trained teacher and now runs training for digital photogs.
See also: Editors ‘Bio’.
By Damon Guy see his profile on Google+.

Handshake blur – do your shots suffer?

Handshake Blur Problems?

• Handshake Blur Problems? •
It is so easy to lose sharpness in your shot because your hands make tiny movements. There are simple ways to fix it. Here’s how…

Handshake blur – a cause of blurred shots.

It is not the only cause of blur, but it is more common than most learners think. Handshake blur is a devil in the camera. Or is it?

In auto modes, most of the time, the camera will cope and help keep your shots sharp. When you get more advanced and start to use manual modes then the problems arise. Most people are perplexed – their shots appear to be getting more blurred as they get more advanced. What is causing this handshake blur?

Auto modes limit your photography

Auto modes are set up to average out the conditions you encounter to give you a “reasonable” result every time. The auto mode is set up to compensate for your handshake blur. It will tend toward higher-than-necessary shutter speed for example. That will help you to freeze the shot, cutting the handshake blur. When you encounter more challenging shots the camera cannot produce the results that manual modes produce.

As you advance you want to start doing things that give you more creative control. This is when manual modes help you. However, working the camera appears to become more technical. In fact it is just responding to more sensitive settings – the ones you choose. What you may not realise is that your camera holding, stance and breathing have an impact. You need to be more sensitive to those when you hold the camera. Take everything into account – personal body movement and breathing.

Toward a handshake blur cure…

Handshake blur is quite a technical problem. The camera manufacturers have been working to improve the response to handshake blur for years. Image stabilising mechanisms are built to help reduce handshake blur problems. Good ones can reduce it a right down. And, you need to work on it too. So how do you stop the problem?

There are three basic responses to handshake blur…

  • Increase shutter speed freeze the picture in time. If the shutter is open for a shorter time your hand has less opportunity to move. Then, blur is reduced.
  • Improve the way you hold your camera. The basic hand position is one hand under the lens and one hand holding the body ready to push the shutter button.
  • Improve your stance and breathing. Your body is acting as a tripod. If you are wobbly, so will your shot be! A practiced stance, will help your stability.

You can read my guide to a good stance and breathing techniques in “Simple tips for a good stance”.

There is another response that’s hardly ever mentioned… but it’s extraordinarily important. Most advanced photographers never mention this. They don’t think it is a problem. Working mostly with beginners I know it can be a huge issue. The problem is…
Muscle tone/strength
…even fit people suffer from weakness with a camera at first. I find that disabled people and older people are more sensitive too. Handshake blur can have a big impact on anyone. It is not something to worry about though.

Cameras are quite heavy – especially DSLRs. They are also unbalanced – long lenses make them more-so. People who are not regular camera holders do not develop the fine muscular control and strength needed to hold a camera and use it.

Sure, one or two shots are OK. If you are on a longish shoot, even tough men find they are unaccustomed to the position and control of a DSLR. Your shots slowly lose sharpness as you get tired. Through a whole day handshake blur can be a real issue.

If you are fit, and if you hold a camera a lot you will find your muscle tone and control improves. So will your control over handshake blur. You don’t have to do weights or go to the gym, although that will help. All you have to do is to carry your camera around and use it regularly. Not too much of a problem! The practice will put strength in your arms, shoulders, fingers and hands. Before long you will be steadier with a camera, reduce that handshake blur and improve the sharpness – a lot.

If you are disabled, have problems holding the camera, or suffer from weakness a chest harness can help. Check out DIY Camera Chest Harness for Weak Hands & Arms

Handshake blur… a video

In this video Mike Browne shows us the things I have mentioned above (except the muscle tone part) and how to put them into practical use.

Uploaded by Mike Browne  External link - opens new tab/page

Comments, additions, amendments or ideas on this article? Contact Us
or why not leave a comment at the bottom of the page…

find out more...Photokonnexion tips by email
If you enjoyed this article please sign up for our
Tips by email service.
                                                 Find out more

Damon Guy - Netkonnexion

Damon Guy (Netkonnexion)

Damon is a writer-photographer and editor of this site. He has run some major websites, a computing department and a digital image library. He started out as a trained teacher and now runs training for digital photogs.
See also: Editors ‘Bio’.
By Damon Guy see his profile on Google+.

Seven easy tips to improve your group photography

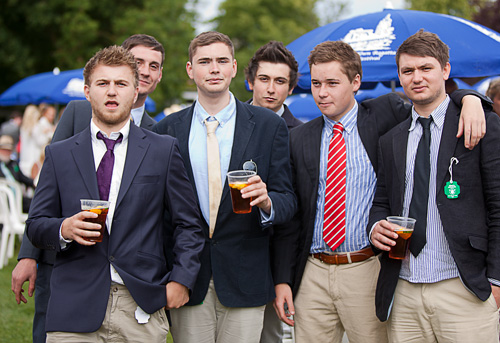
• Boys Group •

• Boys Group •
The humble group photograph can be much improved by a few simple steps.

Simple steps lead to great shots…

With groups you must go a little further than with straight portraits. Getting people coordinated, a range of different settings, beating the dreaded ‘blinks’, great sharpness… Check these out, go the extra mile.

Planning

When doing group shots a few ideas up front helps. Some simple ideas about cohesion, commonality and framing can make your shots more compelling. Clear ideas about how you want this particular group arranged will enable you to get them quickly into place. Groups, by their nature become impatient quickly. Preparation moves things along keeps people on the ball. Have your location scouted and know where you are going to place your group. Have a good, simple background ready. Make sure you have adequate light to work with. Location is everything.

Settings

Remember, groups require a wide view and you need some depth too. Set your aperture too large and you risk the back row being out of the zone of sharpness. Most groups are best photographed at f8 or even better f11. To get the sharpness work with your shutter speed up reasonably high. 1/125th minimum – better 200ths of a second. Go higher if you don’t need flash.

Bigger groups always have a certain amount of movement. Higher shutter speeds help to freeze the action. The problem is, high shutter speed and small aperture leave you needing flash or extra lighting. There is always a trade-off. To compensate you may need to raise your ISO.

Sharp shooting

Shooting at high speed will help freeze the action. It will not steady your hand. If shooting a big group, especially for formal shots, it’s best to use other sharpening techniques. Consider these sharpness…

  • Using a tripod
  • Use mirror lock-up function
  • Image stabilisation off (not needed on tripods – it creates vibration)
  • Auto-focus off on a tripod after the group is focused (it creates vibration)
  • Operate with a remote shutter button or use the on-camera timer

A tripod saves time. You can arrange the group and smooth the shot through. If you have more than one group, your camera is always set up when it is on a tripod. It helps smooth the flow.

Light and shade

Overall light in the scene is important, so is the shade. When taking pictures of groups you are taking a wide angle view. The group is often spread out. It’s easy to miss that one or two of the group are in the shade. Or, with a camera mounted flash, the shadows from the flash fall harshly onto the people behind. Trees, buildings, other people, towers, street lights – any number of objects can cast unexpected shadows which are difficult to notice. Flash casts shadows you don’t see until you open the picture on a computer later. Look carefully at your group. Arrange them to be in clear, consistent light. Make sure any lights or flash you are using treats all the members of the group evenly and fairly.

Clothing

So often with groups you have no control over clothing. If the event is formal the clothes often have a stiff and upright feel. People don’t relax so well in this situation so you will have to set the scene and pose them accordingly. It is not easy, especially with family conventions or a preset plan. Where possible let them arrange themselves with your help. People will be most comfortable next to the people they like and know.

When a group is coming together informally the clothes may be wildly variable in character. What matters when working with a candid group is the fun arrangement of the group. Try to get the group to look dynamic and together. This will offset a strong clothing variation.

The prize giving

• The prize giving •
If the group feels comfortable and you work with them they’ll help make a great picture.

Organisation

Groups, especially close up, look odd if the faces are at different distances from the camera. They are close enough to us to look fine. However, the lens plays tricks on our eyes. If they are out of line – at different distances, but close together – they will appear to have different head sizes. Try to make people in each line of a group stand evenly down the line.

Sometimes the classic, short in front taller to the back works fine. Other times it is better to actually mix up short and tall – especially with different generations. It is much more natural for grandchildren to be arranged with grandparents than stuck on the end of the line because they are small. Putting children between adults also provides an opportunity to have a shorter person behind so as to break up a line up – to make it less formally arranged.

Close family groups, and friends, often look good leaning together, or heads together. It is very intimate to touch heads.

The dreaded ‘blinkies’ strike every group shot if you are not careful. The bigger the group the more likely that someone will blink. Overcome it with a little group control. Ready to shoot? Tell them you are going to help stop them blinking in the shot. Tell every one to shut their eyes. Count to two, tell everyone to open. Count to two. Press the shutter. Everyone will have open eyes. Explain it first so they know what is coming. It will make sure they all have eyes open long enough for you to get the shot.

So, with all these different ways of organising the group make sure that what you have is comfortable, natural – never forced.

Posing

Organising the group is about positioning and location. Posing is about personal stance and comfort. You, as the photographer, need to direct the group. But on the other hand you have to work with the people you have before you. Try to make it fun. Get them to relate to one another. If you have time, especially with candids or informal group, get them to experiment. Handshakes, greetings, hugs, arms around each other, standing in groups – the idea is to make ‘that’ group look good. Another group might not look good with the same poses. You should work with them, discuss ideas with them, respect their thoughts. They probably know each other better than you know them and will make the best suggestions. It is your job as a director to pick up on the most effective shots from their ideas. Consider what you know about them, consider their ideas for their poses – then work together to make the shot just right.

Getting the right feeling…

Working with groups is more than just lining them up. You have to consider the time, place, light, shade, the settings and the technique. But the best shots still come from the group itself. If the members of the group are comfortable, having fun and feel natural about their poses they will make sure you get a good shot. Work with them, help them make your picture work.

Comments, additions, amendments or ideas on this article? Contact Us

find out more...Photokonnexion tips by email
If you enjoyed this article please sign up for our
Tips by email service.
                                                 Find out more

By Damon Guy (author and Photokonnexion editor)

Damon Guy - Netkonnexion

Damon Guy (Netkonnexion)

Damon is a writer-photog and editor of this site. He has run some major websites, a computing department and a digital image library. He started out as a trained teacher and now runs training for digital photographers.
See also: Editors ‘Bio’.
Ten simple ideas to improve your photography (and a fun quiz)

Ten Tips

Ten Tips and 12 fun quiz questions.

Simple things help you…

We should all take a step back and think about the basics sometimes. It helps us remember essential techniques and keeps us on our toes. Here are the basics with some fun quiz questions too.

The simplest techniques in photography are often the most important ones. In this post we make sure we don’t forget them…

10 essential things to know; 12 fun quiz questions
  1. Not knowing your camera: This is really bad news. If you are hoping to improve your photography make sure you learn what every lump, bump, dial, screen, lens and twiddly bit does. Read your manual regularly. Practice with each function until you have got it right. Then practice it in the dark so you can do a night shoot.
    Quiz Question 1: How many lenses are there on a camera? Answers at the end!
  2. Poor stance: Most people when starting photography don’t realise that the way they stand and hold the camera creates all sorts of problems and poor performance. If you are a keen photographer a good stance can contribute to improved sharpness (hand-held shots), better focus, more steady hand and better shot timing. Learn to stand properly right at the start and you will save yourself lots of re-training time later.
    Quiz Question 2: At what point in the breath cycle is it best to take your shot?
  3. Not using a tripod: classic mistake. Tripods save you lots of time and give you pin sharp photographs. They give you an opportunity to set your camera up properly and ensures that your are ready for your shot.
    Quiz Question 3: A monopod has one leg, a tripod has three legs. What is, and how might you use, a bipod?
  4. Not giving the camera time to focus: When you press the shutter button halfway down it causes the auto-focus to cut in which focuses the camera. But if you punch straight through that to the shot the focus has not had time to do the full focus. This normally happens on the first focus attempt when the focus is right off. After that the lens in nearly focused and will adjust more quickly. So don’t make your first focus attempt too close to the shot or it will be blurred.
    Quiz Question 4: Why do you have two rings on a modern auto-focus/zooming photographic lens? What do you call each of them?
  5. Taking pictures against a bright light? Cameras don’t like very bright lights. Especially if there are also very dark spots nearby. Shooting indoors while looking at a window out to a bright sky will cause a strong white spot. This is very distracting and draws the eye away from the subject. Not good. There are Light and Lighting resource pages on Photokonnexion for you to learn more.
    Quiz Question 5: How many stops of light can healthy human eyes see (20:20 vision)? How many can the camera (rough generalisation) cope with?
  6. Relying on flash (especially pop-up flash): Pop up light has a very small concentrated source. It discolours faces, washes out colours, creates harsh, sharp-lined shadows and is badly placed (too close to the optical axis) creating nasty highlights on faces. Try to use natural light more. It is much more forgiving and does not produce such harsh shadows most of the time.
    Quiz Question 6: What is often the result of using pop-up flash with respect to two parts of the face?
  7. Dead centre subject: If you put the subject of your picture in the centre it will usually be boring. If you off-set your subject the eye will be looking to see why the symmetry is broken. That keeps the eye hunting around the screen. Learn about the “Rule of thirds” and other Composition principles. That will help you make the shot more compelling to the eye.
    Quiz Question 7: What type of compositional perspective would you be working with if you want to promote a three dimensional feel to your picture composition?
  8. Horizon control: Make sure your horizon is level, especially if it is a seascape. If you leave it on an angle the picture will be ruined because it will look like the sea is sliding off the page! Horizons also induce mid-picture viewer-stupor. Make a decision. Either shoot for the sky in which case place the horizon in the bottom third of the picture. Or, shoot for the ground in which case the horizon goes in the top third of the picture. An off-set horizon is more dynamic and keeps the viewers eye moving.
    Quiz Question 8: If your main choice is to shoot for the sky, where would you take your exposure from? (Where would you point your viewfinder focus point?) a. The sky? b. The ground?
    Quiz Question 9: Describe autofocus hunting and why it happens?
  9. Simplify, simplify, simplify: The most effective way to show a subject to your viewer is to de-clutter the picture. Take out of your composition everything that is nothing to do with the subject. The more you make the viewers eye go to the subject the more effective your shot will be.
    Did I mention that you should simplify your shot?
    Quiz Question 10: What is it called when you paint out something from your picture in post processing to simplify a shot?
    By the way, did I mention that you should work really hard to simplify your shots?
  10. Go manual: Auto-modes on your camera are really best guesses about what the manufacturer thinks will be suitable for the average shots most snappers will take. Buy you are a keen photographer. To get the camera to do exactly what you want, and to make discerning choices about your images you should work on improving your manual control. Your understanding of photographic principles will improve, your skill at exposure will improve and you will find yourself making informed choices about how you want your picture to come out. You will turn from a snapper into a photographer.
    Quiz Question 11: What does the ISO control do? a. Adjust the sensitivity of the digital image sensor or b. Change the aperture size?
    Quiz Question 12: Does ‘shutter speed’ or ‘aperture’ control movement blur?
Answers to quiz questions
  • Quiz Question Answer 1: I am talking about any camera that has a lens, not just DSLRs. the number of lenses is a matter of variation. If you are discussing photographic lenses then only that one will count (but read on). Some people think of each glass element in the photographic lens as an independent lens. Technically that is not true. They are optical lenses or glass elements, not photographic lenses. However, if the photographic lens (and elements if you included those) were all you counted you would be wrong. Here is a short list of Possible lenses on a camera of any sort…

    There may be others.

  • Quiz Question Answer 2: You should take a shot at the full inhale point or full exhale point before inhaling or exhaling in the next part of the cycle. You can choose which is best for you. All you do is delay the next part of the cycle while you take a shot. This is the point in the breath cycle when there is least movement of the shoulders/chest. Read more about it in Simple tips for a good stance
  • Quiz Question Answer 3: A bipod is photographically uncommon. Understandably, it has two legs. Find out more here… Definition: Bipod
  • Quiz Question Answer 4: The two rings on an auto-focussing photographic lens allow one ring to focus the image – the focus ring. The other ring is for zooming the lens. The latter changes the focal length and is called the focal length ring.
  • Quiz Question Answer 5: Human eyes can see about 18 to 20 stops of light when healthy. However, by contrast the best commercially available cameras have to operate with a dynamic range of 8 to 12 stops of light. Research is pushing the boundaries but there is still a big gap to meet the dynamic range of the human eye (in 2013).
  • Quiz Question Answer 6: Pop-up flash is very likely to cause red-eye.
  • Quiz Question Answer 7: To make things look three dimensional in your image you should be working with three point perspective. Look for lines in your image that promote cube-like structures. For example buildings, walls and other objects with lines and shapes that have a solid feel in real life. This will trick the eye into believing that there is a solid object in the picture. Read: Simple ideas about perspective in photography and: Definition: Perspective
  • Quiz Question Answer 8: If you shoot for the sky you will need to be taking your exposure from the sky as that is the brightest point. This will leave the ground darker in your exposure than you would see it with your eye. You can use one of a number of techniques to correct that later.
  • Quiz Question 9: Auto-focus hunting is when the auto-focus in the lens cannot focus and will keep going up and down the focus range trying to get a focus. This is a common problem at night, in darker conditions, low contrast conditions and clear or totally grey skies. You can read more about it in: Auto-focus ‘Hunting’ Definition: Hunting, Auto-focus

  • Quiz Question 10: when you paint out something from your picture in post processing to simplify a shot? You normally use a cloning tool. You can find out more in: Definition: Cloning; To Clone; Cloned; Clone Tool.
  • Quiz Question 11: What does the ISO control do? It adjusts the sensitivity of the digital image sensor allowing you to work in bright light (low ISO setting) or low light (high ISO setting). There is an article on ISO here: ISO.

  • Quiz Question 12: Shutter speed controls movement blur. Aperture controls blur (bokeh) created by the loss of sharpness outside the zone of acceptable sharpness. This is traditionally known as the depth of field. More reading on: Definition: Exposure and related to aperture: Definition: f number.

find out more...Photokonnexion tips by email
If you enjoyed this article please sign up for our
Tips by email service.
                                                 Find out more
#11030#

By Damon Guy (author and Photokonnexion editor)

Damon Guy - Netkonnexion

Damon Guy (Netkonnexion)

Damon is a writer-photog and editor of this site. He has run some major websites, a computing department and a digital image library. He started out as a trained teacher and now runs training for digital photographers.
See also: Editors ‘Bio’.

How to take photos – each important step in making a photograph

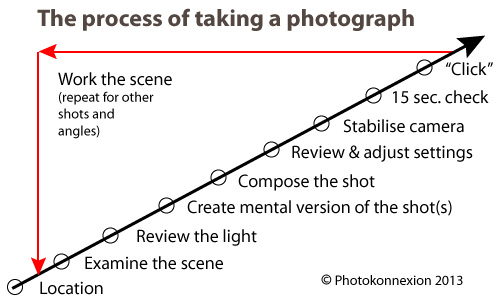
Infographic download - How to take photos

• Infographic showing the various steps in how to take photos •
A guide to what you should doing to make great images.
• Click to download printable full page version

Getting down to the detail…

Yesterdays article was How to take photos – each important step in making a photograph. Today I want to share the detail behind each step. Be warned! You might need to think again about your existing knowledge. Unlearning old ideas will help you to move forward and improve.

How to take photos – The location

Lots of people think you can just turn up and take pictures. Well you can, but often they are not good ones. Getting the best out of your location involves understanding what you’ll find there. Find out about the weather on the day. An idea of light levels and times of sunset and sunrise etc. is useful too. There have probably been lots of visits by others at popular destinations. Check “Google Images” for that site. Google will help with other details too.

When you arrive don’t just fire off loads of shots. Settle down and get into the location. Don’t make photography mistakes that mean you miss great shots. The first time you do this consider a variety of shots. Think about more than one shot, think about the whole shoot.

How to take photos – Examine the scene

Considering the scene is an important part of the work-flow on site. Unless you have been there before you need to get to know it. Use all your knowledge about camera angles, composition, lighting, camera settings and so on. Take the time to examine your location while thinking of these things. Consider your feelings about the scene too. How you feel will help your shot be an impassioned response to the location. What you feel about the scene is the best guide on how to take photos at that location.

How to take photos – Review the light

Most photographers forget this step. They are too wrapped up in the scene and the camera settings or the passion of it all. This step will make or break your shot. Look at the light. If you don’t know what I mean read these:

Ask yourself some simple questions about the light…

  • Is it hard or soft?
  • Is it coloured or more neutral?
  • Is it at the right angle to best capture the location/scene?
  • What is the best time for the right light?
  • Is it very bright and intense or dull and diffused?
  • Do I need any artificial illumination (flash, diffusers etc)?
  • Is the shadow hardly defined (sun up high) or strongly defined (sun to the side)?

Lean about the properties and vocabulary of light. It helps give you a greater understanding of photography. These questions, and others, help you make decisions about lighting for your scene. For more on “How to take photos – Light and Lighting” see the resource page in the SUBJECTS/ARTICLES menu at the top of every page.

How to take photos – Create a mental version of the the shot

If you want to make a great image – have a great picture in your head of your intended outcome. Visualisation has helped athletes, artists, thinkers, inventors and others to achieve amazing things. Train your mind to visualise in detail. If you see what you want to achieve it will guide you when setting up your camera. Take the time to create that mental picture – in detail. Consider how you are going to make the best of the light when you consider how to take photos. More about visualisation… 80 year old secret of world class photographers revealed.

How to take photos – Compose the shot

By now you have an intimate photographic knowledge of your scene. Composing the shot is about realising that potential. Long-time followers of this blog already know something about composition. For first-timers you can get lots of information from our Composition resources page in the SUBJECTS/ARTICLES menu at the top of every page. Composition is a skill that evolves as you develop as a photographer. Knowing more about composition helps your awareness and skill develop. Read about it to gain insight. Think about it every shot.

How to take photos – Review and adjust the camera settings

Now you have a picture in mind, composed, and are ready to set up your exposure. The exposure is defined by your camera settings. Camera makers will have you believe that the auto-setting on your camera is the perfect exposure. The fact is they made informed guesses to arrive at that exposure. It is different for every model of image sensor. Modern cameras do make a good representation of the scene. It is not always what you want however. You can change the exposure by under-exposing, over-exposing and by using different apertures, ISO levels and shutter times. That is your interpretation of the shot. When you think about how to take photos, plan how you want the image to come out.

Having a visualisation in your head helps you set the camera up to make that mental image. You do it using ISO, Aperture and Shutter speed. Even using one of the ‘mode’ settings is still a way of regulating your exposure. They all adjust those three basic facets of the exposure.

Here are some other links to pull together ideas about exposure:

How to take photos – Stabilise the camera

You want the photo to be sharp, crisp and clear. The faster the shutter speed the easier it is to get a sharp shot. But often, especially for a good quality shot, longer exposures are better. You need a good stance to hand-hold the camera. You will need a tripod (or other method) to steady it for longer exposures.

Stance is down to basic technique and comfort. The stance you use will be a personal thing for you. I have found many photogs have to relearn their stance after many years of a poor stance. It is best to learn a good one early. Here is my recommendation: Simple tips for a good stance

The use of tripods or other supports is a wide subject. It is also one that many learners tend to ignore- at least at first. When learning how to take photos sharpness is vital. Become acquainted with a tripod (preferably a good one) as early as you can. Your images will improve a huge amount. Here is some advice about tripods:

And, here is some basic advice about improving sharpness overall – The Zen of sharpness – 12 easy ways to improve

How to take photos – 15 second check

OK, that may seem like a long time. However, it is actually the time you need. You can get faster at it, but if you are taking a serious attitude to your shot then give it the time. You can find out all about the the 15 second check by reading these in order:

  1. An old sailors trick to improve your photography
  2. The fifteen second landscape appraisal
How to take photos – “Click”

This is where you press the shutter button. How you press that button can make a difference to your sharpness. Earlier, I mentioned this link, Simple tips for a good stance. It also gives advice on pushing the button without affecting sharpness.

An essential element of your shot is about confidence in what you have done. Today we are lucky. We just look at the back of our camera. Your first “click” may be a test shot. If your settings need adjustment then a simple technique called “Chimping” will help. Chimp and adjust. You will only need to do it a few times to get the shot right. You will not need to machine-gun the site with hundreds of “just in case” shots.

How to take photos – Work the scene

Chimping helps you set up for the shot and compose it. To get other possible shots you visualised earlier, you should work the scene. Repeat all the steps you have just done for each of the shots you foresaw. Working the scene is a skill and takes practice.

How to take photos – Time line

What is not obvious from the diagram is that the diagonal arrow is also a time-line of the shot. Of course it is a different length for every shot. You will have different problems to solve and ideas to consider for every shot. That’s fine. You have just learned a more careful, precise method for how to take photos. As you practice will quickly get faster at taking shots. But you will also make better images.

A promise

I can guarantee that if you follow the steps on this page you will…

  • Take less shots;
  • Get a better hit-rate (more usable shots per shoot);
  • Spend less time in post-processing;
  • Have better composition;
  • Improve your photography overall.

What is less obvious is that you will also save a lot of time.

By Damon Guy (author and Photokonnexion editor)

Damon Guy - Netkonnexion

Damon Guy (Netkonnexion)

Damon is a writer-photog and editor of this site. He has run some major websites, a computing department and a digital image library. He started out as a trained teacher and now runs training for digital photographers.
See also: Editors ‘Bio’.

The benefits of 100% viewing

Cornish Vista

Cornish Vista
At full resolution this picture is 5616 x 3744 pixels – Canon 5D MkII
Click picture to see the cropped version of the beach.
“Cornish Vista – secluded beach” by Netkonnexion on Flickr

Check sharpness right through.

One of the mistakes that beginners make is not to get the sharpness right into the image. Often it looks good on screen. Below the surface it’s not so good. When you open the image up to full resolution there is a lack of sharpness. What is going on?

Sharpness is the name of the game

A picture with poor sharpness may still look good on screen when you open it. Image editors will readjust the size to fit the picture on-screen. Then you can see the whole shot. The image editor has sharpened it as it resized the picture. What you see is not a full resolution view. As a result the picture looks better than its full resolution sharpness. Print it or see it at full size and the truth is revealed. The sharpness is just not there.
More after this…

find out more...Photokonnexion tips by email
Enjoying this article? Please sign up for our
daily email service.
                                                Find out more…
#11030#

Beginners find it difficult to learn to take a sharp image because they only ever see pictures as small pre-sharpened versions on screen. They think the image is sharp – it’s not. The benefit of opening up your image to 100% resolution is that you see the sharpness that you have really achieved.

Professional photographers will tell you that if your image will not print sharp at full resolution your picture is not sharp enough. That level of skill is something that takes time to develop. However, if you have aspirations to improve your photography then you need to know the level of sharpness you have achieved. For this reason, I urge you to open all your images up to 100% size resolution. You will probably not be able to see the whole picture. Some of it will be off-screen. However, you will be able to properly see what sharpness you are achieving. As you improve your sharpness this test will show your improvement.

Each image editor has its own method of changing the image to 100% size. Check out the help pages for your editor to find out how it’s done.

Here are some links to help you work on your sharpness:
Simple tips for a good stance
Are you sacrificing image quality with a zoom lens?
Five tips you must know to start photography
Focus – great tips for better understanding
Don’t get lucky, get great photographs
The Third Most Important Piece of Kit
The Tripod

Don’t get lucky, get great photographs

Random or 'splatter' tactics when shooting are not going to make you lucky.

Random or ‘splatter’ tactics when shooting are not going to make you lucky.

Ever taken a few more shots, just for luck?

I think we all have if we are honest. We know that approach is really about random shooting and not about getting good shots. Here are some ways to help you get over blasting off shots just for luck.

The tell-tail signs

You always come back from a shoot with hundreds of shots. A high percentage of them are throw-aways. It’s difficult to know what to point your camera at when shooting. Your shots appear to be random. It is difficult to know what settings to use… feel uncertain while out shooting. You suffer photographic stress. Simple, you need to get organised about your shoots.

Here’s a plan…

To move forward, you need work on a plan to get past the randomness and work toward taking consistent shots.

Increase your confidence: Low hit-rates are pretty demoralising. You need to find ways to increase the successes. Go back to basics. BUT, you need to do it in a way that will help you move on. When in a new situation set your camera to auto-settings. Take a few test shots. Note what settings your camera uses. Once you have the measure of things, swap back to the settings that give you creative control. You will be more confident – you know what settings to return to if your settings don’t work out on a shot.

Learn about light: Light is a very fickle entity. Just when you want great light it’s not there. Other times it’s there but you are not sure how to use it to best effect. Well, here are two pieces of advice. First, shoot late or early – long shadows help define your subject and with better colours in the light. Second, learn the difference between hard light and soft light. Hard, harsh light will tend to be less forgiving and less aesthetically pleasing. Once you know these things, you are on the path to improvement. Check over our other Light and Lighting resources on light to continue your improvement.

Learn about settings on your camera and exposure: The most important ideas in photography rest on getting a good exposure. Start with simple shots, simple light. Learn the settings on your camera, in particular about ISO, Aperture and Shutter speed. Together these form a golden triangle for photographers. Read your manual so you know how to control them. Then read up on exposure. Here are a range of links to get you started on exposure…
Definition: Exposure
Definition: Aperture
Definition: f number
Definition: ISO
Definition: Shutter Speed

Portraiture: Friends or family expect you to do it right and you are under pressure. To make the situation more controlled ask a supportive member of your family, or a good friend, to try out a few poses. There are quite a few posing guides in books. Here are a list of books on Amazon that I have found particularly useful to get you started…

Start simple and work on a set of poses to commit to memory. Memorise about five or six poses for a male and the same for a female. These will let you get a session going. After that you rely on your intuition while working with your subject – work out what will suit them. Watchwords here are: Keep it simple; keep it well lit. To get under way read this article to get you thinking about portraiture… Simple positions for classic portrait work.

Finger off the trigger: I know it is easy to punch away at that button and hope something comes out. Take it from me you need to do just the opposite. Stop. Consider. Compose. Frame. Fire. Make sure you get into the habit of thinking each shot through before you push the button. Visualise your shots so you have a good idea for your picture before you even raise the camera to your eye. Pre-visualisation in most pursuits is how you can focus your energy and skill. It is no different in photography. Try improving your stance too. Most people improve their shots a huge amount if they take time to get the stance right. I have a system I teach my students. Read about it in: Simple tips for a good stance.

Composition: There are simple things you can do to improve immediately. Here are three posts on the fundamentals:

  1. Rule of Thirds
  2. Golden Hour; Magic Hour;
  3. Don’t Stick the Horizon Line in the Middle!

Follow up with more composition reading: Composition – resource pages on Photokonnexion.

Planning your shoot and being productive: It is best to do a bit of planning. Get some ideas going before you start shooting. Read about planning a shoot without the scatter-gun approach: Shoot Less – Keep More.

Putting it all together…

That is the fundamental plan. To do it you need to work on one bit at a time. Practice the simple principles above, work with the camera, make sure you look at good photographs daily. Oh! And, one further thing… you are not alone. We all went through this stage. With practice you will soon be making great images regularly.

By Damon Guy (author and Photokonnexion editor)

Damon Guy - Netkonnexion

Damon Guy (Netkonnexion)

Damon is a writer-photog and editor of this site. He has run some major websites, a computing department and a digital image library. He started out as a trained teacher and now runs training for digital photographers.
See also: Editors ‘Bio’.