
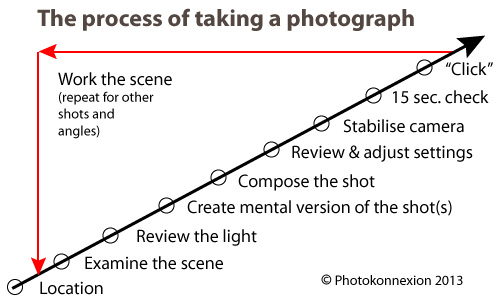
• Infographic showing the various steps in how to take photos •
A guide to what you should doing to make great images.
• Click to download printable full page version •
Getting down to the detail…
Yesterdays article was How to take photos – each important step in making a photograph. Today I want to share the detail behind each step. Be warned! You might need to think again about your existing knowledge. Unlearning old ideas will help you to move forward and improve.
How to take photos – The location
Lots of people think you can just turn up and take pictures. Well you can, but often they are not good ones. Getting the best out of your location involves understanding what you’ll find there. Find out about the weather on the day. An idea of light levels and times of sunset and sunrise etc. is useful too. There have probably been lots of visits by others at popular destinations. Check “Google Images” for that site. Google will help with other details too.
When you arrive don’t just fire off loads of shots. Settle down and get into the location. Don’t make photography mistakes that mean you miss great shots. The first time you do this consider a variety of shots. Think about more than one shot, think about the whole shoot.
How to take photos – Examine the scene
Considering the scene is an important part of the work-flow on site. Unless you have been there before you need to get to know it. Use all your knowledge about camera angles, composition, lighting, camera settings and so on. Take the time to examine your location while thinking of these things. Consider your feelings about the scene too. How you feel will help your shot be an impassioned response to the location. What you feel about the scene is the best guide on how to take photos at that location.
How to take photos – Review the light
Most photographers forget this step. They are too wrapped up in the scene and the camera settings or the passion of it all. This step will make or break your shot. Look at the light. If you don’t know what I mean read these:
Ask yourself some simple questions about the light…
- Is it hard or soft?
- Is it coloured or more neutral?
- Is it at the right angle to best capture the location/scene?
- What is the best time for the right light?
- Is it very bright and intense or dull and diffused?
- Do I need any artificial illumination (flash, diffusers etc)?
- Is the shadow hardly defined (sun up high) or strongly defined (sun to the side)?
Lean about the properties and vocabulary of light. It helps give you a greater understanding of photography. These questions, and others, help you make decisions about lighting for your scene. For more on “How to take photos – Light and Lighting” see the resource page in the SUBJECTS/ARTICLES menu at the top of every page.
How to take photos – Create a mental version of the the shot
If you want to make a great image – have a great picture in your head of your intended outcome. Visualisation has helped athletes, artists, thinkers, inventors and others to achieve amazing things. Train your mind to visualise in detail. If you see what you want to achieve it will guide you when setting up your camera. Take the time to create that mental picture – in detail. Consider how you are going to make the best of the light when you consider how to take photos. More about visualisation… 80 year old secret of world class photographers revealed.
How to take photos – Compose the shot
By now you have an intimate photographic knowledge of your scene. Composing the shot is about realising that potential. Long-time followers of this blog already know something about composition. For first-timers you can get lots of information from our Composition resources page in the SUBJECTS/ARTICLES menu at the top of every page. Composition is a skill that evolves as you develop as a photographer. Knowing more about composition helps your awareness and skill develop. Read about it to gain insight. Think about it every shot.
How to take photos – Review and adjust the camera settings
Now you have a picture in mind, composed, and are ready to set up your exposure. The exposure is defined by your camera settings. Camera makers will have you believe that the auto-setting on your camera is the perfect exposure. The fact is they made informed guesses to arrive at that exposure. It is different for every model of image sensor. Modern cameras do make a good representation of the scene. It is not always what you want however. You can change the exposure by under-exposing, over-exposing and by using different apertures, ISO levels and shutter times. That is your interpretation of the shot. When you think about how to take photos, plan how you want the image to come out.
Having a visualisation in your head helps you set the camera up to make that mental image. You do it using ISO, Aperture and Shutter speed. Even using one of the ‘mode’ settings is still a way of regulating your exposure. They all adjust those three basic facets of the exposure.
Here are some other links to pull together ideas about exposure:
- Simple videos showing how camera settings work
- How to work with your camera settings – a simple, fun lesson
- Simple explanations of camera exposure modes
- How good is your exposure?
How to take photos – Stabilise the camera
You want the photo to be sharp, crisp and clear. The faster the shutter speed the easier it is to get a sharp shot. But often, especially for a good quality shot, longer exposures are better. You need a good stance to hand-hold the camera. You will need a tripod (or other method) to steady it for longer exposures.
Stance is down to basic technique and comfort. The stance you use will be a personal thing for you. I have found many photogs have to relearn their stance after many years of a poor stance. It is best to learn a good one early. Here is my recommendation: Simple tips for a good stance
The use of tripods or other supports is a wide subject. It is also one that many learners tend to ignore- at least at first. When learning how to take photos sharpness is vital. Become acquainted with a tripod (preferably a good one) as early as you can. Your images will improve a huge amount. Here is some advice about tripods:
- When is a tripod not a tripod?
- Three easy photography time savers
- A simple introduction to tripod sharpness and tripod heads
- Three Tips for Pin Sharp Shots with a Tripod
And, here is some basic advice about improving sharpness overall – The Zen of sharpness – 12 easy ways to improve
How to take photos – 15 second check
OK, that may seem like a long time. However, it is actually the time you need. You can get faster at it, but if you are taking a serious attitude to your shot then give it the time. You can find out all about the the 15 second check by reading these in order:
How to take photos – “Click”
This is where you press the shutter button. How you press that button can make a difference to your sharpness. Earlier, I mentioned this link, Simple tips for a good stance. It also gives advice on pushing the button without affecting sharpness.
An essential element of your shot is about confidence in what you have done. Today we are lucky. We just look at the back of our camera. Your first “click” may be a test shot. If your settings need adjustment then a simple technique called “Chimping” will help. Chimp and adjust. You will only need to do it a few times to get the shot right. You will not need to machine-gun the site with hundreds of “just in case” shots.
How to take photos – Work the scene
Chimping helps you set up for the shot and compose it. To get other possible shots you visualised earlier, you should work the scene. Repeat all the steps you have just done for each of the shots you foresaw. Working the scene is a skill and takes practice.
How to take photos – Time line
What is not obvious from the diagram is that the diagonal arrow is also a time-line of the shot. Of course it is a different length for every shot. You will have different problems to solve and ideas to consider for every shot. That’s fine. You have just learned a more careful, precise method for how to take photos. As you practice will quickly get faster at taking shots. But you will also make better images.
A promise
I can guarantee that if you follow the steps on this page you will…
- Take less shots;
- Get a better hit-rate (more usable shots per shoot);
- Spend less time in post-processing;
- Have better composition;
- Improve your photography overall.
What is less obvious is that you will also save a lot of time.
Start Photokonnexion email subscription now!
Photokonnexion Photographic Glossary – Definitions and articles.
The links in order of appearance from above…
The secret steps in taking a photograph – infographic (download a print version).
How do you improve your photography? – Unlearning old ideas
Photography mistake that means you miss great shots
Seeing the Quality of Light
The Properties of Light
Light – the essential component
Definition: Hard-Light
Definition: Soft-Light
Definition: Light; the vocabulary of light
“Lighting”
80 year old secret of world class photographers revealed.
Composition resources on Photokonnexion
Definition: Exposure
Definition: Sensor; Image Sensor; Digital Image Sensor
Definition: ISO
Definition: Aperture
Definition: Shutter Speed
Simple videos showing how camera settings work
How to work with your camera settings – a simple, fun lesson
Simple explanations of camera exposure modes
How good is your exposure?
Simple tips for a good stance
When is a tripod not a tripod?
Three easy photography time savers
A simple introduction to tripod sharpness and tripod heads
Three Tips for Pin Sharp Shots with a Tripod
The Zen of sharpness – 12 easy ways to improve
An old sailors trick to improve your photography
The fifteen second landscape appraisal
Definition: Shutter Button
Simple tips for a good stance
How to take a test shot
Examine Shots Before Shooting Again – Chimping
Working the scene…
By Damon Guy (author and Photokonnexion editor)

Damon Guy (Netkonnexion)
See also: Editors ‘Bio’.