Tag Archives: Panning

How many types of blur are there in photography?

Blur by Netkonnexion - types of blur

Blur by Netkonnexion
Click image to view large
Blur By Netkonnexion on Flickr External link - opens new tab/page
There are many types of blur in photography.

Not all blur is equal.

There are various types of blur. It sounds odd. In fact there is a lot more to blur than most people realise. It is quite a varied subject. It is used in nearly all aspects of photography. From abstracts to zooming, we will find some aspect of blur. Lets take a look…

Okay bokeh…

First up, and one of the best known types of blur, is Bokeh. This Japanese word means haze or blur. It originally referred to the quality of blur. Today we use it to describe the actual blur. A sharp subject and a blurred background is created by a blur of tiny circles where each of the tiny points of light are not focused, that is bokeh. It is created by the lens and aperture.

When you use a wide aperture, say f4.0 (or wider) you get a shallow depth of field. The depth of field is the sharp part of the picture. The rest, the out-of-focus part, is blurred. That blur is the bokeh.

Bokeh can add a whole range of composition effects. It is also has its own aesthetic quality. The quality of the little ‘circles’ varies as does the true circular shape of the circles themselves. Photographic lenses with apertures that are more circular produce the best bokeh. Some apertures are more like regular polygons (say a hexagonal). Polygon bokeh is not as pleasing to the eye as circular bokeh. Fewer sides on the polygon forms a less circular bokeh circle. It may even form an obvious bokeh polygon. Manufacturers go to some lengths to make the bokeh pleasing. One way to make the bokeh more circular is to add blades to the aperture diaphragm. That can raise the cost of the lens.

Subject-movement types of blur

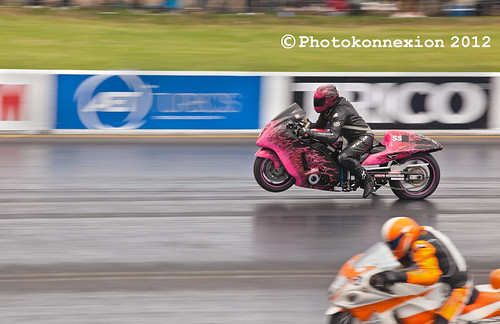
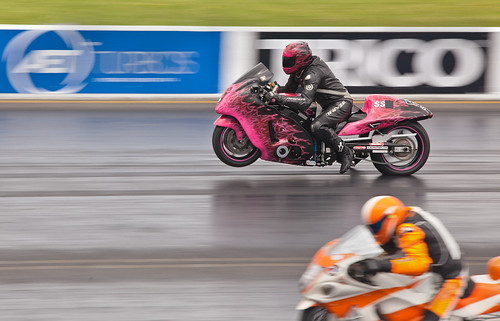
When a subject moves in front of your stationary camera the resulting image has a blurred subject. This is movement blur. The types of blur which include movement can be varied. In the picture above the motor bikes are moving at around 90 miles per hour. When taking this shot I was panning with the far bike resulting in that bike being sharp. The pan meant that my camera was not paced at the same speed as the nearest bike. As a result its movement was relatively out of synchronisation with my camera. The nearest bike was in relative movement and thus blurred.

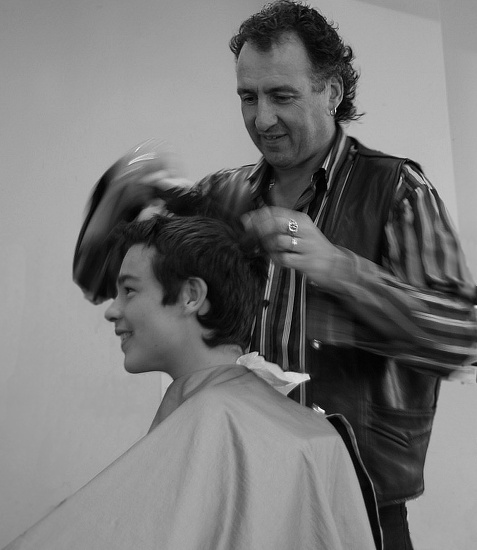
In “The Barber”, below, I have set my camera to capture the blur of his working hands. As with any movement shot, you want some of the shot blurred and some sharp. If it is all blurred it just looks badly taken.
The Barber

• The Barber By Netkonnexion in 365Project •
Click image to view large
The Barber By Netkonnexion in 365Project External link - opens new tab/page
The movement of the hands is blurred to simulate his hair cutting work. Types of blur created in-camera are most effective.

Movement of the subject is controlled by shutter speed. To get it right you have to practice with the speed of that subject. Try the subject at slow speed first. Once you have an idea of the settings, speed the subject up. As you develop a feel for the speed-of-movement versus the shutter-speed you will be able to get a sharp background but a blurred subject.

More types of blur… Camera movement

When a subject is moving pan your camera with it. I did that in the bike picture at the top of the page and got a sharp bike placed against a blurred background. That is not bokeh in the background. As the camera panned with the bike it captured a stationary background. However, as the camera was moving it created a movement blur on the background.

Movement blur of the background normally occurs when panning. If you hold a stationary camera out of a car window and take a long exposure and the same type of blur will result. However, nothing will be sharp in that case (unless something next to you is travelling at your exact speed).

Done right background blur from camera movement has great impact. In the motorbikes above it gives a race feel. It looks really fast.

Some blur is not so good

Hand movement during a shot causes all sorts of blur. You get blurred shadows, blurred faces, possibly jerky tracks… not good at all. However, you can have some fun with this sort of movement. Some famous pictures have been created by deliberate hand movements. There are lots of shots, like tree shots  External link - opens new tab/page, where the movement of the camera creates a surreal or abstract view of the subject. Some people have tried throwing their camera and triggering it in mid-air – some bizarre results can be obtained (including a smashed camera).

Out of focus types of blur

Of course it is possible to completely blur a shot quite deliberately. Some pleasant aesthetic effects can be achieved. Wedding and romantic photographers love the “soft focus” shot. This is a deliberate very slight lack of sharpness. It emphasizes the romantic, soft nature of something… kittens, brides, the first kiss, baby and so on. Google images of soft focus shots provides quite a good range of possibilities for this type of blur.

The soft focus shot can be created different ways. Each give slightly different types of blur. You can literally set the lens to manual focus. Then when properly focussed pull the focus slightly back. so as to create a small amount of blur. Another way to do it is to use a soft focus filter. These are simply screwed to the end of the lens and give the same effect. When I was first starting out in photography many wedding photographers carried a flesh coloured or white nylon stocking. Pulled tight over the lens while the photograph is taken it creates a soft focus effect. Others like a skylight (ultraviolet) filter with a tiny amount of grease smeared on it. All these work, but give you a slightly different soft focus effect. Experiment… have fun!

Zoom blur

One of the less well known types of blur – zoom blur. You need a steady hand or better, a tripod. It makes the picture look like the world is rushing toward you very rapidly.

Adjusting the zoom during exposure creates zoom blur. Set your camera to have a long exposure – around one second is good. Balance the shutter speed with the ISO and aperture to get a proper exposure. You will need to use manual focus to adjust the zoom in the shot. Press the shutter button and rotate the zoom focus ring. A short turn or through its full arc – the amount of turn gives different effects. With a bit of practice you can reduce hand-shake blur. A smooth zoom throughout the exposure creates some great effects. Look through this page of zoom blur images on Google for some ideas…  External link - opens new tab/page.

Artificial blur

Most image editors have software filters to create types of blur. In fact there are a variety of different software filtersavailable. Gaussian blur is one common type. It softens or smooths the image, but also causes loss of detail. There is also rotational blur (self explanatory); linear blur or movement blur – you choose the direction of the blur. Other editng packages will have other blur types too.

Artificial types of blur do not have the same effect as blurs created in-camera. Artificial blur tends to lack depth. Whereas, blur using depth of field gives depth to a picture. The bokeh and movement blurs both have the impact of realism and depth as they vary throughout the depth of the image. Applying a uniform artificial blur can affect the realism. Applied with care and artful work you can make artificial blur look real. It is all about care and attention.

Are there more blurs?

There are probably other types of blur. They may fit into one or more of the categories above. Why not let us know about others. I would like to hear of new ideas and types of blur.

Comments, additions, amendments or ideas on this article? Contact Us
or why not leave a comment at the bottom of the page…

Like this article? Don’t miss the next — sign up for tips by email.

By Damon Guy (author and Photokonnexion editor)

Damon Guy - Netkonnexion

Damon Guy (Netkonnexion)

Damon is a writer-photog and editor of this site. He has run some major websites, a computing department and a digital image library. He started out as a trained teacher and now runs training for digital photographers.
See also: Editors ‘Bio’.

A quick look at image stabilisation

Image Stabilisation

Image Stabilisation

Image stabilisation helps you get a sharper picture.

Good images rely on a steady hand or a tripod. You also get a help from the image stabilisation in your camera or lens. These systems help your lens stay steady. Here we are going to get a look at what is involved and how to use it.

What is image stabilisation?

The term “Image stabilisation” represents a number of technologies used to reduce blurring caused by camera movement during exposure. It compensates for movement in two planes. These are referred to as pan (lateral twisting or yawing movement) and tilt (vertical or pitching movement).

Camera movement is recorded as blur when the shutter is open long enough for the movement to be captured. The slower the shutter speed the more likely it is that the movement will be detected. The tiny, but continuous movements of our hands tend to make hand held shots a little soft. Longer exposures will be even softer since the tiny movements will continue blurring the shot throughout the exposure.

Using an image stabilisation technology allows a mechanism to off-set or compensate for the movement not prevent it. Extreme or large movements will still cause blur during the exposure. However, image stabilisation systems are designed to compensate for the movements created by the almost imperceptible movements of our hands while hand-holding a shot. Typically recent image stabilisation systems will compensate for exposures four to sixteen times longer than could be hand held without the compensation. This would mean that instead of using a shutter speed of 1/250th of a second, you can use image stabilisation to get a shutter speed of around a 1/30th of a second and still get similar image quality. This could significantly improve the light levels in your exposure.

Types of image stabilisation

Optical image stabilisation: This type is mounted in the lens. It uses high speed motors to shift a lens element around changing its orientation to compensate for the movement of the camera. It is highly accurate, compact and fast. It does add quite a lot of weight (and expense) to the photographic lens unit overall. However, it performs really well under all types of movement even fairly extreme movement that might be found in panning for example. It will not prevent the gross movement blur, but will compensate for the tiny variations while panning for example.

In-camera stabilisation or sensor shift stabilisation
This technology uses motor technology to move the Digital Image Sensor to compensate for the movement of the camera. This method concentrates the stabilisation in the camera body and therefore it is only paid for once on the purchase of the camera body (unlike lens-based systems). Sensor shift technology tends to mean the lens is lighter too making handling easier for some people. This type of system does not cope as well as lens-based systems for more extreme movements. Long focal lengths and telephoto lenses will tend to exaggerate the degree of movement of a beam of light hitting the sensor. Consequently the sensor needs to be able to compensate for more extreme vibrations or movements to get the same image quality as a lens system. As the sensor shift system is limited by its range of movement it has limited tolerance at the more extreme end of the range.

Stay sharp!

Many learners find that the softness they get when using a DSLR is very frustrating. While image stabilisation helps, it does not cure the problem. Remember that these systems can only compensate, not prevent, movement blur and softness. So you need to take other steps to make your shots sharp. Here are some issues to consider regarding image stabilisation…

High ISO (in manual control modes): Raising your ISO can help reduce movement blur because you are making the sensor more sensitive to light. Your image sensor will be exposed more readily allowing you to still have a faster shutter speed to take your shot – then movements don’t have time to make the shot soft. Remember, high ISO may increase your digital noise, particularly with very high ISO levels (say 800 or more).

One way to overcome this softness created by hand movement is to raise the and set a faster shutter speed The point and shoot mode or auto mode of your camera will do this to ensure your get sharp shots in most daylight situations. Of course this means a short exposure which may not be suitable for your shot.

Wide aperture(in manual control modes): This too will allow more light into the shot and will allow you to have a faster shutter speed. However, the depth of field will be reduced and that will reduce your sharpness in some areas of the shot.

Use a tripod: Using a tripod is probably the best way to get a sharp shot. In most situations you should turn off your image stabilisation to use a tripod. The motors that do the stabilisation actually create vibration in the tripod and can cause softness. Some systems compensate automatically for being on a tripod so read your technical manual to get guidance for your camera.

Panning: This will definitely create movement blur. But some image stabilisation systems have mechanisms to reduce the vertical movement while panning. In this case make sure you know how to switch to this mode. The difference it can make to getting a moving object sharp is surprising.

Mirror lock-up: Vibration is caused when the reflex mirror in a DSLR flips up. You can lock up these mirrors while you take the shot. The procedure for that is different on every camera so check the manual for the correct method. The image stabilisation mechanisms will not compensate for movement caused by the mirror movement.

Careful use of the shutter button
Don’t stab the shutter button. Roll your finger onto the button gently depressing it. If you stab at it there will almost certainly be an erratic movement that the image stabilisation will not be able to compensate for.

Eagerness!
While enthusiasm is great, taking the camera away from your face too quickly can induce movement before the exposure is complete. Image stabilisation will not compensate for this type of action. Try to count to two before taking the camera away from your face.

Improving overall

Image stabilisation systems vary in their effectiveness according to model, camera, lens, use and how much movement there is. They can be very effective in helping you gain control over your sharpness but they are not the final answer. Sharpness involves a range of techniques and procedures which you will need to learn and practice to improve. Nevertheless, if you are hand-holding a shot you will get significant improvements in sharpness by using these systems. If you want to know a little bit more detail about image stabilisation you can see some more detail in Definition: Image stabiliser; Image stabilisation.

find out more...Photokonnexion tips by email
If you enjoyed this article please sign up for our
daily email service.
                                                 Find out more
#11030#

Can you write? Of course you can!
Write for Photokonnexion...

We would love to have your articles or tips posted on our site.
Find out more…
Write for Photokonnexion.

By Damon Guy (author and Photokonnexion editor)

Damon Guy - Netkonnexion

Damon Guy (Netkonnexion)

Damon is a writer-photog and editor of this site. He has run some major websites, a computing department and a digital image library. He started out as a trained teacher and now runs training for digital photographers.
See also: Editors ‘Bio’.

Getting started with a new lens

Got a new lens? Or perhaps you want to buy one?

• Got a new lens? •
Or, perhaps you are thinking of buying one? External link - opens new tab/page
How do you start using it?

Getting a new lens?

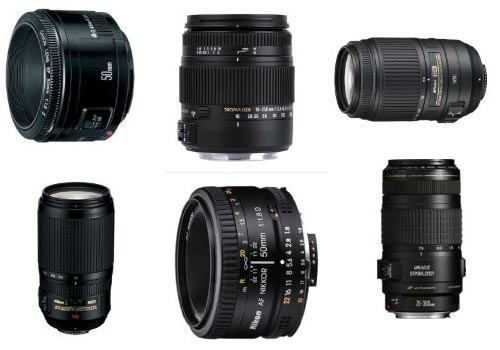
The most important items that photographers own are lenses. It is best to approach a new lens with a method in mind. That way you will get more out of the lens. In this article we are going to look at learning about your new lens.

A new friend

You are probably going to spend a lot of time with your new lens. It will become like a friend to you. Treat it well, and with respect, it will last a lifetime. Abuse it and you will lose it.

To get to know your new lens you need to make its acquaintance. Here are some suggestions as to how you should get to know it.

Read the manual: You would be surprised how many people pop the lens on and disappear over the horizon. Then they get into trouble and wonder what to do. My dad used to say “If all else fails, read the manual!”. Well, I prefer to do it the other way around. Read it first. Stop, think, and read. I find that a quick skim is usually enough. Lens manuals are usually pretty thin. Then, as I slip out the door to try my new lens I pop the manual in my bag so it’s on hand in case I need to solve a problem.

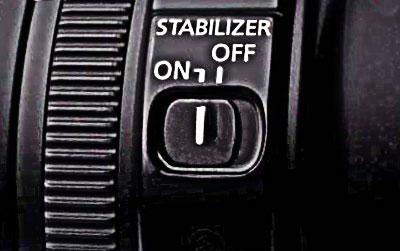
Make sure you find out where the various controls are located and what they do. It would be tragic to miss a good shot because you did not know which vibration compensation mode to select for example!

Shoot off about ten shots: You probably won’t achieve much, but it will make you feel better. I always feel better once I have used a new lens, then I can concentrate on learning it properly.

Minimum focusing distance: Get in close to a test subject. Take a shot. Take a step back and take another. Repeat this a few times until you are well into the normal operational zone for the lens. Do the same for a few other angles on your subject. Now go and download the pictures. How does the new lens cope with close ups? Does it do a good job or does it need a little separation from the subject before it comes into its own?

Testing its zoom ability: Zoom lenses make it too easy to shift up and down focal lengths at will. It’s great for getting the view you want. But it is terrible for understanding how the new lens performs at each focal length. Try setting the focal length in one place then leaving it fixed in position. Don’t shift up and down when taking shots. Walk back and forth so that you get a feel for the lens at one fixed focal length. After taking say, twenty shots, at one focal length, try a slightly longer one. Take another set of shots at that one, then move up the scale again. Try to build up a picture of how your lens behaves at each focal length. The pictures will enable you to see the photographic quality and lens effect at each point in the zoom range. This exercise shows you what sort of perspectives the new lens will give you.

Aperture effects: Change of aperture has a big impact on a picture. In particular the depth of field is affected. Get a feel for the Depth of Field expressed by the new lens. Start by taking a few pictures with the aperture open wide. Then, work through the different F-stops (f4, f5.8, f8, f11, f16 etc) taking pictures each time to get a feel for the different depths of field this will give you.

The depth of field is affected by three factors…

  1. Aperture.
  2. Distance-from-subject (or “focus distance”).
  3. Focal length.

You should test the impact of your aperture at a range of “Distance-from-subject” points. You should also do so at various focal lengths. Then you will have a good idea of the way that depth of field behaves with all aspects of the lens.

One other point on depth of field. Check your sensor size. A small sensor will give you sharpness right through the picture at larger aperture sizes than a large-sensor camera. Large format cameras will need much smaller aperture sizes to get the same right-through sharpness. If you are swapping your new lens between cameras this will have an impact. I use several of my lenses on a small format Canon and a full frame Canon. Be aware they will behave in a different way on each camera.

Testing the telephoto capability: If your lens has telephoto components then you should look to doing a few longer distance shots or landscapes. Repeat the telephoto shots at different apertures and focal lengths. You are looking for how the wide-angle shots compare to the long focal length shots when the field of view is narrow. When you examine these on the computer check for any distortions and check to see how the background comes out.

Auto-focus: It is difficult to test the auto-focus control without setting up instruments to calibrate it. Most of us don’t have those. So what I do is focus along things. For example, I put my test subject next to a wall so I have to look down the wall to shoot it. Try the auto-focus out on each of the focus points. If they focus accurately on the subject and are not confused or affected by the wall then what is the quality of the result in the final pictures. Do it first on one side then the other so all the focus points get a go at being next to the wall.

Another test for the auto-focus is to try and focus on something tiny like a bird at twilight. Auto-focus finds low contrast light situations difficult. So test them out. When will it hunt rather than focus? At what sort of light intensities will hunting begin? Also, try out any auto focus modes to ensure you know, for example, how your autofocus will behave when panning compared to a still subject.

Beyond the start tests

Getting to know your new lens takes more time than a few tests. Honest appraisal requires continuous use in lots of different situations. When I buy a new lens I shoot with it every day – sometimes for months. This really gives you the feel for what it can do. And, you will be learning to rely on it. Once you can rely on it, that will be when your best pictures will come – because you will be using it instinctively.

If you are looking for a new lens, here’s how to do it… Amazon’s lens finder External link - opens new tab/page. The lens finder is a great tool. Use the selection boxes to set up the sort of lens you need and it will return suggestions for you to choose from. It is a great way to refine the ideas you have to identify the perfect lens for your needs.

By Damon Guy (author and Photokonnexion editor)

Damon Guy - Netkonnexion

Damon Guy (Netkonnexion)

Damon is a writer-photog and editor of this site. He has run some major websites, a computing department and a digital image library. He started out as a trained teacher and now runs training for digital photographers.
See also: Editors ‘Bio’.

Can you write? Of course you can!
Write for Photokonnexion...

We would love to have your articles or tips posted on our site.
Find out more…
Write for Photokonnexion.

Simple facts about successful birds-in-flight shots

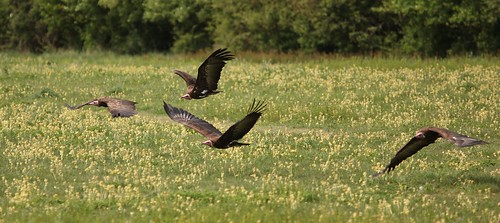
Vultures on the wing

Vultures on the wing – the capture of these birds needs the same panning techniques as any other moving objects.
Click image to view large. “Vultures on the wing” By Netkonnexion on Flickr External link - opens new tab/page

The capture of birds in flight is fun.

Birds rarely stay still for long and move fast when flying. The techniques here will provide basic ways for you to master birds-in-flight photography. The ideas build on techniques used in other areas of photography.

Panning techniques

Bird-in-flight shots are about movement. With any moving thing the only way to capture a sharp shot is to pan with the subject as it moves. Bird-in-flight panning uses the same techniques as other action shots. To learn panning techniques check out this series Action shots – How to….

As with any photographic technique, mastery comes with practice. If you are learning panning to photograph birds, start by panning cars. They are big targets and move with consistent speeds. They come past at regular intervals so practice is easy. You can practice almost anywhere and you will learn to pan quickly. Then, when you are ready, move onto smaller bird targets when you have mastered the simple movements and turning speeds.

Camera settings

Applying simple panning techniques is easy but the detail is important. The speed at which the birds are flying is critical. The focus you need to use is equally as critical. Here are some simple steps to set up the shots…

  1. Take a photograph of your subjects using automatic mode. You will use this as a starting point. Note down the settings for:
    ISO,
    Shutter speed and
    aperture.
  2. Next, set the camera to manual mode.
  3. Set your manual settings to those you noted from your auto-mode shot. You are going to gradually vary the settings until you get them right.
  4. The ISO setting will need to be fixed (for now). Leave it as you set it from your first (automatic) shot.
  5. Aperture is going to be an artistic decision. If you need to have the background sharp then you can tend toward higher F.stop numbers – say F11. If you need it soft (with bokeh) then use a wider aperture (F 4.0 to F5.6).
  6. Shutter speed is going to dictate how much movement you will see in the wings. To be safe, start with a faster shutter speed to freeze the action (500th, or 200th with flash).

You will be making changes to these settings from your original setting you noted from the auto-mode shot. Just remember, all settings are related. They balance. A change one way with a setting will need a compensation with another setting. If you need to move toward a faster shot to freeze the action you need to…

  1. Change the manual setting for shutter speed by one click toward a faster setting. This will be one third of a stop on most DSLRs.
  2. Then, to balance the settings, move the aperture setting one click off toward a larger aperture. This is because if you have less light coming in (faster shutter) you will need to open the aperture to compensate.
  3. You can repeat this process until you get the bird to freeze in its movement.

If you set a faster shutter speed, you need to open the aperture to compensate for less light getting in. A wider aperture reduces your depth of field. If you want to keep the depth of field as it was, then you need to increase the ISO by one third of a stop instead.

In other words, to move a setting towards your desired position you need to keep the balance of the other settings by equal amounts.

Focus and framing

When capturing birds-in-flight the focus is critical because the bird is moving. Set your camera focus to “continuous auto focus”. Continuous focus mode adjusts the focus as the bird moves. This allows your camera to maintain some focus control for the moving target.

You also need to set your focal length to approximately where you are going to capture the bird in flight. This means being ready with the approximate focal length to capture the incoming flight path of the bird(s). You may have no idea where the next bird is going to come from. However, you can make some approximate guesses based on experience and your location. The rest is up to you.

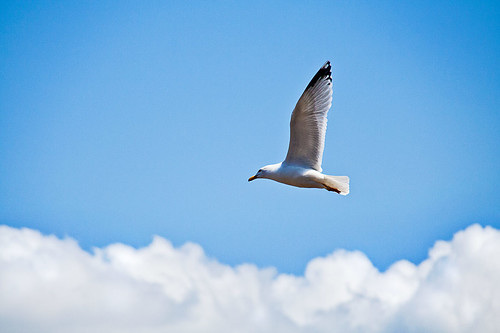
Zoom out from the shot leaving enough room to hold the bird in the frame while panning

Zoom out from the shot leaving enough room to hold the bird in the frame while panning. Click image to view large.
“Seagull in flight” By Netkonnexion on Flickr External link - opens new tab/page


Setting up the framing is the critical final step.

You need to be able to confidently place the bird in the frame for the shot. However, it is not easy to frame the bird so it fills the frame because they move so fast and are a small target. If you fill the frame when panning you will find it very difficult to get the subject consistently in the frame throughout the pan. So, zoom out. You will have to crop the shots later to bring the bird up to size. Yes, this probably means you are going to have to take more shots and do more post-processing. Unfortunate, but it is in the nature of these types of shots.

You should also consider leaving some room in front of the subject so it looks like it has some space to fly into. If your bird is right up against the edge of the picture in the direction it is going it looks like it is about to fly into something. The viewers eye naturally follows the line of flight and they will be distracted by that line if it is about to fly directly out of the frame.

Applying the techniques

So now you have the settings and you have the location/focus/framing worked out. The rest is practice. Now it’s shoot and wait – shoot and wait. It is time to apply yourself, to try out the techniques.

My personal experience with birds has involved plenty of practice and trial and error. What you read here will give you the essentials. Applying them is about doing some photography and learning as you go along. Enjoy it, panning and photographing birds in flight is great fun.

#11030#

Panning With Motion… Seek A Compelling Background

The final touch to a great panning shot

There is no doubt that the killer shot is not just in the panning. Great panning action is only a part of the job. As in any situation aesthetics plays a big part in the winning image. Continuing our theme on panning and motion blur here is a great video introducing some excellent shots of moving objects filmed sharp, with great backgrounds. The panning and movement shots are wonderful, but the backgrounds make them killer shots. It all goes to show that the composition wins the day in the end… Enjoy!
Video by: www.kevinwinzeler.com External link - opens new tab/page

Practicing and Improving your Panning – Seven Hints

You can improve your panning technique by following the hints below

You can improve your panning technique by following the hints below.

Hints to improve your panning (Action shots Part 5)

In the article Action Panning Shots with Motion Blur we looked at basic panning technique. In this post we look at some things you can do to improve your panning shots.

How to practice

Getting started is easy, just follow this simple plan…

  • Consult some local maps. Find a road with regular, spaced traffic. I find an ‘A’ road is best – it’s not too fast. A road with a green space alongside it is best. You should be able to stand back from the road and see about 200 meters in each direction. Thirty mile an hour traffic is a good practice speed.
  • Take an hour for your first practice. Light weekend traffic is best. Stand on the grass roadside space in the middle of your chosen stretch – about 10 to 20 meters back from the road.
  • Stand facing the road, legs slightly apart, so traffic passes right in front of you. Swivel your body to look sideways down the road. Now, without pushing the release button track a car as it comes toward you, passes and recedes. Follow all the way through, keep control.
  • Your tracking movement should be smooth, level, and based on the speed of the vehicle. Keep the subject vehicle in your viewfinder throughout the pan into the distance. Repeat at least five times without taking a shot. Your aim is to feel the speed of your rotation. Concentrate on the smooth flow of your tracking as you pan. Learn how long the pan takes, judge your button push point. Ensure you follow through.
  • Now you will have a ‘muscle memory’ of your moves. Try your first shots. The camera settings are in this article: Action Panning Shots with Motion Blur. Press the button and keep it pressed.
  • Inspect your first shots on your camera. Pick out the good and bad points. Try to spot where the subject vehicle was sharp and where it was not – where it was in the frame, where it was not. Repeat the shots for practice and analyze it each time. As you get better with practice you will find the ‘memory’ of the practice will help you keep your panning consistent.
  • Practice once a week or more for a few weeks. You will find that it gets easier and easier. You develop a ‘muscle memory’ of how to pan after a while. Then it is easier to adapt your tracking speed and tempo.
More ideas to help

Hint 1. Motion blur of the background of a panned shot is created by the camera movement. As you pan the camera through the shot the background blurs. The idea is to keep your panning motion consistent with the speed of your subject. The subject will then be stationary relative to the camera – so you get a sharp shot. The trick is to pace your shot. Keep your body swivel-movement tracking to keep the subject in the viewfinder.

Hint 2. When doing your practice try to pan with different subjects at different speeds. Bicycles are fun, but the panning is slow. You will find that you may make up/down movements when panning slowly. It takes practice to pan slower and still be level and consistent. Try to gets lots of practice at the same speed as the pans you want to do. I photograph a lot of water sports. At first it was difficult to get it right because the panning speed is slower than a vehicle. After practicing with rowing boats for a few hours and working with a shutter speed of 1/15th of a second I began to return some decent shots.

Hint 3. While panning a subject your body turns slowly at first. It gets faster when the subject is right in front of you. Then your swivel slows down again as the object recedes. You will need to feel that happening and compensate for it as you track the object while panning. Your swivel motion is NOT the same speed throughout your pan. There is a good reason for this. As the subject comes toward you it is in the viewfinder for relatively longer when at a distance. When it is right in front of you it is moving a very short distance across your view at full speed. So you need to be fast tracking there.

Hint 4. If your subject changes speed/direction you must anticipate that and stay with it. Corners and straights (acceleration) are examples where changes occur. So you will need to work the shot a few times before you get the tempo of your new panning motion where the change occurs.

Hint 5. While panning you will find that you are able to hold the camera evenly at the same level if you swivel smoothly through the pan. However, if you go slower or faster than the subject you will introduce blur to the subject – they will no longer be stationary relative to the camera. So you must practice accurate tracking of the speed of the subject while panning.

Hint 6. The vibration control in your lens is important. Canon cameras have ‘image stabilisation’ (IS). Nikon has ‘Vibration Reduction’ (VR). These systems compensate for vertical and horizontal vibration and movement. More expensive lenses allow you to turn off the horizontal component. When panning, if you swivel smoothly from the waist you will find the horizontal movement through the pan is quite consistent. To take advantage of the lens control, turn off the horizontal stabilisation. This will help the sharpness of the shot compensating for any vertical movement. If you leave the horizontal compensation on it will act against your panning movement.

Hint 7. Finally, I have met some people who think you can pan successfully with a monopod or tripod. It is a practically difficult thing to achieve. Think about it. A fixed turning point in front of you will not allow you to track a subject unless it is going in a circle around the tripod centre point. To keep tracking around the centre of turning on the tripod you will need to move or bend yourself off-balance. You may make a few shots, but your record will be inconsistent. Proper panning is a sweep of the body rotating about your centre. That rotation point is right between your legs. Proper rotation takes practice and free-holding of your camera. Your hand-held practice will definitely pay off.

By Damon Guy (author and Photokonnexion editor)

Damon Guy - Netkonnexion

Damon Guy (Netkonnexion)

Damon is a writer-photog and editor of this site. He has run some major websites, a computing department and a digital image library. He started out as a trained teacher and now runs training for digital photographers.
See also: Editors ‘Bio’.

Can you write? Of course you can!
Write for Photokonnexion...

We would love to have your articles or tips posted on our site.
Find out more…
Write for Photokonnexion.

Action Panning Shots with Motion Blur

Fast action demands a prepared shot

Fast action demands a prepared shot. Work the shot before it happens; keep your finger on the shutter button for multiple shots; pan and follow through to the end.
EXIF data for this shot… Model – Canon EOS 5D Mark II
ExposureTime – 1/125 seconds; FNumber – 14; ISOSpeed – 200
ExposureProgram – Shutter priority
Sequence mode – Continous; Focus mode – AI Servo

Motion blur is created by panning (Action shots Pt 4)

In Getting Started With Action Shots I showed how to ‘fix’ the action using fast shutter-speeds. Fixing the action creates a picture that is not quite as the eye sees it. In life, when watching fast motion we keep our heads and eyes following the action. The background is of little interest – it blurs with motion and we see the subject sharp in the foreground while we track its movement. Here is how we create a still photograph reproducing that background movement blur.

Setting the shutter speed

The principle exposure control we need to work with is shutter speed. This means you can either work with manual control, or set your camera to use the Tv (time value setting). If you are not happy using manual then set your camera to shutter priority (Tv).
More after the jump…

We previously set a fast shutter speed to ‘fix’ the action. To capture background motion-blur the shutter speed should be slow. Start your panning experiences with a shutter speed of 1/125th second. At this speed you get some motion blur and it is easy to capture a sharp image. Later, after some practice you can decrease your shutter speed to 1/60th second and even lower to an ideal 1/30th of a second.

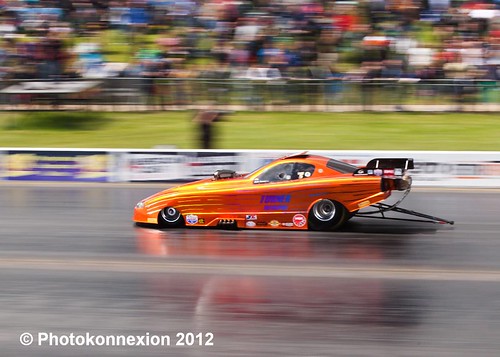
These suggested shutter speeds are relative to the type of action you are photographing. Very high speed action, like racing cars, can be taken at faster shutter speeds. That is more forgiving for your panning. The drag racing car (above) was traveling at around 130mls per hour when the shot above was taken at 1/125th second. Action at lower speeds should be at slower shutter speeds. Athletics and body motion shots should be panned at around 1/30th second, or if you can do it, 1/15th second. With practice you will be able to judge what is best. Once you have mastered the technique with faster shutter speeds, then try with lower speeds. A good rule to set shutter speed close to the approximate miles per hour the subject doing…
  • 150-200 mls/hr – s/speed 1/200th sec. – Racing car, small aircraft landing
  • 130 mls/hr – s/speed 1/125th sec. – Fast motorcycle
  • 70 mls/hr – s/speed 1/60th sec. – UK motorway driving limit
  • 30 mls/hr – s/speed 1/30th sec. – typical Urban free-flowing traffic
  • 15 mls/hr – s/speed 1/15th sec. – Sprinter, running dog
  • 3 – 8 mls/hr – s/speed 1/15th sec. – jogger
Other camera settings

If you are working in shutter priority your camera will adjust the aperture. You should leave the ISO on automatic. The camera will take care of itself while you shoot the movement.

If you are working with full manual set your aperture to give you a good depth of field – say f11 on a bright but cloudy day. In this case set the ISO to an appropriate setting. Probably around 200 ISO (bright day) or 400 ISO (bright/cloudy) will be best. On a very bright sunny day you could try 100 ISO. Do some chimping to get the right exposure.

If you are using either manual or shutter priority you should also set the ‘burst mode’ – otherwise known as continuous shooting. The burst mode will let you fire shots continuously. You will need to fire more than one shot at a time when panning your camera. At least some of the shots will come out sharp. Your camera will shoot off about four to six shots in a burst (RAW) – more with some cameras. You will need to judge the best place to start continuous shooting.

And so to the panning…

By now you have your camera set up. The fun bit is actually capturing your shot. The aim of panning is to follow your subject with your camera shooting as you go. Here are some pointers to get you started…

  • Stand with feet shoulder width apart for stability. Ideally you want the action to pass right in front of you. Place yourself so your subject comes from one side and passes you when you are facing forward. It will then recede again on your other side.
  • Turn your body toward where your subject is going to come from. Don’t move your feet. Point your camera at the oncoming object.
  • Start tracking the subject with your camera as it comes toward you. As the object comes nearer you must smoothly swivel your body from your waist. Note that your camera/head face the object, it is your body that rotates. As the object passes your body will be facing full forward. Then, you continue to swivel keeping it in your sights as it recedes the other side. Smoothness in the rotation of the body is essential.
  • When your subject is large in your viewfinder you can press the shutter button and hold it down continuously shooting as you pan along with the subject.
  • Do not stop tracking the subject when your ‘burst’ is finished. It is important to follow through With the panning so there is no sudden jerky move at the end.
What you are aiming for

Ideal panning shots provide the following outcomes…

  • At least one element (the subject) will be sharp, preferably ‘pin sharp’.
  • The background will be too blurred to see any details.
  • Moving parts on the subject (legs, wheels, oars, propellers etc) may also be blurred.

By Damon Guy (author and Photokonnexion editor)

Damon Guy - Netkonnexion

Damon Guy (Netkonnexion)

Damon is a writer-photog and editor of this site. He has run some major websites, a computing department and a digital image library. He started out as a trained teacher and now runs training for digital photographers.
See also: Editors ‘Bio’.