Tag Archives: Depth of Field

Ten simple ideas to improve your photography (and a fun quiz)

Ten Tips

Ten Tips and 12 fun quiz questions.

Simple things help you…

We should all take a step back and think about the basics sometimes. It helps us remember essential techniques and keeps us on our toes. Here are the basics with some fun quiz questions too.

The simplest techniques in photography are often the most important ones. In this post we make sure we don’t forget them…

10 essential things to know; 12 fun quiz questions
  1. Not knowing your camera: This is really bad news. If you are hoping to improve your photography make sure you learn what every lump, bump, dial, screen, lens and twiddly bit does. Read your manual regularly. Practice with each function until you have got it right. Then practice it in the dark so you can do a night shoot.
    Quiz Question 1: How many lenses are there on a camera? Answers at the end!
  2. Poor stance: Most people when starting photography don’t realise that the way they stand and hold the camera creates all sorts of problems and poor performance. If you are a keen photographer a good stance can contribute to improved sharpness (hand-held shots), better focus, more steady hand and better shot timing. Learn to stand properly right at the start and you will save yourself lots of re-training time later.
    Quiz Question 2: At what point in the breath cycle is it best to take your shot?
  3. Not using a tripod: classic mistake. Tripods save you lots of time and give you pin sharp photographs. They give you an opportunity to set your camera up properly and ensures that your are ready for your shot.
    Quiz Question 3: A monopod has one leg, a tripod has three legs. What is, and how might you use, a bipod?
  4. Not giving the camera time to focus: When you press the shutter button halfway down it causes the auto-focus to cut in which focuses the camera. But if you punch straight through that to the shot the focus has not had time to do the full focus. This normally happens on the first focus attempt when the focus is right off. After that the lens in nearly focused and will adjust more quickly. So don’t make your first focus attempt too close to the shot or it will be blurred.
    Quiz Question 4: Why do you have two rings on a modern auto-focus/zooming photographic lens? What do you call each of them?
  5. Taking pictures against a bright light? Cameras don’t like very bright lights. Especially if there are also very dark spots nearby. Shooting indoors while looking at a window out to a bright sky will cause a strong white spot. This is very distracting and draws the eye away from the subject. Not good. There are Light and Lighting resource pages on Photokonnexion for you to learn more.
    Quiz Question 5: How many stops of light can healthy human eyes see (20:20 vision)? How many can the camera (rough generalisation) cope with?
  6. Relying on flash (especially pop-up flash): Pop up light has a very small concentrated source. It discolours faces, washes out colours, creates harsh, sharp-lined shadows and is badly placed (too close to the optical axis) creating nasty highlights on faces. Try to use natural light more. It is much more forgiving and does not produce such harsh shadows most of the time.
    Quiz Question 6: What is often the result of using pop-up flash with respect to two parts of the face?
  7. Dead centre subject: If you put the subject of your picture in the centre it will usually be boring. If you off-set your subject the eye will be looking to see why the symmetry is broken. That keeps the eye hunting around the screen. Learn about the “Rule of thirds” and other Composition principles. That will help you make the shot more compelling to the eye.
    Quiz Question 7: What type of compositional perspective would you be working with if you want to promote a three dimensional feel to your picture composition?
  8. Horizon control: Make sure your horizon is level, especially if it is a seascape. If you leave it on an angle the picture will be ruined because it will look like the sea is sliding off the page! Horizons also induce mid-picture viewer-stupor. Make a decision. Either shoot for the sky in which case place the horizon in the bottom third of the picture. Or, shoot for the ground in which case the horizon goes in the top third of the picture. An off-set horizon is more dynamic and keeps the viewers eye moving.
    Quiz Question 8: If your main choice is to shoot for the sky, where would you take your exposure from? (Where would you point your viewfinder focus point?) a. The sky? b. The ground?
    Quiz Question 9: Describe autofocus hunting and why it happens?
  9. Simplify, simplify, simplify: The most effective way to show a subject to your viewer is to de-clutter the picture. Take out of your composition everything that is nothing to do with the subject. The more you make the viewers eye go to the subject the more effective your shot will be.
    Did I mention that you should simplify your shot?
    Quiz Question 10: What is it called when you paint out something from your picture in post processing to simplify a shot?
    By the way, did I mention that you should work really hard to simplify your shots?
  10. Go manual: Auto-modes on your camera are really best guesses about what the manufacturer thinks will be suitable for the average shots most snappers will take. Buy you are a keen photographer. To get the camera to do exactly what you want, and to make discerning choices about your images you should work on improving your manual control. Your understanding of photographic principles will improve, your skill at exposure will improve and you will find yourself making informed choices about how you want your picture to come out. You will turn from a snapper into a photographer.
    Quiz Question 11: What does the ISO control do? a. Adjust the sensitivity of the digital image sensor or b. Change the aperture size?
    Quiz Question 12: Does ‘shutter speed’ or ‘aperture’ control movement blur?
Answers to quiz questions
  • Quiz Question Answer 1: I am talking about any camera that has a lens, not just DSLRs. the number of lenses is a matter of variation. If you are discussing photographic lenses then only that one will count (but read on). Some people think of each glass element in the photographic lens as an independent lens. Technically that is not true. They are optical lenses or glass elements, not photographic lenses. However, if the photographic lens (and elements if you included those) were all you counted you would be wrong. Here is a short list of Possible lenses on a camera of any sort…

    There may be others.

  • Quiz Question Answer 2: You should take a shot at the full inhale point or full exhale point before inhaling or exhaling in the next part of the cycle. You can choose which is best for you. All you do is delay the next part of the cycle while you take a shot. This is the point in the breath cycle when there is least movement of the shoulders/chest. Read more about it in Simple tips for a good stance
  • Quiz Question Answer 3: A bipod is photographically uncommon. Understandably, it has two legs. Find out more here… Definition: Bipod
  • Quiz Question Answer 4: The two rings on an auto-focussing photographic lens allow one ring to focus the image – the focus ring. The other ring is for zooming the lens. The latter changes the focal length and is called the focal length ring.
  • Quiz Question Answer 5: Human eyes can see about 18 to 20 stops of light when healthy. However, by contrast the best commercially available cameras have to operate with a dynamic range of 8 to 12 stops of light. Research is pushing the boundaries but there is still a big gap to meet the dynamic range of the human eye (in 2013).
  • Quiz Question Answer 6: Pop-up flash is very likely to cause red-eye.
  • Quiz Question Answer 7: To make things look three dimensional in your image you should be working with three point perspective. Look for lines in your image that promote cube-like structures. For example buildings, walls and other objects with lines and shapes that have a solid feel in real life. This will trick the eye into believing that there is a solid object in the picture. Read: Simple ideas about perspective in photography and: Definition: Perspective
  • Quiz Question Answer 8: If you shoot for the sky you will need to be taking your exposure from the sky as that is the brightest point. This will leave the ground darker in your exposure than you would see it with your eye. You can use one of a number of techniques to correct that later.
  • Quiz Question 9: Auto-focus hunting is when the auto-focus in the lens cannot focus and will keep going up and down the focus range trying to get a focus. This is a common problem at night, in darker conditions, low contrast conditions and clear or totally grey skies. You can read more about it in: Auto-focus ‘Hunting’ Definition: Hunting, Auto-focus

  • Quiz Question 10: when you paint out something from your picture in post processing to simplify a shot? You normally use a cloning tool. You can find out more in: Definition: Cloning; To Clone; Cloned; Clone Tool.
  • Quiz Question 11: What does the ISO control do? It adjusts the sensitivity of the digital image sensor allowing you to work in bright light (low ISO setting) or low light (high ISO setting). There is an article on ISO here: ISO.

  • Quiz Question 12: Shutter speed controls movement blur. Aperture controls blur (bokeh) created by the loss of sharpness outside the zone of acceptable sharpness. This is traditionally known as the depth of field. More reading on: Definition: Exposure and related to aperture: Definition: f number.

find out more...Photokonnexion tips by email
If you enjoyed this article please sign up for our
Tips by email service.
                                                 Find out more
#11030#

By Damon Guy (author and Photokonnexion editor)

Damon Guy - Netkonnexion

Damon Guy (Netkonnexion)

Damon is a writer-photog and editor of this site. He has run some major websites, a computing department and a digital image library. He started out as a trained teacher and now runs training for digital photographers.
See also: Editors ‘Bio’.

The simple secrets behind good food photography

Food for Her World Vietnam magazine.

Food for Her World Vietnam magazine.
Food styling by Dang Phuong
Photography by Mads

Food for the World Vietnam magazine. Photography by Mads • on FlickrExternal link - opens new tab/page

We all love good looking food…

Food photography? So, what makes it look really good? I love to cook and make tasty food. But, great cooks also have a skill with presentation. It is the presentation which really makes great food shots too.

Food photography seems to be centred on three things – good looking food composition; great light and picking the right focus/centre of interest. Duh! Wait a minute, isn’t that pretty much photography summed up all over? OK, I jest. There are some specific ideas and techniques involved. Good food photography seems to require a particular approach.

Here are some introductory points for good food photography. You should look to achieve…

  • Experience with small-sized and table-top compositions.
  • A working knowledge of lighting at the table-top scale.
  • Simple natural light from one source (window).
  • Able to use reflectors/black cards to shape the light.
  • Simple centre of interest in the shot.
  • Carefully chosen depth of field.
  • Very simple, but rich backgrounds.

And with the food itself…

  • Natural and where possible bright colours.
  • The colour mix should work together.
  • Avoid odd clashes of colour.
  • The food combinations should be simple and few.
  • Focus on the main interest.
  • Avoid highlight bokeh spots where possible.
  • Try to emphasis the texture of the food (lighting).
  • Use simple but eye catching cutlery and plates.
  • Avoid cluttering the shot with too much food.
  • Give the food a big/deep background.

More after this…

Book recommendation:

Food Photography:
From Snapshots to Great Shots

Simple advice on lighting including great diagrams. The pictures include camera settings. Excellent advice on setting up a table-top studio which was also inexpensive to do. Lots of tricks and techniques like the pros use. Great presentation ideas.


Food Photography Tips – Video

In this video we look a range of ways to look at and shoot food. It is a great introduction to food photography basics. The video uses graphic images for a broad introduction to the art of angles, framing and creating drool inducing food photos.


Damon Guy - Netkonnexion

Damon Guy (Netkonnexion)

Damon is a writer-photographer and editor of this site. He has run some major websites, a computing department and a digital image library. He started out as a trained teacher and now runs training courses in digital photography.
See also: Editors ‘Bio’.

Can you write? Of course you can!
Write for Photokonnexion...

We would love to have your articles or tips posted on our site.
Find out more…
Write for Photokonnexion.

Inexpensive Close-Up Photography – Tips and Tricks

• Oil and water •

• Oil and water •
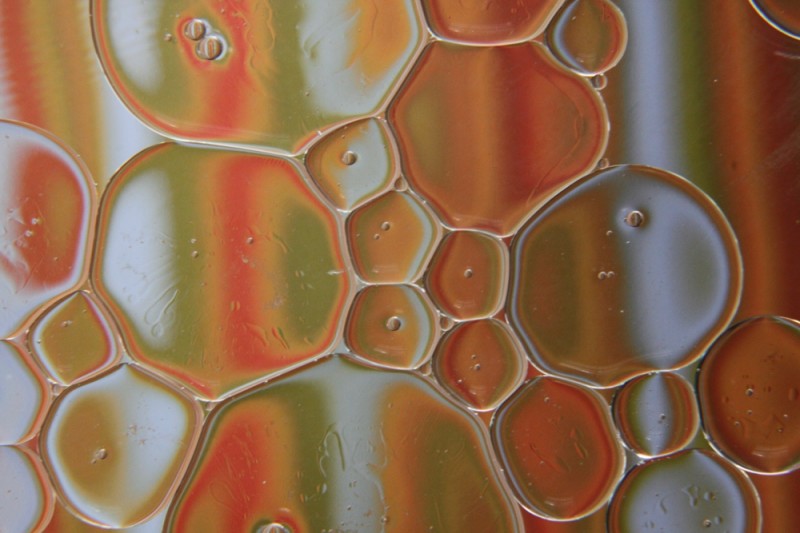
These bubbles of oil in water were shot with a
Canon 50 mm f/1.8 and a +10 close-up filter
Click image to view large
Oil and water • by ArchaeoFrog

Easy, budget macro.

Macro or close-up photography is accessible without investing in a pricey macro lens. The first three articles in this series covered techniques for inexpensive macro-level results: close-up lenses, reverse rings, and extension tubes. In this article, I offer suggestions for achieving great-looking results using any of these three techniques.

Choose Your Depth of Field

Depth of field is a term that refers to the area of the image that is acceptably sharp and in focus. Depth of field is a function of many things. Our interest is in three factors. These are aperture, the distance between the camera and the subject, and the orientation of the subject relative to the camera.

Aperture has a direct influence on the depth of field. A wide aperture (smaller f number, such as f/1.8) creates a shallow depth of field. Areas of the image outside of the zone of sharpness fall out of focus quickly. Wide apertures can be used to create bokeh – unsharp sections of the image.

A narrow aperture (larger f number, such as f/22) creates a deep depth of field. The majority of the image is in focus. Narrow apertures are often used by landscape photographers to capture front-to-back sharpness throughout an image.

The distance between the camera and the subject also influences the depth of field. Generally, the closer that you are to your subject, the narrower the depth of the field becomes. This is particularly important when using macro and close-up photography techniques where you need to be physically close to the photographic subject.

• Bokeh penny •

• Bokeh penny •
By ArchaeoFrog
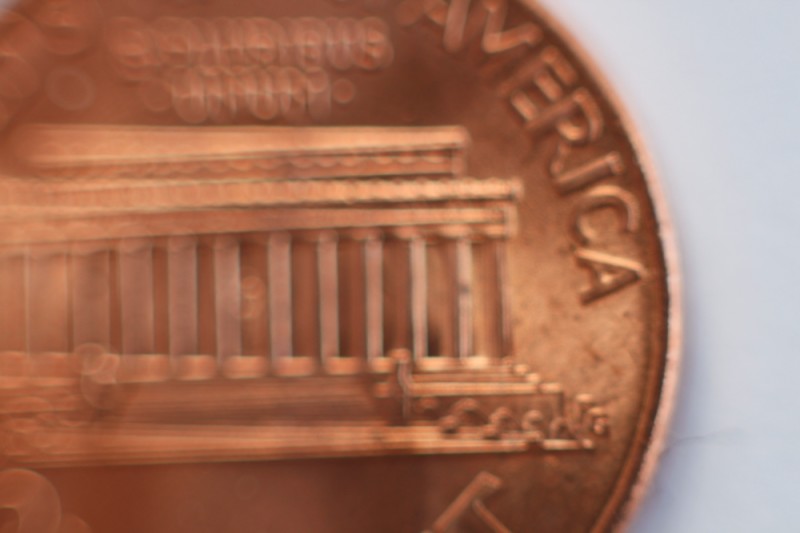
Penny shot with a Canon 50 mm f/1.8 lens and a full set of three, generic extension tubes (7, 14, and 28 mm). The plane of sharpness lies parallel to the flat of the lens. If the plane is not parallel the focus is quickly lost.
Click image to view large

It is also important to consider the orientation of the subject relative to the camera. The depth of field can be thought of as a plane that is parallel to the camera lens. If you can orient yourself so that the subject is parallel to the flat of camera lens, more of your subject will be in focus than if it is at an angle to the camera. In the penny shot above, I tilted the camera lens slightly away from the parallel position. The loss of focus from right to left is obvious.

• Flowers and Depth of Focus •

• Flowers and Depth of Focus •
Click image to view large

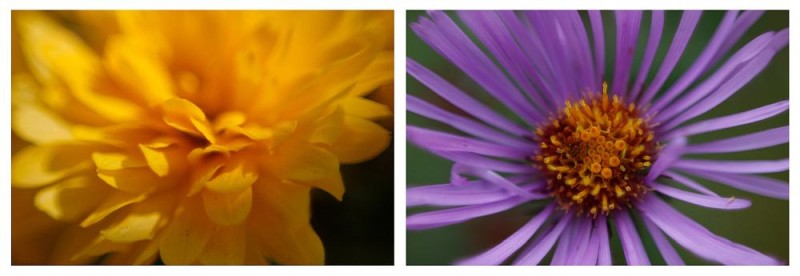
The flower photographs show how depth of field influences an image. Both were taken with the same lens (Canon 50 mm f/1.8), the same aperture (f/1.8), and the same technique (reverse ring). Both images have a shallow depth of field (wide aperture) and are close to the subject. The appearance of the depth of field is very different. The yellow flower (left) is sideways to the camera. Only the closest edges of the petals are within the depth of field and are in focus. The purple flowers center is shot parallel to the camera. The entire center of the flower is within the depth of field and appears in focus.

If you want more of your subject in focus use a narrower aperture. Increase the distance between yourself and the subject, and set the camera (and thus the depth of field) parallel to the subject. If you want less of your subject in focus, you can use a shallow aperture, get in closer to your subject, and orient the camera and depth of field perpendicular to the subject. Try it many different ways and see what works best for what you envision!

The Tripod: With and Without

It is possible to achieve acceptably sharp macro results hand-holding the camera. The majority of images in these articles were shot hand-held. If you have a stationary subject using a tripod will greatly improve the sharpness of your image. A tripod allows you to use longer shutter speeds. This helps you get crisper images in lower light. It also allows a narrower aperture to gain a deeper depth of field. The steadiness of the tripod will significantly reduce hand movement.

If available, also use the Live-View function on your camera to fine-tune your focus. Live-View lets you use your display screen rather than the viewfinder. Many cameras allow you to zoom in on a portion of the image to check the focus.

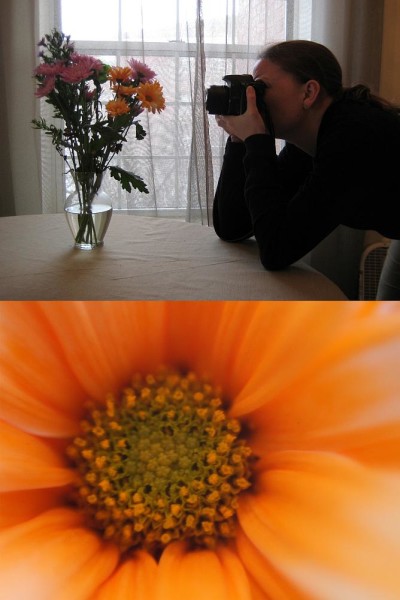
Without a tripod a good stance improves stability while hand-holding. Create your own tripod with your body by bracing yourself or your camera. In the diptych image below, I am using my elbows for support. The elbows in combination with my feet create a similar a three-point stability like a tripod. In the extension tube article, I demonstrated a similar human-tripod by bracing my elbows on my knees while shooting.

• Simultaneous diptych •

• Simultaneous diptych •
These two images were taken at the same time and show my hand-holding position as well as the image captured. The flower was shot with a reverse-mounted Canon 50 mm f/1.8 lens.
Click image to view large

This three-point position allows me to lean in and out very slightly with the camera. I can manually find the exact focus that I want in the photograph. Focusing with body movement allows me to place the depth of focus exactly where I want it relative to the subject.

More after this…

find out more...Photokonnexion tips by email
Enjoying this article? Please sign up for our
daily email service.
                                                Find out more
#11030#

When you are hand-holding practice breathing slowly and pushing the camera shutter button gently, without imparting additional motion to the camera. (More tips on stance)

Play, Combine, and Find What Works for You

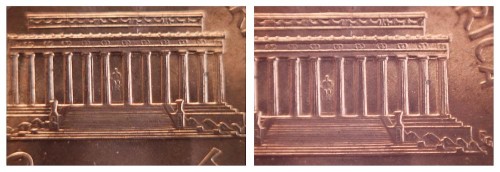
You can use extension tubes in combination with either a reverse ring or close-up lens for even more detailed images. However, the working distance between the lens and the subject is narrow and the depth of field is incredibly shallow. With the pennies below, I found it impossible to keep both Mr. Lincoln and the columns of his memorial in focus together, as the columns are slightly raised relative to the surface of the penny.

• Penny diptych •

• Penny diptych •
These pennies were both taken with a Canon 50 mm f/.18 lens and a set of three, generic extension tubes (7, 14, and 28mm). In the left-hand image a +10 close-up lens was added, and in the right-hand image the lens was instead reverse mounted.
Click image to view large

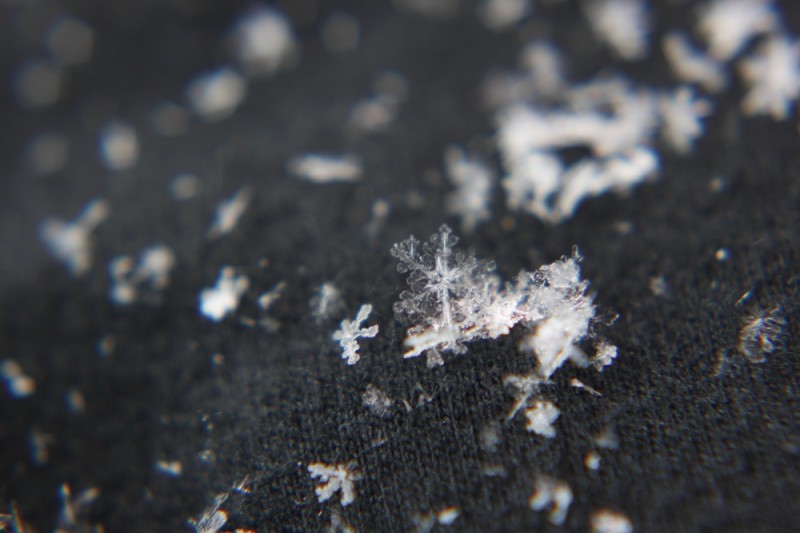
Close-up lenses can also be screwed in to each other for greater magnification. I used both a +4 and +10 close-up lens for the snowflake image below. There is some distortion visible in the image particularly around the edges. I also found it more difficult to focus when looking through both lenses.

• Macro snowflake •

• Macro snowflake • By ArchaeoFrog •
This snowflake was shot with a Canon 50 mm f/1.8 lens
and a +4 and +10 close-up lens.
Click image to view large

The final curtain

The varieties of subjects for macro and close-up photography are endless. I have tried to highlight a variety of them during this series. Flowers, insects, and falling water are perennial favourites, as are coins, Lego figures, and other small objects. Your imagination and creativity are your only limitations. Enjoy!

• Macro snowflake •

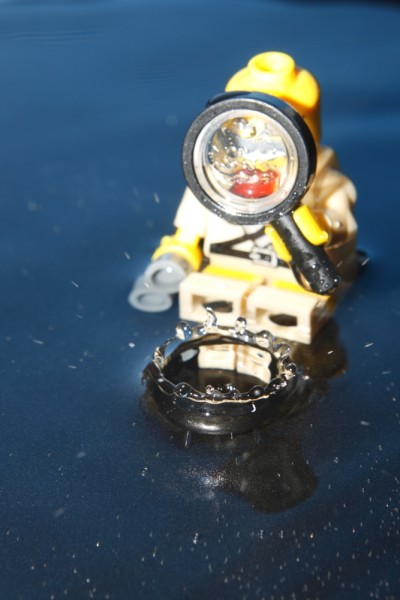
• Lego water crown •
This Lego mini-figure and falling water crown were shot using a
Canon 50 mm f/1.8 lens and a +4 close-up lens.
Click image to view large

Articles on Close-Up and Macro Photography
by Katie McEnaney

Part 1 of this series focused on using close-up lens, Part 2 covered reverse rings, and Part 3 explained extension tubes.

Inexpensive Close-Up Photography – close-up rings
Inexpensive Close-Up Photography – Reverse Rings
Inexpensive Close-Up Photography – Extension Tubes
Inexpensive Close-Up Photography – Tips and Tricks (this article)

By Katie McEnaney (contributing author)

Katie is an elementary school teacher in Wisconsin, USA. She is an avid photographer with wide interests. She is always interested in learning more and growing in her photography.
By Katie McEnaney (Archaeofrog)

Can you write? Of course you can!
Write for Photokonnexion...

We would love to have your articles or tips posted on our site.
Find out more…
Write for Photokonnexion.

A simple introduction to backlight

• Introduction to backlight •

• Introduction to backlight •
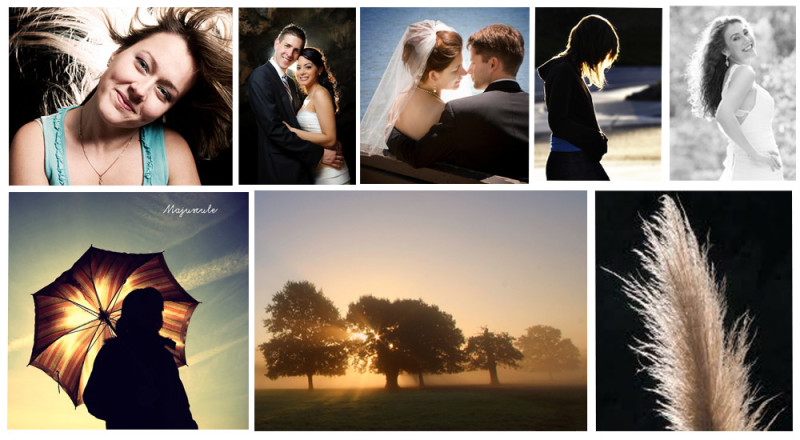
Various images showing backlight scenarios in the studio and outside.
Images from various artists – displayed on Google Images.

Backlight is a versatile light with great potential.

The term backlight refers to the use of a light which is projected from the back of the scene/studio onto the subject from behind. The camera is placed facing the subject. It captures the effect of the light as a highlighted rim or halo around the back edges of the subject.

The use of a backlight creates very distinct effects. The most important is the rim light around the edges of the subject. This highlighting effectively isolates the subject from the background. So it is a useful technique when the subject and background share similar colours or tones. The rim effect around the edges of the subject is especially useful for bringing out highlights and style in hair. Sometimes it is also used to imply purity or goodness after the manner of a religious halo.

Backlight can be produced either with artificial light, natural light or a combination. The sun is normally the most important light for back lighting and so in cases where sunlight is strong artificial light is often used to bring the foreground or the subjects front side out of shadow. This is fill light and provides sufficient light for a good shot of the subject without blowing out the effects of the back light.

In photographic scenes the backlight is often used to create an emphasis on the three dimensionality of the subject. Lights coming directly from the position of the camera tend to make a subject look flat because all the shadows are removed. Backlight has the opposite effect. The light halo effect at the back of the subject emphasises the depth of the subject. It can also be used to emphasis depth in the picture. By strongly highlighting the back of the subject the distance to the scenery behind the subject is revealed giving the image some depth.

Setting up an effective backlight requires some care. If the source of the light shines directly into the camera lens it will blow out and create a strong distraction for the picture viewer. Also a strong backlight can make the front side of the subject look very dark or even silhouetted. To prevent this it is normal practice to use a front light as well so the subject is bright enough to capture. Setting up a good backlight often requires getting the foreground light correct first, then putting in the backlight at around 2 to 3 stops brighter to create the emphasis.

The angle at which a backlight hits the subject can be critical. If the backlight is directly toward the camera the subject can be strongly blown out by and direct light passing around the subject. Normally backlight is applied at an angle. That way the lighting will provide a little texture on the subject and not be directed into the camera lens. It can also be used to more effectively show fashion elements like hair styles by picking out highlights, curls etc.

“Backlight” should not be confused with background lighting. The latter is where a light is used to light the background, the scenery or backdrop. Background lighting typically faces away from the camera. Backlights face toward the camera.

Backlights are used in such a large variety of ways that some practice and experimentation is needed to be able to work out the best way to use them. However, because of the intensity of the light from the back the foreground lighting is often important too. It is not unusual for multiple artificial lights to be needed in order to get the best out of backlights and to keep the balance of lighting good all around the subject.

Examples of “Studio backlighting” on Google  External link - opens new tab/page
Examples of general “backlight photography” on Google  External link - opens new tab/page

Backlight techniques are very important in photography as they have so many effective outcomes. It is certainly worth practising with your lights or even natural light to try out some of the effects.

By Damon Guy (author and Photokonnexion editor)

Damon Guy - Netkonnexion

Damon Guy (Netkonnexion)

Damon is a writer-photog and editor of this site. He has run some major websites, a computing department and a digital image library. He started out as a trained teacher and now runs training for digital photographers.
See also: Editors ‘Bio’.

Contribute A Definition?

Send us a definition of a photographic word or phrase...

Send us a definition for our list of photographic words and phrases. Simply write a clear definition and send it in. Include an original picture if you wish. Give us your name and a link to your website and we will credit your work.

Inexpensive Close-Up Photography – Reverse Rings

Bubble Wrap

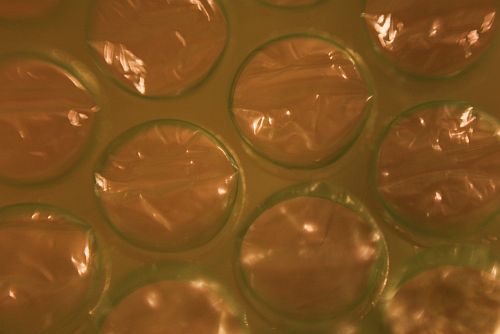
Green bubble wrap shot with Canon 50 mm f/1.8 lens reversed.
Hand-held to the camera body.
• Bubble Wrap •
By Archaeofrog

Anyone can use reverse rings.

Close-up or macro photography is something every photographer should try. However, a macro lens can be an expensive investment. This series covers inexpensive ways to get great close-up results. The first article “Inexpensive Close-Up Photography – close-up rings” discussed using close-up lenses that attach to your existing photographic lens. A second way to achieve close-up results, surprising as it may sound, is to reverse your DSLR camera’s lens by mounting it on backward.

It is possible (but awkward) to simply handhold your lens backwards against your camera body, as in the top photograph. I don’t recommend it, as it can allow dust or other debris into your camera that may affect the sensor. The inexpensive alternative is to purchase a reverse ring camera mount adapter that fits your lens (based on its diameter) and the make and model of your camera body.

Canon Reversed Lens

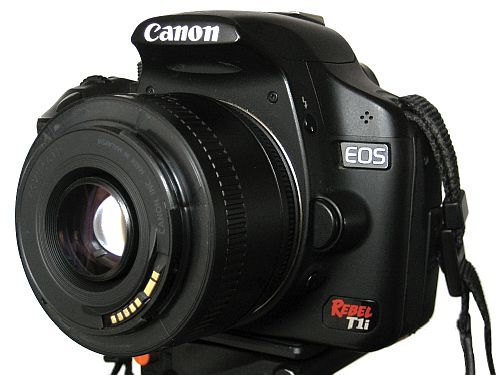
Canon 50 mm f/1.8 lens attached backwards to a Canon T1i body using a reverse ring. The depth of field preview button is visible underneath the lens release button.
Click image to view large

How to use the reverse ring

First, remove any filters you have on your lens. To use a reverse ring, screw the ring securely on to the front of your camera lens filter thread. Hint, it is easiest to screw the ring on while the lens is in the camera body. After attaching the reverse ring to the lens, remove the lens from the camera body. Now reverse it and fit the lens-mount side of the ring into the camera body and lock it in place. You will no longer be able to use the autofocus function of your camera or adjust the aperture of the lens once it is reversed, but you will be able to adjust the shutter speed and ISO. Your camera may display an aperture value of F00 or other default. I recommend that you change the shooting mode on your camera to aperture priority or manual. In aperture priority mode, the camera will calculate and set the shutter speed for you, while in manual, you will set it yourself. Now you are ready to use the lens.

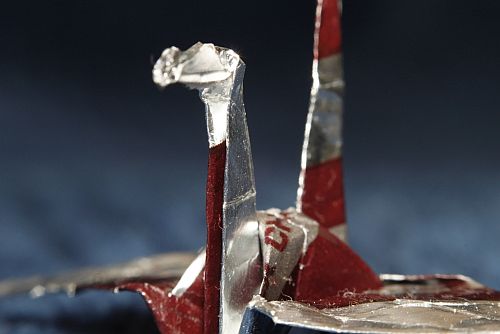
Origami Crane

• Origami Crane •
Click image to view large
Origami paper crane folded from a bite-sized Hershey wrapper.
Captured with a reverse-mounted Canon 50 mm f/1.8 lens

A reverse ring gives better results when used with a prime lens rather than a zoom lens. Prime lens are often faster, which means that they have a wider maximum aperture and can use a faster shutter speed, even in lower light.

You can use any type of lens, although light lenses are recommended. Very heavy lenses may damage the reverse ring mount adaptor or the lens filter thread.

Using a zoom lens, particularly when fully zoomed out, can be awkward to support. Because the lens is reversed, zooming the lens requires you to be further from the object you are photographing and does not give such a close-up view of the subject. The working distance (distance from the lens to the object in focus) is about five inches with the Canon 50 mm f/1.8 lens reversed. Using my Tamron 18-270 mm zoom lens at 18 mm, I have to be within about two inches to get an object in focus, while it is greater than six inches at 270 mm.

Adjusting the aperture

When your camera lens is not attached to a camera, its default position is to be open to its widest aperture. So, for the Canon 50 mm f/1.8 that would be f/1.8, which results in a very shallow depth of focus. In the crane picture above, the neck of the crane is in focus, while the beak and tail are not. When I reverse this lens on my camera, the aperture will still be f/1.8, and I will be unable to adjust the aperture value after the lens is reversed on the camera. But there is a work-around.

Most DSLR cameras have a ‘depth of field preview’ button. The purpose of this button is to allow you to look through the viewfinder and see exactly what your camera will see at the aperture that is set. When you press that button, the blades inside the camera lens close down to the selected aperture. This will allow you to set the aperture for your lens. (Please note: not all DSLRs have a depth of field preview button).

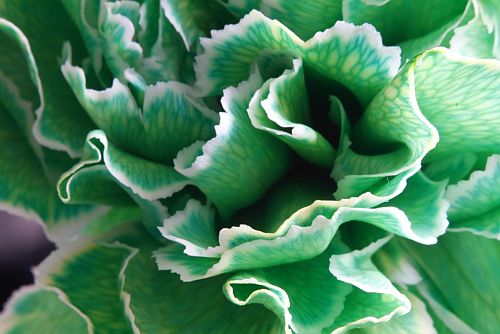
Carnation at F22

• Carnation at F22 •
By Archaeofrog

Here is the procedure. Using aperture priority or manual mode on your camera, dial in the aperture that you want to use for the shot. Next, depress and hold the depth of field preview button. While still holding down the button, press the lens release button and remove the camera lens. Then you can mount it on your camera body using the reverse ring. The camera lens will maintain whatever aperture you had selected. If you want to return to the default position or change the aperture again, simply put the lens back on the camera the regular way and repeat the process. Tip: if working outside, you may want to set your aperture first and reverse the lens indoors, to avoid dust getting into the camera body and on the sensor.

Advantages and limitations of reverse rings

The reverse ring is a fun and easy way to experiment with close-up photography. The ring itself is very inexpensive, usually less than $10 USD (around £7-£8 UK), and is small enough to fit in a purse or pocket. Depending on the lens that you reverse, you can get very close to macro-level results.

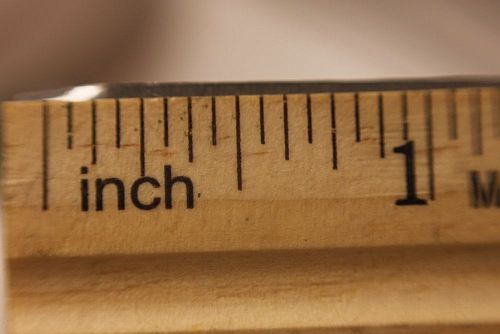
Ruler

• Ruler •
Click image to view large
This photograph of a ruler demonstrates the scale of a reverse-mounted Canon 50 mm f/1.8 lens, which gets down to an image of about an inch and a quarter wide and has a working distance of about five inches.

Like other close-up techniques, using a reverse ring does require you to be physically close to the objects you are photographing. Depending on your lens and your comfort level, however, you may still be able to capture detailed shots of slower moving insects, such as the bee below. A reverse ring is also ideal for indoor shots or other stationary details.

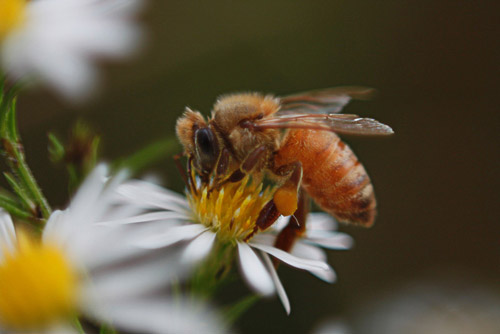
Bee

• Bee •
Click image to view large
Bee photographed using a reverse-mounted Canon 50 mm f/1.8 lens.

You will lose some of the automatic functions of your camera, including autofocus, with a reverse ring. The electrical contacts that normally carry signals to the lens are not in contact with a reversed lens. This is not that much of a disadvantage. Generally, with close-up shots, you get better results when using manual focusing.

While you can adjust the aperture (on some cameras), there is an additional step of setting the aperture using the ‘depth of field preview button’ before reversing the lens.

As with any close-up or macro technique, the depth of field (area in focus) will be very shallow. You can maximize sharpness by keeping the camera lens parallel to the object being photographed. In the photograph of the bee, above, the body of the bee is parallel to the camera lens and stays in focus. The flower is perpendicular to the lens and falls out of focus quickly.

Another technique to maximize sharpness is to use a smaller aperture like f/22, but this may require a longer shutter speed than you can easily hand-hold. You can solve this problem by using a tripod for stationary objects, which allows you to use a longer shutter speed to achieve the desired sharpness.

All close-up techniques benefit from the additional stability of a tripod. Although, as you can see from the shots above, you can get effective results from hand-held techniques.

A flexible option

Overall, a reverse ring is an inexpensive and portable way to use your existing lens for close-up photography. Depending on the lens you reverse, there is enough working distance to photograph insects, flowers, or any other small subjects that interest you. There is flexibility to adjust the aperture value before reversing the lens, which gives you a little control over the depth of focus. It is an inexpensive option to get you started in the tiny world of close-up photography.

Buyers guide

The inexpensive nature of these rings makes a quick purchase worthwhile. Remember that you will need to buy the ring that suits your specific camera mount (eg. Canon, Nikon etc). The size of the filter thread on your lens is important too. On the following link you can find a range camera mount types as well as thread sizes…
Reverse ring camera mount adapter products  External link - opens new tab/page

A great lens for doing close-up work is a 50mm prime lens. More information on buying 50mm prime lenses including product links can be found in…
Are your pictures distorted? Considered a 50mm?

For general reference: 50mm Prime lens product listing  External link - opens new tab/page

Lego

• Lego •
Click image to view large
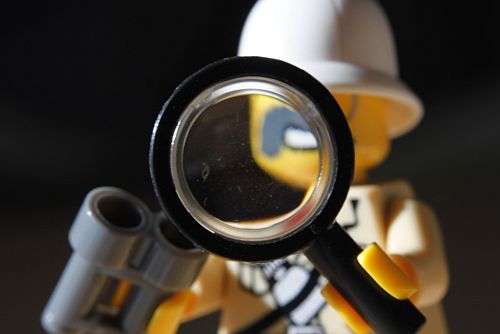
Lego explorer mini-figure.
Using a reverse-mounted Canon 50 mm f/1.8 lens at f/1.8.
• Lego • By Archaeofrog

Articles on Close-Up and Macro Photography
by Katie McEnaney

Part 1 of this series focused on using close-up lenses. Part 3 will cover extension tubes, and Part 4 will bring all these techniques together with a range of close-up ideas and tips.

Inexpensive Close-Up Photography – close-up rings
Inexpensive Close-Up Photography – Reverse Rings (this article)
Inexpensive Close-Up Photography – Extension Tubes
Inexpensive Close-Up Photography – Tips and Tricks

By Katie McEnaney (contributing author)

Katie is an elementary school teacher in Wisconsin, USA. She is an avid photographer with wide interests. She is always interested in learning more and growing in her photography.
By Katie McEnaney (Archaeofrog)

Can you write? Of course you can!
Write for Photokonnexion...

We would love to have your articles or tips posted on our site.
Find out more…
Write for Photokonnexion.

Simple portrait lighting for anyone to try (pt.2)

Video

Video from the “Slanted Lens”

Making a portrait is a process.

A great portrait says something about the subject. It will capture something of the essence of the person in the shot. Achieve that level of artistry and you will have arisen above the technical process. However, if you cannot do the basic photographic capture well, all the artistry in the world will not save your shot.

In Simple portrait lighting for anyone to try (pt.1) I looked at the background layout for the one light set up in portraiture and explained the components involved. Today we will see a video for the same set up so you can put into context my diagram from yesterday.

The Basics of a One Light Setup: A Lighting Tutorial

TheSlantedLens

By Damon Guy (author and Photokonnexion editor)

Damon Guy - Netkonnexion

Damon Guy (Netkonnexion)

Damon is a writer-photog and editor of this site. He has run some major websites, a computing department and a digital image library. He started out as a trained teacher and now runs training for digital photographers.
See also: Editors ‘Bio’.

Can you write? Of course you can!
Write for Photokonnexion...

We would love to have your articles or tips posted on our site.
Find out more…
Write for Photokonnexion.

Simple videos showing how camera settings work

Understanding the relationship between ISO, Aperture and Shutter speed…

These are the three critical factors in the exposure relationship. Getting a feel for how they work together is the essence of controlling your camera. Several people asked me to find a simple explanation for the way this relationship works after seeing this post yesterday: How to work with your camera settings – a simple, fun lesson.

The key point

The three settings, ISO, Aperture or Shutter Speed are set up on your camera in stops, or fractions of stops. The stop is a photographers way of measuring light in the camera.

The most important thing to remember is that a stop of aperture is the same as a stop of ISO, and in turn a stop of shutter speed. As they equal each other, you can keep them in balance. If you put one setting up a stop (or fraction of a stop) you can put one of the others down a stop (or fraction) and you will get the same exposure. This allows you to change your settings to get a different result (more bokeh, less movement blur etc) but retain the same exposure levels.

The two videos below will help you to understand the way the settings work. I have given you two versions of the same information. They both present differently, and they both have snippets of information that are different from the other. However, they both cover the same material. I hope that one or both of them will help you to see how the settings work. Enjoy!

Aperture Shutter Speed and ISO, Photography 101

The second video covers almost identical material but shows some of the points through the camera viewer. This helps you to see the context of the settings easier.

Exposure (Aperture, Shutter Speed, ISO)

Now try out your new knowledge…

Now you can try out CameraSim in yesterdays post. Try varying the settings for yourself like they did in the videos and see how they work together to get an exposure balance.

By Damon Guy (author and Photokonnexion editor)

Damon Guy - Netkonnexion

Damon Guy (Netkonnexion)

Damon is a writer-photog and editor of this site. He has run some major websites, a computing department and a digital image library. He started out as a trained teacher and now runs training for digital photographers.
See also: Editors ‘Bio’.

Can you write? Of course you can!
Write for Photokonnexion...

We would love to have your articles or tips posted on our site.
Find out more…
Write for Photokonnexion.