Tag Archives: Depth of Field

A quick shoot making water splashes? Tips to get started…

Water splashes :: Have a go at water from a bottle

• Have a go at water from a bottle •
Water splashes :: Great fun, easy to do at home.
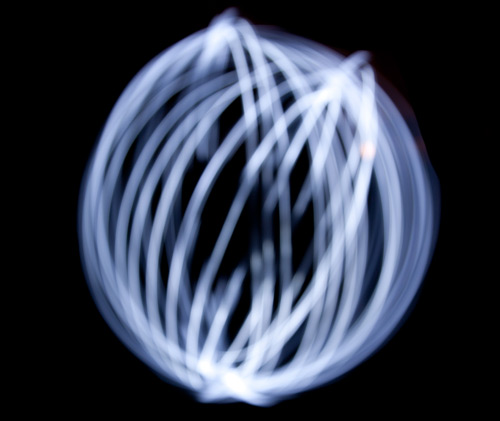
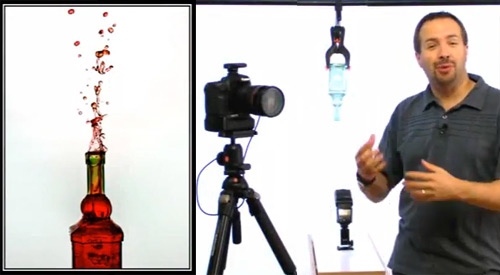
Picture taken from the video.

Photographing water splashes is great fun!

Every photographer has to have a go at water splashes some time. It is fun, can be done at home, and produces some creative. exciting and visually interesting shots. To get started you need very little kit. Here’s how you can have a go…

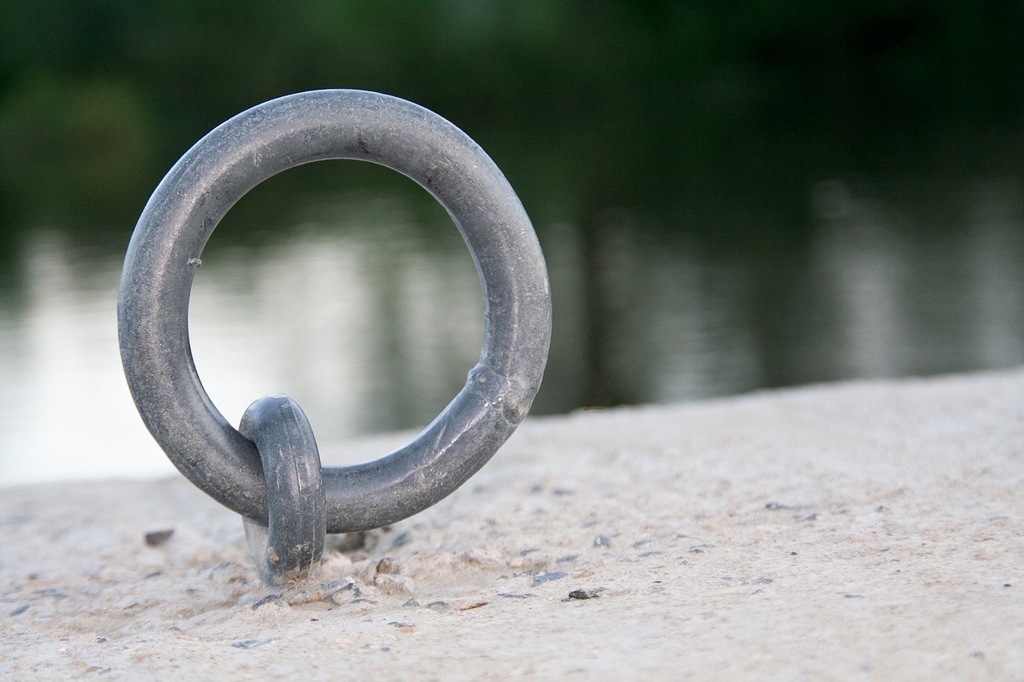
Water splashes :: Fine art water droplets

Everyone wants to do water droplets splashing up. Typical fine-art water droplets shots produce brilliant shapes and forms that we don’t see every day. I am sure you have seen them… if not here is a page of examples ::
Fine art water droplet images on Google  External link - opens new tab/page

Water splashes :: Working with water to get started

Fine art water splash shots need quite a bit of practice and precise measurements. It is better to get some practice working with water first. Then you will learn about the equipment and working with water. You will also get some great shots.

Start off with an easy exercise. The video is going to show you how you can do photos of water tumbling out of a bottle. You get some great results and there is a twist to add a little pizazz. You can show the bottle with the water splashes going upwards!

The video will show you how to set up the water splashes shot with a bottle. Here are a few things you need to do for this exercise. In the video Gavin Hoey has some expensive equipment. We can do it using only household items.

What you need…
  • A water tray – to collect the water splashes coming out. Use a baking tray or large bowl.
  • Use a broom stick or pole to hang the bottle. Put two chairs on a table with the the pole between them Use the backs to hang the bottle. This gives you enough height for the shot at a comfortable level.
  • Use a smallish, thin-necked bottle. Large bottle necks let the water out too quickly. Start looking for the right bottle now. You will have found what you want by the weekend!
  • To suspend a bottle without a studio clamp, tie the bottle around with a length of string long enough to hang it from your pole. Then use some packing tape, or electrical tape to stick down the string tied around the bottle. This stops the bottle from slipping out of the string. This method actually does a better job than shown in the video because the bottle hangs slightly to one side – a pleasing composition. Tape the string onto the bottle near the end of the bottle so your shot captures the top part of the bottle without seeing the tape.
  • If your bottle swings too much while the water is coming out, tie it up using two strings affixed to the bottle. Tie them to the pole wider apart than the width of the bottle and this will stop the swing.
  • In the video Gavin suggests using an off-camera flash. OK, lots of you do not have these. Use the pop-up flash flash on your camera. The problem is that the on-board flash may create a bottle shadow on your background. This is because the flash is in-line with the shot. Notice how the flash is below the bottle in the video. Pull your working table away from the background. Then, well away from the water, point one or two bright domestic lamps at the wall. These will stop shadows and make sure that you have a perfect white background. I usually stand them on the floor behind the table and point them at the wall from there.

Apart from these tips the rest of the equipment is much as shown in the video.

One trick not in the video…

Cleaning! Don’t we all hate it? Yes, but it can really make a difference to your shots. Make sure you clean your bottle really carefully. Did I mention carefully? One thumb mark, dirty trace or blotch and the beautiful clarity of your shot will be ruined. Wash it in detergent and make sure it is dry (free of drips) before you start. It really makes a difference.

Please remember safety…

This is a safe exercise if you remember a few tips…

  • Make sure any electrical appliances are well away from any water splashes.
  • Ensure there are no trailing electrical wires near any water or equipment.
  • Have a towel on hand. Mop and dry wet patches on the table and floor as soon as they spill to prevent slipping.
  • Keep your camera and especially any flash equipment away from the water splashes. You don’t want to break your camera or get it wet.
  • Flash guns, even ones with batteries, release very high power jolts of electricity and can be dangerous if wet.
  • With chairs on the table make sure they are safe from falling.
  • This may seem a fun environment for kids… it’s not. Keep them clear. Have fun with the pictures later.
  • Remember, food dye can mark certain clothes, table tops and carpet materials. Keep it clear from these things, wear old clothes.
How to create amazing photos with water and a bottle


PhotoGavin  External link - opens new tab/page

A fun extension activity…

I have found that this bottle exercise can be huge fun. However, it’s also fun to experiment. I have on occasion placed various items under the falling water. Place them within the range of your shot frame. It takes a little lining up. Fun things like brightly coloured objects work well. Try grapefruit, lemon, bright colour balloons a bath duck and so on… Make sure you have something large enough to catch the water splashes. This makes way-more mess over a larger area!

If you want to make it really fun you can do the water splashes falling on someone’s head. Yeeha!

Have fun with your water splashes. With only a few tries you can get some great results and have some excellent shots to show your friends.

Comments, additions, amendments or ideas on this article? Contact Us
or why not leave a comment at the bottom of the page…

Like this article? Don’t miss the next — sign up for tips by email.

find out more...Photokonnexion tips by email
If you enjoyed this article please sign up for our
Tips by email service.
                                                 Find out more

Broaden your lens and focal length knowledge

Mixed lens types

Mixed lens types – What do they all do?

There is a range of lens types…

If you know about the lens types you have, that’s good. But talking and thinking about buying others takes a wider knowledge. Here are two videos to give some insights on lens types. There are some interesting facts too.

Think about your lens types

Before you buy lenses, think about what you want. If you are just learning photography this is important. It keeps you in touch with what’s possible with each of the lens types. Also, it helps you to know what you can do with the skills you have. With each video, try to relate your experience with the lens types they are talking about. Then you will be able to extend your skills with kit you own now.

Another point worth thinking about is what you want to photograph. Long lens types, for example, get you closer to objects in the distance. They make things large in the frame, even when it’s far away. But some subjects are more environmental. So you might benefit more from showing a distant subject in its wider environment. Landscapes are a classic example, but there are others. So, think about what other creative views you can achieve with each of the lens types too.

Introduction to Camera Lenses PT1


Mike Browne  External link - opens new tab/page

Introduction to Camera Lenses Part 2


Mike Browne  External link - opens new tab/page

Comments, additions, amendments or ideas on this article? Contact Us
or why not leave a comment at the bottom of the page…

Like this article? Don’t miss the next one — sign up for tips by email.

By Damon Guy (author and Photokonnexion editor)

Damon Guy - Netkonnexion

Damon Guy (Netkonnexion)

Damon is a writer-photog and editor of this site. He has run some major websites, a computing department and a digital image library. He started out as a trained teacher and now runs training for digital photographers.
See also: Editors ‘Bio’.

Get Photokonnexion tips by email!
We send you tips daily – find out more…

Start email subscription now!

A quiz about lenses… what do you know?

• Lenses • Lens quiz

• Lenses •

Lenses are a wide ranging subject…

and there is a lot to know. It is very easy to make mistakes. So finding out the basics is important. In this lens quiz I will give you the links to resources so can find the simple answers which is also essential information… have fun!

Lens Quiz Questions…
  • Q1. Why do you use a lens hood?
  • Q2. Name the phenomenon that causes light to bend when it hits a lens surface?
  • Q3. How does the optical path differ from the optical axis?
  • Q4. What is another name for an individual glass lens inside a photographic lens?
  • Q5. Is the focal length of an optical lens the same as the focal length of a photographic lens?
  • Q6. How many lenses in a lens group?
  • Q7. Describe what “chromatic aberration” looks like in a picture.
  • Q8. What is projected onto the sensor plane from the lens?
  • Q9. What is the diaphragm in a photographic lens?
  • Q10. Can the focal length be greater than the measured length of the lens body?
  • Q11. What would you normally use a macro lens to do?
  • Q12. Does a wide aperture have a low ‘f’ number or a high ‘f’ number?
  • Q13. Is the shutter in the lens or the camera?
  • Q14. Which is the fastest lens an f1.2, f5.6 or f4.0?
  • Q15. What controls the depth of field?
Where to find the answers…
Answer sheet

You can download a copy of an answer sheet so you can write the answers while looking at web pages.

Our answers…

We will give you our answers on Monday 05th August 2013. In the meantime, have fun!

Comments, additions, amendments or ideas on this article? Contact Us
or why not leave a comment at the bottom of the page…

Like this article? Don’t miss the next one — sign up here.

Damon Guy - Netkonnexion

Damon Guy (Netkonnexion)

Damon is a writer-photographer and editor of this site. He has run some major websites, a computing department and a digital image library. He started out as a trained teacher and now runs training for digital photogs.
See also: Editors ‘Bio’.
By Damon Guy see his profile on Google+.

find out more...Photokonnexion tips by email
If you enjoyed this article please sign up for our
Tips by email service.
                                                 Find out more

Facts about focus… how much do you know?

Orb Out Of Focus

• Orb – Out Of Focus •

Focus is more complex than at first sight.

Focus, and the associated functions on a camera, take a little time to sort out in your mind. Here are some fundamentals and some obscure facts for you to think about.

Focus facts…
  1. When you point your camera at a single colour, blank space, solid blue sky or night sky the auto-focus will ‘hunt’ for some contrast. The lens will be unable to focus but keep trying. If it detects a difference of contrast in the frame it’ll be able to balance it out and use it to create a focus. If your lens is ‘hunting’, find something with a bit of colour or light contrast. Then it will stop hunting and focus. More…
  2. The light from your lens focuses on the “image plane”, the flat surface that is also the surface of the Digital Image Sensor. The circle of light it creates is bigger than the sensor. The light that falls outside the sensor area is normally inferior to the light which falls on the sensor surface. This is because the edges of the lens creates an inferior quality of light compared to the middle part of the lens. More…
  3. There is such a thing as a “fixed focus lenses”… they have no focus capability. They are put in the camera at time of manufacture and set to give a deep focus from a few meters through to infinity. Can you imagine why such a lens would be used in a camera? More…
  4. Bokeh appears in out-of-focus areas. Some people think that the prominent little circular highlights are the bokeh. This is incorrect. In fact bokeh is a statement relating to the quality of the out-of-focus blur. The blur itself is called… blur! More…
  5. Macro lenses are highly effective at focusing at short distances from the lens and to enlarging the image. Actually they will also focus at other distances too. Macro lenses produce a great portrait. More about macro lenses…
  6. When a lens lets light through the light follows something called the optical path. The focus is achieved on the optical path. However, in a DSLR when the mirror is down, the optical path ends up at the eye. The optical path is not the same all the time. More…
  7. Where you focus affects your exposure. Most people assume focus and exposure are two separate things. And, in fact, they are. But, your camera senses the light conditions where you are focusing and sets that focus at the same time as taking readings for the light meter. Change your point of focus and you may change the light reading. Even a tiny movement may change your exposure readings if your focus changes from a lighter to darker surface. Useful to know if you are in a darker environment with bright light sources around. Especially useful if you are trying to learn manual control.
  8. The ‘sensor plane’ is the surface on which the image is projected by the lens. It is the surface of the sensor itself. In former times it was the same surface that the film was laid upon. Any idea what other names might be applied to the same surface in a camera? More…
  9. Sometimes it is important to measure your focus distance precisely. For example if you want to repeat shots or vary the distance form camera to focus-point by a measured amount in a series of shots. Such measurements are often used in forensic photography, macro work and for working out scene sizes and distances. There is only one place where you can take a true measurement from on a DSLR. It is clearly marked. Know what it’s called and where it is? More…
  10. Consider turning off your auto-focus when using a tripod. The motor that works the auto-focus creates vibration that may affect your shot. It is less likely to have an effect on long exposures, but if you get into the habit of doing it you may help to sharpen your shots. Reducing any vibration is good when you are trying to sharpen your shots.
  11. The Plane of focus is a very important concept – it is about where you are focussing. It gives you an idea of what your focus is doing at any angle of the camera. You should really have a good idea about it if you want to make sure you are getting a proper focus on the subject of your shot. More…
Lots more to learn…

Focus is big subject and can become extremely technical. There is a lot more you can learn. These points are just some fun ideas to help you learn about different aspects of focus in general. If you have any comments, other ideas or want me to write about another aspect of focus – leave a comment at the bottom of the page.

Comments, additions, amendments or ideas on this article? Contact Us
or why not leave a comment at the bottom of the page…

Can you write? Of course you can!
Write for Photokonnexion...

We would love to have your articles or tips posted on our site.
Find out more…
Write for Photokonnexion.

By Damon Guy (author and Photokonnexion editor)

Damon Guy - Netkonnexion

Damon Guy (Netkonnexion)

Damon is a writer-photog and editor of this site. He has run some major websites, a computing department and a digital image library. He started out as a trained teacher and now runs training for digital photographers.
See also: Editors ‘Bio’.

Is your composition in photography up to scratch?

Composition in photography :: Image: River Bokeh

• River Bokeh •
There is more to composition in photography than simply placing the subject on a third. The concept of “composing” pulls in many aspects of Photographic work.

Composition in photography – science or art.

Many photographers struggle with composing a picture. Composition in photography seems seems difficult to define. Starting with a few simple ‘rules’ helps. If you want to develop your work you must go beyond the rules and understand some of the other principles in photographic art.

A lifelong adventure

The Definition: Composition (photographic aesthetics) in our Photographic Glossary is up to date and helps to explain the idea of the Elements of photographic art. It would help to read that definition before the rest of this article.

Construction or deconstruction

I have thought about the traditional elements and principles of art for a long time. I find myself dissatisfied with the traditional view with respect to photography.

Composition from a photographers viewpoint is, I think, a different situation to say a painters viewpoint. We could be side-by-side with a painter and both create an image of the scene which is broadly alike. Alternatively we could produce something totally different. They could be worlds apart.

I think there is something different in the approach to a scene for a photographer compared to an artist. A painter constructs a picture from scratch. They can create something that is like the scene they see. They my paint something that differs from that scene so completely it is unrecognisable. Whichever it is, they are able to construct the scene, element by element.

In this “construction” mode an artist has used their knowledge of the “elements of composition” and done an analysis of the scene. Then, using their imagination they put the elements together using the principles of art to create a rounded composition which is aesthetically pleasing, well proportioned, organised and representative of the scene.

A photographer has to approach the scene from a different perspective. The scene has attributes which are elements of art. While the photographer sees the textures, proportions, colours and other elements the way these are used differs to the ‘construction’ work of the artist. A photographer has to take a ‘viewpoint’ in using composition in photography. We look at a scene and are faced with less artistic license in the placement of the elements or how to colour, texture or use them. Instead the photographer has to consider what not to include in the picture – to make it simple. Photographers consider using the natural attributes of the scene to pick out the compositional elements. We use the principles of art. But we consider them in an existing context to create an aesthetic outcome. This is done through our viewpoint of the scene.

In other words, photographers tend to work in a “deconstructive” mode. Simplification and point-of-view are compositional tools. They derive from the principles of photographic art. This helps make it easier to express the desired outcome. But essentially our efforts at composition in photography are about ignoring elements of the scene (leaving them out of the image). And also to emphasise others (or keep them in the frame) in order to develop the message or ‘point’ of the picture.

Complexity

All art is complex. So there is plenty of ways that this analysis can be knocked down by a whole range of “what if” arguments. Nevertheless I feel that photographic art does have this deconstructive approach to a scene compared to other creative arts. To a lesser or greater extent it applies to all scenes. There will be more construction in a still life; less in a landscape. So this is not a simple concept to be applied in all situations.

However complex a scene, however it is approached, the outcome will be unique to the photographer or the artist. It is in this variation and infinite use of interpretation that photography is an art. The use of our knowledge of composition in photography allows an analysis of the scene which may seem like the same analysis made by an artist. I question that the principles of art are the same as the principles of photographic art. I think they are deployed differently.

Think about the contrasting models of the artist and photog. Construction (artist) verses deconstruction (photographer) is one way to bring out how a scene can be approached. This analysis is one more way to think about composition in photography.

Background

You may feel that you need more background on the subject of composition in photography. If you do, here is a slide show to provide some insight into the basics of composition in photography. Please also read the Definition: Composition (photographic aesthetics) and look up the Composition resources on Photokonnexion

Comments, additions, amendments or ideas on this article? Contact Us
or why not leave a comment at the bottom of the page…

By Damon Guy (author and Photokonnexion editor)

Damon Guy - Netkonnexion

Damon Guy (Netkonnexion)

Damon is a writer-photog and editor of this site. He has run some major websites, a computing department and a digital image library. He started out as a trained teacher and now runs training for digital photographers.
See also: Editors ‘Bio’.

A fast and simple introduction to portrait photography

How to make a digital camera

A rapid but full introduction to portraiture


When I introduce a new idea or a concept in these pages I often provide a video to help put the point across. Well, here is a video that stands up on its own. It is a light and simple introduction to portraiture. It bombs along at a great rate and has plenty to say about good principles in portrait photography. So, without further ado here it is. It’s 4mins 15secs long.

How to take great portrait photos


VideoJug  External link - opens new tab/page
Portraiture – Resources on Photokonnexion.com

Comments, additions, amendments or ideas on this article?
Contact Us
or why not leave a comment at the bottom of the page…

Seven easy tips to improve your group photography

• Boys Group •

• Boys Group •
The humble group photograph can be much improved by a few simple steps.

Simple steps lead to great shots…

With groups you must go a little further than with straight portraits. Getting people coordinated, a range of different settings, beating the dreaded ‘blinks’, great sharpness… Check these out, go the extra mile.

Planning

When doing group shots a few ideas up front helps. Some simple ideas about cohesion, commonality and framing can make your shots more compelling. Clear ideas about how you want this particular group arranged will enable you to get them quickly into place. Groups, by their nature become impatient quickly. Preparation moves things along keeps people on the ball. Have your location scouted and know where you are going to place your group. Have a good, simple background ready. Make sure you have adequate light to work with. Location is everything.

Settings

Remember, groups require a wide view and you need some depth too. Set your aperture too large and you risk the back row being out of the zone of sharpness. Most groups are best photographed at f8 or even better f11. To get the sharpness work with your shutter speed up reasonably high. 1/125th minimum – better 200ths of a second. Go higher if you don’t need flash.

Bigger groups always have a certain amount of movement. Higher shutter speeds help to freeze the action. The problem is, high shutter speed and small aperture leave you needing flash or extra lighting. There is always a trade-off. To compensate you may need to raise your ISO.

Sharp shooting

Shooting at high speed will help freeze the action. It will not steady your hand. If shooting a big group, especially for formal shots, it’s best to use other sharpening techniques. Consider these sharpness…

  • Using a tripod
  • Use mirror lock-up function
  • Image stabilisation off (not needed on tripods – it creates vibration)
  • Auto-focus off on a tripod after the group is focused (it creates vibration)
  • Operate with a remote shutter button or use the on-camera timer

A tripod saves time. You can arrange the group and smooth the shot through. If you have more than one group, your camera is always set up when it is on a tripod. It helps smooth the flow.

Light and shade

Overall light in the scene is important, so is the shade. When taking pictures of groups you are taking a wide angle view. The group is often spread out. It’s easy to miss that one or two of the group are in the shade. Or, with a camera mounted flash, the shadows from the flash fall harshly onto the people behind. Trees, buildings, other people, towers, street lights – any number of objects can cast unexpected shadows which are difficult to notice. Flash casts shadows you don’t see until you open the picture on a computer later. Look carefully at your group. Arrange them to be in clear, consistent light. Make sure any lights or flash you are using treats all the members of the group evenly and fairly.

Clothing

So often with groups you have no control over clothing. If the event is formal the clothes often have a stiff and upright feel. People don’t relax so well in this situation so you will have to set the scene and pose them accordingly. It is not easy, especially with family conventions or a preset plan. Where possible let them arrange themselves with your help. People will be most comfortable next to the people they like and know.

When a group is coming together informally the clothes may be wildly variable in character. What matters when working with a candid group is the fun arrangement of the group. Try to get the group to look dynamic and together. This will offset a strong clothing variation.

The prize giving

• The prize giving •
If the group feels comfortable and you work with them they’ll help make a great picture.

Organisation

Groups, especially close up, look odd if the faces are at different distances from the camera. They are close enough to us to look fine. However, the lens plays tricks on our eyes. If they are out of line – at different distances, but close together – they will appear to have different head sizes. Try to make people in each line of a group stand evenly down the line.

Sometimes the classic, short in front taller to the back works fine. Other times it is better to actually mix up short and tall – especially with different generations. It is much more natural for grandchildren to be arranged with grandparents than stuck on the end of the line because they are small. Putting children between adults also provides an opportunity to have a shorter person behind so as to break up a line up – to make it less formally arranged.

Close family groups, and friends, often look good leaning together, or heads together. It is very intimate to touch heads.

The dreaded ‘blinkies’ strike every group shot if you are not careful. The bigger the group the more likely that someone will blink. Overcome it with a little group control. Ready to shoot? Tell them you are going to help stop them blinking in the shot. Tell every one to shut their eyes. Count to two, tell everyone to open. Count to two. Press the shutter. Everyone will have open eyes. Explain it first so they know what is coming. It will make sure they all have eyes open long enough for you to get the shot.

So, with all these different ways of organising the group make sure that what you have is comfortable, natural – never forced.

Posing

Organising the group is about positioning and location. Posing is about personal stance and comfort. You, as the photographer, need to direct the group. But on the other hand you have to work with the people you have before you. Try to make it fun. Get them to relate to one another. If you have time, especially with candids or informal group, get them to experiment. Handshakes, greetings, hugs, arms around each other, standing in groups – the idea is to make ‘that’ group look good. Another group might not look good with the same poses. You should work with them, discuss ideas with them, respect their thoughts. They probably know each other better than you know them and will make the best suggestions. It is your job as a director to pick up on the most effective shots from their ideas. Consider what you know about them, consider their ideas for their poses – then work together to make the shot just right.

Getting the right feeling…

Working with groups is more than just lining them up. You have to consider the time, place, light, shade, the settings and the technique. But the best shots still come from the group itself. If the members of the group are comfortable, having fun and feel natural about their poses they will make sure you get a good shot. Work with them, help them make your picture work.

Comments, additions, amendments or ideas on this article? Contact Us

find out more...Photokonnexion tips by email
If you enjoyed this article please sign up for our
Tips by email service.
                                                 Find out more

By Damon Guy (author and Photokonnexion editor)

Damon Guy - Netkonnexion

Damon Guy (Netkonnexion)

Damon is a writer-photog and editor of this site. He has run some major websites, a computing department and a digital image library. He started out as a trained teacher and now runs training for digital photographers.
See also: Editors ‘Bio’.