Tag Archives: Reflectors

Autumn photography – 50 things to think about

Autumn Cherry Leaves

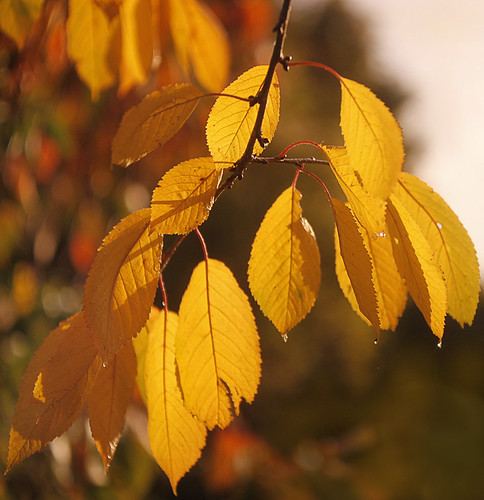
• Autumn Cherry Leaves •
As Fall is upon us. Think of new ways to pull in the eye of the viewer.
Autumn Cherry Leaves by Netkonnexion on Flickr

Autumn is a great time of year.

There is so much to see and photograph. Being out in the open air and lovely locations is part of the attraction. Here are some other important and photographic things to consider.

Locations
  • Don’t always go to the same spot. Find somewhere new every Autumn.
  • Fall colours depend on the species, which may not be shown on maps.
  • Check with park information centres to see if the colours are right.
  • Information centres are great at giving directions to the best locations.
  • Watch weather forecasts to see when the best light is likely to show up.
  • Check websites for the area near the location for useful information.
Colours

What makes Autumn particularly exciting is the lovely russet and golden colours. Making those come out is not always easy. Think about these points…

  • Even slight greyness in the sky can dampen the colours.
  • Bright colour can be lost against a bright sky, exaggerate colour contrast.
  • Shoot yellows against a darker background so they don’t get lost.
  • Golden colours are best with a red dusk. Aim for times in the Golden Hour.
  • Don’t use a pop-up flash. It will flatten the colour and depth.
  • Use off-camera flash from the side to make leaves translucent and bright.
  • Use side light as much as possible to emphasis shadows and define shapes.
  • Use any greens you can as a back-drop for golden colours.
  • Low sunlight peeping under clouds often brings out yellows.
  • Take pictures after rain – the wetness often revitalises colours.
  • Consider a filter on your camera to exaggerate natural colours.
  • Try shots with as many mixed colours as possible.
  • Try shots with lots of similar colours across the picture.
Equipment

Every shoot demands its own approach. But here are some ideas to help the Autumn shots work for you…

  • A tripod is essential. A fuzzy shot of a great scene is horrible!
  • Most people forget the wide angle shots.
  • Remember that zoom lenses flatten perspective – consider prime lenses.
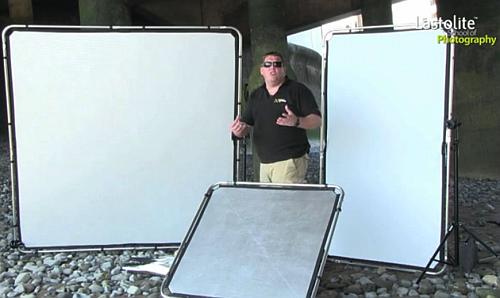
  • Consider using white boards and gold reflectors to help bring up colours.
  • You can’t make great images if you are cold/wet. Wear proper clothing.
  • Beware of changing lenses in damp air!
The shots

Found a great place to rejoice in colour and texture? Now you need to think about composition and ideas for your shots…

  • Check out our resources on composition.
  • Before going spend two hours looking at images by others (Google)  External link - opens new tab/page.
  • Work out a list of, say, 25 shots you would like to try out.
  • Concentrate your efforts on a few ideas.
  • Use your trip to try at least one type of shot new to you.
  • Practice your chosen shots before you go.
  • Remember to work the scene at the location.
  • Remember The fifteen second landscape appraisal.
  • Have a go at this old sailors trick to improve landscapes.
  • People often look up when in trees. Look down, there is plenty there.
  • Get really low.
  • Get really close.
  • Experiment with Depth of Field:.
  • Light leaves from behind. Translucent leaves are wonderful.
  • Consider backlighting to bring out shapes.
  • Hold up something interesting and photograph it with your hand.
  • Dogs look great in leaves! Capture your pet having fun!
  • Take a macro lens or macro tubes. Get really close.
  • Look for golden, yellows and reds in reflections… they look great!
Try going to manual (M) settings…

There is nothing more exciting. Get great images knowing they came out the way you intended. Avoid ‘auto’ shots programmed by a boffin at the camera factory.

Autumn and you…

Don’t be so intense that its not fun! Love your trip, enjoy the moment and if possible share it with a friend. Make some great images along the way.

Have a great Autumn.

Comments, additions, amendments or ideas on this article? Contact Us
or why not leave a comment at the bottom of the page…

Like this article? Don’t miss the next — sign up for tips by email.

Netkonnexion

Damon Guy (Netkonnexion)

Damon is managing editor of Photokonnexion.com with professional experience in photography, writing, image libraries, and computing. He is also an experienced, webmaster and a trained teacher. Damon runs regular training for digital photographers who are just starting out.
See also: Editors ‘Bio’
By Damon Guy :: Profile on Google+

Thinking about different types of diffusion and reflection

• Diffusers and reflectors are important tools for using light •

• Diffusers and reflectors are important tools for using light •
Not all diffusers and reflectors are the same. Watch out for the different characteristics.
Photograph showing Mark Cleghorn of the Lastolite School of Photography
and three Lastolite reflectors/diffusers from the Skylite Rapid System.

Using light – creative fun…

Many photographers assume light is passive in the scene. I get really excited about working light. You can use two methods, modify or add light. Diffusers and reflectors are powerful modifiers to manipulate light. To add light you can use flash or continuous light sources. I want to expand on modifying light.

Modifying any light

You can use a modifier of any kind to change light and make it illuminate your scene the way you want. Light modifiers can include the use of gels, softboxes, and all manor of diffusers connected directly to the light source. However, reflectors and diffusers can also be free standing. Free-standing diffusers can be used to change the light from a natural source or an artificial one. However, remember that light falls off to a quarter of its intensity each time you double the distance from the source. Using a diffuser at a distance from an artificial source is going to significantly reduce the light intensity compared to using it at the source.

Using free standing diffusers and modifiers

I have previously written about table top still life photography and using modifiers. I mentioned that you can use white card as reflectors to bring light around the back of a table top subject. You can also use diffusers to reduce the natural light from a window. I use net curtains. The point is that actually there are a range of modifiers in you home and other places near at hand. Here are some simple household items I have used…

  • Diffusers: Net curtains, white blinds, paper, tissue paper, greaseproof paper, tracing paper, plastic bottles and containers frosted glass, drinking glasses, acrylic glass, white bed-sheets…
  • Reflectors: white walls, towels, card, silver paper, silvered insulation block, mirrors, white plates, white bed-sheets, white boxes, a slide projection screen, various white materials (cotton, nylon, wool)…

You might ask why I use such a wide range of different things as modifiers. That is a crucial point. Each and every one of those items in the list have different properties. For example reflectors with very course surfaces have very soft reflections indeed – towels are an example. A large sheet of white paper can be used as both a reflector and a diffuser in different ways and it has different properties too. People often don’t realise that light coming through glass is reduced by anything up to 40%. It is also scattered. So plain, see-through glass can actually be used as a diffuser and light reducer – depending on the properties of the glass. Frosted glass is an even better diffuser.

More after this…

find out more...Photokonnexion tips by email
Enjoying this article? Please sign up for our
Tips by email service.
                                                Find out more
#11030#

Most of these different materials and objects can be used by stretching them out, hanging them up or propping them up around or near your subject. All of them have a different impact on the final image. Some of the materials are better for table tops. Others are better for hanging and using for say, portraiture.

It is the properties that count

Modifying light is NOT about buying expensive equipment. While it is nice to have great tools for the job, for the photography enthusiast there are lots of other ways of getting a great result. Amateurs, enthusiasts and beginners alike can benefit from thinking about how the light is changed rather than by which equipment. It is the end result that is important, not the method or equipment used to do it.

Look for different properties and how to use the modifiers

In the video Mark Cleghorn shows us how to use a range of professional diffusers and deflectors. I would like you to think about the different properties of each of them. He shows us silvered ones, a semi-diffuser/reflector and lots of ways to use reflectors. He also makes various points about the way to use both reflectors and diffusers. The different properties have an impact on the shot – including light intensity, colour and reflective type. Overall Mark is showing us a variety of different types of modifying properties and how to use them.

You can use this knowledge to think about the things you have around the house. Once you have used something to modify light a few times you will have a knowledge of the type of light it creates. Then, you can experiment with other objects and materials. After a while you will develop a feel for creating different types of light for your various subjects. Becoming a master of light is about knowing what you can do with the materials at hand.

Using the Skylite Rapid system from Lastolite  External link - opens new tab/page

By Damon Guy (author and Photokonnexion editor)

Damon Guy - Netkonnexion

Damon Guy (Netkonnexion)

Damon is a writer-photog and editor of this site. He has run some major websites, a computing department and a digital image library. He started out as a trained teacher and now runs training for digital photographers.
See also: Editors ‘Bio’.

Can you write? Of course you can!
Write for Photokonnexion...

We would love to have your articles or tips posted on our site.
Find out more…
Write for Photokonnexion.

The simple secrets behind good food photography

Food for Her World Vietnam magazine.

Food for Her World Vietnam magazine.
Food styling by Dang Phuong
Photography by Mads

Food for the World Vietnam magazine. Photography by Mads • on FlickrExternal link - opens new tab/page

We all love good looking food…

Food photography? So, what makes it look really good? I love to cook and make tasty food. But, great cooks also have a skill with presentation. It is the presentation which really makes great food shots too.

Food photography seems to be centred on three things – good looking food composition; great light and picking the right focus/centre of interest. Duh! Wait a minute, isn’t that pretty much photography summed up all over? OK, I jest. There are some specific ideas and techniques involved. Good food photography seems to require a particular approach.

Here are some introductory points for good food photography. You should look to achieve…

  • Experience with small-sized and table-top compositions.
  • A working knowledge of lighting at the table-top scale.
  • Simple natural light from one source (window).
  • Able to use reflectors/black cards to shape the light.
  • Simple centre of interest in the shot.
  • Carefully chosen depth of field.
  • Very simple, but rich backgrounds.

And with the food itself…

  • Natural and where possible bright colours.
  • The colour mix should work together.
  • Avoid odd clashes of colour.
  • The food combinations should be simple and few.
  • Focus on the main interest.
  • Avoid highlight bokeh spots where possible.
  • Try to emphasis the texture of the food (lighting).
  • Use simple but eye catching cutlery and plates.
  • Avoid cluttering the shot with too much food.
  • Give the food a big/deep background.

More after this…

Book recommendation:

Food Photography:
From Snapshots to Great Shots

Simple advice on lighting including great diagrams. The pictures include camera settings. Excellent advice on setting up a table-top studio which was also inexpensive to do. Lots of tricks and techniques like the pros use. Great presentation ideas.


Food Photography Tips – Video

In this video we look a range of ways to look at and shoot food. It is a great introduction to food photography basics. The video uses graphic images for a broad introduction to the art of angles, framing and creating drool inducing food photos.


Damon Guy - Netkonnexion

Damon Guy (Netkonnexion)

Damon is a writer-photographer and editor of this site. He has run some major websites, a computing department and a digital image library. He started out as a trained teacher and now runs training courses in digital photography.
See also: Editors ‘Bio’.

Can you write? Of course you can!
Write for Photokonnexion...

We would love to have your articles or tips posted on our site.
Find out more…
Write for Photokonnexion.