Tag Archives: Natural light

Tips for Better Smartphone Photography

This article contributed by Liz Pekler(Bio).
SmartPhone Photography is on an up-trend

Smartphone photography is the source of millions of images per day worldwide. It is not only an important aspect of social interaction, it is also a way to express yourself. Find out how to improve your shots and make the best of your smartphone photography.


Smartphone Photography is attracting more and more people. The number of images made on mobile devices exceeds the number taken on compact or DSLR cameras. Who could blame these keen users? Smartphones are easier to carry, cheaper to maintain, and are more user-friendly than the DSLR. And, with the constantly evolving smartphone camera apps and accessories, the future of smartphone photography seems assured. Indeed, smartphones and tablets are used in conventional photography too.

Is smartphone photography the new norm?

There’s no denying that DSLRs or mirrorless cameras are still the best types of cameras to have despite their larger size and weight. They have powerful sensors that offer the most megapixels. They allow complete user control over camera settings. However, more than that, they provide flexibility and freedom to use a range of accessories, like interchangeable lenses. The flexibility and control provided by a fully functioned DSLR can help you achieve the highest quality output.

Smartphone photography provides well for general image needs, like social media sharing and family records. Using mobile devices has become standard practice in recent years. Their hardware will need time to catch up on the quality and functions of more advanced cameras. However, there are many smartphone photography accessories available. These add-ons can enable your mobile device to get quite close to the high standard of DSLRs.

As long as smartphone manufacturers continue to develop higher specs and more powerful sensors smartphone photography will be likely to trend upward. However, no matter how good these mobile devices become, using the camera will require some user skill. The best photographs are not the product of the camera. They are a reflection of the vision and skill of the photographer – no matter what the device. Smartphone photography can be artistic, can be beautiful, can return great images.

You can get the best out of the built-in camera in your phones by practicing these helpful tips below:

Tips for Better Smartphone Photography

1. Pay Attention to the light levels

As with DSLRs, think, and make sure everything is good before touching the shutter button. Make sure the image is well-lit. One way to do so is to tap your subject on your phone’s display screen. In the smartphone camera on Auto mode, tapping on your subject will command the camera to focus on the area of the tap. Then the camera will make the exposure adjustment. That will ensure your subject is lit to its best advantage. The camera adjusts the overall image in proportion to the exposure. This shows the subject to its best advantage.

To manually adjust the scene’s brightness, swipe the ‘sun’ or ‘bulb icon’ after tapping on your subject. If you want to revert back to the default value, tapping anywhere on the screen of your smartphone usually does the trick.

Brightness changes are not the best way to lighten your scene. You can over-whiten highlights – leading to distracting white burnouts. Instead, try manually adjusting your ISO levels. Higher ISO means the sensor is more sensitive to light. A high ISO number gives a brighter scene in proportion to the ambient light in the rest of the picture. This helps you adjust your image to avoid burnt out highlights.

Raising the ISO has a penalty. High sensitivity to light levels can make your photos look grainy. It is called digital noise. Dimly lit areas brightened by higher ISO are especially likely to show noise if you boost the ISO too high. Practice with ISO a bit to get a feel for the way to use it.

The best way to avoid digital noise is to add light sources or work with natural light. Camera sensors work well with good light levels. So, think about how you can enhance the light rather than rely on high ISO, if you can.

2. Apply the Principles of Composition

Another thing to significantly improve your smartphone photography is to compose your image. This means taking photos to create a more visually appealing image. Try not to “shoot from the hip”. The quick snap often leads to poor shots.

It helps to keep these basic rules of composition in mind when taking photos:

  • The Rule of Thirds – Mentally divide the screen into a grid with 2 horizontal lines and 2 vertical lines. Then, align your subject with any of the guide lines or intersecting points to achieve a more natural-looking and attractive image.
  • The Golden Ratio Smartphone Photography | External link - opens new tab/page – When you compose your photo, leave 1.6 bits of empty space for every 1 bit of occupied space to achieve a balanced image.
  • Leading Lines – Using lines in your composition will help influence viewing behavior, draw your audience’s eyes across an image or towards a subject, and adds motion and dynamism.
  • Three-Layer Image – Having a foreground, a subject in the middle, and a background adds a sense of depth and interest to your photo. See “River Scene” below.
  • Rule of odds – multiple subjects in an image are more attractive if they are an odd number. The most famous case is to have three of something, but five and seven are often used too.
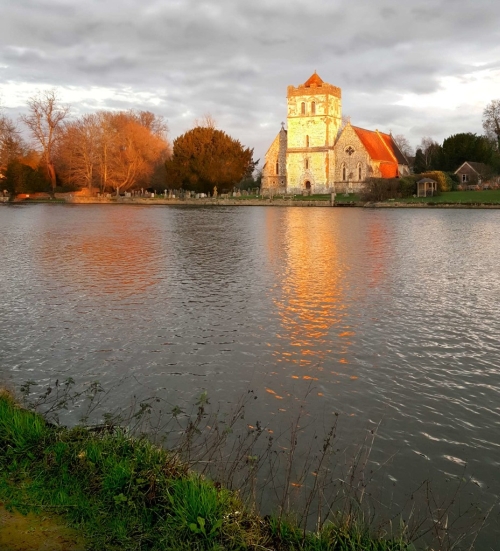
Smartphone photo showing three compositional layers

:: River Scene ::
This smartphone photograph shows three compositional layers. Introducing clear layers into your image helps to bring out a three dimensional depth and structure. Try to use foreground, mid-ground and distance layers in your images.
(Taken on a Galaxy S6 – Android phone)
(Click here to view large)


There are many ways you can use composition to improve your images. There is a whole page of composition links for you learn more here: Composition resources on Photokonnexion

3. Move as Close to your Subject as Possible

When using a smartphone to take photos, opt to move closer to your subject instead of using its zoom feature. Smartphone camera lenses usually have fixed focal lengths so they can’t zoom optically. Instead, it zooms digitally, which visibly distorts, pixelates, and lowers the quality of your images when overdone. Alternatively, you can use a compatible lens attachment that offers optical zoom capabilities.

4. Use Natural Light

The built-in flash on smartphones can sometimes be unflattering as it can wash out your subjects and produce harsh shadows. Harsh shadows with sharp lines create an angular appearance. This is particularly unflattering on faces.

To produce the best results, go for natural lighting. Natural light has an attractive quality for our eyes. We are naturally tuned to it. If you really need a flash there are some good attachments. You can use an attachable pocket spotlight or ring flash. Better still, use a more diffused light. An attractive diffused light provides just enough light for your subjects and creates flattering soft light with shadows. Shadows from soft light helps to create depth – giving a three dimensional feeling in the image.

5. Use A Third-Party Camera App

Your smartphone’s dedicated camera app can get the job done. However, third party apps allow you to do more with your phone’s built-in camera. Some of them offer better exposure adjustments, manual focus and camera settings (like shutter speed and aperture), or even integrated photo editing features so you can touch up captured photos instantly. If your interest is in better smartphone photography then use better editing too. Work to ensure you can navigate within the app and help you optimize its features for better photos.

Also familiarize yourself with the menu, settings, and features of your chosen camera app. If you’re a beginner, spend time and effort on learning photography basics. Think particularly about the shutter speed, ISO, and aperture. Also, think about how they relate to each other to create the exposure. Do some reading of this blog or other photography sites. Watch a YouTube tutorial on manual camera settings. Help yourself to develop a rounded approach to understanding both exposure and how best to take photos. Smartphone photography is as good for producing images as a DSLR. That is only true, providing, you know your tools and how to use them to produce a great image.

6. Take Advantage of the HDR Mode

The HDR mode on your camera phone allows it to take multiple shots of the same scene at different exposures, and then blend them together to create an image that pleases the eye. HDR mode blends the shots to create deeper contrasts in the image. This is particularly useful when shooting landscapes or high contrast scenes where there are obviously uneven highlights and dark areas. However, it must be used sparingly, as it can leave your images looking odd and overly edited. Don’t overuse it – try to work the editor so that your eye sees reality in the results. Trust your eye.

As a safety measure, also leave HDR on Auto. Then, you can manually pick out a better photo from the bunch of shots that were initially taken, in case the HDR blend goes badly. Apply the final result afterwards.

7. Post-Process Your Images

Post-processing can never replace good photography techniques. The best images stand alone for their beautiful content. However, it is also helpful to have editing skills. You can work to enhance a great image, or to work for the overall improvement of your photos. Take out spots, noise, or other irritations. Clean the image up so you show the beauty without distractions.

Photo editing apps like Instagram, VSCO, and Snapseed can be very helpful in making basic photo adjustments that will give you your desired result. Their photo filters are also great for setting or altering the mood of your images.

However, keep your edits at a minimum – especially processing ‘filters’. Instead, strive to make naturally beautiful images. This way, you don’t have to make too many adjustments later. After all, viewers can tell when you “cheat” your way to a good-looking image. Over-editing lowers the quality of your photos.

8. Keep Your Lens Clean and unscratched

This is something that is often overlooked by smartphone owners. It may not seem to be such a big deal for a small camera. However, a lens having oil, dirt, and moisture on it can slowly damage the glass. Leaving the lens on a tabletop can lead to scratching and marking. These ultimately affect image quality. Make sure you wipe the lens before use and use a protector or case, especially when doing a lot of outdoor shoots.

Can smartphone photography ever replace the DSLR?

Not all smartphones are capable of the more complex camera functions. However, many of the models some models currently on the market already have capabilities that mimic those found in DSLRs. In fact, many of them already allow control over the important camera settings, shutter speed, aperture, and ISO. These controls are native to some of the phones without having to use a third-party camera app.

Some of the latest smartphones, like the brand new iPhone and the latest Google Pixel, have more powerful and versatile cameras with more megapixels and other advanced features. Optical image stabilization for sharper photos and smoother videos is appearing, for example. The LG G6, released earlier this year, has great built in features. It carries a wide-angle lens that covers a larger area and is ideal for capturing group shots, magnificent architecture, and stunning landscapes. Many smartphone cameras from other brands offer other impressive features too. These advances are appearing just a few years after we thought such innovations wouldn’t be possible.

Smartphone photography is progressing fast. In a few years time, smartphone cameras are going to become even more sophisticated. For now, it’s safe to say that smartphones are definitely catching up, but whether they will ever surpass the DSLR remains to be seen. One thing is sure, the smartphone camera and DSLR are converging on each other. Furthermore, emergent technologies could take us anywhere. Camera technology still has a long way to go. Enjoy the ride!

Comments, additions, amendments or ideas on this article? Contact Us
or leave a comment at the bottom of the page…

Like this article? Don’t miss the next — sign up for tips by email.

Post contributed by :: Liz Pekler

I am a travel photographer with several years of experience in the field. Being a freelance blogger enables me to help photography beginners and enthusiasts to tell wonderful stories of their travels as seen through their lenses. It also allows me to share my thoughts about another advocacy of mine: social equality and change.
Connect with Liz Pekler: Linkedin :: Twitter: @liz_pekler

find out more...Photokonnexion tips by email
If you enjoyed this article please sign up for our
daily email service.
                                                 Find out more

Ten simple ideas to improve your photography (and a fun quiz)

Ten Tips

Ten Tips and 12 fun quiz questions.

Simple things help you…

We should all take a step back and think about the basics sometimes. It helps us remember essential techniques and keeps us on our toes. Here are the basics with some fun quiz questions too.

The simplest techniques in photography are often the most important ones. In this post we make sure we don’t forget them…

10 essential things to know; 12 fun quiz questions
  1. Not knowing your camera: This is really bad news. If you are hoping to improve your photography make sure you learn what every lump, bump, dial, screen, lens and twiddly bit does. Read your manual regularly. Practice with each function until you have got it right. Then practice it in the dark so you can do a night shoot.
    Quiz Question 1: How many lenses are there on a camera? Answers at the end!
  2. Poor stance: Most people when starting photography don’t realise that the way they stand and hold the camera creates all sorts of problems and poor performance. If you are a keen photographer a good stance can contribute to improved sharpness (hand-held shots), better focus, more steady hand and better shot timing. Learn to stand properly right at the start and you will save yourself lots of re-training time later.
    Quiz Question 2: At what point in the breath cycle is it best to take your shot?
  3. Not using a tripod: classic mistake. Tripods save you lots of time and give you pin sharp photographs. They give you an opportunity to set your camera up properly and ensures that your are ready for your shot.
    Quiz Question 3: A monopod has one leg, a tripod has three legs. What is, and how might you use, a bipod?
  4. Not giving the camera time to focus: When you press the shutter button halfway down it causes the auto-focus to cut in which focuses the camera. But if you punch straight through that to the shot the focus has not had time to do the full focus. This normally happens on the first focus attempt when the focus is right off. After that the lens in nearly focused and will adjust more quickly. So don’t make your first focus attempt too close to the shot or it will be blurred.
    Quiz Question 4: Why do you have two rings on a modern auto-focus/zooming photographic lens? What do you call each of them?
  5. Taking pictures against a bright light? Cameras don’t like very bright lights. Especially if there are also very dark spots nearby. Shooting indoors while looking at a window out to a bright sky will cause a strong white spot. This is very distracting and draws the eye away from the subject. Not good. There are Light and Lighting resource pages on Photokonnexion for you to learn more.
    Quiz Question 5: How many stops of light can healthy human eyes see (20:20 vision)? How many can the camera (rough generalisation) cope with?
  6. Relying on flash (especially pop-up flash): Pop up light has a very small concentrated source. It discolours faces, washes out colours, creates harsh, sharp-lined shadows and is badly placed (too close to the optical axis) creating nasty highlights on faces. Try to use natural light more. It is much more forgiving and does not produce such harsh shadows most of the time.
    Quiz Question 6: What is often the result of using pop-up flash with respect to two parts of the face?
  7. Dead centre subject: If you put the subject of your picture in the centre it will usually be boring. If you off-set your subject the eye will be looking to see why the symmetry is broken. That keeps the eye hunting around the screen. Learn about the “Rule of thirds” and other Composition principles. That will help you make the shot more compelling to the eye.
    Quiz Question 7: What type of compositional perspective would you be working with if you want to promote a three dimensional feel to your picture composition?
  8. Horizon control: Make sure your horizon is level, especially if it is a seascape. If you leave it on an angle the picture will be ruined because it will look like the sea is sliding off the page! Horizons also induce mid-picture viewer-stupor. Make a decision. Either shoot for the sky in which case place the horizon in the bottom third of the picture. Or, shoot for the ground in which case the horizon goes in the top third of the picture. An off-set horizon is more dynamic and keeps the viewers eye moving.
    Quiz Question 8: If your main choice is to shoot for the sky, where would you take your exposure from? (Where would you point your viewfinder focus point?) a. The sky? b. The ground?
    Quiz Question 9: Describe autofocus hunting and why it happens?
  9. Simplify, simplify, simplify: The most effective way to show a subject to your viewer is to de-clutter the picture. Take out of your composition everything that is nothing to do with the subject. The more you make the viewers eye go to the subject the more effective your shot will be.
    Did I mention that you should simplify your shot?
    Quiz Question 10: What is it called when you paint out something from your picture in post processing to simplify a shot?
    By the way, did I mention that you should work really hard to simplify your shots?
  10. Go manual: Auto-modes on your camera are really best guesses about what the manufacturer thinks will be suitable for the average shots most snappers will take. Buy you are a keen photographer. To get the camera to do exactly what you want, and to make discerning choices about your images you should work on improving your manual control. Your understanding of photographic principles will improve, your skill at exposure will improve and you will find yourself making informed choices about how you want your picture to come out. You will turn from a snapper into a photographer.
    Quiz Question 11: What does the ISO control do? a. Adjust the sensitivity of the digital image sensor or b. Change the aperture size?
    Quiz Question 12: Does ‘shutter speed’ or ‘aperture’ control movement blur?
Answers to quiz questions
  • Quiz Question Answer 1: I am talking about any camera that has a lens, not just DSLRs. the number of lenses is a matter of variation. If you are discussing photographic lenses then only that one will count (but read on). Some people think of each glass element in the photographic lens as an independent lens. Technically that is not true. They are optical lenses or glass elements, not photographic lenses. However, if the photographic lens (and elements if you included those) were all you counted you would be wrong. Here is a short list of Possible lenses on a camera of any sort…

    There may be others.

  • Quiz Question Answer 2: You should take a shot at the full inhale point or full exhale point before inhaling or exhaling in the next part of the cycle. You can choose which is best for you. All you do is delay the next part of the cycle while you take a shot. This is the point in the breath cycle when there is least movement of the shoulders/chest. Read more about it in Simple tips for a good stance
  • Quiz Question Answer 3: A bipod is photographically uncommon. Understandably, it has two legs. Find out more here… Definition: Bipod
  • Quiz Question Answer 4: The two rings on an auto-focussing photographic lens allow one ring to focus the image – the focus ring. The other ring is for zooming the lens. The latter changes the focal length and is called the focal length ring.
  • Quiz Question Answer 5: Human eyes can see about 18 to 20 stops of light when healthy. However, by contrast the best commercially available cameras have to operate with a dynamic range of 8 to 12 stops of light. Research is pushing the boundaries but there is still a big gap to meet the dynamic range of the human eye (in 2013).
  • Quiz Question Answer 6: Pop-up flash is very likely to cause red-eye.
  • Quiz Question Answer 7: To make things look three dimensional in your image you should be working with three point perspective. Look for lines in your image that promote cube-like structures. For example buildings, walls and other objects with lines and shapes that have a solid feel in real life. This will trick the eye into believing that there is a solid object in the picture. Read: Simple ideas about perspective in photography and: Definition: Perspective
  • Quiz Question Answer 8: If you shoot for the sky you will need to be taking your exposure from the sky as that is the brightest point. This will leave the ground darker in your exposure than you would see it with your eye. You can use one of a number of techniques to correct that later.
  • Quiz Question 9: Auto-focus hunting is when the auto-focus in the lens cannot focus and will keep going up and down the focus range trying to get a focus. This is a common problem at night, in darker conditions, low contrast conditions and clear or totally grey skies. You can read more about it in: Auto-focus ‘Hunting’ Definition: Hunting, Auto-focus

  • Quiz Question 10: when you paint out something from your picture in post processing to simplify a shot? You normally use a cloning tool. You can find out more in: Definition: Cloning; To Clone; Cloned; Clone Tool.
  • Quiz Question 11: What does the ISO control do? It adjusts the sensitivity of the digital image sensor allowing you to work in bright light (low ISO setting) or low light (high ISO setting). There is an article on ISO here: ISO.

  • Quiz Question 12: Shutter speed controls movement blur. Aperture controls blur (bokeh) created by the loss of sharpness outside the zone of acceptable sharpness. This is traditionally known as the depth of field. More reading on: Definition: Exposure and related to aperture: Definition: f number.

find out more...Photokonnexion tips by email
If you enjoyed this article please sign up for our
Tips by email service.
                                                 Find out more
#11030#

By Damon Guy (author and Photokonnexion editor)

Damon Guy - Netkonnexion

Damon Guy (Netkonnexion)

Damon is a writer-photog and editor of this site. He has run some major websites, a computing department and a digital image library. He started out as a trained teacher and now runs training for digital photographers.
See also: Editors ‘Bio’.

Thinking about different types of diffusion and reflection

• Diffusers and reflectors are important tools for using light •

• Diffusers and reflectors are important tools for using light •
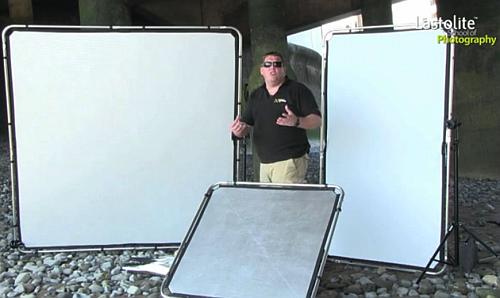
Not all diffusers and reflectors are the same. Watch out for the different characteristics.
Photograph showing Mark Cleghorn of the Lastolite School of Photography
and three Lastolite reflectors/diffusers from the Skylite Rapid System.

Using light – creative fun…

Many photographers assume light is passive in the scene. I get really excited about working light. You can use two methods, modify or add light. Diffusers and reflectors are powerful modifiers to manipulate light. To add light you can use flash or continuous light sources. I want to expand on modifying light.

Modifying any light

You can use a modifier of any kind to change light and make it illuminate your scene the way you want. Light modifiers can include the use of gels, softboxes, and all manor of diffusers connected directly to the light source. However, reflectors and diffusers can also be free standing. Free-standing diffusers can be used to change the light from a natural source or an artificial one. However, remember that light falls off to a quarter of its intensity each time you double the distance from the source. Using a diffuser at a distance from an artificial source is going to significantly reduce the light intensity compared to using it at the source.

Using free standing diffusers and modifiers

I have previously written about table top still life photography and using modifiers. I mentioned that you can use white card as reflectors to bring light around the back of a table top subject. You can also use diffusers to reduce the natural light from a window. I use net curtains. The point is that actually there are a range of modifiers in you home and other places near at hand. Here are some simple household items I have used…

  • Diffusers: Net curtains, white blinds, paper, tissue paper, greaseproof paper, tracing paper, plastic bottles and containers frosted glass, drinking glasses, acrylic glass, white bed-sheets…
  • Reflectors: white walls, towels, card, silver paper, silvered insulation block, mirrors, white plates, white bed-sheets, white boxes, a slide projection screen, various white materials (cotton, nylon, wool)…

You might ask why I use such a wide range of different things as modifiers. That is a crucial point. Each and every one of those items in the list have different properties. For example reflectors with very course surfaces have very soft reflections indeed – towels are an example. A large sheet of white paper can be used as both a reflector and a diffuser in different ways and it has different properties too. People often don’t realise that light coming through glass is reduced by anything up to 40%. It is also scattered. So plain, see-through glass can actually be used as a diffuser and light reducer – depending on the properties of the glass. Frosted glass is an even better diffuser.

More after this…

find out more...Photokonnexion tips by email
Enjoying this article? Please sign up for our
Tips by email service.
                                                Find out more
#11030#

Most of these different materials and objects can be used by stretching them out, hanging them up or propping them up around or near your subject. All of them have a different impact on the final image. Some of the materials are better for table tops. Others are better for hanging and using for say, portraiture.

It is the properties that count

Modifying light is NOT about buying expensive equipment. While it is nice to have great tools for the job, for the photography enthusiast there are lots of other ways of getting a great result. Amateurs, enthusiasts and beginners alike can benefit from thinking about how the light is changed rather than by which equipment. It is the end result that is important, not the method or equipment used to do it.

Look for different properties and how to use the modifiers

In the video Mark Cleghorn shows us how to use a range of professional diffusers and deflectors. I would like you to think about the different properties of each of them. He shows us silvered ones, a semi-diffuser/reflector and lots of ways to use reflectors. He also makes various points about the way to use both reflectors and diffusers. The different properties have an impact on the shot – including light intensity, colour and reflective type. Overall Mark is showing us a variety of different types of modifying properties and how to use them.

You can use this knowledge to think about the things you have around the house. Once you have used something to modify light a few times you will have a knowledge of the type of light it creates. Then, you can experiment with other objects and materials. After a while you will develop a feel for creating different types of light for your various subjects. Becoming a master of light is about knowing what you can do with the materials at hand.

Using the Skylite Rapid system from Lastolite  External link - opens new tab/page

By Damon Guy (author and Photokonnexion editor)

Damon Guy - Netkonnexion

Damon Guy (Netkonnexion)

Damon is a writer-photog and editor of this site. He has run some major websites, a computing department and a digital image library. He started out as a trained teacher and now runs training for digital photographers.
See also: Editors ‘Bio’.

Can you write? Of course you can!
Write for Photokonnexion...

We would love to have your articles or tips posted on our site.
Find out more…
Write for Photokonnexion.

The simple secrets behind good food photography

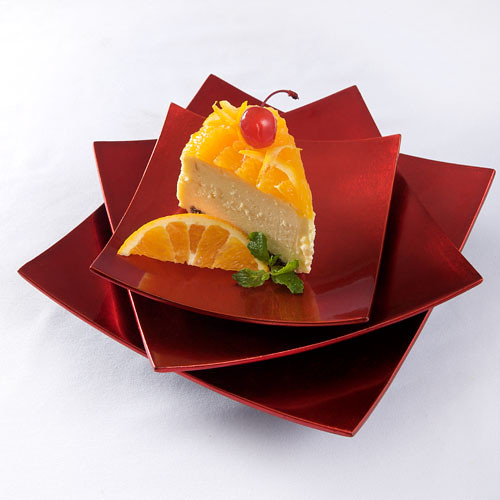
Food for Her World Vietnam magazine.

Food for Her World Vietnam magazine.
Food styling by Dang Phuong
Photography by Mads

Food for the World Vietnam magazine. Photography by Mads • on FlickrExternal link - opens new tab/page

We all love good looking food…

Food photography? So, what makes it look really good? I love to cook and make tasty food. But, great cooks also have a skill with presentation. It is the presentation which really makes great food shots too.

Food photography seems to be centred on three things – good looking food composition; great light and picking the right focus/centre of interest. Duh! Wait a minute, isn’t that pretty much photography summed up all over? OK, I jest. There are some specific ideas and techniques involved. Good food photography seems to require a particular approach.

Here are some introductory points for good food photography. You should look to achieve…

  • Experience with small-sized and table-top compositions.
  • A working knowledge of lighting at the table-top scale.
  • Simple natural light from one source (window).
  • Able to use reflectors/black cards to shape the light.
  • Simple centre of interest in the shot.
  • Carefully chosen depth of field.
  • Very simple, but rich backgrounds.

And with the food itself…

  • Natural and where possible bright colours.
  • The colour mix should work together.
  • Avoid odd clashes of colour.
  • The food combinations should be simple and few.
  • Focus on the main interest.
  • Avoid highlight bokeh spots where possible.
  • Try to emphasis the texture of the food (lighting).
  • Use simple but eye catching cutlery and plates.
  • Avoid cluttering the shot with too much food.
  • Give the food a big/deep background.

More after this…

Book recommendation:

Food Photography:
From Snapshots to Great Shots

Simple advice on lighting including great diagrams. The pictures include camera settings. Excellent advice on setting up a table-top studio which was also inexpensive to do. Lots of tricks and techniques like the pros use. Great presentation ideas.


Food Photography Tips – Video

In this video we look a range of ways to look at and shoot food. It is a great introduction to food photography basics. The video uses graphic images for a broad introduction to the art of angles, framing and creating drool inducing food photos.


Damon Guy - Netkonnexion

Damon Guy (Netkonnexion)

Damon is a writer-photographer and editor of this site. He has run some major websites, a computing department and a digital image library. He started out as a trained teacher and now runs training courses in digital photography.
See also: Editors ‘Bio’.

Can you write? Of course you can!
Write for Photokonnexion...

We would love to have your articles or tips posted on our site.
Find out more…
Write for Photokonnexion.

How to work with reflectors… essential!

Every photographer likes natural light – reflectors give you more.

Using a reflector you can use ambient natural light and modify it to suit your needs. The 5-in-one reflector is probably one of the best buys you can make to extend your lighting.

The five-in-one reflector is a system of reflectors in one package. The system includes a white ring (42inch) with white translucent material filling the ring. The translucent ring is accompanied by reversible covers. The set provide the following properties…

  • Translucent white: creates a strong light diffuser It creates a soft light so it has a vibrant wrap-around quality. Ideal for softening hard light sources, direct sunlight and effectively creating soft shadow edges particularly on the face for portraits.
  • Silver cover: reflects silver-light for increasing specular highlights and high-contrast light reflectance.
  • Gold cover: reflects a warm golden colour for gold colour fill light which is ideal for sunsets, portraits indoors and out, and for special work like fashion highlights, jewellery and back reflection on other surfaces.
  • White cover: produces an even and neutral reflection which will be an effective fill-light for still-life, portraits, product shots and many other situations where light is needed at an angle to the main source of light.
  • Black cover: used to absorb light increasing the shadow on the side used and to dampen the softer lights in the area. Effectively applies definition to glass on the edges of illuminated glass pieces. It will also stop-down sun light and bright hard lights.

In the video the guys from ImprovePhotography go through the different reflectors and how they can be used… more information after the video.
Published on May 23, 2012 by ImprovePhotography External link - opens new tab/page

The use of reflectors is the best way to create a second light-source to produce fill-light for your shots. Reflection or diffusion softens light and reduces its intensity. This is great news because it means that the reflected light looks natural and in proportion to the main light source. It even exhibits similar tonal quality to the main source unless the reflector colours it as gold or silver for example. One side of the shot will be illuminated with ambient light from a natural source or from a flash or other light. The other side is filled by the reflected light. Reflectors are a great way to extend your lighting equipment cheaply and to create great light that is controllably in proportion to the other light in the area. Excellent!

You can buy a five-in-one reflector set on Amazon now…

By Damon Guy (author and Photokonnexion editor)

Damon Guy - Netkonnexion

Damon Guy (Netkonnexion)

Damon is a writer-photog and editor of this site. He has run some major websites, a computing department and a digital image library. He started out as a trained teacher and now runs training for digital photographers.
See also: Editors ‘Bio’.

Can you write? Of course you can!
Write for Photokonnexion...

We would love to have your articles or tips posted on our site.
Find out more…
Write for Photokonnexion.

Natural Light Portraiture – with reflected fill-in light

Make your natural light portraiture work

Love photography? Then natural light portraiture is something you will try at some time. In the video below we will see a few tips that overcome some of the lighting issues photographers encounter when starting these portraits.

For photographers just starting out, natural light portraiture is often about snapping shots of friends. Actually, portraiture as an art form in its own right. Why? Because the human eye is incredibly well tuned to viewing the human face. Get it wrong and it is blatantly obvious!

Snaps often result in a flat and poorly sculpted face. Bad or flat light leaves the face looking drawn or sick. Worse, it can look as if it is almost featureless. The way to get around this is to use natural soft light. The best light for this is during the golden hour. The low light will mean a big contrast between bright sky light and the side of the body away from the light. The answer is to use a reflector to fill in the darker areas of the face. Reflectors are cheap and available in lots of photography suppliers. You can easily make your own reflector from white art board too.


In this video photographer Karl Taylor shows you how to use natural light and a reflector to take a good natural light portrait. Watch out for his five key points. Enjoy!
Seen on YouTube: GreatPhotographyTips External link - opens new tab/page

Remember these?

  1. Communication
  2. Lens
  3. Aperture
  4. Lighting
  5. Environment

Key points worth remembering.

By Damon Guy (author and Photokonnexion editor)

Damon Guy - Netkonnexion

Damon Guy (Netkonnexion)

Damon is a writer-photog and editor of this site. He has run some major websites, a computing department and a digital image library. He started out as a trained teacher and now runs training for digital photographers.
See also: Editors ‘Bio’.

Outdoor lighting – Getting into Portraits

Natural light makes wonderful portraits – a great video

When photographers feel the first urge to start on portrait photography they think they have to buy a whole range of new equipment. That’s not true. Photography is all about the light. It is the only thing we really need to know well. Getting to know how to do portrait shots without a huge investment in lighting equipment is easy and fun. Not only that, the outdoors provides a great resource for portraits and the light is already there.

In this video Jeff Smith explains how to run an outdoor portrait session. He explains the way to use natural light using only reflectors. He also explains great ways to bring out the character of your subject in natural light. A great video.

Can you write? Of course you can!
Write for Photokonnexion...

We would love to have your articles or tips posted on our site.
Find out more…
Write for Photokonnexion.