Tag Archives: Framing

Seven easy tips to improve your group photography

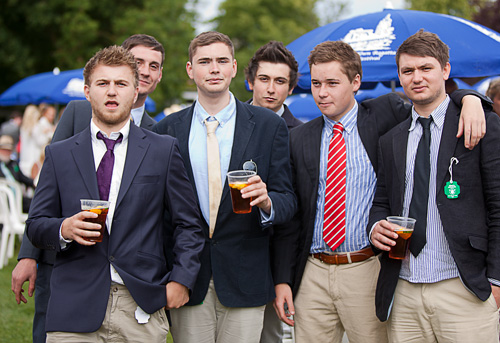
• Boys Group •

• Boys Group •
The humble group photograph can be much improved by a few simple steps.

Simple steps lead to great shots…

With groups you must go a little further than with straight portraits. Getting people coordinated, a range of different settings, beating the dreaded ‘blinks’, great sharpness… Check these out, go the extra mile.

Planning

When doing group shots a few ideas up front helps. Some simple ideas about cohesion, commonality and framing can make your shots more compelling. Clear ideas about how you want this particular group arranged will enable you to get them quickly into place. Groups, by their nature become impatient quickly. Preparation moves things along keeps people on the ball. Have your location scouted and know where you are going to place your group. Have a good, simple background ready. Make sure you have adequate light to work with. Location is everything.

Settings

Remember, groups require a wide view and you need some depth too. Set your aperture too large and you risk the back row being out of the zone of sharpness. Most groups are best photographed at f8 or even better f11. To get the sharpness work with your shutter speed up reasonably high. 1/125th minimum – better 200ths of a second. Go higher if you don’t need flash.

Bigger groups always have a certain amount of movement. Higher shutter speeds help to freeze the action. The problem is, high shutter speed and small aperture leave you needing flash or extra lighting. There is always a trade-off. To compensate you may need to raise your ISO.

Sharp shooting

Shooting at high speed will help freeze the action. It will not steady your hand. If shooting a big group, especially for formal shots, it’s best to use other sharpening techniques. Consider these sharpness…

  • Using a tripod
  • Use mirror lock-up function
  • Image stabilisation off (not needed on tripods – it creates vibration)
  • Auto-focus off on a tripod after the group is focused (it creates vibration)
  • Operate with a remote shutter button or use the on-camera timer

A tripod saves time. You can arrange the group and smooth the shot through. If you have more than one group, your camera is always set up when it is on a tripod. It helps smooth the flow.

Light and shade

Overall light in the scene is important, so is the shade. When taking pictures of groups you are taking a wide angle view. The group is often spread out. It’s easy to miss that one or two of the group are in the shade. Or, with a camera mounted flash, the shadows from the flash fall harshly onto the people behind. Trees, buildings, other people, towers, street lights – any number of objects can cast unexpected shadows which are difficult to notice. Flash casts shadows you don’t see until you open the picture on a computer later. Look carefully at your group. Arrange them to be in clear, consistent light. Make sure any lights or flash you are using treats all the members of the group evenly and fairly.

Clothing

So often with groups you have no control over clothing. If the event is formal the clothes often have a stiff and upright feel. People don’t relax so well in this situation so you will have to set the scene and pose them accordingly. It is not easy, especially with family conventions or a preset plan. Where possible let them arrange themselves with your help. People will be most comfortable next to the people they like and know.

When a group is coming together informally the clothes may be wildly variable in character. What matters when working with a candid group is the fun arrangement of the group. Try to get the group to look dynamic and together. This will offset a strong clothing variation.
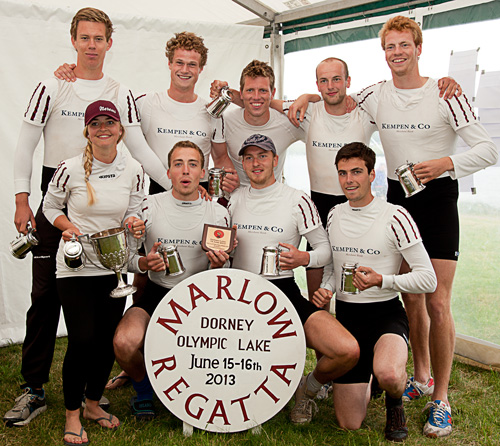
The prize giving

• The prize giving •
If the group feels comfortable and you work with them they’ll help make a great picture.

Organisation

Groups, especially close up, look odd if the faces are at different distances from the camera. They are close enough to us to look fine. However, the lens plays tricks on our eyes. If they are out of line – at different distances, but close together – they will appear to have different head sizes. Try to make people in each line of a group stand evenly down the line.

Sometimes the classic, short in front taller to the back works fine. Other times it is better to actually mix up short and tall – especially with different generations. It is much more natural for grandchildren to be arranged with grandparents than stuck on the end of the line because they are small. Putting children between adults also provides an opportunity to have a shorter person behind so as to break up a line up – to make it less formally arranged.

Close family groups, and friends, often look good leaning together, or heads together. It is very intimate to touch heads.

The dreaded ‘blinkies’ strike every group shot if you are not careful. The bigger the group the more likely that someone will blink. Overcome it with a little group control. Ready to shoot? Tell them you are going to help stop them blinking in the shot. Tell every one to shut their eyes. Count to two, tell everyone to open. Count to two. Press the shutter. Everyone will have open eyes. Explain it first so they know what is coming. It will make sure they all have eyes open long enough for you to get the shot.

So, with all these different ways of organising the group make sure that what you have is comfortable, natural – never forced.

Posing

Organising the group is about positioning and location. Posing is about personal stance and comfort. You, as the photographer, need to direct the group. But on the other hand you have to work with the people you have before you. Try to make it fun. Get them to relate to one another. If you have time, especially with candids or informal group, get them to experiment. Handshakes, greetings, hugs, arms around each other, standing in groups – the idea is to make ‘that’ group look good. Another group might not look good with the same poses. You should work with them, discuss ideas with them, respect their thoughts. They probably know each other better than you know them and will make the best suggestions. It is your job as a director to pick up on the most effective shots from their ideas. Consider what you know about them, consider their ideas for their poses – then work together to make the shot just right.

Getting the right feeling…

Working with groups is more than just lining them up. You have to consider the time, place, light, shade, the settings and the technique. But the best shots still come from the group itself. If the members of the group are comfortable, having fun and feel natural about their poses they will make sure you get a good shot. Work with them, help them make your picture work.

Comments, additions, amendments or ideas on this article? Contact Us

find out more...Photokonnexion tips by email
If you enjoyed this article please sign up for our
Tips by email service.
                                                 Find out more

By Damon Guy (author and Photokonnexion editor)

Damon Guy - Netkonnexion

Damon Guy (Netkonnexion)

Damon is a writer-photog and editor of this site. He has run some major websites, a computing department and a digital image library. He started out as a trained teacher and now runs training for digital photographers.
See also: Editors ‘Bio’.

Three great ideas to make group shots more compelling

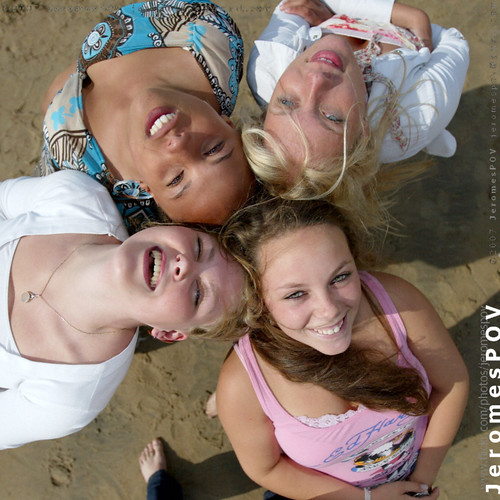
Group shots - Bloomingdale beach girls put their heads together by JeromesPOV, on Flickr

Bloomingdale beach girls put their heads together
Click image to view large
Bloomingdale beach girls put their heads together by JeromesPOV, on Flickr External link - opens new tab/page

Group shots are about togetherness.

It’s important in any picture is to connect subject and viewer. Some pictures are more compelling than others. Here are three powerful ideas for group shots.

Group shots and cohesion

More compelling group shots show cohesion. A happy group of friends shows great cohesion. Much more than people on a street corner waiting to cross. Something in a friend-group holds them together. There are many ways to build cohesion in a group shot. I try to get the group to put their heads together. When people want to bring their heads close, or touching, it shows great intimacy. Cohesion is strong.

There are many ways to show cohesion . Another form of it is arms around each other. You could ask your group to be leaning in the same way. That imparts a powerful group-force. Group hugs are fun! Another idea is to pose arms in a similar way or a direction. You can also use pointing legs.

Commonality in group shots

Group shots can hang together well without being intimate. A common theme in the group shows a dynamic togetherness. Colour is a good theme. If I am doing family portraits it is important to capture the faces. Any distraction takes away the family feel. Bring the family group close with similar colours and clothes. That helps prevent distraction from the faces to create togetherness.

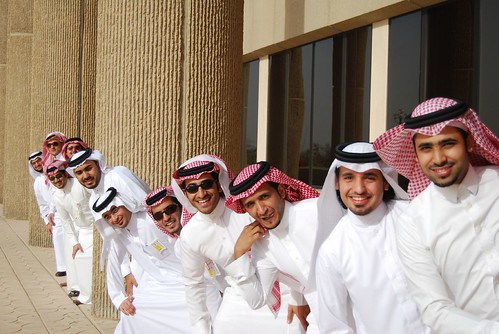
Poses of all sorts can help too. When you are all doing the same thing it pulls the group together. The pose does not have to be intimate. It just needs to show a common theme in the pose.

Group shots - Saudi Graduates by Ben SJ, on Flickr

• Saudi Graduates •
Doing something in common like the pose here, or wearing similar clothes helps the group to have a common theme.
Click image to view large
Saudi Graduates by Ben SJ, on FlickrExternal link - opens new tab/page

Framing

A strong element of composition in group portraits is framing. Find a frame to constrain your group shots in small places. It helps them look more cohesive. This is especially if the frame keeps them close together. A great example is wedding photography. Close members of the family pictured between tight columns outside a church is a good way to pull the group together. The columns prevent the eye from straying out sideways. The family hold the eye as a result.

More after this…

find out more...Photokonnexion tips by email
Enjoying this article? Please sign up for our
Tips by email service.
                                                Find out more
#11030#

Group intimacy through framing can be shot in trees or other landscape features. If the framing feature is not too strong the group will gain from being close and still be the centre of interest. Using landscape features is great for one-off family shots on holiday.

A traditional form of framing is the use of the vignette. You make a vignette in post production. Use a shadow or white-out technique at the edge of the picture and around the corners. It helps focus the eye gently to the centre of the picture.

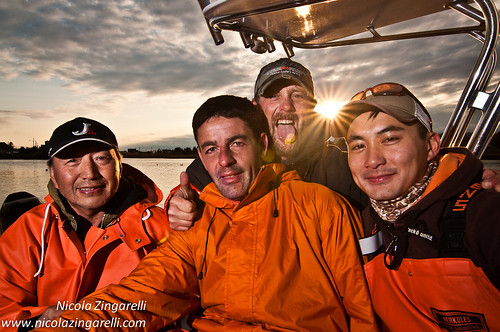
Fishermen ... and friends!

• Fishermen … and friends! •
Small group portrait shot in Green Harbour, Massachussets
This shot pulls it all together. Close head intimacy (right hand three). Togetherness pose (arm positions, smiles/expressions). Commonality in colour/clothes. Common theme – fishing. Framing – the boat roof stops the eye straying upward.
Click image to view large
Fishermen … and friends! Small group portrait shot in Green Harbour, Massachusetts by Nicola Zingarelli, on Flickr External link - opens new tab/page

Getting it all together

There are lots of ways to help make your group shots hang together. Try to add cohesion, commonality and framing to your group shots. You’ll be on the way to a compelling shot.

Netkonnexion

Damon Guy (Netkonnexion)

Damon is managing editor of Photokonnexion.com with professional experience in photography, writing, image libraries, and computing. He is also an experienced, webmaster and a trained teacher. Damon runs regular training for digital photographers who are just starting out.
See also: Editors ‘Bio’
By Damon Guy :: Profile on Google+

Three photography lessons from this one weird old trick!

Holding down the shutter button he peppered the area with repeat images... :: What happened to quality?

Holding down the shutter button he peppered the area with repeat images…
he was hoping for at least one good shot out of that lot!
(P.S. What every happened to forethought and quality?)

Ever hold down the shutter button and hope for the best?

We all have – in modern times at least. In the days of film we didn’t. It was just too expensive to do that. So, here is a lesson you can learn from changing your behaviour. Go for quality in your photography.

The wonderful world of digital has set us into a new era. We can take an individual shot for free, download it for free, process it for free, store it almost free. Wow! It could not be better. Little wonder that we see a shot that is just a little bit difficult and we press the button and start firing off our exposures like we had machine guns. What do we achieve? Dozens of shots that are almost identical. Many of them a waste of time and effort. We are really just hoping against the odds that the shot will some how work out. Think for a moment… Why did you not go for a quality shot that got what you wanted?

Have we lost the ability to ‘make’ a decisive, quality capture?

Try this exercise next time you go on a shoot. Pretend your memory card can only hold 36 exposures. That was the number of negatives you would get from a large roll of film. Next, given that you can only shoot off 36 frames, you need to do three things…

  • Think about each shot – carefully. Plan it, savour it. Make sure that you know what you are going to do before you even put your finger to the button. Set your camera up for it. Aim for a quality result.
  • Frame the shots. Compose each as if there was payback of $64,000 for every good shot. Pick the perfect composition for each press of the shutter button – make that shot pay!
  • Wait for just the right moment… add up all the variables in the shot until you have confidence it will work. At the right instant capture the image – make a photograph.

We seem to have forgotten the power of these three things that went into every photograph in former times:
Forethought;
Framing;
The decisive moment.

These simple things did a lot for photographers. They enabled us to learn what was important in a shot before we started. They helped us to know what we were trying to achieve. They taught us to get it right at the right moment. These simple things made us better photographers and produced quality results.

Comments, additions, amendments or ideas on this article? Contact Us
or why not leave a comment at the bottom of the page…

Like this article? Don’t miss the next — sign up for tips by email.

Damon Guy - Netkonnexion

Damon Guy (Netkonnexion)

Damon is a writer-photographer and editor of this site. He has run some major websites, a computing department and a digital image library. He started out as a trained teacher and now runs training for digital photogs.
See also: Editors ‘Bio’.
By Damon Guy see his profile on Google+.

Landscape verses Portrait – page orientation

Sometimes page orientation is dictated by subject... but there are other reasons to pick a particular format

Sometimes page orientation is dictated by subject... but there are other reasons to pick a particular format

There are a many reasons to choose portrait view

Landscape orientation is where a page or picture has the longest side on the horizontal. The picture above is in the portrait view – the longest side is upright. The use of the term ‘page orientation’ refers to either horizontal (landscape) or upright (portrait).

Of course there is more to it than that. In most cases we also consider the aspect ratio. In most SLR formats the aspect ratio is 4 to 3 (or 4:3 as it is written). This means four units along the long axis. And upwards, 3 units tall. This is a typical landscape view. Wider screens on televisions in recent years has introduced a new format of 16:9 although this is not seen as a common format for still photographs.

The current norm is for SLR video formats to be the same 4:3 of the still images. Normally the aspect ratio is considered only for landscape view – a ratio is not given for portrait view.

When taking a picture the photographer needs to consider orientation as part of the composition decision. It is probably true to say that the starter SLR-photog generally uses landscape orientation. It is a natural position since the shutter release is in a naturally comfortable position.

So what makes you turn your camera sideways and change the page orientation to take a portrait shot? There could be a number of good reasons. So here are a few ideas to keep you thinking…

Subject orientation

If your subject is long and upright then it is pretty natural to take it in an upright framing. Despite how natural it is, many people take the picture in landscape, then crop the shot afterwards. This is wasting a compositional opportunity and image space. If you take the shot in portrait from the start it lets you get close to the shot and fill the frame.

Page orientation drives the framing decision. The same framing opportunities arise in portrait as do in landscape. You just have to practice the framing.
Exercise: Go out for a day. Take only portrait view shots. Consider every one as carefully, or more carefully, than your normal landscape shots.

Panorama shots
So panorama shots are in landscape view? Yes. But the best panorama shots are frequently made of portrait shots digitally stitched together along the long axis. This assembly gives them the height and width needed to make up a substantial picture in panorama format. Understanding the portrait format gives you an appreciation of the type of framing needed to master panorama landscape work. So, even in panorama work the page orientation is crucial.
Images in text: page orientation is an essential consideration

If you are planning to contribute to a publication you learn how to take portrait shots. Editors are often more interested in the portrait view. It will fit into one column. That will give the editorial more space to tell the story. Editors like this format. If you wish to be published cultivate your skills in portrait view.

Portraiture:

Portraiture can easily be done in landscape format but has an odd feel. It is important to make page orientation comfortable for the eye. The portrait format is ready made for capturing the upright nature of the natural portrait. We would normally give a wide orientation to something that is moving. The landscape view provides space to move into. In portraits there is often no movement or implied movement. The taller, thinner format helps the person pictured to engage with the viewer. An upright page orientation helps the picture sides to hold in the viewer’s eye to the portrait subject.
Exercise: Try a traditional portrait format and see if you think the portrait orientation is more effective. You will need to shoot a number of different shots to get the feel for it. Try different lighting conditions too.

Page orientation is also about presentation

The need for upright formats is not just about what is in the picture. It might also be about the way the picture is to be used. A picture may be chosen for its shape. Often a picture purchase is made to fit in a place which needs that format. A long thin alcove in a wall suits a long thin picture format. Taking the picture with that page orientation better suites the situation than cropping afterwards. How a picture will be used is a reason to frame a picture that way. Page orientation is a composition and presentation decision.

Words:

If you are taking a picture with words in it think about your page orientation.

It is easy to forget that very wide pages make reading difficult. Landscape view will hinder reading if the text spans the page. If you must use that page orientation with text find ways to keep the text from going across the page.

Using landscape format may be a good idea if the meaning of the text is unimportant. Where the impact of text is stronger than its meaning then you can span the image for effect. For example, the name of a café may not be as significant as the run down and decaying feel of the old building and its name sign. The impact may be more in the other elements of the scene. The importance of reading the text is minimised. Reducing the impact of text in an image is often a good idea as the eye is drawn to it. This can reduce the impact of the rest of the picture. Try to strike a balance. It may be better to use landscape with text if you want to include other things in the image.

If for some reason you are setting up a picture to take text then consider the portrait view. It will make the shot easier and your viewer will appreciate it. The reading will be more comfortable and quicker. This will take the emphasis off the text and allow the reader to quickly move on to the rest of the image.

Exercise: Paste a page of text into a word processor page. Set the page to landscape view. Print it out. Easy to read?

Page orientation as an eye stop

Artists and photographers often use the page orientation as a way to control the eye. The landscape page orientation helps the eye to flow from one side to the other. You can use other elements in the page to help keep the eye move around. The right sort of content in a picture can stop the eye moving out of the page. For example, a tree trunk on the edge of a landscape page tends to act as a natural stop to the eye, directing it upward into the canopy. The eye can then flow back the other way.

The use of a portrait format naturally causes the eye to move upward or downward. Where it is important to stress the up/down impact of an image use portrait view. Portraits, are a classic example. Other examples might be trees, or tall architectural images. The power in the image is controlling the eye between the image sides.

Page orientation is also a resolution issue

Where page orientation is a bad match for the composition, all is not lost. It is easy to crop the image to bring out the content in a new page orientation. However, consider the resolution for a minute. If you have to crop out a segment of the picture you may be affected by resolution. Artefacts, lack of sharpness, poor resolution and blur are all enhanced by a crop. Changing the page orientation makes these more likely to affect the final image. Consider the correct orientation from the start. Then you will not be faced with these quality issues.

Overall

The context of landscape or portrait orientation is the important thing. There is no reason to assume that either format is best. Pay attention to the needs of the composition or context in which the image is used. Clearly both upright or horizontal have their place. It is down to you to decide page orientation. My main point is, don’t ignore poor old portrait view. It can lead to some stunning compositions. It would be a shame to miss out on the benefits.

Comments, additions, amendments or ideas on this article? Contact Us
or why not leave a comment at the bottom of the page…

Like this article? Don’t miss the next — sign up for tips by email.

Damon Guy - Netkonnexion

Damon Guy (Netkonnexion)

Damon is a writer-photographer and editor of this site. He has run some major websites, a computing department and a digital image library. He started out as a trained teacher and now runs training for digital photogs.
See also: Editors ‘Bio’.
By Damon Guy see his profile on Google+.