Tag Archives: Shutter button

Lag time – don’t miss the shot

Lag time - test one

• Lag time – test one •
There is a gap between pushing the button and the making the photo.
(image by Netkonnexion)

Every time you push the button…

There’s a period when not much happens. Lag time is the total time taken for the camera to complete the exposure process from the button push. In that process is a lot of detail. Here we look at lag time. With a simple test you can get a feel for the lag time in your camera.

Why is lag time important?

If you buy a camera for action shots you want minimal lag time. Otherwise you look and press, but the action has gone. Of course you can anticipate the action. This is how we all deal with lag time. But to know what time to anticipate you need a feel for the camera. A long lag time is likely to make your guess about when to press the shutter button less accurate. So it’s in your interest to know the lag time and practice with it. If you know the lag it makes it easer to guess the delay for shots.

Shutter lag – don’t misuse the term

Some people use the term shutter lag in a confusing way. They mean it to be the same as lag time. In the past this may have been the case. In early cameras most of the exposure process was completed by the shutter. Today we have a lot of other steps involved. The list of various time related things in the exposure process is quite long today…

  1. LCD activation of the picture (LCD display and electronic [mirrorless] viewfinders only).
  2. Thinking time between seeing a subject on the display and the finger push on the button.
  3. Time taken to get a focus.
  4. Aperture – time to calculate & set aperture size.
  5. Meter – time from light reading to exposure set up.
  6. Digital sensor start up to be ready.
  7. Shutter motor/mechanism actuation.
  8. Shutter opening.
  9. Digital capture of light data.
  10. Shutter closing.
  11. Data emptied from sensor ready for next exposure.

These items may overlap, run simultaneously or be in sequence. Some may not apply to some cameras. It depends on the camera model, design, efficiency and the components involved.

This list adds up to the total lag time. The first five items are not shutter related. They delay the firing of the shutter. They are shutter delay times. The other items are shutter lag items. They are responsible for the shutter and sensor capture of the exposure. They determine the shutter process from start to finish. These are the shutter lag items.

To be clear, lag time is the sum of all the lag items. Shutter lag is only those items related to the shutter-sensor system.

For a more detailed look at various components of lag times check out: Definition: Shutter lag; Shutter delay; Lag time; Processing lag;

Getting the shot – lag time explored

In order to know your camera better you can actually measure your lag time. So here is a method you can use at home. I have tested it using two different pieces of equipment and on two cameras with good results.

A word of warning. The on-board flash crosses all the other lag/delay times and may extend your total lag quite a lot. This is because it takes time to charge up ready for the flash. It will affect the results. Before testing turn off your flash. Check your manual if you are not sure how. Both these methods have back-lighting. You will get enough light without it.

Explanation/method: to measure the lag time we need to identify all the processes involved. I have done this for you above. This allows you to know what parts of the process are holding things up. You will see later that can help you save time.

Next we need to find a way to mark the start and end of the process. Fortunately the camera helps us. When the shutter button is pushed we know the exposure process is started. The clever part is that if we photograph a timer we know when the exposure process is finished because the clock will show the finish time.

To find out our lag time is easy. We activate a clock at the same time as we push the shutter button. We do this while photographing the clock. When the shot is taken the end of the the lag time is shown on the photograph.

Two methods to try out

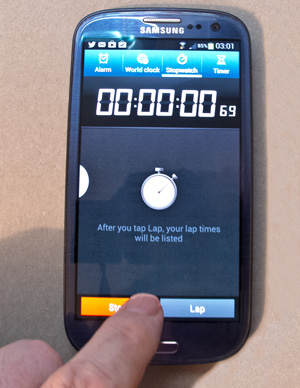
In the photo “Test one” above I have used this method with my smart phone. I set up the stop-watch app on my phone. Then I pushed “start” with my left hand. I simultaneously held the camera and pushed the shutter button. The key is to make sure you set off both the timer and shutter button at once. If you do, the the photograph will show the lag time. In the photo above it shows 69/100ths of a second. This is my lag time for a photo taken on my little Canon G12. Use a tripod or stand if holding your camera and pushing the button at once is not steady enough.

If you do not have a smart phone (or a stop watch) to photograph, try this web page…
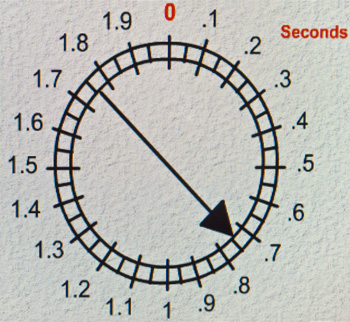
This page will allow you to test your Digital Camera’s shutter lag… External link - opens new tab/page.
(Note: this page is about your total lag time even though it refers to the shutter lag).
Shutter Lag Test two

• Shutter Lag Test two •
Test your Digital Camera’s lag time External link - opens new tab/page.

Follow the instructions on that page. You will see a very slight retard on the clock at the ‘zero’ point. That gives you time to notice the top point and press the shutter button. The resulting photo will tell you the lag time on your camera.

I have run tests on my camera using both the web page and the stop-watch app method. They give consistent results. I feel confident you will find either test will work for you.

Pre-focus to get the shot

Notice on the second test page there are two tests. The second one shows you how you can shorten your lag time. If you pre-focus the camera that saves some pre-shutter time. Focus takes quite a bit of time. So if it is already focused when you take the shot your lag is reduced.

To reduce the delay with pre-focus press the button half way down while looking at the clock. The camera will focus and take meter reading. Then you can hold the half way position – this is called focus-lock. Hold your half-down position until, at zero. Then push the shutter button the rest of the way down. You will normally find your camera lag time is greatly reduced. Possibly by as much as a half. Something to bear in mind for future shots.

Accuracy

Of course you might take a totally bad reading for your fist shot. After playing I found that for both methods you need to practice a little to get consistent readings.

To ensure you get a good overall result I suggest taking ten readings after some practice. Here are readings from my run of ten… 0.53 + 0.53 + 0.69 + 0.98 + 0.89 + 0.66 + 0.74 + 0.65 + 0.66 + 0.74 = 7.07
If we divide the total by ten we will get an average reading. It will iron out any anomalous readings.
Thus: 7.07÷10 = 0.71 (rounded to two places). The lag time on this camera is therefore 71/100ths of a second.

This ‘average’ method provides us with a consistent standard over our readings. This is a more accurate method of gauging the lag time.

What have we done?

The things a modern camera does to take a picture has created a long lag. The lag time is the sum of all the different things that impact the exposure process. From button-press to complete capture-of-data is the lag time.

We have looked at two ways of testing the lag time: a stop watch app; and a web page timer. I have also suggested using an average reading to iron out anomalies.

If you go through this process you will know your camera much better. But more to the point you will have a new confidence. You will know how long it takes to complete an exposure. And, you will know how much time to delay for a shot.

Comments, additions, amendments or ideas on this article? Contact Us
or why not leave a comment at the bottom of the page…

Like this article? Don’t miss the next — sign up for tips by email.

Damon Guy - Netkonnexion

Damon Guy (Netkonnexion)

Damon is a writer-photographer and editor of this site. He has also run some major websites, a computing department and a digital image library. He started out as a trained teacher and now runs training for digital photogs.
See also: Editors ‘Bio’.
By Damon Guy see his profile on Google+.

Getting the right shutter speed

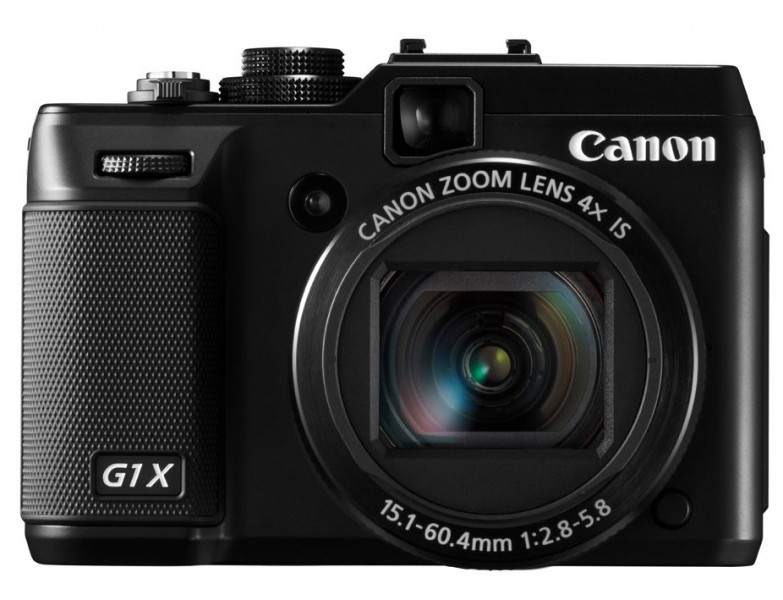
New Canon Powershot G1X Digital Point-and-Shoot With SLR control

The Canon Powershot G1X Digital Point-and-Shoot With SLR control. Billed by Canon as the “Highest Image Quality Powershot Digital Camera”

Getting sharpness right…

It’s not just about the right camera. It is also about technique and knowing the best way to set up your shot. Getting the right shutter speed takes a little knowledge when you are starting from scratch. Here are some pointers to help you make choices about shutter speed.

Why set your own shutter speed?

Getting full control of your camera is an important aspect of gaining creative control over the outcome of your photographs. Despite what the manufacturers say, you can only achieve so much by messing around with their ‘modes’. Capturing pictures using camera modes other than the basic photographic modes (ISO, aperture, shutter speed) is going to give you a programmed result. In other words ‘modes’ are what some boffin back at the lab has formulated as ‘about right’ for the average photos people take. But, you are not average are you? You want to produce the shot your way. So gaining control over your shutter speed is important.

The long and short of it

Shutter speed gives us creative control in a number of ways. A very shallow depth of field will give great bokeh in the background. But it is difficult to create on a bright day unless you have a fast shutter speed (to reduce the incoming light). Bokeh is created by a wide aperture. A wide aperture lets a lot of light in. If the shutter is open too long the photograph will be overexposed. So a shorter shutter speed is required.

Shutter speed also controls movement blur. If you are taking a photo of a moving object a relatively long shutter speed will create greater blur (example 1/15th sec). A very short shutter speed will tend to freeze the action preventing blur (example 1/500th second).

Sharpness counts

Starting to control your shutter speed is often about finding the best shutter speed that you can handle for a sharp result. So what is the lowest hand held shutter speed you can apply?

Actually, in practical terms, the slowest hand-held shutter speed is reliant on a number of factors…

  • Physical fitness: If you are not strong enough for using your camera weight it is more difficult to hold it steady. Regular practice with your camera will help you build muscles to steady your hand and therefore shoot at lower shutter speeds.
  • Focal length: Longer focal lengths tend to need higher shutter speeds. As you shoot further into the distance the angle of movement seen at the point of focus is more exaggerated.
  • Optical stabilisation: If your lens is optically stabilised this means it will compensate for the tiny movements of your hands. This compensation will help you to reduce hand shake and therefore give you potentially longer shutter speeds.
  • The picture you want to create: Obviously, the picture you want to produce is dependent on how much blur you want in it. So if you want no blur (for the sharpest result) you want a fast shutter speed.
  • The amount of light: Brighter light allows you to have a shorter shutter speed. Knowing when to use a tripod instead of hand-held is the crucial issue here. Most people simply give up if a low shutter speed demands a tripod… For the accomplished photographer many of the best shots are found in low light situations. So shutter speed control is of crucial importance – as important as using a tripod at the right time.
Rule of thumb

Those factors aside here is a rule of thumb. In practice most people do not shoot with a steady enough hand to produce sharp hand-held shots below 1/60th second. Of course, optical stabilisation on the lens will help you get longer shutter speeds. But even then a practical limit of 1/30th of a second is about as low as you can go and be sharp. That is not a shutter speed I would suggest you work with regularly when hand-held.

Best guide to shutter speed

The shutter speed you need to work to is often related to the focal length you are working with. There is a reasonable rule that can help you get a good guide to picking the best shutter speed for your focal length. It is said that the longest shutter speed you can use hand-held for a lens or zoom setting is:

1 divided by the Focal length times 1.5

So, if your lens is a normal lens at 50mm it will have an effective lowest hand-held shutter speed of 1/(50 x 1.5) or 1/75. The nearest (rounded up) setting on your camera is likely to be 1/80th second.

If you are working at 200mm then, 1/(200 x 1.5) or 1/300th of a second will be your lowest working shutter speed. The nearest setting on most cameras will be 1/320th second.

These apply if you are not using optical stabilisation. You can of course work one or maybe two stops faster if you are using stabilisation. You will need to check that figure against your lens specification. Most optical stabilisation systems will give you between one and two stops extra control.

Shutter speed standard

shutter speed is standardized on a 2:1 scale. When you open the aperture on single aperture stop and at the same time reduce shutter speed by a single step the result will be an identical exposure. This table shows the shutter stop standard steps…

  • 1/2000 sec
  • 1/1000 sec
  • 1/500 sec
  • 1/250 sec
  • 1/125 sec
  • 1/60 sec
  • 1/30 sec
  • 1/15 sec
  • 1/8 sec
  • 1/4 sec
  • 1/2 sec
  • 1 sec

The scale extends up above these figures to very high shutter speeds. Up to date DSLRs may allow have shutter speeds of less than 1/5000ths of a second. Very fast indeed. While at the other end cameras will allow long shutter speeds of up to 30 seconds in manual modes (M mode; or Manual) and longer in “bulb mode”.

Each of the steps in the table above will be equal to a change of one stop of light up or down. A change of one stop of light will double the amount of light entering the camera.

As one stop of light is quite a large amount, cameras have become more sophisticated. Most are now marked off with thirds of a stop for ISO, aperture and shutter speed. So your calculations can be quite precise and lie between these values in the table above.

You can read more about stops of light here: Definition: f number; f stop; Stop

Doing it right

Gaining control over your camera is of importance if you want to become a creative master of its full potential. Learning about shutter speed and other aspects of exposure are critical to learning that control. You can have great fun creating bokeh and controlling movement blur. At the same time you can remove that other type of blur – ugly hand-held shake-blur.

Please leave questions and issues for us to discuss if you want to take this further…

By Damon Guy (author and Photokonnexion editor)

Damon Guy - Netkonnexion

Damon Guy (Netkonnexion)

Damon is a writer-photog and editor of this site. He has run some major websites, a computing department and a digital image library. He started out as a trained teacher and now runs training for digital photographers.
See also: Editors ‘Bio’.

Seven easy tips to improve your group photography

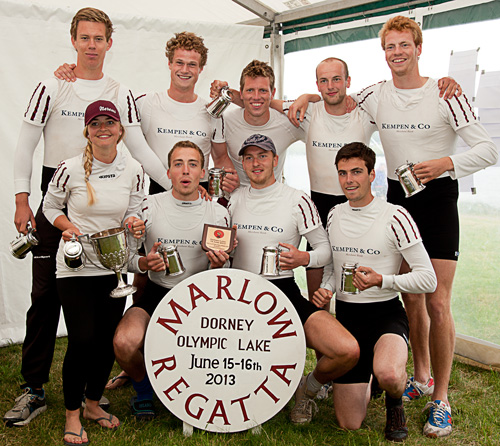
• Boys Group •

• Boys Group •
The humble group photograph can be much improved by a few simple steps.

Simple steps lead to great shots…

With groups you must go a little further than with straight portraits. Getting people coordinated, a range of different settings, beating the dreaded ‘blinks’, great sharpness… Check these out, go the extra mile.

Planning

When doing group shots a few ideas up front helps. Some simple ideas about cohesion, commonality and framing can make your shots more compelling. Clear ideas about how you want this particular group arranged will enable you to get them quickly into place. Groups, by their nature become impatient quickly. Preparation moves things along keeps people on the ball. Have your location scouted and know where you are going to place your group. Have a good, simple background ready. Make sure you have adequate light to work with. Location is everything.

Settings

Remember, groups require a wide view and you need some depth too. Set your aperture too large and you risk the back row being out of the zone of sharpness. Most groups are best photographed at f8 or even better f11. To get the sharpness work with your shutter speed up reasonably high. 1/125th minimum – better 200ths of a second. Go higher if you don’t need flash.

Bigger groups always have a certain amount of movement. Higher shutter speeds help to freeze the action. The problem is, high shutter speed and small aperture leave you needing flash or extra lighting. There is always a trade-off. To compensate you may need to raise your ISO.

Sharp shooting

Shooting at high speed will help freeze the action. It will not steady your hand. If shooting a big group, especially for formal shots, it’s best to use other sharpening techniques. Consider these sharpness…

  • Using a tripod
  • Use mirror lock-up function
  • Image stabilisation off (not needed on tripods – it creates vibration)
  • Auto-focus off on a tripod after the group is focused (it creates vibration)
  • Operate with a remote shutter button or use the on-camera timer

A tripod saves time. You can arrange the group and smooth the shot through. If you have more than one group, your camera is always set up when it is on a tripod. It helps smooth the flow.

Light and shade

Overall light in the scene is important, so is the shade. When taking pictures of groups you are taking a wide angle view. The group is often spread out. It’s easy to miss that one or two of the group are in the shade. Or, with a camera mounted flash, the shadows from the flash fall harshly onto the people behind. Trees, buildings, other people, towers, street lights – any number of objects can cast unexpected shadows which are difficult to notice. Flash casts shadows you don’t see until you open the picture on a computer later. Look carefully at your group. Arrange them to be in clear, consistent light. Make sure any lights or flash you are using treats all the members of the group evenly and fairly.

Clothing

So often with groups you have no control over clothing. If the event is formal the clothes often have a stiff and upright feel. People don’t relax so well in this situation so you will have to set the scene and pose them accordingly. It is not easy, especially with family conventions or a preset plan. Where possible let them arrange themselves with your help. People will be most comfortable next to the people they like and know.

When a group is coming together informally the clothes may be wildly variable in character. What matters when working with a candid group is the fun arrangement of the group. Try to get the group to look dynamic and together. This will offset a strong clothing variation.

The prize giving

• The prize giving •
If the group feels comfortable and you work with them they’ll help make a great picture.

Organisation

Groups, especially close up, look odd if the faces are at different distances from the camera. They are close enough to us to look fine. However, the lens plays tricks on our eyes. If they are out of line – at different distances, but close together – they will appear to have different head sizes. Try to make people in each line of a group stand evenly down the line.

Sometimes the classic, short in front taller to the back works fine. Other times it is better to actually mix up short and tall – especially with different generations. It is much more natural for grandchildren to be arranged with grandparents than stuck on the end of the line because they are small. Putting children between adults also provides an opportunity to have a shorter person behind so as to break up a line up – to make it less formally arranged.

Close family groups, and friends, often look good leaning together, or heads together. It is very intimate to touch heads.

The dreaded ‘blinkies’ strike every group shot if you are not careful. The bigger the group the more likely that someone will blink. Overcome it with a little group control. Ready to shoot? Tell them you are going to help stop them blinking in the shot. Tell every one to shut their eyes. Count to two, tell everyone to open. Count to two. Press the shutter. Everyone will have open eyes. Explain it first so they know what is coming. It will make sure they all have eyes open long enough for you to get the shot.

So, with all these different ways of organising the group make sure that what you have is comfortable, natural – never forced.

Posing

Organising the group is about positioning and location. Posing is about personal stance and comfort. You, as the photographer, need to direct the group. But on the other hand you have to work with the people you have before you. Try to make it fun. Get them to relate to one another. If you have time, especially with candids or informal group, get them to experiment. Handshakes, greetings, hugs, arms around each other, standing in groups – the idea is to make ‘that’ group look good. Another group might not look good with the same poses. You should work with them, discuss ideas with them, respect their thoughts. They probably know each other better than you know them and will make the best suggestions. It is your job as a director to pick up on the most effective shots from their ideas. Consider what you know about them, consider their ideas for their poses – then work together to make the shot just right.

Getting the right feeling…

Working with groups is more than just lining them up. You have to consider the time, place, light, shade, the settings and the technique. But the best shots still come from the group itself. If the members of the group are comfortable, having fun and feel natural about their poses they will make sure you get a good shot. Work with them, help them make your picture work.

Comments, additions, amendments or ideas on this article? Contact Us

find out more...Photokonnexion tips by email
If you enjoyed this article please sign up for our
Tips by email service.
                                                 Find out more

By Damon Guy (author and Photokonnexion editor)

Damon Guy - Netkonnexion

Damon Guy (Netkonnexion)

Damon is a writer-photog and editor of this site. He has run some major websites, a computing department and a digital image library. He started out as a trained teacher and now runs training for digital photographers.
See also: Editors ‘Bio’.

Three photography lessons from this one weird old trick!

Holding down the shutter button he peppered the area with repeat images... :: What happened to quality?

Holding down the shutter button he peppered the area with repeat images…
he was hoping for at least one good shot out of that lot!
(P.S. What every happened to forethought and quality?)

Ever hold down the shutter button and hope for the best?

We all have – in modern times at least. In the days of film we didn’t. It was just too expensive to do that. So, here is a lesson you can learn from changing your behaviour. Go for quality in your photography.

The wonderful world of digital has set us into a new era. We can take an individual shot for free, download it for free, process it for free, store it almost free. Wow! It could not be better. Little wonder that we see a shot that is just a little bit difficult and we press the button and start firing off our exposures like we had machine guns. What do we achieve? Dozens of shots that are almost identical. Many of them a waste of time and effort. We are really just hoping against the odds that the shot will some how work out. Think for a moment… Why did you not go for a quality shot that got what you wanted?

Have we lost the ability to ‘make’ a decisive, quality capture?

Try this exercise next time you go on a shoot. Pretend your memory card can only hold 36 exposures. That was the number of negatives you would get from a large roll of film. Next, given that you can only shoot off 36 frames, you need to do three things…

  • Think about each shot – carefully. Plan it, savour it. Make sure that you know what you are going to do before you even put your finger to the button. Set your camera up for it. Aim for a quality result.
  • Frame the shots. Compose each as if there was payback of $64,000 for every good shot. Pick the perfect composition for each press of the shutter button – make that shot pay!
  • Wait for just the right moment… add up all the variables in the shot until you have confidence it will work. At the right instant capture the image – make a photograph.

We seem to have forgotten the power of these three things that went into every photograph in former times:
Forethought;
Framing;
The decisive moment.

These simple things did a lot for photographers. They enabled us to learn what was important in a shot before we started. They helped us to know what we were trying to achieve. They taught us to get it right at the right moment. These simple things made us better photographers and produced quality results.

Comments, additions, amendments or ideas on this article? Contact Us
or why not leave a comment at the bottom of the page…

Like this article? Don’t miss the next — sign up for tips by email.

Damon Guy - Netkonnexion

Damon Guy (Netkonnexion)

Damon is a writer-photographer and editor of this site. He has run some major websites, a computing department and a digital image library. He started out as a trained teacher and now runs training for digital photogs.
See also: Editors ‘Bio’.
By Damon Guy see his profile on Google+.