Tag Archives: soft light

The Zen of photographing collections

Collections of things are fun and easy to photograph. Everyone loves a collection.

Collections of things are fun and easy to photograph. Everyone loves a collection.
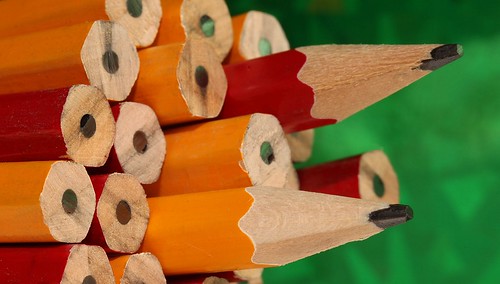
Click image to view large. “Pencils” By Netkonnexion on Flickr External link - opens new tab/page

Collections are everywhere

For some reason us humans love them! So taking photos of collections seems natural. The shots pull viewers in. They are easy to photograph too. In this post we’ll get you started on this fun photographic frolic!

First, what is a collection? Simply a number of items in the same category. Pencils; pens and pencils; crayons or all three are different collections of things in the same category. If there is a common theme mixing things it’s fine. Or, you can have all the same objects in your collection. Normally I find a large number of items is best. That is helpful to cover a whole frame of your shot, and it also gives you scope to vary the way they are laid out.

Organised collections

Organised collections are those that show a neat arrangement. Of course this can be a bit boring. So lovely arrangements really help here. There is plenty of scope to develop your artistic talents. Here is a series of photographs that have both beauty and organisation, but a limited range of the collected items: Thousands of suspended buttons made as common objects External link - opens new tab/page.

There are so many beautiful photographs of pencils in neat arrangements online. Here is a link with image ideas… Collections of pencil photographs on Google ImagesExternal link - opens new tab/page. It is worth trying out a few to see how you get on.
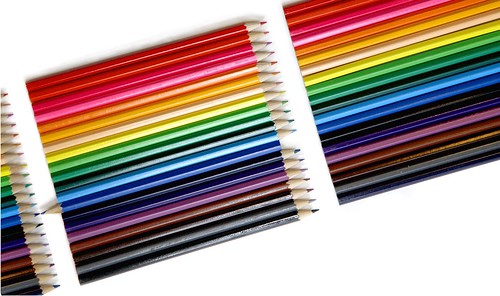
Pencils are particularly fun to photograph. They make great arrangements and have wonderful colours.

Pencils are particularly fun to photograph. They make great arrangements and have wonderful colours.
Click image to view large. “Arrangement” By Netkonnexion on Flickr External link - opens new tab/page

Both of my pencil photographs here are carefully arranged to be “different” in a small way. At the top of the page the pencils are arranged so some are pointing out, and some point in. It’s just added interest. Can you spot the one difference in the picture “Arrangement”? The idea with a neat collection is to introduce a random element to capture the imagination of your viewer. Or to raise questions in their mind. That way they are pulled into the shot and become absorbed. Then your picture has succeeded.

Disordered collections

There is even more potential for disordered collections than with ordered ones. Wow! Think pebbles on the beach. An infinite variety of arrangements right before your eyes. However, this can trip you up. What do you look at or photograph first?

The first principle is to look for something that you think is interesting. Look around for a while and find some pebbles that are brightly coloured or that have particularly good markings. Then you can assemble them as if that was the way you found them.

I have often found that you can find something completely different to break up the pattern. Then the pebbles become a background. I have on different occasions in the past introduced seaweed, a leaf, a small piece of driftwood… you get the idea. The one-off object placed in your collection relives the monotony and highlights the collection at the same time.

Of course disordered collections can have ordered elements to relieve the monotony. In the image below I introduced a little pattern. It may not be immediately obvious. But the idea is that the pattern comes out after a short time looking at the picture. The viewer is pulled in while trying to establish order – then suddenly finds it.
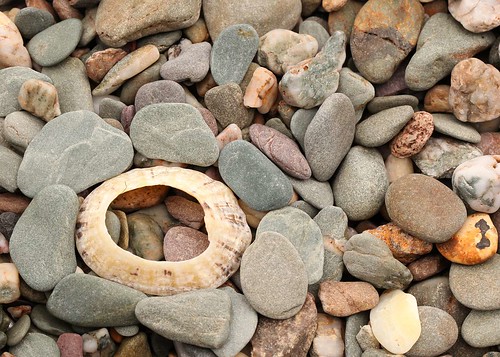
"Stones and Shell" - creating order out of chaos

“Stones and Shell” – creating order out of chaos
Click image to view large.
“Stones and Shell” By Netkonnexion on Flickr External link - opens new tab/page


Disordered collections are quite fun when you have multi-coloured items and only a few. I have seen some great cotton reel shots. Brightly coloured stationary items are fun too – I love paper clips. Those make great backgrounds for all sorts of purposes. I have taken drawing pins, buttons, polished stones… all sorts of collections.

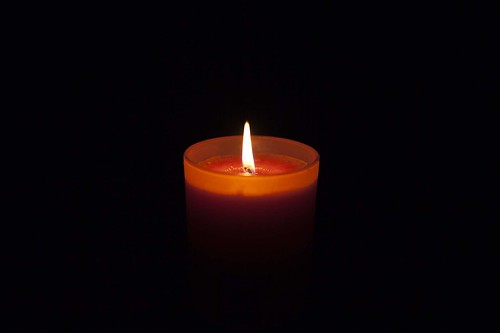
I have shown many collections in exhibitions and competition too. They always attract attention. It often depends on the way they are photographed of course. In various situations the importance of light comes to the fore. This next photograph was taken for a client. The subject matter is perhaps not the most inviting. However, the interesting shapes, shallow depth of field and the moody light changes the “clinical” to the “interesting”. The shallow incidence of soft light also helps define the shapes which might otherwise have been lost in a full high key lighting situation.
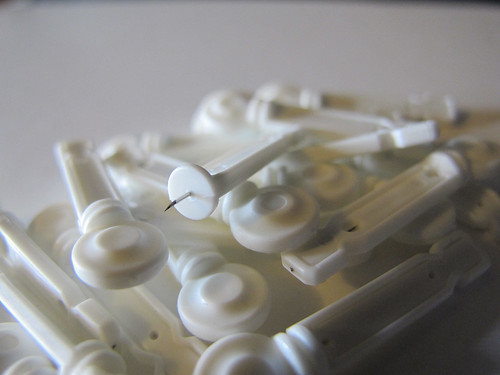
"Medical lancets" - shallow depth of field and moody light softens the appearance of the collection.

“Medical lancets” – shallow depth of field and moody light softens the appearance of the collection.
Click image to view large.
“Medical lancets” By Netkonnexion on Flickr External link - opens new tab/page


Over the years I have had a great deal of fun working with collections and creating shots. They provide plenty of interest for the eye and can involve great colour, geometry, pattern, chaos, form and shape. Have a go – you will find collections are very stimulating subjects. And, the endless variety offers so many photo opportunities.

Hobby collections

There is a great deal to be said about hobby collections. Each item in such a collection is prized and valued. Displays and lighting are a special part of the presentation and the actual photography. So I am not going to tackle this subject in this post. It is an involved and deep subject which relies on the particular hobby. However, it is worth mentioning that often photographs of hobby collections are about taking a record shot. In the links below I have put some links relating to hobby collections that may be worth you following up.

Damon Guy - Netkonnexion

Damon Guy (Netkonnexion)

Damon is a writer-photographer and editor of this site. He has also run some major websites, a computing department and a digital image library. He started out as a trained teacher and now runs training for digital photogs.
See also: Editors ‘Bio’.
By Damon Guy see his profile on Google+.

Simple tips to save you from disaster on your photoshoot!

Am I preaching to the converted?

Ever gone on a shoot and forgotten something? I have. If you’re like me you will have a bag packed ready. But, check the night before. Things may have changed. Here is some help.

Checking

The night before you go is the first time you should check your equipment. That’s the time to realise you need to charge your batteries. Yes, always have more than one – you don’t want to run out. Charge both. If you have an off-camera flash, check they are up to power too. I use rechargeable batteries in my flashes. So I charge them. But you may have standard disposable ones. Have fresh ones on hand.

Check you have a memory card in the camera and at least one spare. A corrupt card is as good as stopping your shoot if you have no spare. Oh, and make sure you downloaded the previous shoot. I turned up to a shoot once with a card nearly full of my previous shoot. I had not had time to post process them. OK, no problem. Ah! Had I downloaded them? Er… I could not remember. Then, eeek! I had no spare card. One full, no spare. It cost me an hour to find a shop for a new card – I was not impressed with the card either, but no choice. How stupid did I feel when I got back and found out I had downloaded the previous shoot. I could have used the card I had. Better safe than sorry.

Lenses

Choose your lenses if you have more than one. Also check they are clean, properly packed and have lens caps. Camera bags are generally made of very harsh material. If the glass rubs against the material it will rub off the coating and may scratch the glass. Look after your lenses and they will last for years. Got clean lens cloths? Make sure you do… you may need to clean up while out. Oh, I have an extender for my 70-200mm. It takes the lens up to 280mm – enough for most long shots. Don’t forget lens accessories. And, if you think you are going to need them, what about filters?

Camera straps?

Check your camera straps for damage. The little slits the straps go through gradually wear the strap. If a strap breaks your pride and joy will crash to the ground! Check the straps and zips on your camera bag are good too.

Got your tripod? Ah, but have you got the quick release plate? I forgot one once and had a day of really hard shots and poor results.

I normally carry three different light modifiers. They are a little honeycomb for focussed, hard light and a strap on diffuser which directs the light in one direction for soft wide focussed light. Finally, a plastic diffuser for popping on top of the flash for all-round bounce light to give wide-spread light. So, check your modifiers. If you don’t have any get some. Flash is too harsh for most shots.

Camera?

Ha ha! I am not joking actually. I once went on a shoot with a great friend. He had a new Canon 7D – proud as punch. He turned up on our shoot with a wonderful camera bag. In it was everything he needed for the shoot – except the camera body. He had left it on the table at home. Fortunately I was able to lend him one of my spares.

Sundry other items may be important too… Torch? Large plastic sack to cover everything in a sudden shower? Map? Tablets? Sandwiches, drinks, money? Well you get the idea. Everyone’s list is personal, so work out what is meaningful for you.

Going on a shoot for a day or more is a complex business. Your day can be ruined or shortened if you are not prepared. So why not make check lists. One for the night before, one for the morning before you go. Go through everything you have an then put it on the list. Then, check it all in complete confidence that you will have a great day.

Simple techniques for photographing yourself

Most people want to have a go at a ‘selfie’.

You are a good model for trying out shots and poses. You can have lots of fun doing innovative shots of yourself. Here’s some simple techniques for self portraiture which are fun and useful.

In this video Mark Wallace shows easy ways to set up and take self portraits.

Uploaded by snapfactory on Aug 31, 2010

Five easy ways to learn about the light/shadow relationship

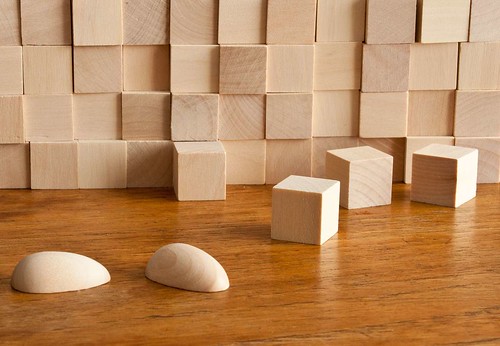
Practice blocks provide a great way to understand light/shadow relationship.

Practice blocks provide a great way to understand light/shadow relationship.
View large About the light/shadow relationship :: External link - opens new tab/page

Our first priority is light – second is shadow.

The relationship between them is one of the great pillars of photography. Learning about them is essential. The key to understanding the use of light is seeing the effect of shadow. In this article I am offering some ways to learn about the light/shadow relationship. If you have not already done so I recommend you read Three little known facts about shadows External link - opens new tab/page first.

The light/shadow relationship – a transition

When looking for a scene the right light and shadows can make or break a shot. We are looking at the light/shadow relationship so we can convey the right message to the viewer. Things with harsh and sharp shadow-lines tend to indicate hard, masculine, tight, dark, angular, tough, solid, artificial, technical. Things with soft shadow-lines showing gradual light-to-dark change are the opposite. They tend to be gentle, mild mannered, lighter, soft, rounded, meek, curved, natural and feminine in appearance. Using the wrong light sends conflicting messages to the viewer. The right light will help your message. The defining aspect of this relationship is the transition from light to dark. The shades between light and shadow are the definition of form. “Form” being the three dimensional shapes we see. The harsh sharp shadows of hard light are great for angular forms. The soft rounded and gradual shadows of a softer light are great for showing rounded three dimensional forms – like faces, eggs and balls.

Creating the right light

Creating light of the right sort is the quickest way to understanding the different types of light and the shadows they create. So, we are looking to bring out the transitional light/shadow relationship through the use of different types of light. This will help us define form in our images and bring out the 3D feel that makes pictures appear to have depth.

You need to be able to create two types of light for these experiments. Hard light – created with an intense beam from a relatively small light source. A torch like this one is excellent for this purpose…

 
The ‘Lenser’ LED Torches

The ‘Lenser’ LED range of torches External link - opens new tab/page is available on Amazon. I personally recommend the excellent LED Lenser 8407 P7 (Black) External link - opens new tab/page torch (advert – left). It is excellent for all types of photography. At night you want a rugged and powerful torch for safety, lighting and to prevent losing equipment. Lenser also sell a coloured filter set for it making this torch great for light painting External link - opens new tab/page too. It’s the top seller (5 star) in the range. Experience has shown it to be an exceptional piece of technology.

You also need soft light – usually generated from a large light source like a window, softbox or photographic umbrella.

Make sure you are using only one light source for your tests. Multiple lights confuse the shadows. The hard and soft lights are best used at the same intensity so you can compare results between them later. If you have one, an off-camera flash with the appropriate modifiers would do the same work. Use a honeycomb or snoot to get the tight beam of a hard light. Use a diffuser or bounce the light off reflectors or walls to create a soft light.

For your first experiments with soft and hard light try out your different light sources. Place a simple object of your choice on a table. For the subject see a small vase, a simple ornament, a small box or something similar. Take a few photographs with both hard and soft light. Then open them on your computer and compare them. What you are looking for is the quality of the shadow. How intense is it – light or dark. How quickly does the light change from light to dark. Is it an abrupt, sharp change? Or, is it a slow, gradual transition? Study your shots to see which you prefer. The light/shadow relationship is best shown in gradual steps. So your shots should show very hard light right through to very soft light.

Experimenting with curves

The use of curved subjects is going to create gradual transitions of light anyway. But curves can also have quite hard shadow-lines if the light is also hard. Using something rounded will show the point. A small ball, an egg or something similar are great for testing the hard or soft light effects. I have several wooden eggs for this purpose. They make test subjects for thinking through individual or group portrait shots. They help in planning shoots and lighting set-ups. They are a very cheap way of making your mistakes before the shoot! Give them a try.

Using a rounded subject, try your hard and soft tests again. This time take shots from at least eight light-positions in a circle round your egg. You must stay in the same position to take each shot. That way you will see all the different angles of the light/shadow relationship as a graduation as you move the light round for each shot.

In your computer ask the same questions about the hard edges and soft graduations of light through shadow. Imagine the eggs are faces. Which will work best on a face – those hard sharp lines or the soft graduations?

Experimenting with lines

For working with more hard-edged objects I have 50 wooden children’s building blocks. I use these in the same way as the eggs. They help me plan lighting and sets/props positions for shoots.

Use one block to start. Repeat the exercise as you did with the eggs. Take eight shots using different light positions around the cube. Keep the camera and cube in the same position from the start. Just move the light to each of the eight positions around the cube. Repeat the exercise for the hard and soft light sources. You will see that the results for a hard edged object is very different to the soft edged eggs in the previous experiment. Concentrate on how the light transitions in the light/shadow relationship shown by each shot.

This time, you are asking the same types of questions… about the quality of the shadow. How intense is it? How quickly does the light/shadow relationship transition, and so on. Again, study your shots to see which you prefer. You will have a different type of result because the edges are much harder than the rounded eggs. The shadow shapes will be very different too.

The wooden blocks are useful. The set I use for this purpose is advertised to the left. It has rounded blocks and a variety of shapes. This gives you the opportunity of trying out a whole range of effects and test lighting set-ups.

Experimenting with specifics

You have experimented with rounded subjects and hard edged ones above. Now it is time to look at the other possibilities.

Try mixing rounded and square edges. Try out a few scenes using the blocks to map out props. If you have other toys around use the blocks to create little still life scenes with the toys or other objects. The idea is to try and creatively use the toys, blocks and egg to make a scene. But you must concentrate on creating sympathetic shadows. Look always for the way you can understand the balance in the light/shadow relationship and make it complement your theme.

Suppose you depict a robot war. Your best light will be hard and very direct. The harsh sharp curves will help create a chaotic and harsh environment. Try depicting a love scene between two figures. You want to use soft, diffused light to carry the romantic mood.

You see my point. You are trying out in miniature what you want to do in the real world to emphasis your message.

I used to use several action figures for testing out scenes with people. But the kids broke them eventually. These days I use cheap wooden artists dummies. They are fun to use and give a very good idea how to set up lighting for poses. The one I use is advertised to the left. It is really great for lighting tests.

The Importance of Eggs

Finally, here is a video which I posted earlier this year. It focuses on the angles of light in the light/shadow relationship. It will show you the point of the eggs exercise. So you can see how it is all done. He shows you the principles. However, you will need to try out for hard and soft light and hard and soft edges – which the video does not show… Enjoy!

The Importance of Eggs (a previous post on Photokonnexion).

Three little known facts about shadows

What is shadow? Why is it so important in photography?

What is shadow? Why is it so important in photography?

Shadow is difficult to understand… it’s, well, shadowy.

To a photographer the nature of shadow is the second most important concept we work with, but most don’t understand what it is. Here is a look at three ideas to help you know shadow.

First, you may ask, what is the most important concept to a photographer before shadow? Light… it’s the very centre of photography. It is also the reason we have shadow.

Fact no. 1 – It’s all in the difference

Light and shadow are in fact the same thing. They are not opposites. Dark is the absence of light – a pretty rare thing in modern times. But, shadow is the difference between a particular light intensity and a lower light intensity next to it. Shadow is created by an object intercepting the light from a light source. Light passing the object will be brighter than the light where the beam has been blocked.

Fact no. 2 – It’s not dark in the shadow because…

Light is pretty fickle stuff. It travels in straight lines (direct light) unless it bounces off something. In fact light will bounce off almost anything – even the atmosphere. We see everything around us because light has bounced off things and then entered our eyes. Places with a lot of light bouncing around from different objects and in many directions is said to have diffused light. Some of that light will be bounced into shadow areas. It lightens the shadows. Some light is produced by big light sources like a photographer’s umbrella. This causes a less direct or soft light. The soft light source creates shadows with poorly defined edges. The shadows have a gradual transition from light to the darker shadow areas. Where soft light and diffusion occurs you get less shadow and it is poorly defined.

Fact no. 3 – Direct light and little diffusion equals hard light

Direct light, where there is little diffusion, creates sharp edges on the shadows. The shadow abruptly stops and the brighter light starts. This is called hard light and is normally created by a small light source. Because there is little diffusion the shadow is more intense. This is because there is no diffused light bouncing into the shadow area to lighten it. Hard light and little diffusion creates well defined shadows.

Where does this lead us

The photographer works mainly with light intensity, direction, colour and hardness. Together these components create the quality of light that is so important for successful photography. We intuitively understand intensity and direction. Colour in light is something that we gradually learn to see (harsh blue of mid-day to the golden glow of dusk).

Most photographers don’t immediately see the difference between hard and soft light, and what the effects are on shadow formation. However, shadows are of great importance because they define what we see many ways. More intense shadows stand out more. As they catch our eye we are better able to see what is causing them. As we do so we become aware of the shapes and forms that are sculpting the shadows. In other words, shadows help to give definition to the objects and world around us.

Photography is a two dimensional media. We are very experienced at seeing the world in three dimensions. When we see a flat representation of the world we are able to interpret it in three dimensions because we understand how shape and form are portrayed by the light/shadow relationship. So get to know shadows, hard and soft. Become skilled at capturing them in your images. You will be better able to create a three dimensional world for your viewer – even within a two dimensional medium.

Tips for improving your use of flash

Simple tips about flash help all aspects of your photography.

The use of flash is all about increasing the light intensity in the area where you are working. There are many ways that flash can be used. Here is a great round up of flash tips to get you started.

In Six tips for photographing silhouettes we talked about how to create a silhouette. One of the reasons for flash is to prevent a silhouette. Often when you have a bright background you want to light the foreground to prevent your subject being too dark. You can use your on-board flash, an external flash or studio lights to fill that foreground light and bring your subject up to a brightness level that makes them look natural and well lit.

One thing to remember is that your flash is adjustable. This is a fact that many people forget. Look in your camera or flash manual to see how to make the adjustment. Then make sure that you do not have too much power. Nearly always photographers have the flash too high. Very bright flash makes faces look washed out and tired. It will also cause nasty and distracting highlights. You can turn your flash off, down or sometimes up. It is certainly worth experimenting with it to see how much you can adjust it and what effects the adjustment has on your subject.

On-board flash and off-camera flash are two different things altogether. You can easily do some things with the off-camera flash that you can with you pop-up (on-board) unit. However, there are some things you should know about on-camera flash – it is pretty limiting.

The differences between types of flash, and many other useful tips, including more on the tips above, can be found in the video below. It explores quite a few aspects of flash and is a great background for you to get started.

Posted on YouTube by: http://www.steeletraining.com

By Damon Guy (author and Photokonnexion editor)

Damon Guy - Netkonnexion

Damon Guy (Netkonnexion)

Damon is a writer-photog and editor of this site. He has run some major websites, a computing department and a digital image library. He started out as a trained teacher and now runs training for digital photographers.
See also: Editors ‘Bio’.

Five tips to help your portraiture from the Renaissance

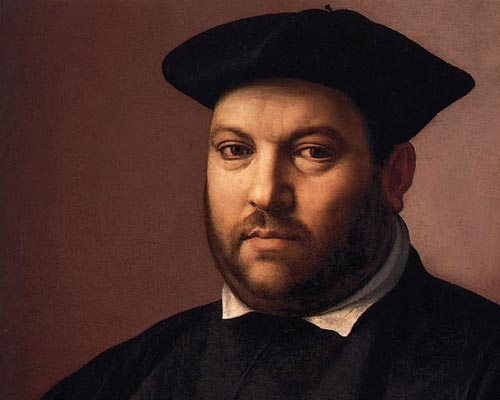
Renaissance Painting - "Portrait of a Gentleman" by Ridolfo Ghirlandaio

“Portrait of a Gentleman” by Ridolfo Ghirlandaio (Part copy of the original)
Renaissance painting can teach us a lot about portraiture.

The way we look at people is a constant in time.

Renaissance Portraits represent the artists view at the time. Our photographs represent our view today. Artists paint to bring out features. We can see lessons in that emphasis to help our portraiture in photography.

The Renaissance painters created a culture of portraiture leaving us with a superb legacy. Their realistic portraits were a study of light and shadow – the fundamentals of art. their study specialised in the face. They wanted the lines and shadows to be flattering, portraying the features in the best possible light – literally. Today we have a lot of portraits by masters who knew how to see light and shadow and pick it out.

Here are five things that we can look at in Renaissance portraits to apply to our own photographic work.

The direction of light

To make the best of the features of our portrait sitter we need to understand light direction. Renaissance portraits tend to have slightly exaggerated shadow lines. As a result we can see which direction the light is coming from. Once we have worked this out we can apply the principle to our own shots. We can place the sitter relative to a light source or move the lights.

Light intensity

In general Renaissance portraits have no highlights on the face. Modern flash and lighting techniques tend to produce harsh, hard lights unless we carefully control it. The Renaissance images sometimes have bright light, but the painters left them as bright, not white. Spots of white, blown out light, are very distracting for the viewer. We should be on the lookout for the brightest spots try to reduce the light intensity. In films the make-up reduces skin reflection. When that is not practical we can instead just use reduced lighting, or diffusion screens.

Angle of incidence

In the picture above there’s quite a strong shadow line on his forehead under the hat line. This is because a hard light is striking the face slightly from above and to the side, not straight on. This imitates the sun, or a high point of light – say, through a window. By looking at the shadows on the face we can see how the light is angled in addition to it’s direction. Different angles of lighting and the shadows responding to it give clues about how the scene is lit. An evening scene with a lamp would show a lower angled light and it would be more yellowish. An evening light would be more straight from the side and tend to be redder. Bright daylight will tend to be from a higher angle. Looking at the angle light strikes the face, and the type of shadows, helps you to imagine how your own portraits could be set up.

Hard and soft light

Sometimes the old masters cheated or messed about with light to emphasise something on the face. In the picture above you will see quite a hard line of shadow down the shadow-side of the nose. This hard line of shadow comes from a harder light. Yet on the cheeks the light is soft – the shadows have a gradual tenancy toward darker areas rather than a hard line. In general, it is difficult to mix hard and soft light lines like this in real life. It is interesting because here it shows how the face is well defined. I think this is because the artist was trying to define a quite rounded face. Too rounded and the face becomes feminine. To avoid that feminine look he has put one or two harsher, sharp lines on the face to bring out the masculine side. For your portraits remember that hard light brings out masculinity and soft light brings out feminine features.

Eyes

Eyes are something of a study for artists and photographers. They establish life and vitality as well as a rapport with the viewer. If you can mark the direction of the eyes so the person in the portrait is looking directly into the viewers eyes then you capture the viewers attention. We are transfixed by eyes that look at us. In a very clear picture the pupils gives us a clue. In most pictures the catchlights in the eyes indicate the direction light in the face, the direction they are looking and also provides vitality and expression in the eyes. In the portrait above the catchlights are small, the picture is reduced in size and low resolution. But the catchlights are present. Have a close look at them. When working your portraits make sure your catchlights are a good shape and are true to the direction of the main light.

Here is a fun exercise

To improve your portrait skills pick a Renaissance portrait. Try to create a modern version of it. Look carefully at the light direction, intensity, angle, relative hardness/softness and the eyes. See if you can get someone to sit for you while you reproduce the light, shadow, catchlights and the pose. Work on the ways that the shadows lie on the face. See how the shadow graduation works. Soften and harden the light to reproduce that softness.

Here is a link to the Google image pages for Renaissance Portrait Paintings External link - opens new tab/page

This is an exercise in light control. You can do it with natural light. You can even do it with a table lamp (although it may create a colour-cast). The idea is two-fold. First, get control of the light. Second, try to reproduce classic portraiture pose. Both are fun, and both will teach you all sorts of lessons about what in the light makes people look the way they do.