Tag Archives: Record shot

Artwork images – record or new art?

Artwork images are not as easy to photograph as they seem.

Artwork images are not as easy to photograph as they seem.
Image of paper art by Peter Gentenaar
More from this artist on: http://www.gentenaar-torley.nl/  Artwork images: Link to Peter Gentenaar | External link - opens new tab/page

Artwork images are sometimes questionable as art

Most photographers look at work by an artist they like and feel compelled to take a picture. Of course it serves to remind them of the art they saw. That is reasonable. The keen photographer thinks differently. They like to see the artwork. They also like to produce photographic art of their own. But more often than not the picture they take is actually a record shot.

It is often said by judges in photographic competition that a sculpture photograph is a record shot. I have said it myself when judging. A pure record is not a piece of art by the photographer. Just exactly what do we mean by that?

Artwork images: Record verses interpretation

An example of a record shot is the photo at the top of this article. This work is by the wonderful paper artist Peter Gentenaar. His work is stimulating and interesting to the eye. Photos of his work bring out the splendour of his art. That is the point. They are less about the photographers interpretation of the art. Instead, they are about repeating the work in its fullness to show the work itself. It is a record. As such, it will show off the skill of the original artist.

Record shots are a legitimate photographic form. But they are often a record of the exhibit - not new photographic artwork images in their own right.

Record shots are a legitimate photographic form. But they are a record of the exhibit – not new photographic artwork in their own right.

[Seen on www.starr-art.com/ on 30/05/2015
Sol LeWittWall Piece,
1988 Painted wood,
76 x 5 x 5 inches
Published by Edition Schellmann,
Munich and New York.]


Reproduction of artworks in a record style is a proper photographic form. For remembrance, or sales purposes, it is fine. For those seeking to make their own art there is something more needed than simply snapping someone else’s work.

That something extra is a new re-interpretation of the work. The photographer has to invest something of their own into the picture. They have to make more of the original artwork than is presented solely by the work itself. There are a number of ways to do this.

A new interpretation may not be a complete image of the work. It may include the full work, or only be a part of it. The environment of the image, how it is presented, or its framing are all important. Overall there will be something in the new artwork images that the photog makes their own.


How can you make new artwork images from an art piece?

Abstract from a piece of art

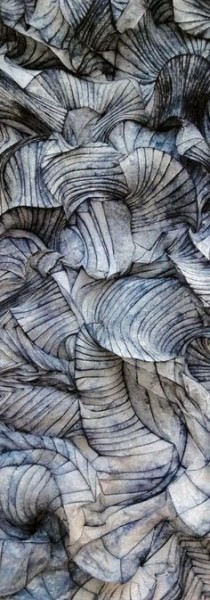
In this abstract of another piece by Peter Gentenaar the photographer has not shown the whole piece of work. They have taken a piece of the work that shows the wonderful lines and curves, but as a whole it creates a taste for seeing more.
See: Peter Gentenaar–Paper Magician Artwork images:  | External link - opens new tab/page.

• Abstract artwork images: One way to get something new out of a piece of art is to create an abstract of some sort. Abstract photos can be deeply satisfying to create and provide an interesting image for the viewer to consider. Most of the time abstracts are about making an image of a part of the artwork. An example is shown on the left. There can be a lot more to creating abstract photos than simply framing a bit of the total. The power of abstract is to create the essence of the total.

Abstracts require an eye for what works when the whole is not seen. For more on abstracts see our Abstracts Resources Page.

• Creating an new environment: The environment where sculptures are displayed is often important to the sculpture. Sometimes images are still record shots even if they are not on a simple white background. This link is an example of a Henry Moore sculpture record shot (Author unknown).. The author has displayed the sculpture just as it is with little enhancement. In fact it is almost devoid of its environment. The sky serves only as a backdrop.

The same could be said of this picture of an elephant sculpture (below). The artist has created a superb piece which mimics the body of an elephant defying gravity. The first shot is a pure record shot. But, the second is a superb interpretation of the sculpture in it entirety with an audience, depersonalised by movement blur. Very clever. Both images are taken by the sculptor himself, Daniel Firman. A simple but excellent reinterpretation. Such re-inventions are in themselves artistic. As such they are creating artwork images in their own right.

Gravity-Defying Elephant Sculpture

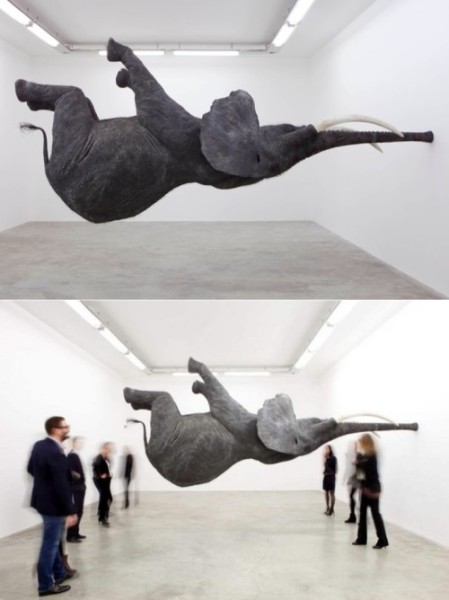
Gravity-Defying Elephant Sculpture by Daniel Firman.
Images by Daniel Firman.

Published in: Gravity-Defying Elephant Sculpture.
(Seen on WordlessTech Artwork Images: Gravity-Defying Elephant Sculpture by Daniel Firman | External link - opens new tab/page 29/05/2015).


Another Henry Moore Sculpture is shown below. This image makes as much of the environment as the sculpture. The artist has created a great panoramic picture using a letter-box crop. The length of the principle subject (the sculpture) is complemented by the almost central position. But, it is highlighted by the mundane, but important line of sheep. The latter gives the eye an excellent weighted contrast to the sculpture in the background. Clever compositional devices like this often create great great artwork images. There is no way this is a record shot.
Artwork images: The compositional devices in this image make it an interesting example.

The compositional devices in this image make it an interesting example of artwork images – definitely not a record shot.
(Seen on: Backstrap Weaving Artwork Images: Henry Moore sculpture on Backstrap Images blog. | External link - opens new tab/page.
(Click the image to see full size).

• Adding something: Another way to make something new of a piece of art is to put something new into, or onto, the piece. I leave the artwork images to your imagination here.

I have often heard judges say about record shots, of say a sculpture, “this needs your hat on it”. Alternatively they might say something like, “a cat just here would make the image something different”. What the judge is saying is, the author has created a shot that does not have anything from the photographer in the image. Whereas, with a little thought, or a little prop, or even a person – the picture could be transformed. Instead of the simple (and boring) representation, the author could have added that little extra that makes the image into a reinterpretation – something different. It would be something created uniquely by the photographer.

Works by you are artwork images

The uniqueness of a photograph is something that makes photography interesting. But, make the main subject a simple representation of somebody else’s work, then the uniqueness is lost. A simple record is created. But with simple compositional thoughts, re-frameing, or the addition of some new aspect, you create a new synthesis. One that is unique to you. One that is a real contribution to the body of artwork images. That is what makes photography so special.

The main point to take from this is simple. Think, plan and consider the composition when taking pictures of other peoples art. A subtle treatment of the art piece can transform it into an image only you could make.

Artwork images – further thinking

Which of these are record shots of Henry Moore Sculptures and which are artwork images by the author…
Henry Moore sculpture on Google Images Artwork images - further thinking | External link - opens new tab/page

Comments, additions, amendments or ideas on this article? Contact Us
or why not leave a comment at the bottom of the page…

Like this article? Don’t miss the next — sign up for tips by email.

Damon Guy - Netkonnexion

Damon Guy (Netkonnexion)

Damon is a writer-photographer and editor of this site. He has run some major websites, a computing department and a digital image library. He started out as a trained teacher and now runs training for digital photogs.
See also: Editors ‘Bio’.
By Damon Guy see his profile on Google+.

Do you find it difficult to photograph art?

http://farm6.staticflickr.com/5345/8977458941_2c55c81a0e_o.jpg

• The World Is A Different Place When Viewed Through Art •
Click image to view large
The World Is A Different Place When Viewed Through Art By Netkonnexion on Flickr External link - opens new tab/page

It’s all about interpretation…

We all have a little difficulty photographing art. We know that interpretation is important to the success of a piece – have we got the interpretation right? Should we hesitate when shooting art by others? Analysis paralysis could stop us doing anything. My view is we have to give it a try.

When photographing art there are two broad approaches. One way is to create a record shot which tries to represent the art as seen. You are producing a sort of factual postcard representation. The other is to take the shot putting your own interpretation on the piece.

Both these approaches are legitimate.

Some general points…

As with all photography there are some general principles that need to be established. In a nutshell we should try to…

  • Declutter the scene so the eye goes to the subject
  • Make sure our subject is the main focus of the shot
  • Ensure we have a clear purpose for the shot
  • Work hard to remove distractions (eg. bad focus or burnt out highlights)
  • Treat the subject with complementary light to bring out its best features

…these help us to ensure that we are conveying the meaning of our shot to our viewers.

The purpose

Clarity of purpose for a shot is an important part of crystallising our idea about how to present it. If we make a conscious decision about why we are taking the shot, it will help us to make the distinction between a record shot or an interpretation.

A judge at a photography competition once told me, “you should never put a picture of a piece of art in a competition unless you have put your own mark on the piece of art”. “Otherwise,” he said, “it is a record of someone else’s art”. For a judge that’s important. If it is a record of someone else’s work, what has he got to mark that is yours?

So, with photography of art I think you need a clear idea about your intentions. A record shot is about preserving the piece, ensuring that it’s essence is retained.

That judge I mentioned told a story. His friend was passionate about public art – pieces on public display in the open air. He travelled widely photographing sculpture. He always had something with him that he put on the sculpture. A scarf. A hat maybe. Sometimes a teddy bear. The strategic placement of that one thing was enough to add a new meaning. It was a sort of reinterpretation. The judges friend was creating a new work of art.

This clarity about “representation verses interpretation” comes up in many aspects of photography.

Often beginners are not aware of its significance. That is the reason there is often “something missing” in their pictures. The pictures of beginners often look sterile because they have tried to represent reality. The standard of their photography is not good enough to make the picture stand out. The picture itself is insipid because it lacks interpretation.

When someone has an artistic eye, even if a beginner, the interpretation they bring to a shot trumps the lack of technical skill. That is why some artists can create great images within a short time of first handling a camera. They know how to create an event in the imagination of the viewer – even if they lack the skill to create a great photograph. That event is the image that stays with the viewer.

Making the difference

Once we have established the purpose of the shot we should have a clear idea about some of the things that we can do to actually make the image…

Record shots: You are looking to create a clear, technically excellent representation. Work on sharp outlines and clear colours which are as close as possible to the original. Try to capture any essential textures, but also try to show the piece in its entirety. You will probably need to take a regimented progression of shots to do this. Typically a good record shot is one of a series. Record the full detail of the piece, capture it from all sides. Try not to embellish or exaggerate. Make a plain statement of its existence. Use plain light. However, if you only have time for one shot then make it as faithful to the original as possible.

Interpretation shots: You can let your imagination run wild. Anything goes. You are doing it to express how you feel about this piece. Get your feelings out there, exaggerate, magnify, close in, show it all or just enough… wild angles, odd views. You get the point. You are making the shot yours. You are doing some thing different.

Photographing art is one example

The principle of “expression versus representation” runs right through photography. Natural history shots are a case in point. We want our pictures of birds to be essentially record shots. We are looking for a faithful record of them. The trick with wildlife is to show them performing some behaviour which is peculiar to them.

You can probably think of other examples of the way this split affects your shots.

Once you become aware of this essential tension within every shot you can begin to work on the imagination or the representation in your own area of interest. It is critical to conveying meaning in your shot.

By Damon Guy (author and Photokonnexion editor)

Damon Guy - Netkonnexion

Damon Guy (Netkonnexion)

Damon is a writer-photog and editor of this site. He has run some major websites, a computing department and a digital image library. He started out as a trained teacher and now runs training for digital photographers.
See also: Editors ‘Bio’.

Can you write? Of course you can!
Write for Photokonnexion...

We would love to have your articles or tips posted on our site.
Find out more…
Write for Photokonnexion.

Nine simple guidelines for great interior shots

• Dining Room • For great interior shots follow the guidelines

• Dining Room • For great interior shots follow the guidelines
Click image to view large
• Dining Room • By Netkonnexion on Flickr External link - opens new tab/page

Photographing interiors is easier with simple rules.

We have all taken interior shots at some time. Indoor subjects are wide ranging. What about when you want to take a picture of the room itself? Here are some simple rules to help you get it right.

Why would you want to take a picture of the room?

Actually there may be many reasons. In the picture above the shot was taken because of the historical interest. It is a record shot. Of course there are lots of other types of shots you might want to take in an interior. Here are some examples…

  • Historical interest
  • Insurance record
  • Design interest
  • Before and after shot
  • House or room for rent
  • Hotel room for holiday snap
  • Hotel room for advertising
  • Colour and décor sampler for decorating plans
  • Sales and marketing photo for building sale purposes
  • Comparison with other places
  • Artistic impressions or interpretation

You get the point. Rooms can have a lot of reasons to be the subject of a photograph.

Some simple guidance…

1. Give yourself a clear purpose for the shot(s): Without such a purpose how will you know the best approach, what to include and exclude and how much of the room to take in. So know why you are doing it and what you hope to gain from the photograph. It helps to write it down.

2. Minimise distractions: As with any type of photography your primary purpose can be affected by distractions in the shot. Think carefully about the purpose of the shot. Remove anything that is discordant or will not add value to that purpose or will distract the eye. Take out objects that are too bright, nothing to do with the shot; something that may confuse the purpose of the shot.

3. Work on the brightness: Remember, the normal lights in a room will probably have a colour cast which will have an impact on the overall colour. If possible use daylight adjusted lights or off camera flash units. Use the flashes to light up specific areas of the room. Highlights like that add to the atmosphere in a room. Be consistent with the natural lighting and any artificial lights that may be in evidence as permanent fittings so the lighting does not look out of place. If you only have the on-camera flash make sure you have it set to a sufficient power to light the whole room. Arrange the furniture so that the light coming from the camera does not leave harsh shadows on the floor in front of you. Flash is inclined to leave such shadows which make the room look very angular and uncomfortable. Rooms that have soft, bright and well lit aspects are more welcoming and give an air of comfort.

4. Windows and doors: These are important parts of a room. Depending on your purpose you may need to show them. If they are looking out onto a bright exterior, or directly to the outside you may have a problem. The outside is quite likely to be much brighter than inside. More than two stops of brightness will almost certainly burn out. This creates a very bright white area of the shot. That’s very distracting. It will take the viewers eye straight away from the subject. One way to counter-act that is to raise the internal light levels so the contrast from inside to out is not so large. That will probably require some additional flash units or other lighting around the room. Alternatively, you could lower the incoming light by closing curtains or the door. However, you light the room remember to use the appropriate white balance settings on your camera. Colour casts can spoil the shot. It is also better to shoot in RAW so you can adjust the colour balance in post processing.

5. Straight lines and verticals: Rooms and interior spaces often look odd in pictures because the straight lines are not straight and the verticals are converging. You must prevent this if your purpose for the shot is to make the room look normal. Use a lens that minimises distortion and set your camera on a level for the shot so it minimises convergence in the upright lines. If you are unable to prevent the lines from bending or converging then make sure you can straighten them in an editing application in post processing. Of course if you are making this photograph for artistic reasons, anything goes.

Langley Library

Use furniture to give the impression of depth.
Place pieces so they look like there is a succession into the depth of the room.

6. Impart depth to the room: Taking just any old shot you will find that the room often looks flat, or lacking in depth. The effect of zoom lenses and maybe an on-camera flash will exaggerate that effect. You can do three things to off-set that effect…

  • Use lines in the room to give the impact of depth as they trend away from you (eg. the table in the top shot above).
  • Create a foreground, mid-ground and far point of the room. Taking a shot with a piece of furniture directly in front of you, something mid-way into the room and something on the far wall will do the trick.
  • Strategic placement of lights down the length of the room will draw the eye down the room too.

7. Adjust comfort levels to suite your purpose for the shot: Every room has what I call a comfort level. It the room is cold and uninviting the comfort level is low. If you intend your room to look like a medical clinic then find ways to give it a low comfort level. Harsh lights, angular furniture, sparse layout… anything that will make it look uncomfortable.

If you want to sell a new home to a home-loving family then you need to raise the comfort level in the room. Soft lights, soft furnishings, rounded corners, bright and inviting cushions… these things help people to feel comfortable. Your pictures should reflect the reason you are taking the picture.

8. Use appropriate lenses: Different lenses have different effects. If you use wide angle lenses they will distort the long dimensions. Use it in portrait view and the lens will appear to make the room look high. If you use a wide angle lens down the length of the room it will make it look long and thin. If you use a zoom lens it will have the effect of foreshortening the room. A 50mm lens will tend to show the room much as the eye would see it. Every room or interior space is going to be interpreted in different ways. The best guidance is to look for a lens that will best exaggerate sizes, or complement dimensions to suit your stated purpose for the shot.

9. People: The inclusion of people in a room can be either a good or bad thing. It all depends on how you want to portray the space and the purpose of the shot. In an entertainment space lots of people enjoying themselves will make the shot good. In a warm, homely room one or two people chilling out and enjoying the comforts will also sell the shot. On the other hand, a record shot should really be about the room, factual and un-distracted.

If it is solely the room you intend to show then it is probably better not to include people.If you do include people then make sure it complements the purpose for the shot.

Interiors are satisfying to photograph

There may be lots of reasons to take pictures of rooms, but that makes it important that you think about what you are trying to portray. If you have a clear purpose for the shot then you can match the layout, furnishings, lighting etc to meet the purpose you have set. Think about layout, depth and finishings. Think about people. There is a lot to consider. However, interior shots can be very satisfying indeed. Practice makes perfect, so work on the points above.

find out more...Photokonnexion tips by email
If you enjoyed this article please sign up for our
daily email service.
                                                 Find out more
#11030#

By Damon Guy (author and Photokonnexion editor)

Damon Guy - Netkonnexion

Damon Guy (Netkonnexion)

Damon is a writer-photog and editor of this site. He has run some major websites, a computing department and a digital image library. He started out as a trained teacher and now runs training for digital photographers.
See also: Editors ‘Bio’.

The Zen of photographing collections

Collections of things are fun and easy to photograph. Everyone loves a collection.

Collections of things are fun and easy to photograph. Everyone loves a collection.
Click image to view large. “Pencils” By Netkonnexion on Flickr External link - opens new tab/page

Collections are everywhere

For some reason us humans love them! So taking photos of collections seems natural. The shots pull viewers in. They are easy to photograph too. In this post we’ll get you started on this fun photographic frolic!

First, what is a collection? Simply a number of items in the same category. Pencils; pens and pencils; crayons or all three are different collections of things in the same category. If there is a common theme mixing things it’s fine. Or, you can have all the same objects in your collection. Normally I find a large number of items is best. That is helpful to cover a whole frame of your shot, and it also gives you scope to vary the way they are laid out.

Organised collections

Organised collections are those that show a neat arrangement. Of course this can be a bit boring. So lovely arrangements really help here. There is plenty of scope to develop your artistic talents. Here is a series of photographs that have both beauty and organisation, but a limited range of the collected items: Thousands of suspended buttons made as common objects External link - opens new tab/page.

There are so many beautiful photographs of pencils in neat arrangements online. Here is a link with image ideas… Collections of pencil photographs on Google ImagesExternal link - opens new tab/page. It is worth trying out a few to see how you get on.

Pencils are particularly fun to photograph. They make great arrangements and have wonderful colours.

Pencils are particularly fun to photograph. They make great arrangements and have wonderful colours.
Click image to view large. “Arrangement” By Netkonnexion on Flickr External link - opens new tab/page

Both of my pencil photographs here are carefully arranged to be “different” in a small way. At the top of the page the pencils are arranged so some are pointing out, and some point in. It’s just added interest. Can you spot the one difference in the picture “Arrangement”? The idea with a neat collection is to introduce a random element to capture the imagination of your viewer. Or to raise questions in their mind. That way they are pulled into the shot and become absorbed. Then your picture has succeeded.

Disordered collections

There is even more potential for disordered collections than with ordered ones. Wow! Think pebbles on the beach. An infinite variety of arrangements right before your eyes. However, this can trip you up. What do you look at or photograph first?

The first principle is to look for something that you think is interesting. Look around for a while and find some pebbles that are brightly coloured or that have particularly good markings. Then you can assemble them as if that was the way you found them.

I have often found that you can find something completely different to break up the pattern. Then the pebbles become a background. I have on different occasions in the past introduced seaweed, a leaf, a small piece of driftwood… you get the idea. The one-off object placed in your collection relives the monotony and highlights the collection at the same time.

Of course disordered collections can have ordered elements to relieve the monotony. In the image below I introduced a little pattern. It may not be immediately obvious. But the idea is that the pattern comes out after a short time looking at the picture. The viewer is pulled in while trying to establish order – then suddenly finds it.

"Stones and Shell" - creating order out of chaos

“Stones and Shell” – creating order out of chaos
Click image to view large.
“Stones and Shell” By Netkonnexion on Flickr External link - opens new tab/page


Disordered collections are quite fun when you have multi-coloured items and only a few. I have seen some great cotton reel shots. Brightly coloured stationary items are fun too – I love paper clips. Those make great backgrounds for all sorts of purposes. I have taken drawing pins, buttons, polished stones… all sorts of collections.

I have shown many collections in exhibitions and competition too. They always attract attention. It often depends on the way they are photographed of course. In various situations the importance of light comes to the fore. This next photograph was taken for a client. The subject matter is perhaps not the most inviting. However, the interesting shapes, shallow depth of field and the moody light changes the “clinical” to the “interesting”. The shallow incidence of soft light also helps define the shapes which might otherwise have been lost in a full high key lighting situation.

"Medical lancets" - shallow depth of field and moody light softens the appearance of the collection.

“Medical lancets” – shallow depth of field and moody light softens the appearance of the collection.
Click image to view large.
“Medical lancets” By Netkonnexion on Flickr External link - opens new tab/page


Over the years I have had a great deal of fun working with collections and creating shots. They provide plenty of interest for the eye and can involve great colour, geometry, pattern, chaos, form and shape. Have a go – you will find collections are very stimulating subjects. And, the endless variety offers so many photo opportunities.

Hobby collections

There is a great deal to be said about hobby collections. Each item in such a collection is prized and valued. Displays and lighting are a special part of the presentation and the actual photography. So I am not going to tackle this subject in this post. It is an involved and deep subject which relies on the particular hobby. However, it is worth mentioning that often photographs of hobby collections are about taking a record shot. In the links below I have put some links relating to hobby collections that may be worth you following up.

Damon Guy - Netkonnexion

Damon Guy (Netkonnexion)

Damon is a writer-photographer and editor of this site. He has also run some major websites, a computing department and a digital image library. He started out as a trained teacher and now runs training for digital photogs.
See also: Editors ‘Bio’.
By Damon Guy see his profile on Google+.

The mistake we make with holiday photography

"The Brave". A tribute to the American Soldiers who landed on Omaha Beach on June 6th 1944.

“The Brave”. A tribute to the American Soldiers who landed on Omaha Beach on June 6th 1944. A brilliant recognition of the sacrifice.
(Sculpture by Anilore Banon, St. Laurent-sur-Mer, Normandy).

Record shot or a family holiday moment?

I love the lines and drama of this sculpture. It is a tribute to the great sacrifice made by so many on Omaha Beach in Normandy, France. It is, as a sculpture, invested with energy and power. It lifts the feelings and at the same time reminds us of darker moments in history.

Is it a fitting reminder of a family holiday? No, I think it is a photographers reminder of a wonderful sculpture. It’s a record shot.

Of records and tourist spots

Whatever you are photographing it’s fine to make a record shot. It reminds us that the subject has a character of its own. We see it in an uncomplicated and straight forward way. It is a pure record.

A sculpture like this, however poignant, is a reminder that we live our lives in places of great significance. Yet, as a photograph it does not come alive. In the same way, many postcards are records of a tourist attraction. They are not your experience of the scene. Why take pictures that are like postcards? Will they really remind you of your experience?

Of people and places

Everyone wants a photographic record of ‘being there’. Yet, most of these shots are a cliche. Google lists more than twenty five million images about the Eiffel Tower. Most of them are, well, the Eiffel Tower. Everyone who goes to the French capital takes a shot of it. You’ve just gotta do it!

While there, look out for different, unusual, bizarre and the odd angles. Have you ever seen a shot of the big rivets in the steel-work of the Eiffel Tower? What about the people who are there around you? They have a story to tell and you can show the location too.

Sit down for a while in these places. See what is going on. Wait for a story to unfold. Capture the old lady reading a newspaper on the pedestal of the monument. Snatch an image of the lovers kissing at the flower stall beside an iconic statue. Look at life and actions around you and invest the image with that life. You will remember the sights, sounds, smells and stories of the moment. See the attraction, but, picture the experience and people sharing it with you. Capture the local moment, the essence of the place.

Here are some sorts of things to think about putting in an image when in a tourist spot…

  • The restaurant where you had lunch.
  • Strong fishy smells from the market in the port.
  • A family playing games outside their home in the old town.
  • Condensation on the glass of a drink you had.
  • A crying lady on the steps of the Taj Mahal.
  • Peeling paint on an old building in Venice.
  • A local food you enjoyed.
  • A puddle reflecting street lights in the town square.
  • Character and integrity in the face of a devout worshiper.
  • Street performers doing something extraordinary.

Show something that makes a memory out of your visit. At the same time show the location. Enjoy!

Photographing Signs. They Are All Sorts of Fun!

Signs can be humerous - they can do many other things for our photography too.

Signs can be humerous - they can do many other things for our photography too.

There are many reasons to take photographs of signs

Sometimes it is the ordinary and everyday things that provide us with the most fun, the most information, and something to identify with. Here are a few reasons you should look out for signs on your photo-shoots.

  • Humour – lots of fun!
    There are literally millions of funny signs around the world. Try a search of Google about funny signs and you will be laughing for hours. I have managed to grab a few fun shots of signs over the years. This one above has given me lasting smiles. Keep on the look out. You will see some of the most extraordinary mess-ups if you look at hand-made signs. Sometimes quite serious ones bring a smile too.
  • Orientation – know where your shots were taken…
    Often, particularly in out-of-the-way places it is not always easy to get an idea of where you are. If you take a shot of a lovely landscape you want to remember where it was. Sometimes the nearest road sign is a great help. You don’t need to show it to anyone or to do anything special with the picture. Keep it. One day it will remind you of where you took that landscape and you can tell your friends where to go to find it.
  • Sense of place – helps give a feeling of where you were…
    Travel photography can be surprisingly stressful. You are on the run all the time; trying to make the best of your holiday/trip. Stopping to take snaps is great fun, but where were you when you took that one of the man holding a six foot red banana? Very bizarre – yet so absorbed in the moment you forgot to take note of where it was and what sort of place it was. Taking a quick snap of a few signs or local shops can be a great help. Your pictures remind you of the place and the character of the surroundings. It does not need to be road signs – shops sign, location or building signs, even schools, hotels and other places that can identify and convey a sense of the local character. One day you will look back and remember in much more detail the character of the place.
  • Direction – signs help you to know where you were looking…
    Looking in one direction or another is important. When you are trying to orientate a shot to the direction you were shooting, road signs with arrows are particularly useful.
  • A way to remember – your adventures geo-tagged…
    Having fun in a restaurant on your holiday? Take a picture of the menu, take a picture of the shop front. Best of all take a picture of a road sign from inside the building looking out. You will never forget where it was, and the fun of doing these quick shots will also help you to fix the adventure in your mind. Issues of the moment are often what makes a memory vivid.
  • Memorable places – the sign reminds you of a visit…
    I once went to see the Leonardo Da Vinci’ house in central France. Outside was a wonderful sign. It was quite lengthy, explaining the museum and the exhibits found inside. I took lots of photos of the museum and its exhibits. When I got outside and read the sign it was hilarious. The translation was awful – so awful it was hugely funny. I took a shot for the humour, and because it reminded me of what I saw inside. Unfortunately the camera was stolen before I took the film out. That was 30 years ago and I still regret not having that shot! What a fine summary of the days memories it would have made today.
  • Conveying local culture – signs tell you what sort of place you visited…
    Signs tell you a surprising amount about the local culture. Building signs can be quite a cultural clue. The grandness of a sign sets the tone for what is inside. The language, font or characters can be quite illuminating or interesting. Sometimes they make great photos in their own right. Especially shops with a bit of character or interest. They can really say something about the place you are in, and what you see there. It is also interesting to see how many signs there are in a place. Sometimes the presence of lots of signs tells you about the activities. Markets and high streets in developed countries are often quite regulated. Signs are not allowed to become too obtrusive. In underdeveloped countries this is not true. The signs in the main shopping district can be a riot of colour, fonts, shapes, sizes, placement, pictures… you name it. Everyone is trying to get a message out over everyone else. These sorts of shots make for a fun view of a frenetic area and tell your viewer about its character and tone of life there.
  • Reminders of exhibits you have photographed…
    My son taught me this one. When he goes to a museum he photographs the info-sign next to every exhibit which takes his interest. I don’t go that far. However, when I am photographing aeroplanes at air museums (an interest of mine) I take a picture of the info-sign for any plane I photograph. Then I have a record shot of what I have seen. It just serves as a memory jogger for the picture and its contents. Beware you do not use the photo however, you might be infringing copyright.

As you can see, signs provide more than basic information. They are also about a place. They provide an inside guide as well as a pointer on where to go… and they are fun. Enjoy!

Netkonnexion

Damon Guy (Netkonnexion)

Damon is managing editor of Photokonnexion.com with professional experience in photography, writing, image libraries, and computing. He is also an experienced, webmaster and a trained teacher. Damon runs regular training for digital photographers who are just starting out.
See also: Editors ‘Bio’
By Damon Guy :: Profile on Google+