Tag Archives: selling

The Zen of photographing collections

Collections of things are fun and easy to photograph. Everyone loves a collection.

Collections of things are fun and easy to photograph. Everyone loves a collection.
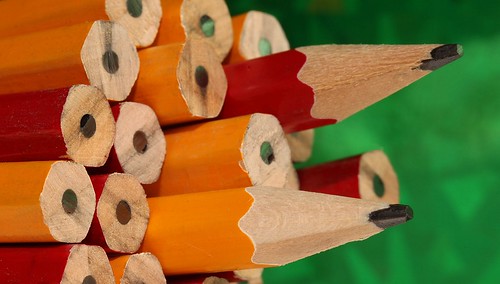
Click image to view large. “Pencils” By Netkonnexion on Flickr External link - opens new tab/page

Collections are everywhere

For some reason us humans love them! So taking photos of collections seems natural. The shots pull viewers in. They are easy to photograph too. In this post we’ll get you started on this fun photographic frolic!

First, what is a collection? Simply a number of items in the same category. Pencils; pens and pencils; crayons or all three are different collections of things in the same category. If there is a common theme mixing things it’s fine. Or, you can have all the same objects in your collection. Normally I find a large number of items is best. That is helpful to cover a whole frame of your shot, and it also gives you scope to vary the way they are laid out.

Organised collections

Organised collections are those that show a neat arrangement. Of course this can be a bit boring. So lovely arrangements really help here. There is plenty of scope to develop your artistic talents. Here is a series of photographs that have both beauty and organisation, but a limited range of the collected items: Thousands of suspended buttons made as common objects External link - opens new tab/page.

There are so many beautiful photographs of pencils in neat arrangements online. Here is a link with image ideas… Collections of pencil photographs on Google ImagesExternal link - opens new tab/page. It is worth trying out a few to see how you get on.
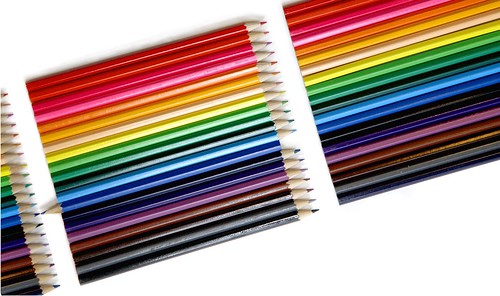
Pencils are particularly fun to photograph. They make great arrangements and have wonderful colours.

Pencils are particularly fun to photograph. They make great arrangements and have wonderful colours.
Click image to view large. “Arrangement” By Netkonnexion on Flickr External link - opens new tab/page

Both of my pencil photographs here are carefully arranged to be “different” in a small way. At the top of the page the pencils are arranged so some are pointing out, and some point in. It’s just added interest. Can you spot the one difference in the picture “Arrangement”? The idea with a neat collection is to introduce a random element to capture the imagination of your viewer. Or to raise questions in their mind. That way they are pulled into the shot and become absorbed. Then your picture has succeeded.

Disordered collections

There is even more potential for disordered collections than with ordered ones. Wow! Think pebbles on the beach. An infinite variety of arrangements right before your eyes. However, this can trip you up. What do you look at or photograph first?

The first principle is to look for something that you think is interesting. Look around for a while and find some pebbles that are brightly coloured or that have particularly good markings. Then you can assemble them as if that was the way you found them.

I have often found that you can find something completely different to break up the pattern. Then the pebbles become a background. I have on different occasions in the past introduced seaweed, a leaf, a small piece of driftwood… you get the idea. The one-off object placed in your collection relives the monotony and highlights the collection at the same time.

Of course disordered collections can have ordered elements to relieve the monotony. In the image below I introduced a little pattern. It may not be immediately obvious. But the idea is that the pattern comes out after a short time looking at the picture. The viewer is pulled in while trying to establish order – then suddenly finds it.
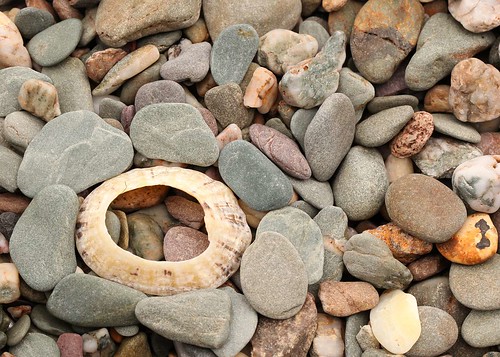
"Stones and Shell" - creating order out of chaos

“Stones and Shell” – creating order out of chaos
Click image to view large.
“Stones and Shell” By Netkonnexion on Flickr External link - opens new tab/page


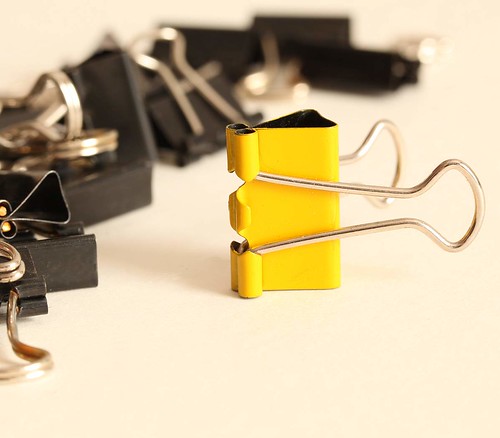
Disordered collections are quite fun when you have multi-coloured items and only a few. I have seen some great cotton reel shots. Brightly coloured stationary items are fun too – I love paper clips. Those make great backgrounds for all sorts of purposes. I have taken drawing pins, buttons, polished stones… all sorts of collections.

I have shown many collections in exhibitions and competition too. They always attract attention. It often depends on the way they are photographed of course. In various situations the importance of light comes to the fore. This next photograph was taken for a client. The subject matter is perhaps not the most inviting. However, the interesting shapes, shallow depth of field and the moody light changes the “clinical” to the “interesting”. The shallow incidence of soft light also helps define the shapes which might otherwise have been lost in a full high key lighting situation.
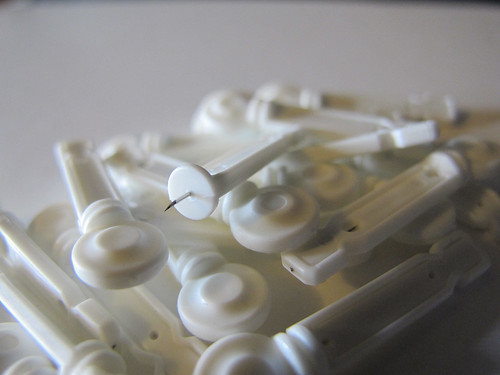
"Medical lancets" - shallow depth of field and moody light softens the appearance of the collection.

“Medical lancets” – shallow depth of field and moody light softens the appearance of the collection.
Click image to view large.
“Medical lancets” By Netkonnexion on Flickr External link - opens new tab/page


Over the years I have had a great deal of fun working with collections and creating shots. They provide plenty of interest for the eye and can involve great colour, geometry, pattern, chaos, form and shape. Have a go – you will find collections are very stimulating subjects. And, the endless variety offers so many photo opportunities.

Hobby collections

There is a great deal to be said about hobby collections. Each item in such a collection is prized and valued. Displays and lighting are a special part of the presentation and the actual photography. So I am not going to tackle this subject in this post. It is an involved and deep subject which relies on the particular hobby. However, it is worth mentioning that often photographs of hobby collections are about taking a record shot. In the links below I have put some links relating to hobby collections that may be worth you following up.

Damon Guy - Netkonnexion

Damon Guy (Netkonnexion)

Damon is a writer-photographer and editor of this site. He has also run some major websites, a computing department and a digital image library. He started out as a trained teacher and now runs training for digital photogs.
See also: Editors ‘Bio’.
By Damon Guy see his profile on Google+.

Photography Tips to Improve Your Online Selling…

Online selling? Make your product shots interesting

Selling online? Make your product shots clean, interesting and good looking.
Click to view large.

Online selling? Better sales – great looking products

Selling online is about getting your product noticed. Nobody will pay top dollar for your product when others look better? A great photo is essential to your sale. Here are some questions to ask yourself. Does your product photo…

  • Look great?
  • Look clean?
  • Show everything important?
  • Show the product is in great condition?
  • Represent the true colour?
  • Show only the product?

Make your buyer think, “Yes, I want THAT one”! If lots of people want it then you can get a high price. If your photograph is dull, cluttered, dirty and with poor colour… forget it. Someone else will make the sale. Here are a few tips to help you get your online selling product looking good.

Photographic background for online selling

Make sure that your background is looking good when online selling. White is a colour that looks crisp, clean and bright. It can lift the mood of your shot immediately. It is also a neutral colour so it goes well with most others. It will not clash with your product and will look great.

You can buy large white card sheets cheaply from a local art or stationery suppliers. Look after it and you can use it hundreds of times for your online selling backgrounds. You might also try this technique for white backgrounds… Simple photography in the bath – high key shots.

Use a card bent in the middle so you can see it below and behind the product. Or, use two boards jointed with white tape to hide the join. This gives the feeling of infinite white space around your product. Clean crisp white to infinity in your image is a great way to display a product for online selling. Online catalogues use this technique a lot.

For very brightly coloured or white products, use another neutral colour. Off-white, cream or black cards are great as backgrounds. They will not distract buyers from your product. Black is good for focusing the attention on the subject. Cream is a slight contrast from yellows or very bright colours. Make sure your colours and background are sympathetic to the subject. If they clash your online selling will bomb.

Distractions…

Make sure there is only your product in view. Other items are a distraction for the buyer. They will wonder why it is there and what it has to do with the sale. Online selling relies on your product being the centre of attention. Simplify the scene as much as possible. Present the product as a centerpiece.

Make your online selling products interesting

Try to present the product in an interesting way. If there are multiple items in the product you can arrange them artistically. If you have only one item take it from an interesting angle. Try to think how most people look at the object and take the shot from a different viewpoint. If you normally look down on an object, look at it from below. If you normally see it from the side take it from above and so on. If someone sees the shot from a different view they will often spend more time looking at it. That is when you will be most likely to make a sale.

Warning: Check your photo for unexpected reflections or body parts. Many Internet joke sites have unfortunate pictures of people who did not notice dodgy additions to the shot!

 
• eBay Photography the Smart Way •
Creating Great Product Pictures that Will Attract Higher Bids and Sell Your Items Faster.
It stands to reason that you should present a product well. Nobody will buy awful looking products. Great sales rely on a great looking product. It’s quite easy to improve your skills.

This book will help you to get to grips with making your product look outstanding.   • eBay Photography the Smart Way •


Show the product in full

Consider if you need more than one view of your product. Some sites allow you to have several photos. Try to capture it from all sides without too many shots or you can cause indecision. With one picture, shoot from the best side so it presents well.Online selling pays off if you spend a little time presenting it in full and from the best angle.

Bring out all the good points. Product marketing aims for the ‘unique selling points’ of a product – the reasons why people want to buy it. So ensure you have these in the photo if possible. If not, write about it in your posting.

If there are accessories, additional products or extra items included, think carefully how to photograph them. Consider just listing them with the product on your advert. Extra photographs of something which is not the main product may weaken your message.

Lighting the shot for online selling

If using images straight from your camera beware of light casts. Indoors tungsten bulbs and fluorescent lights can strongly colour the scene. Choose the ‘Tungsten’ or ‘fluorescent’ setting in your ‘White balance’ menu. This will off-set the colour cast. You will get a more realistic colour.

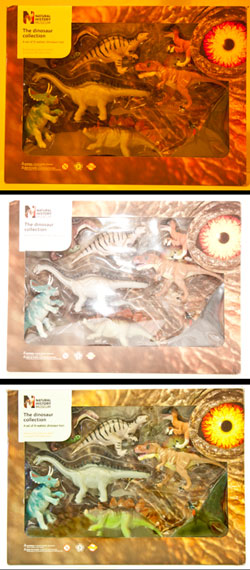
If you get the lighting right your product will be much more likely to sell

The right lighting will help you sell your project.

Top: Underexposed, dim light with a tungsten colour cast - unappealing.

Middle: Nasty highlights, too bright, reflections, washed out colour - distracted buyer.

Bottom: Diffused light, proper camera settings - An attractive product.
.

The important part of your photograph is the light. Make lighting simple and bright. One diffused light, slightly off from one side is best. Try not to make it a hard light. That will cause harsh shadows and highlights and make it look ugly. Diffuse the light as much as you can so it is a soft light. Hang a piece of white cotton in front of the light, or use some other type of diffusion. This will allow the brightness but keep the shadows soft and flattering to your product. Also try to light your product to avoid unnecessary black spots. If the detail is lost, so is your online selling customer.

Harsh lights and flash both create over-brightness which is ugly and distracting. It puts customers off. Most people use flash – it’s easy and already set up in their camera. Unfortunately, it is often far too bright and harsh, sharpening the shadows and washing out the colours. Many cameras allow you to turn down the flash. Look through the menus for the flash control. If you are close to the product for the photo then the lowest setting is probably fine.

You may also need to diffuse the flash. You can put tissue paper over the flash panel and tape it on. Alternatively you can deflect the flash or point it at a wall/ceiling so the light is bounced around the room. This gives a nice even and diffused light.

If you used bounced light for your online selling photographs, be careful about coloured walls. They can cause colour casts. This leaves your product looking odd coloured and unattractive.

Look out for nasty highlights, bright sparkles and bright reflections. They are totally distracting and will put off potential buyers. Find a way to light your product to get rid of them. Good online selling requires your customer to like the product and not be distracted by the photography!

Taking the shot

Here is a quick checklist…

  • Make sure the whole object is properly in focus.
  • For maximum sharpness use a tripod – very important.
  • Make sure the product is spotless – really work on cleanliness.
  • Set white balance and lighting correctly to get the best colours.
  • Arrange your scene in a pleasing way.
  • Get close to fill the frame to provide the most detail you can.
  • Try not to lop bits off your subject – get it all in the frame.
  • Shoot and re-shoot… get it right.
Finally…
Practice for online selling

Don’t assume you will get it right straight away. Take a shot and look at it very carefully. Re-shoot several times if necessary. Download the shot and look at it on the computer. Be prepared to go back to get it right.

If you are serious about selling things online this is your chance to do it well. The key is good lighting and careful attention to detail. With practice you will get it right quicker, increase your business and have fun with your photography.

Comments, additions, amendments or ideas on this article?
Contact Us or leave a comment at the bottom of the page…

Like this article? Don’t miss the next — sign up for tips by email.

Damon Guy - Netkonnexion

Damon Guy (Netkonnexion)

Damon is a writer-photographer and editor of this site. He has run some major websites, a computing department and a digital image library. He started out as a trained teacher and now runs training for digital photogs.
See also: Editors ‘Bio’.
By Damon Guy see his profile on Google+.