Tag Archives: Diffusion

On-camera flash… advice for taming the beast

Taming on-camera flash

• Taming on-camera flash •
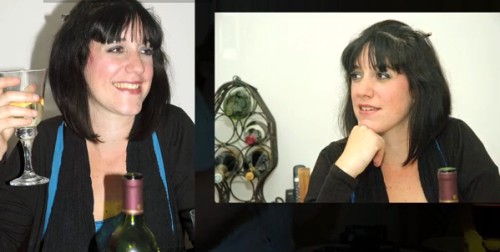
Left: harsh light and highlights are so unflattering!
Right: properly controlled you get proper skin tones and no highlights.
•••••||•••••
On camera flash can be a pretty tough nut to crack – learn how.
(Images taken from the video)

On-camera flash is pretty harsh…

In fact it’s often the source of ruined pictures from otherwise great dinner parties and family events. Dealing with with these little beasts takes a little work. You can make them do you bidding, you just need to know how.

A small powerful light source

The power of the little flash on your camera is misleading. For such a small light it puts out a lot of power. The learner is often caught off-guard. A great scene can be ruined by very unpleasant light, colour leached from faces, shiny reflections on faces and really hard-edged shadows. The whole thing is pretty ugly.

Here is some news. There are ways to control these little beasts and make them do your bidding.

Two of the most useful techniques for dealing with the problems are explained more fully in: Find out more about diffusing your on-camera flash. The other way is to help your flash work better in the room. Use the room itself as a way to bounce light around. Point your flash at a wall or ceiling so the light is reflected everywhere. It will make harsh flash into soft light – make it a more wrap-around light. This is always more flattering and shows the gentle curves of the face much better. It also means the light works its way around the back of the subject reducing harsh shadows cast onto the wall.

Practical use of the on-camera flash

For those quiet evenings where you are chatting with your friends and family here are some easy techniques. You can use your on-camera flash to good effect without the harsh shadows. You can escape the electric shock faces and startled expressions too. Have a look at the video and follow the sage advice of Mike Browne at a dinner party…

Using on-camera Flash Indoors – With Mike Browne


Mike Browne  External link - opens new tab/page

Using the proper tools is best

Let’s face it. On-camera flash is always going to be a bit difficult. As good as it looks in the video controlled results are always going to be difficult from such a little light source. Here is what Mike himself has to say about on-camera flash…

I’d suggest a speedlight is better because you can fit a diffuser and better still, turn the flash head in any direction and bounce the flash off a wall or ceiling.
Mike Browne  External link - opens new tab/page.

Have a look at some off-camera ideas. These are probably the most flexible options for moving your photography forward, especially for small intimate surroundings. Check out these options…

Off camera flash units

Canon Speedlite 430EX II Flash Unit – a great branded flash for general use  External link - opens new tab/page

Nikon SB-600 Speedlight – a great quality mid-range Nikon flash unit  External link - opens new tab/page

Special pick…

This high quality own-brand flash unit performs like branded units but is much more affordable. The unit provides a range of functions as well as being compact, light and robust. Great value for your money. YN560 III 2.4Ghz Wireless Flash Speedlite Support RF-602/603 YN560-III For Canon Nikon Pentax Olympus  External link - opens new tab/page

 
All these units will fire as normal when mounted on the camera. They will require an off-camera flash cord or wireless radio triggers for off-camera flash units  External link - opens new tab/page to connect to the camera when shooting off-camera.

Comments, additions, amendments or ideas on this article? Contact Us
or why not leave a comment at the bottom of the page…

Like this article? Don’t miss the next — sign up for tips by email.

Netkonnexion

Damon Guy (Netkonnexion)

Damon is managing editor of Photokonnexion.com with professional experience in photography, writing, image libraries, and computing. He is also an experienced, webmaster and a trained teacher. Damon runs regular training for digital photographers who are just starting out.
See also: Editors ‘Bio’
By Damon Guy :: Profile on Google+

Save money and improve your scene lighting!

DIY Reflectors, Bouncer, and Absorbers

• DIY Reflectors, Bouncer, and Absorbers •

Professional equipment costs so much!

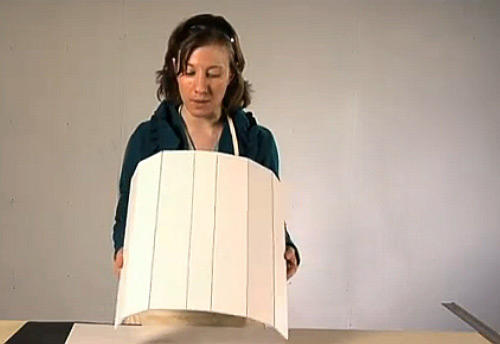
But easily made DIY lighting equipment can do the same as professional light diffusers and absorbers. There is so much you can do to create your own effects. It is pretty easy too. With some simple tools and materials you can have the same outcomes as from a professional studio. The video shows you not only how to make the simple reflectors, bouncers and absorbers, but also shows how they can be used. If you want to get really good with them you will need to practice your photography with them – that is the fun part!

Light reflectors, bouncers and absorbers

The use of flash or studio lights is a great way to light your subjects. However, flash is very harsh and studio lights are often expensive. You can make the reflectors, bouncers and absorbers very cheaply and they can also help adjust the light colour. Bright white board and silver reflectors help to modify the light colour from domestic lights. You may still need to adjust the light balance on your camera, but the reflections will give much more controllable light against the skin tones and clothes of your subject.

Why do we use reflectors and bouncers? These are part of a general class of photography equipment called light modifiers. Anything which changes the light from a light source is a light modifier.

With most lighting situations we have only one main light called the key light. Other lights should not be as strong as the key light. They should also have strength in proportion to the key light. We get that proportion by using reflectors and bouncers to distribute the light around our subject. This ‘fill’ light helps the light on the subject be less harsh. Bounced or reflected light creates soft shadows that wrap around curves and lessen the intensity of darkness in the shadows.

On the other hand absorbers actually cut down the reflections and help the darkness get more intense. This too has its uses. We can make shadows darken and help cut down the effect of light bounced off other things near the subject. The use of absorbers helps define shadows and create darker areas of the scene.

And now to the video…

DIY Ways to Reflect, Bounce, and Absorb Light


Playgallery

Comments, additions, amendments or ideas on this article? Contact Us
or why not leave a comment at the bottom of the page…

A simple lighting technique with lovely light

The mobile phone light... soft and effective.

The mobile phone light… soft and effective.

Table-top photography works with soft light.

When you are doing still life shots you want soft, gentle light. Exposures can be longer so you can create lovely gentle shadow graduations. Your mobile phone provides an excellent light source for this. Here is how it is done.

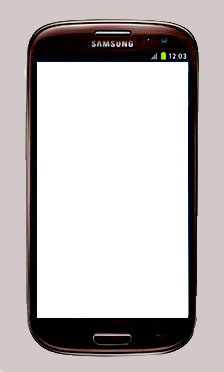
White source image

The basic technique is to put a bright white image onto your mobile screen. When you display it on the mobile screen the illumination produces a white light. This is a wonderful, quite localised soft light for your shot. The steps in detail are…

  • Open your favourite image editor
  • Create a new image (approx size 800 pixels by 600 pixels)
  • Paint it brilliant (pure) white
  • If you are on your computer save the image then upload it to your phone
  • If you are on your mobile phone save the image to a known folder
  • When you want to use the light, display the image on screen

The white image on screen produces enough illumination to create the light you want for your table top image.

Other ways to use your mobile as a light source

Of course many mobiles are also capable cameras in their own right. So here are two other ways to use them:

Photographic light: Lots of mobiles have a “flashlight” app. This will allow you to use the camera flash as a photographic light onto your still life scene. Many on-camera (pop-up flash) flash units are very strong and have a harsh light. The flash on a mobile is often much softer and sometimes is coloured to be a similar colour to daylight (approx 5500 Kelvin). This ‘daylight balance’ is a great light and worth using if you have it. Prop your phone up with the flashlight app activated and start shooting.

Coloured light source: Traditionally coloured light is produced using colour gels. However, some apps on mobile phones can create both a white light or a range of other coloured lights. One such app for example is: Tiny flashlight + LED. This is an app. for Android phones, but there are other apps. for different operating systems. If you cannot find a suitable app. you can produce a colour image like the white one above. Store that on your phone and open the image when you want that colour light.

Versatile

While the light from the screen of your phone might not be very strong, for a long exposure that is not too important. The light is wonderful and soft. As it comes from a wide source it creates lovely wrap-around shadows. These are just great for still life. Other features of phones can help with the lighting for your photography too. So, have a look at your mobile in a new light – see what you think.

By Damon Guy (author and Photokonnexion editor)

Damon Guy - Netkonnexion

Damon Guy (Netkonnexion)

Damon is a writer-photog and editor of this site. He has run some major websites, a computing department and a digital image library. He started out as a trained teacher and now runs training for digital photographers.
See also: Editors ‘Bio’.

Thinking about different types of diffusion and reflection

• Diffusers and reflectors are important tools for using light •

• Diffusers and reflectors are important tools for using light •
Not all diffusers and reflectors are the same. Watch out for the different characteristics.
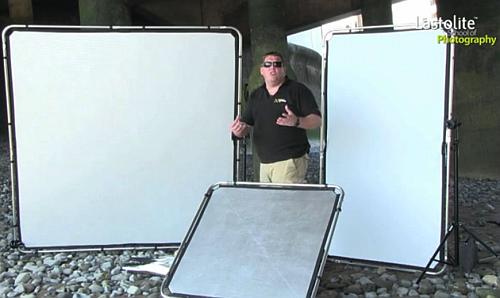
Photograph showing Mark Cleghorn of the Lastolite School of Photography
and three Lastolite reflectors/diffusers from the Skylite Rapid System.

Using light – creative fun…

Many photographers assume light is passive in the scene. I get really excited about working light. You can use two methods, modify or add light. Diffusers and reflectors are powerful modifiers to manipulate light. To add light you can use flash or continuous light sources. I want to expand on modifying light.

Modifying any light

You can use a modifier of any kind to change light and make it illuminate your scene the way you want. Light modifiers can include the use of gels, softboxes, and all manor of diffusers connected directly to the light source. However, reflectors and diffusers can also be free standing. Free-standing diffusers can be used to change the light from a natural source or an artificial one. However, remember that light falls off to a quarter of its intensity each time you double the distance from the source. Using a diffuser at a distance from an artificial source is going to significantly reduce the light intensity compared to using it at the source.

Using free standing diffusers and modifiers

I have previously written about table top still life photography and using modifiers. I mentioned that you can use white card as reflectors to bring light around the back of a table top subject. You can also use diffusers to reduce the natural light from a window. I use net curtains. The point is that actually there are a range of modifiers in you home and other places near at hand. Here are some simple household items I have used…

  • Diffusers: Net curtains, white blinds, paper, tissue paper, greaseproof paper, tracing paper, plastic bottles and containers frosted glass, drinking glasses, acrylic glass, white bed-sheets…
  • Reflectors: white walls, towels, card, silver paper, silvered insulation block, mirrors, white plates, white bed-sheets, white boxes, a slide projection screen, various white materials (cotton, nylon, wool)…

You might ask why I use such a wide range of different things as modifiers. That is a crucial point. Each and every one of those items in the list have different properties. For example reflectors with very course surfaces have very soft reflections indeed – towels are an example. A large sheet of white paper can be used as both a reflector and a diffuser in different ways and it has different properties too. People often don’t realise that light coming through glass is reduced by anything up to 40%. It is also scattered. So plain, see-through glass can actually be used as a diffuser and light reducer – depending on the properties of the glass. Frosted glass is an even better diffuser.

More after this…

find out more...Photokonnexion tips by email
Enjoying this article? Please sign up for our
Tips by email service.
                                                Find out more
#11030#

Most of these different materials and objects can be used by stretching them out, hanging them up or propping them up around or near your subject. All of them have a different impact on the final image. Some of the materials are better for table tops. Others are better for hanging and using for say, portraiture.

It is the properties that count

Modifying light is NOT about buying expensive equipment. While it is nice to have great tools for the job, for the photography enthusiast there are lots of other ways of getting a great result. Amateurs, enthusiasts and beginners alike can benefit from thinking about how the light is changed rather than by which equipment. It is the end result that is important, not the method or equipment used to do it.

Look for different properties and how to use the modifiers

In the video Mark Cleghorn shows us how to use a range of professional diffusers and deflectors. I would like you to think about the different properties of each of them. He shows us silvered ones, a semi-diffuser/reflector and lots of ways to use reflectors. He also makes various points about the way to use both reflectors and diffusers. The different properties have an impact on the shot – including light intensity, colour and reflective type. Overall Mark is showing us a variety of different types of modifying properties and how to use them.

You can use this knowledge to think about the things you have around the house. Once you have used something to modify light a few times you will have a knowledge of the type of light it creates. Then, you can experiment with other objects and materials. After a while you will develop a feel for creating different types of light for your various subjects. Becoming a master of light is about knowing what you can do with the materials at hand.

Using the Skylite Rapid system from Lastolite  External link - opens new tab/page

By Damon Guy (author and Photokonnexion editor)

Damon Guy - Netkonnexion

Damon Guy (Netkonnexion)

Damon is a writer-photog and editor of this site. He has run some major websites, a computing department and a digital image library. He started out as a trained teacher and now runs training for digital photographers.
See also: Editors ‘Bio’.

Can you write? Of course you can!
Write for Photokonnexion...

We would love to have your articles or tips posted on our site.
Find out more…
Write for Photokonnexion.