Category Archives: Post Processing

Any of the activities associated with the processing of the captured photographic or graphic file.

Beginners mistakes and how to overcome them

Beginners mistakes :: We all make them.

Beginners mistakes :: We all make them.

Everyone has to start somewhere

Most aspiring photographers make simple, easily avoidable, mistakes. What’s surprising is how many photographers go on making the same mistakes despite information being freely available. To save you frustration here are the top mistakes I have come across and how to overcome them.

Beginners mistakes :: 1. Buying the first serious camera

Most beginners lack guidance. They look in camera magazines and buy a camera according to a budget. The mistake is to assume a big spend is a better spend. In photography a bigger spend buys more control. Beginners don’t yet know how to control a camera. So more control is just more bewildering and more expensive.

Learning camera control takes a lot of practice. It is like any complex skill. Most modern DSLRs are complex machines. This is true even of the entry level ones. They are complex enough to last the average beginner quite a few years. Even then they will still be learning skills within the capability of the camera. An expensive camera is wasted. It will probably be way beyond the skill level of a beginner. Normally beginners will not even get off ‘auto mode’ for a while. This means that the expensive camera is essentially doing what a point-and-shoot camera will do.

The beginner rarely goes beyond the-point-and shoot skill level without help from more experienced photogs. The background skills needed at the start is a lot to cope with. Here’s what beginners should do to learn quickly and without frustration…
1. Join a club. Learn a little about composition, editing, camera control, light and lenses. Try out things.
2. Produce some fun and interesting pictures.
3. Try out a few cameras from friends.
5. Make friends who know a lot about photography.
6. Ask someone to help them consider a new camera.
With help, the beginner can buy an entry level camera to move to the next stage. They will be more informed. Most important, it will be less bewildering.

Beginners mistakes :: 2. Shooting without understanding the camera

The beginner is often forced to put a complex camera into auto-mode. Lack of experience and knowledge keeps them there. To get off the starting blocks find out what the camera can do. Read the manual. They are pretty dry to read and have few examples. So, dip in and follow up with Internet reading to help you learn.

Beginners mistakes :: 3. Working on your own

Working on your own is disheartening and isolating. At a club you can get and meet kindred spirits. Working with experienced people and other beginners you realise that questions you want to ask, are the same questions everyone needs to know. It boosts confidence and you learn more. Go meet people, share, have fun and learn.

Beginners mistakes :: 4. New gear will solve the problem

People think a new piece of gear will help them improve. A famous modern photographer said,

Gear is good, vision is better.
David DuChemin

And he was right! There is little new in conceptual terms in photography. Most shots can be done with a pretty simple set-up. Piles of expensive equipment do little to improve beginners. New equipment will definitely not sort out your beginners mistakes. You would be better concentrating on the next point…

Beginners mistakes :: 5. Eyes open but not seeing

Photographers realise most people have their eyes open but do not see. Most of what a photographer learns is vision. Colour, light, dark and shadow all define the world. Most people miss this. I did too. I think there are three dimensions of photography. The length of photography is seeing light; the width is distilling simplicity and the height is capturing meaning. To understand image-making one needs to learn vision. You need to know how to think an image out of a scene, create it in the camera. Great images are produced before the shutter button is pushed. A gifted few know these things and can see. For the rest of us we have to learn it by patient study, practice and interaction with those who can do it.

Beginners mistakes :: 6. Shooting *.jpg not RAW

It is an irony, most beginners think that shooting in *.jpg format is easiest. Actually nothing could be further from the truth. The *.jpg format is severely disabled.

When the camera creates a *.jpg file it does a lot of editing according to the manufacturers ideas. Then the camera dumps the data that the image does not need. As a result there is very little editing potential in the file. If you work with the RAW file, the full and original data from the capture, you have a huge editing potential to work with. RAW is also much more true to the original image. Don’t let the camera manufacturer make decisions for you. If your camera can produce RAW files, work with RAW. You will then be able to create images according to your vision. If you can’t make RAW, put that on a list to ensure in your next camera.

Beginners mistakes :: 7. Shooting the wrong resolution

Beginners frequently work with the wrong file resolution. Always shoot with the biggest size and highest file resolution – even if you must work in *.jpg. You will get bigger images and can do more with it. Read your manual and set to the largest, highest resolution image.

Beginners mistakes :: 8. Insufficient memory card space

The largest, highest resolution image will need more memory. However, memory is cheap today. There is little excuse for running out of space. Buy larger memory modules than you think you need. Always have at least one spare. Better still, have more than one spare. Also, memory does develop faults, so keep spares to cover a problem. Check out memory card issues with these articles…
20 Ways to Protect Files on Memory Cards (Part 1) (and then link to part 2).
Memory Card Rotation – play it safe.

Beginners mistakes :: 9. Relying on the LCD screen

The lowest resolution picture your camera makes is on the LCD screen. Making decisions about an image on the basis of such a low resolution image is difficult. Use the screen to see if you captured what you wanted. Don’t delete or edit an image in-camera. You simply cannot tell what you are deleting. And, you cannot even see what you have done wrong. Get all the images home. Then, in comfort and full size you can analyse exactly, and in detail, what you did right or wrong. That is a great learning point. You can also see in proper detail if the image is what you wanted and what editing is needed.

Beginners mistakes :: 10. Deleting Pictures

Most beginners ruthlessly delete images they think are no good. In hindsight most photographers realise that as a beginner you are in no position to make that judgement. Beginners often make bad decisions about images. Decisions which later they would not make. You could easily be deleting your best and not realise it. Keep everything but the worst case no-hopers. Memory is cheap. If they are bad images they are great learning points in the future.

Beginners mistakes :: 11. Not interested in exposure

Most beginners do not understand ‘exposure’. They think the camera does all that stuff! Well, it can do it – that is auto-mode. But, “auto” is the manufacturers attempt at an average job for the light conditions. Learn about exposure. Work toward controlling your own exposures. There is no perfect exposure. There is only the image you want. So create the exposure you intend, instead of the one you wanted. This will allow you to change your pictures into images and your seeing into vision.

Beginners mistakes :: 12. No back up, no safety net

Back up, back up, back up. If your hard-drive fails you will lose everything. Buy two external hard drives. Back up to one every time you download pictures from your camera. Back up to the other as soon as you can. Keep the second one at a different location. This will protect your images against fire and theft at your home. Remember this procedure…

  1. Download your photos from the camera to your hard drive.
  2. Back them up to a second drive.
  3. Now format your memory card in the camera.

I have seen a grown man cry when he downloaded wedding photos, then formatted his memory card. Only then did he find the download did not happen. All the images were destroyed.

Beginners mistakes :: 13. Only one battery

Buy at least one extra battery. They run down, get left uncharged, get dropped and break, or get lost. In cold weather they last for a shorter time. No battery will mean your shoot is ruined. Spend a little extra and cover yourself.

Beginners mistakes :: 14. Not doing editing

If you think your image does not need to be opened in an editor and digitally developed, you are probably shooting *.jpg. In which case the manufacturer has done the developing for you in-camera according to their ideas. Get over it. Photographers always had to develop. What comes out of the camera is an unfinished piece of work. To turn a picture into an image takes your input and finishing.

Beginners mistakes :: 15. Software and hardware is inadequate for the job

Beginners underestimate the power needed to do image processing. They wonder why their computer is so slow. Buy the most powerful hardware and most flexible software you can afford. It will pay you back in speed and quality.

Beginners mistakes :: 16. Use a tripod

A properly used tripod gives you sharp images. Use one every opportunity. If you are serious about photography you will use tripods a lot in the future. Start now and give yourself a head start. Most photographers don’t buy them for years. Then they find they have got really bad habits. Then it takes a lot of time and effort to get past the problem. Buy a proper tripod. They are not cheap. However, they are definitely worth it.

Take your time to understand…

These simple points are those that most beginners will benefit from at the start. A lot to take in. Read this article several times over the next six months and your photography will improve enormously. Enjoy your learning!

Comments, additions, amendments or ideas on this article? Contact Us
or why not leave a comment at the bottom of the page…

Like this article? Don’t miss the next — sign up for tips by email.

Damon Guy - Netkonnexion

Damon Guy (Netkonnexion)

Damon is a writer-photographer and editor of this site. He has run some major websites, a computing department and a digital image library. He started out as a trained teacher and now runs training for digital photogs.
See also: Editors ‘Bio’.
By Damon Guy see his profile on Google+.

Night photography – beautiful images, new ways of seeing

Night image, night introduction.

Taking photos at night is interesting. Photographers normally deal with light. Night photographers deal with the lack of it. Everything is done in minutes, not 100ths seconds. Understanding night photography takes a new approach to dealing with light.

What is it all about?

Instead of working with the instant click-and-capture of light, night photographers manufacture light pools over many minutes. These light pools are often created by simple sweeps of a torch or the use of several lights over several minutes. By sweeping and re-sweeping the light intensifies. The camera picks up a building emphasis of light in the areas of the sweeps. Sweep many times and the final exposure in that sweep radius becomes bright. Lesser areas where the sweeps are few, or the light has just spilled are much darker.

The low light intensity over long times adds up to a full exposure in the lit areas which rapidly falls off to the dark of the surrounding night. This sort of light dark contrast leads to some striking imagery. However, we see things which are unlike our everyday experience. The result is both unworldly and at the same time a fascinating insight to our own world.

The video documents a Night Photography Workshop at Big Bend in West Texas led by photographers Scott Martin and Lance Keimig. In the film the leaders and their students create images of desert places. Some stunning shots are produced in the lights of the night photographers.

The video is six and a half minutes long. And, after the video some news about a forthcoming attraction…

Night Photography: Finding your way in the dark from Mark & Angela Walley on Vimeo. Made by walleyfilms.com

Sparks will fly!

The post on Friday will be a guest post from photographer Steve Maidwell. His website is Imageinnation.com. He is very interested in night photography. The tutorial is about some great night photography effects. Make sure you have time to read that one!

Steve has done a tutorial for us once before. You can find the previous tutorial here: Creating a Fake Smoke Effect. Enjoy!

A fun and easy Halloween trick in post-processing

• Little Fire Devils •

• Little Fire Devils •
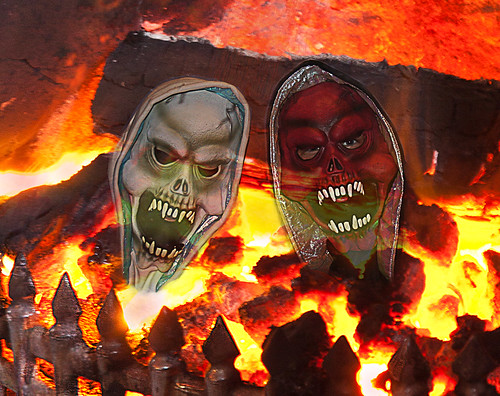
Creating a translucent layer on strong background to make a ghostly image.
Click image to view large.
• Little Fire Devils • By Netkonnexion on Flickr External link - opens new tab/page

Some fun with Halloween pictures.

If you have captured some Halloween partying, or your kids loved their costumes, you can easily create some Halloween fun in post-processing. With a few ideas you can use this technique to create all sorts of ghostly images.

What you need

To do this post processing work you will need two photographs. One will be the character(s) you have photographed, which you will make into ghosts. In the picture above you see the face masks my kids were wearing. If you have more than one photo with multiple characters you can do that too. You will need to add the characters separately. I will show you how below.

The second photograph will need to be the layer you are going to use as a background. I chose to use an old picture of a domestic fireplace fully ablaze. If you want to create a fire background from scratch have a look at: How to take quick and easy photographs of fire.

There is a summary of all the steps at the end of this post. You will be able to see what you have done there. Or, you could refer to it as a way of getting an overview.

Although I will be using Photoshop in this tutorial, you can use other editing applications. I know you can do this in Elements, Paintshop, GIMP and others. Check your editor and see if it has layers and blending options. If it does, you can follow this tutorial.

How you do it

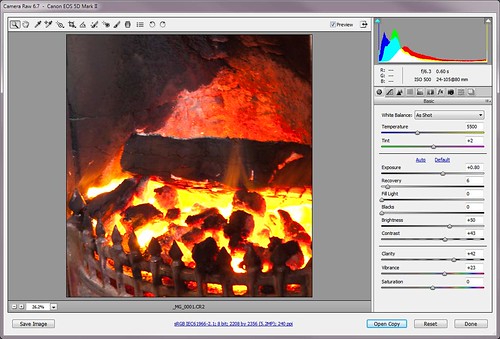
1. Open the background image in Photoshop, or your favourite image editor [Image one].

Opening the RAW image in Photoshop

Opening the RAW image in Photoshop – if your image is a *.jpg it will open directly in the editing window. • Image one

2. You will notice that there is a layer in the layers pallet. Open the layers pallet now if it is not already open (press F7 in Photoshop [Ps]). It is good practice to open a new layer. Make sure the layer is selected, then right click it and select ‘Duplicate Layer’. Now you have a working layer to do the edits in. You also have a copy of the original layer to fall back on. You will not do any work in the original layer. If you make a mistake you can delete all the other layers and start again with the original untouched layer.

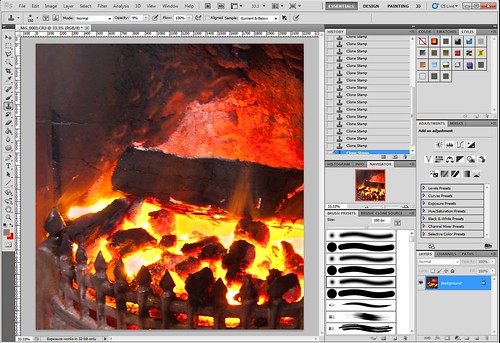
3. Using your working layer, now is the time to do any editing on the background should it be needed. I simply cropped the image ready to start working. The idea of any editing is to provide a good backdrop for your characters when they are pasted into the picture [Image two].

The fully open image in the editing window of Photoshop

The fully open image in the editing window of Photoshop. You can see the layers pallet open with one layer (bottom right hand corner). Create another layer to work on so your original will be there as a fall-back • Image two.

4. Next we will work on the characters themselves. Open the image(s) of your characters so you will now have two images open in Ps. You may have more than two if you are using lots of characters.

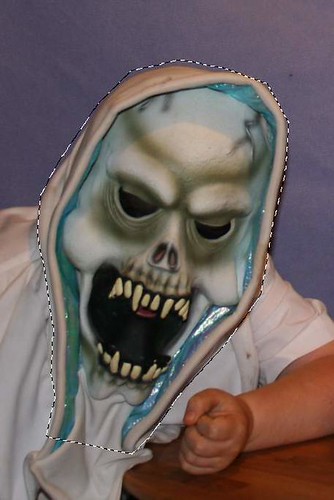
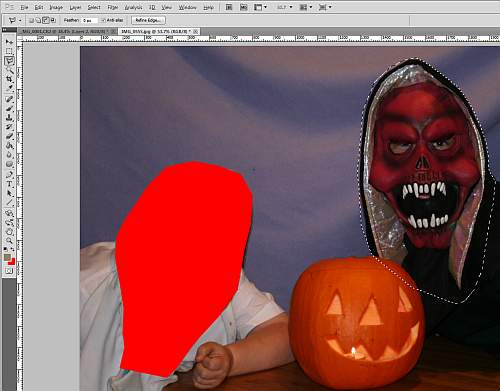
5. Now you need to cut out the characters. In photoshop this is done using the polygonal lasso tool. You can see where I have used the tool to draw round the character. I have not bothered to be very accurate because the background will fade out of sight in the end picture. If your background is more critical take more care. [Image three]

One of the characters is highlighted with 'marching ants' using the lasso tool.

One of the characters is highlighted with ‘marching ants’ using the lasso tool. Next ‘cut’ the character out and paste it into the background image. • Image three .

6. Now you can cut the face out (edit; cut or control+X). Moving into your background image paste the cut segment into your background image (Edit/Paste).

Once the cut segment is pasted in you can move it onto position.

Once the cut segment is pasted in you can move it onto position. • Image four.

7.You will notice a new layer has appeared in the Layer pallet. Make sure the new layer is selected. Now select the Move tool (press v or click the tool in the tools pallet). By clicking on the pasted character you can slide it around the image to where you want it.

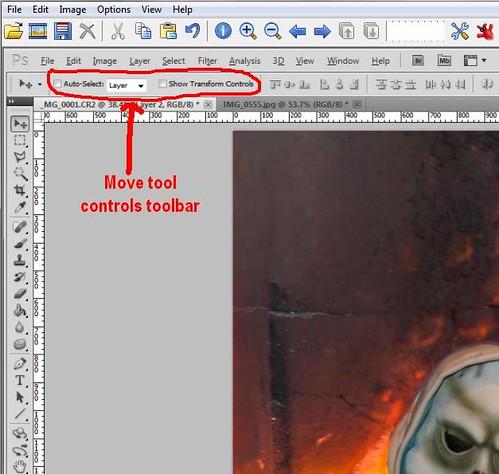
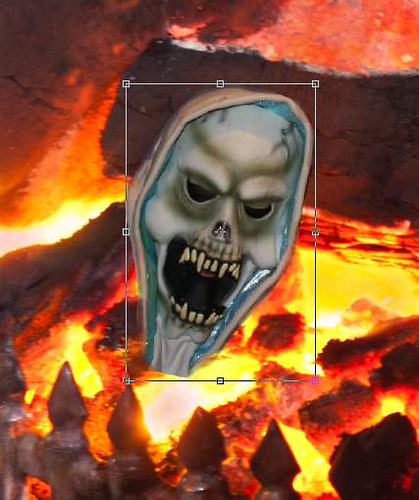
8. You currently have the Move tool open. You will see there is a tool bar showing you the parameters of the open tool [Image four]. Tick in the “Show Transform Tools” box. This gives you the ability to resize the image to make it suitable for the background image [Image five]. You can see the transform lines with corner and mid-line nodes. By holding down the shift button AND pulling/pushing one node you can resize the pasted-in character to your satisfaction. Holding down the shift key keeps the characters side-to-side ratio linked. If you don’t hold the shift key the character will go out of shape. While you are resizing, the tool bar shows accurate measurements of your movements. When you have the size right press the keyboard enter button. The ‘Transform’ controls return to the tool bar. Turn them off now by un-clicking them.

The 'Transform Controls' allow you to resize the image to suit the background.

The ‘Transform Controls’ allow you to resize the image to suit the background. • • Image five .

9. In my image, the rough edges of the character needed to be made slightly translucent to blend them into the background. I selected the Erase Tool (press e or select it from the tool pallet). Then in the toolbar I changed its setting to “20% Opacity”. This means it erases things by 80%, leaving only a remnant of the edges. Then I gently painted around the edges to make them blend into the background as they go translucent.

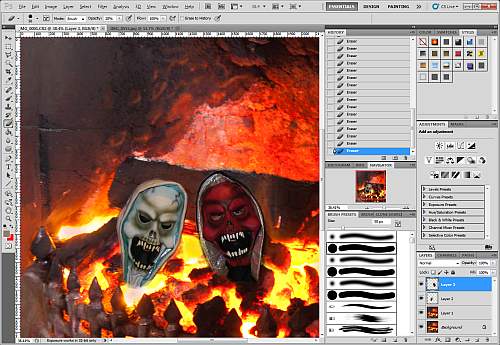
10. Now I repeated the above process. I cut and pasted with my second character. Then I set it place as well as dimming the edges [Image six].

Now you can repeat the process and cut out other characters you want to include.

Now you can repeat the process and cut out other characters you want to include. The picture shows the first character has gone and the second character has been selected using the lasso tool ready to cut out. • Image six

11. Once the character(s) are pasted and treated so the edges are dimmed [Image seven] we can now do the really fun part!

The characters pasted into the background image, resized and treated on the edges.

The characters pasted into the background image, resized and treated on the edges. I have pasted in two characters. You will notice I now have four layers in the layer pallet (bottom right hand corner). The lowest is the original, untouched layer. The next up is my working background layer. The two above are the characters I have pasted into the edit.
• Image seven.

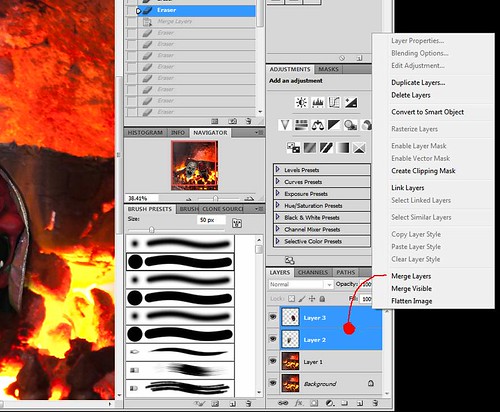
12. I have used two characters pasted in which created two layers. I now want to merge them so I can treat them as one for the next part. In the layers pallet, I select both layers (select one, hold down shift, select the other). Now right-click in the selected blue of the layers. On the menu select Merge Layers [Image eight].
If you look in the Layers pallet [Image eight] you will now see one layer with both my characters merged. If you have only one pasted-in layer you will not need to do this merging part. Click the image to view it in large size.

The two character layers are selected and then right-clicked for a menu. Merge Layers.

The two character layers are selected and then right-clicked for a menu. Merge Layers. Once the character layers are merged we have only three layers.
Click image to view large.
Merged layers (Netkonnexion on Flickr)External link - opens new tab/page • Image eight.

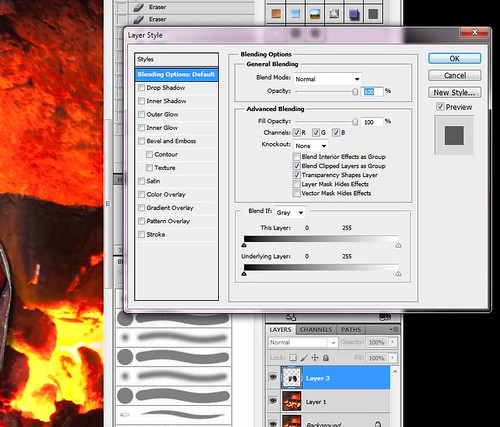
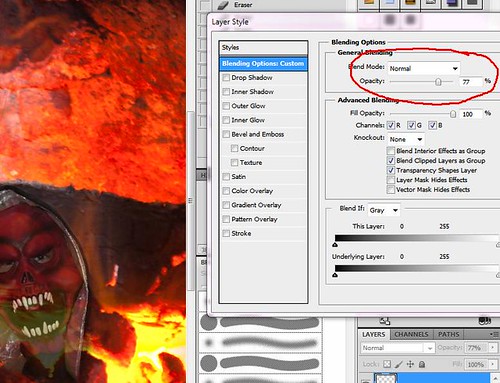
13. Double-click the layer with your characters and a dialogue will open called “Layer Style”. In the “General Blending” box (middle top) [Image Nine] you will see an ‘opacity’ slider. Move that slider back and forward and the layer will go translucent, showing the background layer from behind. Now you have a ghostly effect! I have selected 77% but you might want more or less [Image ten].

Double click the character layer. A 'Layers Style' box will appear.

Double click the character layer. A ‘Layers Style’ box will appear. Adjust the layer so it has a ghostly translucence.
Click image to view large.
The Layer Style Box (Netkonnexion on Flickr) External link - opens new tab/page • Image nine.

The selection of the right 'opacity' sets the ghostliness of the characters.

The selection of the right ‘opacity’ sets the ghostliness of the characters. I have selected 77% – you might select more or less for your image. • Image ten.
Click image to view large.
Blending opacity = 77% (Netkonnexion on Flickr)External link - opens new tab/page • Image ten

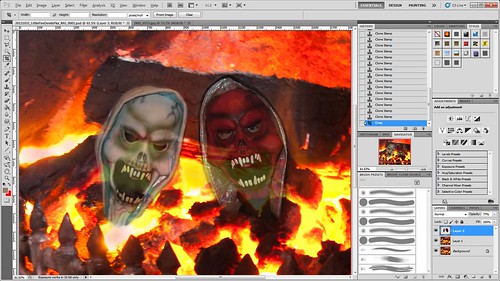
14. Next, I did any a few edits to tidy up the picture ready to save. In my case I just did a little more tidying up of the edges of the characters to remove remaining straight lines I could see. Then did a final crop to size it as I wanted it and saved it [Image eleven].

The final picture ready to save.

The final picture ready to save.
Click image to view large.
The final picture ready to save. (Netkonnexion on Flickr)External link - opens new tab/page

A quick summary
  • In brief you have opened a file as the background.
  • Then you have opened a second file (or more) with a character you want.
  • You have cut out the character.
  • Next you pasted it into the background.
  • You moved and resized the character.
  • You slightly erased edges of the pasted characters to blend into the background.
  • If you need more than one character the cut/paste above is repeated.
  • If you now have more than one character you next merged the layers of characters.
  • The single layer (merged) is now styled to be translucent, slightly showing the layer below for ghostly effect.
  • Finally, you tidied up and saved the file.

These simple steps make it easer to see what has been achieved. As you see it’s not that difficult.

I hope you learnt a lot of ideas for your own blending of layers to make ghostly images.

Ten obvious reasons to change your approach and how to do it

Your photograph is not perfect.

You see good quality photographs every day. Why does your photo not match up to the photographic quality in a publication? What can you do? The answer is simple. You need to look at your overall technique.

Things add up…

Assuming a great idea and composition – what can go wrong? In photography every step of the process counts. The more you get right the better the result.

Professional photographers often repeat a shot tens of times to get it right, sometimes more. They aspire to excellence. Care, dedication, persistence and attention to detail add up to technical quality.

What can go wrong?
  1. Bad lighting: There’s no substitute for suitable, interesting light that’s sympathetic to the subject. If the light is wrong, your shot will not work either.
    Solution: Learn everything about the quality of light, hard light, soft light, the colour of light and the properties of light.
  2. The whole picture is soft: You moved the camera while shooting.
    Solution: Pros use tripods – good ones. They use them fast and efficiently because they practice.
  3. The whole picture is soft: You had to hand-hold the shot.
    Solution: Professionals know how to set up a manual exposure that suits the light. Learn to shoot in manual modes. Know what shutter speed/ISO combinations you can use without movement.
  4. The exposure is too dark/light: Common when learning manual camera control.
    Solution: Use RAW, then you can compensate. With RAW you can deliberately manage your exposure too. There is no ‘perfect exposure’ – there is only the result you want. To get the result you want you have to adjust your exposure. (Hint: you can’t adjust your exposure effectively in *.jpg unless you use exposure compensation).
  5. Colours off: If you are shooting in *.jpg you deserve all you get. The white balance is probably wrong. The manufacturers settings are limited. You can’t fix it in processing. Remember, *.jpg is a RAW file developed in-camera to manufacturers settings, not yours. The settings are applied to your shot blind. No wonder they are not what you want.
    Solution: Get it right. It’s easier to shoot in RAW and develop the shot yourself. It gives you fine control and you can develop your shot work the way you want. Something *.jpg cannot do.
  6. Poor focus: Focus is critical to the right technical and artistic result.
    Solution: Learn about: Depth of Field; aperture, Bokeh, Circle of confusion and how they relate to your lenses. Pros know these things intuitively. You can too with practice.
  7. Poor or soft focus from movement: Focus mode is on the wrong setting.
    Solution: Learn to use the correct focus mode (eg. single shot or continuous etc). Also, learn to focus manually. There are situations where auto-focus is poor (eg. in poor-contrast light). Switch off auto-focus to get better results.
  8. The shot is not sharp: A suspect, poor quality or broken lens.
    Solution: Buy decent lenses. All lenses have sweet and sour spots – even professional ones. Cheap lenses have a poorer optical quality and have more sour than sweet spots.
    Solution: Quality costs money. However, look after a good lens it will last longer than your camera. If you choose right, it’ll fit your next camera. It pays to buy the best quality lens you can afford.
  9. Great lens and tripod! My shot’s still not sharp: Sharpness requires attention to the above and these specific details too…
    Solutions:
    one: Turn off vibration reduction functions. On a tripod motors cause vibration, not stop it.
    two: Turn off auto-focus (another motor), or at least the continuous-focus setting (use the ‘one-shot’ setting).
    three: Use ‘mirror lock-up’ (DSLRs). Mirrors clunk up causing tripod vibration.
    four: Keep out of wind, away from vibration and keep your tripod low (don’t fully extend legs).
    five: Use a remote shutter trigger. Button pushing causes vibration.
  10. I did all this and it’s still not right!
    Solutions:
    one: Practice – putting this together takes time and effort.
    two: Return to locations many times to get the right light and conditions.
    three: Post processing! RAW users, this is where you polish the shot up. Since the earliest photography developing the shot has been a key process. RAW processing is another skill to learn. It’s essential, so learn it. Only *.jpg’ers should worry because they have disabled files. If you used *.jpg there is no hope of properly completing the job.

There is a lot to do! Follow the links and keep at it – you WILL succeed.

By Damon Guy (author and Photokonnexion editor)

Damon Guy - Netkonnexion

Damon Guy (Netkonnexion)

Damon is a writer-photog and editor of this site. He has run some major websites, a computing department and a digital image library. He started out as a trained teacher and now runs training for digital photographers.
See also: Editors ‘Bio’.

Simple facts about successful birds-in-flight shots

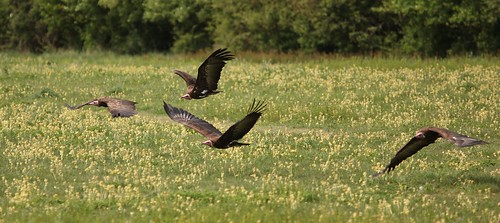
Vultures on the wing

Vultures on the wing – the capture of these birds needs the same panning techniques as any other moving objects.
Click image to view large. “Vultures on the wing” By Netkonnexion on Flickr External link - opens new tab/page

The capture of birds in flight is fun.

Birds rarely stay still for long and move fast when flying. The techniques here will provide basic ways for you to master birds-in-flight photography. The ideas build on techniques used in other areas of photography.

Panning techniques

Bird-in-flight shots are about movement. With any moving thing the only way to capture a sharp shot is to pan with the subject as it moves. Bird-in-flight panning uses the same techniques as other action shots. To learn panning techniques check out this series Action shots – How to….

As with any photographic technique, mastery comes with practice. If you are learning panning to photograph birds, start by panning cars. They are big targets and move with consistent speeds. They come past at regular intervals so practice is easy. You can practice almost anywhere and you will learn to pan quickly. Then, when you are ready, move onto smaller bird targets when you have mastered the simple movements and turning speeds.

Camera settings

Applying simple panning techniques is easy but the detail is important. The speed at which the birds are flying is critical. The focus you need to use is equally as critical. Here are some simple steps to set up the shots…

  1. Take a photograph of your subjects using automatic mode. You will use this as a starting point. Note down the settings for:
    ISO,
    Shutter speed and
    aperture.
  2. Next, set the camera to manual mode.
  3. Set your manual settings to those you noted from your auto-mode shot. You are going to gradually vary the settings until you get them right.
  4. The ISO setting will need to be fixed (for now). Leave it as you set it from your first (automatic) shot.
  5. Aperture is going to be an artistic decision. If you need to have the background sharp then you can tend toward higher F.stop numbers – say F11. If you need it soft (with bokeh) then use a wider aperture (F 4.0 to F5.6).
  6. Shutter speed is going to dictate how much movement you will see in the wings. To be safe, start with a faster shutter speed to freeze the action (500th, or 200th with flash).

You will be making changes to these settings from your original setting you noted from the auto-mode shot. Just remember, all settings are related. They balance. A change one way with a setting will need a compensation with another setting. If you need to move toward a faster shot to freeze the action you need to…

  1. Change the manual setting for shutter speed by one click toward a faster setting. This will be one third of a stop on most DSLRs.
  2. Then, to balance the settings, move the aperture setting one click off toward a larger aperture. This is because if you have less light coming in (faster shutter) you will need to open the aperture to compensate.
  3. You can repeat this process until you get the bird to freeze in its movement.

If you set a faster shutter speed, you need to open the aperture to compensate for less light getting in. A wider aperture reduces your depth of field. If you want to keep the depth of field as it was, then you need to increase the ISO by one third of a stop instead.

In other words, to move a setting towards your desired position you need to keep the balance of the other settings by equal amounts.

Focus and framing

When capturing birds-in-flight the focus is critical because the bird is moving. Set your camera focus to “continuous auto focus”. Continuous focus mode adjusts the focus as the bird moves. This allows your camera to maintain some focus control for the moving target.

You also need to set your focal length to approximately where you are going to capture the bird in flight. This means being ready with the approximate focal length to capture the incoming flight path of the bird(s). You may have no idea where the next bird is going to come from. However, you can make some approximate guesses based on experience and your location. The rest is up to you.

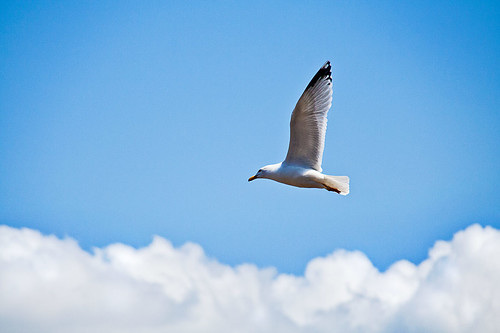
Zoom out from the shot leaving enough room to hold the bird in the frame while panning

Zoom out from the shot leaving enough room to hold the bird in the frame while panning. Click image to view large.
“Seagull in flight” By Netkonnexion on Flickr External link - opens new tab/page


Setting up the framing is the critical final step.

You need to be able to confidently place the bird in the frame for the shot. However, it is not easy to frame the bird so it fills the frame because they move so fast and are a small target. If you fill the frame when panning you will find it very difficult to get the subject consistently in the frame throughout the pan. So, zoom out. You will have to crop the shots later to bring the bird up to size. Yes, this probably means you are going to have to take more shots and do more post-processing. Unfortunate, but it is in the nature of these types of shots.

You should also consider leaving some room in front of the subject so it looks like it has some space to fly into. If your bird is right up against the edge of the picture in the direction it is going it looks like it is about to fly into something. The viewers eye naturally follows the line of flight and they will be distracted by that line if it is about to fly directly out of the frame.

Applying the techniques

So now you have the settings and you have the location/focus/framing worked out. The rest is practice. Now it’s shoot and wait – shoot and wait. It is time to apply yourself, to try out the techniques.

My personal experience with birds has involved plenty of practice and trial and error. What you read here will give you the essentials. Applying them is about doing some photography and learning as you go along. Enjoy it, panning and photographing birds in flight is great fun.

#11030#

Simple ways to add contrast to your black and white images

Changing colour images to B&W often has surprising results.

You may not get what you expected. Often this is because the contrast in colour shots is quite low. B&W conversion requires contrast to work well. This is how you can increase the contrast…

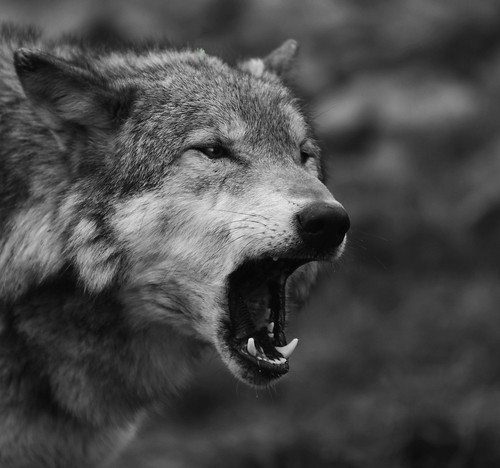
Wolf - the range of black and white tones can really add to the dramatic impact

Wolf – the range of black and white tones can really ad to the dramatic impact.
Click image to view large.
Wolf – By Netkonnexion on Flickr External link - opens new tab/page

The objective

We are trying to increase the range of greyscale tones in the picture. Grey is a fickle colour – it fades from tone to tone almost unnoticed. In a high contrast shot we want to stretch the grey and express tones from deep blacks to whitest whites. This is something we avoid in colour because deep black or blown-out white is a distraction. In black and white they can be too, but if well controlled the balance helps emphasise the pictures’ strong elements. So we must add the contrast. That can be done by applying one or more techniques in post-processing:

  1. Add deeper tones to the darker areas, whites to the lighter areas
  2. Create darker/lighter tones over the whole image – moody effect
  3. Use an overlay technique to apply contrast

I am not going to go into depth with these. Just some simple ideas.

Add deeper tones to the darker areas, whites to the lighter areas
This is essentially a manual technique. Using photoshop or a similar editor, you need to activate the ‘burn’ tool. Originally burning was a way of making film processing darken the print. In digital editing it spreads a soot-like effect where applied. Normally you can just paint it on. Set it so the ‘exposure’ level is low and set for ‘shadow’ in the settings. Then paint away. You will darken the dark shadows without darkening the lighter areas. Higher exposure will darken more. If you set for ‘highlights’ you will be able to paint out whites – great for toning down strong white burn!

You can do the same for whites with the ‘Dodge’ tool. Select ‘highlights’ and a low ‘exposure’ then paint over bright areas and they will brighten slightly. Higher exposures brighten more. Set the tool for shadow and you can lighten darker areas.

In both tools ‘mid-tone’ will brighten or darken the mid-range tones depending on which tool you are using.

Create darker tones over the whole image – moody effect

You can use a ‘contrast’ control in most image editors to affect the lightness and darkness proportions across the image. However, too much of this control tends to give sickly greys an outing. Faces especially look ill if you apply too much of the contrast control.

In most image editors there is usually a ‘gamma’ control somewhere. This uniformly affects the blacks right across the image. Often the toning down of blacks is enough to shift the image to the moody or dramatic side. Gamma gives you great control over this. So look up in your help files how to adjust your Gamma.

In Photoshop the control is in the exposure adjustments panel. If you have not got gamma control in your editor you can use it in Irfanview (free download). Irfanview has a great gamma control. You can find both gamma and contrast with other colour controls in the menus. Go to Image; Colour Corrections… The dialoge box there is worth playing around with.

Gamma is not so good for adding brightness, but in small measure it is OK. So you can either whiten or darken the image using the gamma setting. It actually is great for toning down all sorts of white errors.

Use an overlay technique to apply contrast

In the image editing applications that use layers and overlay there are literally hundreds of ways to adjust contrasts. I have seen one ‘grunge’ technique use 16 layers and 35 steps to create a contrast-widening effect. While grunge is a popular look in image processing it is an artistic process that you really need to practice a lot before it is effective. And, like many processes can be overdone. So, to help you out I have researched the technique below. It is quick and easy. It is possible in several of the full blown applications for image editing. Best of all it takes a few seconds to apply and you can see the results straight away. So watch this short video and I bet you will be itching to have a go…

Uploaded by Larry Lourcey on Dec 16, 2010 http://www.PhotoEducationOnline.com

An important note…

Remember that all of these techniques work better in RAW. Attempting to use them in .jpg is a lost cause and may just look a mess. Although, to be fair, that does depend on the image. Take my advice and shoot in RAW. For 99.8% of the time the results will be better after processing. Remember not to do post processing on your only image. Keep an original and only work on copies.

Do you make this one awful mistake in your photos?

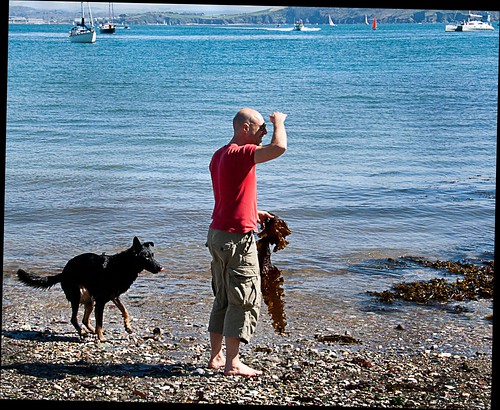
The horizon has only got to be off a little bit to make things look odd.

The horizon has only got to be off a little bit to look odd. It’s not just the horizon – other lines may cause problems too. In this image a quick shot meant the beach line across the bay was off the horizontal. After straightening, the black cut-outs show how much the picture was skewed. View large External link - opens new tab/page

The horizon is a main focus of viewing.

It’s a strong feature to orientate yourself in the image. When the main line in the shot is wrongly positioned it irritates your audience. This mistake is easily fixed in-camera or in processing later.

A major line like the horizon needs careful presentation. Strong lines catch the eye. You tend to match them to the edges of the image frame. They look peculiar when slightly out of line. That is not to say you should not take dynamic or action shots at interesting angles. It is the slightly skewed angle that is irritating. Interesting angles is about something special, not slight photographic inaccuracy. Make your special angle shots a statement.

Get the horizon straight in-camera

Being aware of strong lines is half the battle. When composing your shot, watch out for them. Line them up. There are two ways to do this…

  1. Use your focus points in the viewfinder. Make the strong line lie across two or more of the focus points. If you have a grid, line up with the lines on it. Many compact cameras and recent DSLRs also have an electronic level on the screen. Check in your manual how to activate it. This will enable straightening too.
  2. Using a tripod? Many have a spirit level built into the tripod head. It’s invaluable for setting up and saves making the mistake from the start. If you don’t have one built-in, you can buy cheap hot-shoe mounted spirit levels.
Later, back at the computer

Sometimes a quick shot prevents perfectly lining things up. Straighten the picture in post-processing. Image editor applications have straightening tools. Normally they are really easy to use.

In Adobe Photoshop the straightening tool is used on importing the image. It looks like an angle bracket on the tool bar in the developer module (RAW format only). Drag it along the straight line you want straight. You can also swivel the picture when using the crop tool. Just go to a corner and move the cursor away from the corner at 45°. A quarter-curve cursor arrow appears. Hold down the right button and swivel.

In Irfanview the straightening tool is in: Edit Menu | Show Paint Dialogue. When the paint toolbar comes up hover over each tool. The tooltip will pop-up and tell you which is the straighten tool. Drag the cross-hairs along the line you wish to straighten. The image will swivel to fix the problem (see the image above with black infill showing the reorientation). Then you crop the image to get rid of the odd edges.

By Damon Guy (author and Photokonnexion editor)

Damon Guy - Netkonnexion

Damon Guy (Netkonnexion)

Damon is a writer-photog and editor of this site. He has run some major websites, a computing department and a digital image library. He started out as a trained teacher and now runs training for digital photographers.
See also: Editors ‘Bio’.