Tag Archives: Mood

Exposure changes the mood of your image

Exposure changes can affect many aspects of an image.

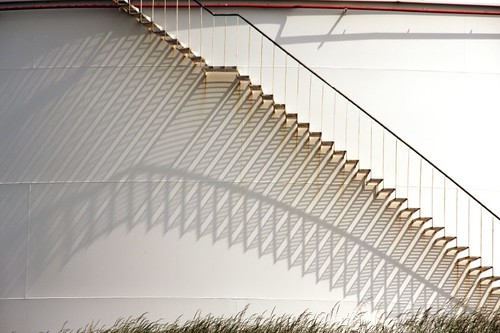
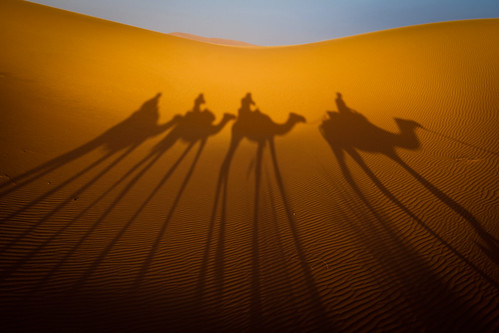
Exposure changes can affect many aspects of an image. Colour, mood, visual impact, contrast and others. The second image below show the differences.
Image better seen large. Click image to view large.

There is no such thing as a perfect exposure

The main goal of starter photographers is to control the exposure. The Exposure Triangle, or other models of balancing light, lead learners to pursue ‘perfection’. Once they grasp the concept of balancing ISO, Aperture and Shutter speed, the needle in the camera viewfinder is their guide.

In manual mode, that central needle is important. It shows that the three elements are balanced. The unwary learner is soon overwhelmed by that needle. They have learned how to keep it central. Now they are going to keep it there despite everything. They have learned that, if the exposure changes, the needle drifts off the middle position. When that happens it is no longer “perfect”.

That mid-position needle is useful. However, it is not ‘perfection’. It is just a guide. Modern camera manufacturers have made things easy for the camera user. The technology, sensors and controls on a modern camera mislead the unwary into a false position. Complex technology and controls give the user confidence that the camera must be right. They assume the central needle creates the perfect capture. That is simply not true.

The balance of light controls the quality of outcome you want. Your final image is created by that quality of light. The creative photographer uses exposure changes to to conjure up the result they want. A good photographer commands the camera to create the picture. The camera does not create the perfect exposure for the user. The user makes exposure changes to create the desired image. Deliberate under or overexposure is an important part of creating your image.

Exposure changes allow you to command the camera

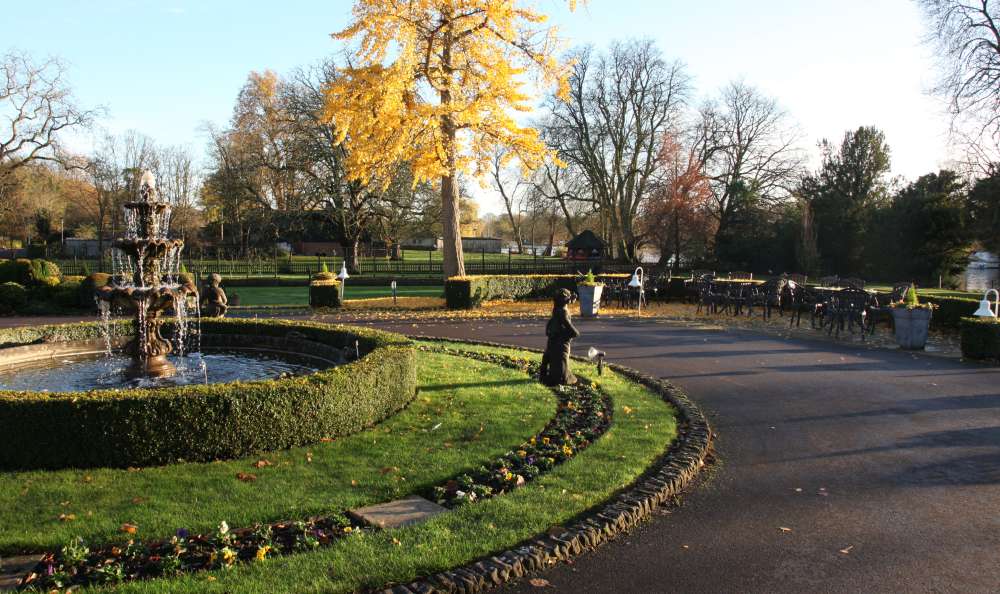
In the image below we see (almost) the same picture as above…

A different quality of exposure changes the whole experience of the picture.

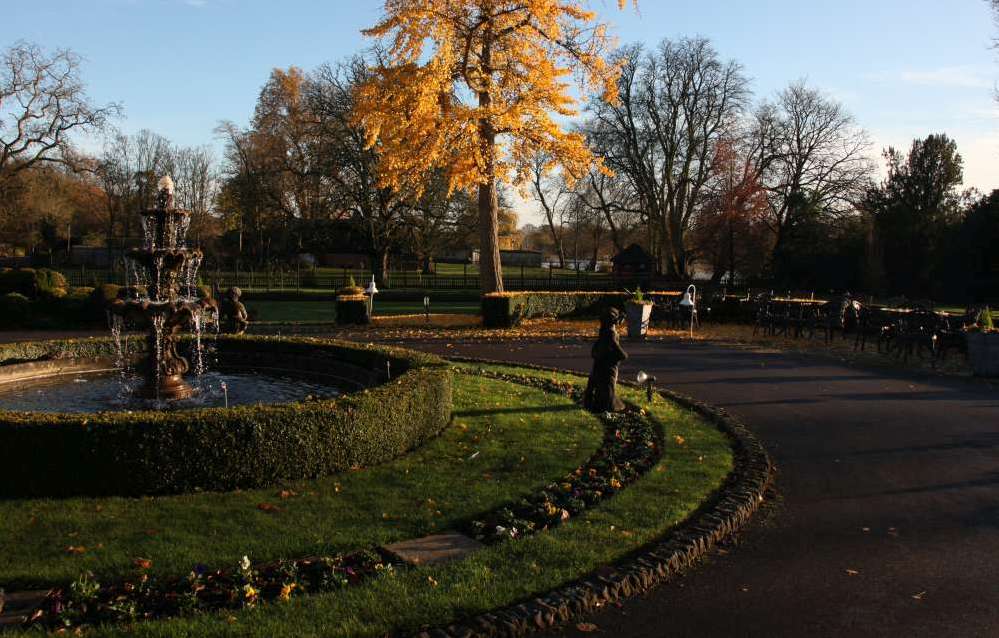
This second image shows same scene as above. But the different quality of exposure changes the experience of the picture. This outcome is no more correct than the top picture. However, when it was taken this one was 1 and 1/3 stops underexposed on the camera viewfinder scale. It was taken within seven seconds of the first image.
Image better seen large. Click image to view large.

Exposure changes allow the user to create the mood of the shot. This is clearly shown by the deeper contrasts, more saturated blues in the sky and reds in the Autumnal leaves. The low sunlight brings out the shadows and colours more. It all adds up. Together they create a very different view of this fountain scene. A twilight feel perhaps.

I was trying to create an Autumn evening view and the deliberate underexposure gave me the key. Yes, I deliberately underexposed to create the effect. I was commanding the camera to create my “perfect” scene for what I wanted.

Experienced photogs make exposure changes regularly

For me, the darker version was right for the reasons I needed that photograph. The control of the intensity of shadows, colours, contrasts, and so on, can be done many ways.

For example, High key shots often use exposure changes. They are created by deliberate overexposure. That brings out the intense whites in a high key image.

Many portraits are lit very brightly to the eye, but a very small aperture or fast shutter speed limits the light entering the camera. This will create an underexposure bringing out the facial features. This gives shadows a depth, without harshness, as can be seen in the next image. This use of exposure changes is a great mood enhancer.

Portrait shot in bright light but underexposed in-camera.

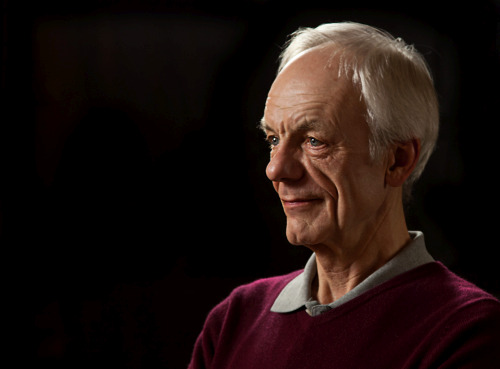
Portrait underexposed in-camera creates a tonally controlled result.

Create the exposure changes you want

How do you create this effect of under or overexposure? Simple. There is a control that can do it in auto or semi-auto modes. While in an auto-mode use the “exposure compensation” dial. You can add or subtract one or two stops of light. You can find out how to use the dial in your manual.

For the learner going fully manual it is even easier. That central needle position is your guide to what the camera calculates as an optimum light level for the shot. To create a manual over or underexposure simply dial the exposure-meter back or forward. Move the needle away from the central position. Shocking I know. You actually create exposure changes by deviating from the central needle position.

Exposure changes of one stop halves or doubles the light entering the camera. So be careful. Take several test shots. Dial one third of a stop or more at a time. Look at the result and check if you have created the right effect.

Create your image in mind – then make exposure changes to suit

The way you want your image is a creative decision. The camera should not be allowed to dictate the outcome.

You have two choices. If you go with the settings the camera gives you, the result is an optimum of the balance of the settings. If you can foresee what you want to achieve, then create your own result. In this case, make the balance of settings so the exposure changes to your choice. Your choice will be different to the result the camera would give you. But with care and practice it will be what you intend for your shot. You have taken control.

So next time you are taking a photo consider this. If you think your picture would be more effective as a darker or lighter representation, then make the exposure changes you need. Do it – create. Really make your images – don’t just capture what is there.

Comments, additions, amendments or ideas on this article? Contact Us
or why not leave a comment at the bottom of the page…

Like this article? Don’t miss the next — sign up for tips by email.

Damon Guy - Netkonnexion

Damon Guy (Netkonnexion)

Damon is a writer-photographer and editor of this site. He has run some major websites, a computing department and a digital image library. He started out as a trained teacher and now runs training for digital photogs.
See also: Editors ‘Bio’.
By Damon Guy see his profile on Google+.

The nature of shadows – ideas and inspiration

Shadows are most important in photography.

Without shadows the everyday shapes we see would be ill-defined. It’s shadows that help to give shape to the objects we view. They can also be the very essence of the picture. In this post I am going to look at different aspects of shadows as the subject of the picture. They can be extraordinary elements, message carriers, central attractions or complementary features. They are major influences in our art, sight and our everyday lives. I hope you will be inspired by shadows and appreciative of them as a strong compositional element in your photography.

What is a shadow?

Shadows help us to see. They are not an absence of light (darkness). It is the reduced light in a shadow that creates the contrasts that the eye picks out. In fact the camera does too. Where shadows are well defined, and contrast to the other light around them, we see a lot better than when there are few shadows and very bright light. Brightness makes it difficult to see things because the contrasts are absent and we can’t make out edges or three dimensions either. The variations in light intensities across an object tell us about its shape. If everything was in uniform brightness shapes would disappear.

Aesthetics and shadows

Shadow, and its counterpart light, are the medium of our vision. Decoding the light/shadow relationship is as stimulating as the pleasure of touching a sensuous surface; the electric excitement of a tantalising taste; being immersed in a powerful smell, or mellowing in the caress of a musical experience. Little wonder that as one of our five senses our understanding of light and shadow is also a deep part of our understanding of beauty and ugliness.

Seeing shadow

Of course our eyes sometimes misinterpret shadows and we make mistakes about them as with anything else. So it’s fun to consider the implications of false statements in shadow. In this first picture the shadow as the carrier of a message, but also the shadow as illusion. Shadow views of this sort bring out dark emotions and “shadowy” thoughts, but are also great fun artistically…

366 • 65 • Shadow monster by Pragmagraphr, on Flickr

366 • 65 • Shadow monster by Pragmagraphr, on Flickr
366 • 65 • Shadow monster by Pragmagraphr, on Flickr External link - opens new tab/page

In his notes on this picture the author says… “I have a lot of school work hanging over me like a shadow.” The visual pun is interesting and conveys a great message.

We love it when something appears as one thing and turns out as another. One of the endearing attributes of shadow is the other side of the visual story. In this next picture the lovely shape and bright eyes of this animal convey it’s essential “catness”. But the shadow is something different. The author says… “Her shadow makes me think about a French bulldog – with a tail” … shadows easily take on different meanings.

Flibberty and Her Shadow by peter_hasselbom, on Flickr

Flibberty and Her Shadow by peter_hasselbom, on Flickr
Flibberty and Her Shadow by peter_hasselbom, on FlickrExternal link - opens new tab/page

Of course shadows can be so much more than just a passive message. In this next picture the message is clear and the visual pun means so much to an English-speaking person. A clever use of shadow as the subject.

Shadow of 'a doubt' by Jon Downs, on Flickr

Shadow of ‘a doubt’ by Jon Downs, on Flickr
Shadow of ‘a doubt’ by Jon Downs, on FlickrExternal link - opens new tab/page

While the subject of a picture may not be the shadow there is still an important complimentary part to play by the shadow. The cobalt blue of the shadow in the next picture creates a wonderful tonality. The shape of the object is defined by the shadow, but it is the blueness that makes the statement. The author acknowledges that fact by his title…

If you can write a visual story with your photograph you pull the viewer directly into the shot. In this next picture the shadow and its disembodied juxtaposition on the ladder brilliantly conveys a set of meanings that we, the viewer, impose. The interest is the simplicity of the picture and yet the complexity of the possible meanings… fireman, escapee, workman, who is he? The interpretations are endless…

Shadow Climbing the Ladder at Sunset by S@ilor, on Flickr

Shadow Climbing the Ladder at Sunset by S@ilor, on Flickr
Shadow Climbing the Ladder at Sunset by S@ilor, on FlickrExternal link - opens new tab/page

Shadow and silhouette are closely related. The dark-side of a silhouette is the result of blocked light, as is the shadow. Normally the statement made by a silhouette is in its shape. I like this next picture because the silhouette is betrayed by the darkness behind it. The hard light and low light-source has lengthened and strongly defined the shadow creating a strong subject. It has become all the more threatening because the silhouette is only partially seen. What is there – is there a threat? Are we being menaced by our imagination misinterpreting the shadow… This is a clever interplay of light and of mood. Nicely done…

Shadow. by David Giron, on Flickr

Shadow. by David Giron, on Flickr
Click image to view large
Shadow. by David Giron, on Flickr External link - opens new tab/page

Shadows can convey much more than just mood. They create a picture themselves, but in a minimalist way. The two dimensional aspect of shadow is only partially compensated for by shape. We know that we can so easily misinterpret a shadow. So it is a relief when the meaning is implied without threat or misinterpretation.

Shadows and intimacy are frequently associated. Above, the closeness of the characters shows intimacy. In the next picture the intimacy of the boudoir is so strong that the viewer is relieved by the pattern of shadows to redirect the mood.

Shadows by Pablo Miranzo

Shadows by Pablo Miranzo.


The author says this is one of a series of pictures intended to contrast light and dark and is in black and white to simplify the composition. Oddly enough the composition is simplified by that, but complicated by the opposing mood settings. An interesting picture of mixed tensions.

The interplay between textures is important. While the shadow is a major part of many subjects, sometimes it is not the only subject. Look out for pattern shots that are uniform across the shot until you allow yourself to be drawn in. Often pattern shots have some compositional element to break the pattern, something that draws the eye. Wood grain and the subtle variations in the rhythm of its lines create micro textures and variation providing relief from the pattern, for example. It is that which draws you in.

Texture is an exciting aspect of any picture. It is created by the subtle tonal variations of light and shadow at the micro-level in the picture. If you see a texture and it convinces you that you would feel the texture if you touched it then the picture has convincingly been created as an image in your mind. In this next picture the image I see is all texture. The wonderful curve of the stair rail and its counterpart, the twisted shadow, combine to create great depth in this picture. The combination gives you the feeling that you can reach in and touch… A great image.

The stairs in the next image are pretty minimalist in themselves. However, the elaborate pattern of light and shadow created by them is exquisite. It is a wonderful example of how shadows transform a picture. In this case the shadows have turned the purely mechanical geometry of the stairs into a complex of pattern and curves. It is a wonderful play-off between the simplicity of one and complexity of the other…

Pulling it all together

The shadow as a subject is clearly a compositional feature. It adds to the texture of the shot too. The clever use of shadow can also add a message and/or impart mood as well. Sometimes though, it all just comes together. If you can combine mood, subject, story, composition and texture you have really made the grade. Your picture comes alive in the mind of the viewer. You have truly created an image. To do all this using just shadow is a clever and precious creation. I think this next image is one such example…

Using shadow as a subject is challenging but worthwhile photographic pursuit. Shadow gives you all the essential elements of a good photograph but supplies it with simplicity and meaning if done well. There are untold interpretations and subjects out there for you to tackle. I hope that I have inspired some new thinking on the subject.

find out more...Photokonnexion tips by email
If you enjoyed this article please sign up for our
daily email service.
                                                 Find out more
#11030#

By Damon Guy (author and Photokonnexion editor)

Damon Guy - Netkonnexion

Damon Guy (Netkonnexion)

Damon is a writer-photog and editor of this site. He has run some major websites, a computing department and a digital image library. He started out as a trained teacher and now runs training for digital photographers.
See also: Editors ‘Bio’.

Simple ways to add contrast to your black and white images

Changing colour images to B&W often has surprising results.

You may not get what you expected. Often this is because the contrast in colour shots is quite low. B&W conversion requires contrast to work well. This is how you can increase the contrast…

Wolf - the range of black and white tones can really add to the dramatic impact

Wolf – the range of black and white tones can really ad to the dramatic impact.
Click image to view large.
Wolf – By Netkonnexion on Flickr External link - opens new tab/page

The objective

We are trying to increase the range of greyscale tones in the picture. Grey is a fickle colour – it fades from tone to tone almost unnoticed. In a high contrast shot we want to stretch the grey and express tones from deep blacks to whitest whites. This is something we avoid in colour because deep black or blown-out white is a distraction. In black and white they can be too, but if well controlled the balance helps emphasise the pictures’ strong elements. So we must add the contrast. That can be done by applying one or more techniques in post-processing:

  1. Add deeper tones to the darker areas, whites to the lighter areas
  2. Create darker/lighter tones over the whole image – moody effect
  3. Use an overlay technique to apply contrast

I am not going to go into depth with these. Just some simple ideas.

Add deeper tones to the darker areas, whites to the lighter areas
This is essentially a manual technique. Using photoshop or a similar editor, you need to activate the ‘burn’ tool. Originally burning was a way of making film processing darken the print. In digital editing it spreads a soot-like effect where applied. Normally you can just paint it on. Set it so the ‘exposure’ level is low and set for ‘shadow’ in the settings. Then paint away. You will darken the dark shadows without darkening the lighter areas. Higher exposure will darken more. If you set for ‘highlights’ you will be able to paint out whites – great for toning down strong white burn!

You can do the same for whites with the ‘Dodge’ tool. Select ‘highlights’ and a low ‘exposure’ then paint over bright areas and they will brighten slightly. Higher exposures brighten more. Set the tool for shadow and you can lighten darker areas.

In both tools ‘mid-tone’ will brighten or darken the mid-range tones depending on which tool you are using.

Create darker tones over the whole image – moody effect

You can use a ‘contrast’ control in most image editors to affect the lightness and darkness proportions across the image. However, too much of this control tends to give sickly greys an outing. Faces especially look ill if you apply too much of the contrast control.

In most image editors there is usually a ‘gamma’ control somewhere. This uniformly affects the blacks right across the image. Often the toning down of blacks is enough to shift the image to the moody or dramatic side. Gamma gives you great control over this. So look up in your help files how to adjust your Gamma.

In Photoshop the control is in the exposure adjustments panel. If you have not got gamma control in your editor you can use it in Irfanview (free download). Irfanview has a great gamma control. You can find both gamma and contrast with other colour controls in the menus. Go to Image; Colour Corrections… The dialoge box there is worth playing around with.

Gamma is not so good for adding brightness, but in small measure it is OK. So you can either whiten or darken the image using the gamma setting. It actually is great for toning down all sorts of white errors.

Use an overlay technique to apply contrast

In the image editing applications that use layers and overlay there are literally hundreds of ways to adjust contrasts. I have seen one ‘grunge’ technique use 16 layers and 35 steps to create a contrast-widening effect. While grunge is a popular look in image processing it is an artistic process that you really need to practice a lot before it is effective. And, like many processes can be overdone. So, to help you out I have researched the technique below. It is quick and easy. It is possible in several of the full blown applications for image editing. Best of all it takes a few seconds to apply and you can see the results straight away. So watch this short video and I bet you will be itching to have a go…

Uploaded by Larry Lourcey on Dec 16, 2010 http://www.PhotoEducationOnline.com

An important note…

Remember that all of these techniques work better in RAW. Attempting to use them in .jpg is a lost cause and may just look a mess. Although, to be fair, that does depend on the image. Take my advice and shoot in RAW. For 99.8% of the time the results will be better after processing. Remember not to do post processing on your only image. Keep an original and only work on copies.

How to tell a story with your picture

Photo storytelling :: Spoken With Humour My Lady

“Spoken with humour my Lady”
Photo storytelling with your picture will capture the imagination of your viewer and draw them into the image.

What is photo storytelling?

Help your viewer to be involved in your picture. Get them thinking. Then they will look hard at it. So, tell a story with it. To get viewers thinking draw out the threads of a story with a time line. Aim to help them see how the story came about. Show clues for what might happen next. Photo storytelling is about making your image clear on what is happening.

The best photo story-tellers are photo-journalists. They capture an event or activity. They try to show the progress of a story. Things you see in the shot tell you what’s happened, what is happening now, and what is possible. In short, it is a time-line.

Photo storytelling :: Keep it simple

Don’t obscure the story. The more interesting you can make the shot, the more viewers will want to look at it. Your story should portray the fullness of events.

Try to make the shot as simple as possible. If there is too much going on it distracts the viewer. Too much clutter does the same. If you do distract the viewer it will confuse or obscure the story.

Have a plan

Ensure clarity in your story. Have a complete plan of what you want to convey. You should:

  • Know what you want to say.
  • Have a clear idea of the main subject.
  • Know the story line (as simple as possible).
  • Know how to express the storyline.
  • Know the composition you will use.
  • Be aware of light, mood, time.
  • Know what to exclude (de-clutter).
  • Know how you are going to work the scene.
  • Have technical settings worked out.
Behind the subject

It is easy to confuse the viewer with the background. Ensure it is consistent with the story. The little romantic exchange in my picture above fits with its background. If this were an urban scene the knights would be out of their expected context. That throws the story off.

How people and things relate to each other

As the story unfolds show the relations between people. That is juicy eye-candy for viewers. The relationship between people and things, in the scene helps too. Working with one photograph, your photo storytelling is going to have to show these links.

There are three relationships in the photo storytelling above. The horse is engaging with the viewer. It stares back at us. The knights are engaging in light-hearted flirting. The peasant is clearly amused by the whole scene. The story tells the viewer where the people are, but also about the feeling between them. Looks, and the direction of gaze, are important. Facial expressions speak volumes. The position of things and people show how they relate to each other.

You must be careful to pick up these traces of relationships. Without them you don’t have the sense of interaction. Then you don’t see photo storytelling in progress.

Time

Time in photo storytelling usually comes from action, expression or movement. In this picture the horse shows boredom. The knights show an on-going and flirtatious conversation. The peasant clearly enjoys the moment. These things show the story is not static. And, it has a future because the knights are clearly enjoying the exchange.

In another type of photo storytelling you might see strong movement. A race is a story. The action shows the progress of time. The race positions tell of the competition. The place where the race is sets the scene.

Clearly there are many ways to express progress through the story. The important thing is that you do actually make sure that it is obvious to the viewer.

The fresh, candid look

Clearly, if the story is staged and forced, the fresh look will be lost. Capture it as if it was unscripted. Captured on the spur of the moment makes it look fresh. Even better if it was a complete candid shot. Nothing beats an honest, true expression. The best scenes are spontaneous. The whole discipline of street photography is based on that concept. However, make sure that the elements of a story still hold true. It will look false if they are not.

If doing candid street shots your post-production work can help. In your editing look to find the shots with the elements above. Then crop or work your post processing to bring it out. Don’t try staging them through a plan. Urban scenes make poor acting scenes for photography.

Patience

Photo storytelling takes patience. So does trying to spot a story in progress. To shoot a scene like the one above takes a few moments. It may only involve a few quick few shots. But the right result may not happen the first time. Take your time and work on the elements needed for your Photo storytelling. As you get better at the things mentioned here you will bring out the story easier.

Photo storytelling :: In Post-production

A story is almost always completed in post-production. Often the composition has to be done quickly in order to capture the right moment. As a result you may need to think about the framing and the crop later. Also think about cloning out clutter and distractions. When Photo storytelling, that is especially true for candid shots.

Photo storytelling is helped by a title

If my image above was called “knights on horses”, there’d be less interest. The title sets the scene. It shows the viewer the link between the knights. A good human relationship or a juicy gossip-phrase gets attention. Photo storytelling is all about those human things. Bring them out in a title.

The actual story

Most important is the actual Photo storytelling itself. To get that right you have to check you have a story at all. That means finding the shot that expresses the story. That is an editorial task. Be ruthless when you try to tell a story with a picture. Show only the shots which actually tell one. Otherwise you will have a fudged concept. There is nothing worse.

Enjoy your Photo storytelling. It’s fun and a challenge. Your skill as a photographer and as an editor of your own work will improve.

Comments, additions, amendments or ideas on this article? Contact Us
or why not leave a comment at the bottom of the page…

Like this article? Don’t miss the next — sign up for tips by email.

Damon Guy - Netkonnexion

Damon Guy (Netkonnexion)

Damon is a writer-photographer and editor of this site. He has run some major websites, a computing department and a digital image library. He started out as a trained teacher and now runs training for digital photogs.
See also: Editors ‘Bio’.
By Damon Guy see his profile on Google+.

Be Obsessive About Light

‘Boats passing’ - Light that is no use for one purpose is great for another

‘Boats passing’ - Light that is no use for one purpose is great for another

Light is not good or bad – it just IS

The so-called ‘golden hour’ is that time before sunset when the sky is illuminated with that wonderful golden cast of the setting sun. Sometimes we slavishly avoid taking shots at other times because of the wonderful colours and tones as the day fades. However, is the harsher brightness of the rest of the day really so ‘bad’?

We should be careful about missing the point of a shot. Life happens at all times of the day and night. The light-levels of the moment are a part of the spontaneity of the event. There is little point attempting to shoot a lunch scene as a golden-hour event. Clearly it is something that happens in the brightness of the middle of the day. Your photographs should reflect the issues of the moment of the shot. To make your creative shots work look to matching the scene with the right sort of illumination – natural or artificial. Alternatively, if on the hunt for a shot, your scene can be picked to complement the light.

Pick you moment and the shot within the light available

The scene in the picture above was taken in the harsh power of mid-afternoon sunlight on a summer day. The wonderful high-key white sails are beautifully off-set against the blue of the water and the suns golden reflection off the boats onto the water.

When I saw this scene coming together I was aware that around me the other scenes were being harshly treated by the light. But, this boat scene just seemed right for the light at that moment. Obsess about your awareness. It will be your knowledge that provides the one true shot that suits your vision of the conditions.

Light is something you need to be obsessive about. Study it in all its moods. Become aware of its problems for the camera, and its wonders for the viewer. Look at light through the lens and study it without the lens. Compare the two and ponder on the changes the camera imposes.

Light is what it is – you need to recognise when it is right.

Lighting in all its forms has characteristics that suit some shots and attributes that don’t suit others. To capture the right light you need to study it until you have a deep and meaningful understanding of it. You will discover it with experience and knowledge.

Photography is about light – nothing else. Know it inside out and you will be equipped to transform your shots into impactful, artful statements.

By Damon Guy (author and Photokonnexion editor)

Damon Guy - Netkonnexion

Damon Guy (Netkonnexion)

Damon is a writer-photog and editor of this site. He has run some major websites, a computing department and a digital image library. He started out as a trained teacher and now runs training for digital photographers.
See also: Editors ‘Bio’.