Tag Archives: F-Stop

Correct snow scenes using exposure compensation

Bright snow scenes create a problem with the auto-settings for exposure

Bright snow scenes create a problem with the auto-settings for exposure
Click image to view large
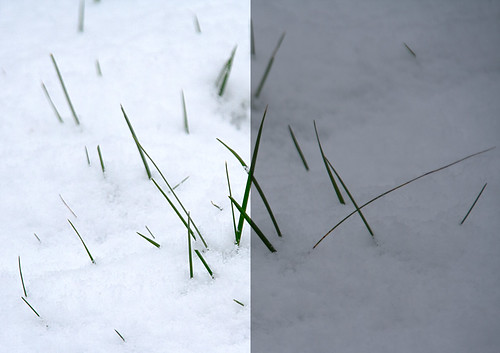
Green shoots through the snow By Netkonnexion on Flickr External link - opens new tab/page

Snow reveals a problem with auto-modes.

The brightness of a snow scene throws off exposure. Cameras in auto-modes work to a “normal” type of scene. When unusually bright scenes are encountered the camera cannot compensate. It leaves the scene grey. This is because the camera is calibrated to work with a mix of colours, light and darks that represent the sort of scene we encounter every day. It senses the luminance levels in the scene and sets exposure to the middle of the range between light and dark.

If the camera senses an unusually bright scene, like the snow scene above, it is unable to compensate properly. The brightness is outside its normal range of compensation. The camera responds by underexposing the shot, and the snow turns grey. The photograph above shows the scene as shot in the right hand panel. It is grey. The left hand panel shows the correct exposure after the underexposure is compensated by an exposure compensation of 1.66 stops (one and two thirds stops). (See: Definition: f-stops)

Photographers are more accurate than camera auto settings

In these bright (or dark situations) we can dial in exposure compensation to manually set the scene to be brighter. Using the exposure compensation we can increase the exposure to brighten the scene (+ settings) or even darken the scene (- settings) as appropriate. Then, we take another picture. By looking at the screen on the camera (“Chimping”) we can get the exposure correct by adjusting the exposure compensation to correctly whiten the scene.

This exposure compensation principle applies to the camera modes which are automatic or semi-automatic. In full auto, the camera calculates the exposure by balancing the ISO, shutter speed and aperture settings. However, in the semi-automatic modes the photographer changes one of the settings while the camera changes the other. In these modes, as in full-auto, the camera can still make the mistake of under-exposing (or over-exposing). Only the photographer can judge the exposure correctly.

When using aperture priority mode, you the photographer, makes the decision on the aperture size (f-stop setting). The camera calculates the appropriate shutter speed. If your camera cannot correctly interpret the scene, as with snow for example, then you will need to dial the exposure compensation to correct for the under-exposure. If you are using shutter priority, same again, the camera calculates the aperture (f-stop) setting. If the camera makes a wrong exposure decision, you can manually set the exposure compensation to over-ride the f-stop setting the camera would set.

Full manual mode, where the photographer sets all the settings directly, cannot use exposure compensation. In this mode the photographer makes all the decisions. The camera does not interfere with the exposure settings. In this case the photographer is free to make decisions to fix the exposure setting for all three factors of exposure – ISO, aperture and shutter speed. There can be no element of compensation for a failed camera decision. The photographer stands by their own settings and has full discretion to control the exposure as they wish. Deliberate over or under-exposure as well as accurate exposure are all possible. It is for this reason that I urge you to work in full manual where you can. You have far more control over the outcome of the shot. You also as a consequence have more artistic control over your image.

If you are working in RAW, the native data mode of image files in camera, it is possible to correct for camera exposure errors in post-processing. As I have argued elsewhere it is better to try and get all the settings correct in camera than to spend time processing afterwards for a number of reasons. So, no matter what file type you are using, try to set the shot up correctly from the start.

There you have it. Exposure compensation is a camera setting which is wholly dedicated to compensating for the mess-ups that the camera makes with its exposure calculations in auto or semi-auto modes. But when using auto-modes, and/or using *.jpg files, it is essential to be able to compensate for the cameras’ failings by using exposure compensation – otherwise your snow will be grey!

find out more...Photokonnexion tips by email
If you enjoyed this article please sign up for our
daily email service.
                                                 Find out more…
#11030#


By Damon Guy (author and Photokonnexion editor)

Damon Guy - Netkonnexion

Damon Guy (Netkonnexion)

Damon is a writer-photog and editor of this site. He has run some major websites, a computing department and a digital image library. He started out as a trained teacher and now runs training for digital photographers.
See also: Editors ‘Bio’.

What is the aperture range of a lens?

Photography phactoid number 004

We are used to working with apertures in the range of f16 (small aperture) down to say f3.5 (large aperture). These are commonly available on many consumer lenses. But what sort of aperture range is there for camera lenses?

Working ranges

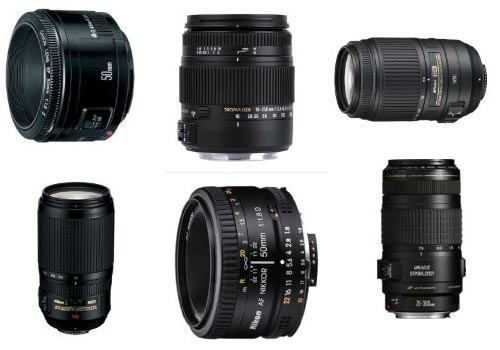
Some consumer lenses have begun to show quite big ranges. The really popular Canon EF 70-200mm F/2.8 L IS II USM Lens is a great example. I just love that baby! Wow! Excellent definition and clarity and brilliant control of aberrations. An incredible lens – no wonder it is so popular. Well, that lens shows an upper aperture range to f45 on my version (I think the latest version is f32). Now that is a small aperture. That sort of small aperture is used only for very, very bright conditions and long exposures. I don’t think I have ever used such a small aperture.

Pro lenses and specialist lenses

The reasonably priced nifty fifty Canon EF 50mm – f/1.4 USM Lens is another really popular lens. For aperture size however, it is beaten by another Canon lens that is also a 50mm, the extraordinary Canon EF 50mm f/1.2L USM Lens. An amazing lens, the depth of field on mine is so controllable you can focus it so that a wedding ring, looking through the hole, is in focus from front to back. Nothing else in the picture is in focus. Wonderful, but essentially a pro-lens.

Specialist lenses go further. On the minimum aperture size the smallest I have heard of is an f64. I am not sure how practical that is for a lens in the modern digital context. Has anyone some knowledge of that sort of aperture? Please comment below.

In the making of the film in this post: “How good is your exposure?”, they used ex-NASA lenses that were rated at f0.7. Now that is a wide aperture. Talk about a fast lens! Again, probably not practical for most purposes on a modern still digital camera.

In effect then, for modern every-day photography, an aperture range of f2.8 to f32 is acceptable and reasonable. In the pro-lens domain some exceptional lenses might stretch to f1.2 at the wide end. For other lenses, the aperture may narrow as far as f45. Outside of those boundaries you are talking specialist applications and big, big money… barrow loads of it!

Some links about lenses after this…

find out more...Photokonnexion tips by email
If you enjoyed this article please sign up for our
daily email service.
                                                 Find out more…
#11030#


By Damon Guy (author and Photokonnexion editor)

Damon Guy - Netkonnexion

Damon Guy (Netkonnexion)

Damon is a writer-photog and editor of this site. He has run some major websites, a computing department and a digital image library. He started out as a trained teacher and now runs training for digital photographers.
See also: Editors ‘Bio’.

Six things to consider for starting portraiture

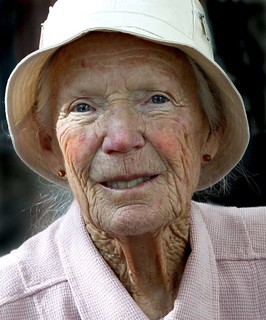
A dear friend

• A dear friend •
Click image to view large
• A dear friend • By Netkonnexion on Flickr External link - opens new tab/page

Portraiture – the photographers passion.

Starting in portraiture can be daunting. We are going to look at the important things to consider when getting started with photographing portraits. There are also links to some of the portraiture resources available on Photokonnexion.

This post is aimed at introducing the portraiture resources found here…

Location

Choice of location can make or break a portrait. If you choose an outdoor location you have to consider a range of issues like the weather, how to pose your subject and exactly what you will be putting in the background. The problem with outdoor portraits is that there is potentially a huge number of composition decisions to make. Taking the shot can be quick. Deciding on what background is right can take a lot of effort and research.

If you are just starting out with portraits it might be better to focus on indoor shots. The environment and light is potentially simpler and the lighting more controllable. The essence of good indoor shots is to reduce the composition to a very simple background and lighting and to focus your attention on the subject. This gives you time to practice the posing, including expressions, and the lighting set up.

Lighting

Light and Lighting can be as simple or complicated as you make it. My advice is to make it as simple as possible. Most great portraits are done with one simple source light. Working with one light gives you the ability to try out shadow casts and hard light vs. soft light. Practice with simple ideas will help develop your skills more than working with confusing multiple light sources.

Background

This is not the same as the location (which is really more about the surroundings). When you are considering the background this could be as simple as a blanket suspended behind your subject. It could also be as complicated as a workbench that your subject works at. What you have to do is decide how to set it up, how to light it and how to place your subject in front of the background. You have to make a decision as to whether you are taking an environmental portrait (a large amount of the background is visible) or a simple portrait where the background is a minimalist setting, where you show very little of the environment and make it as simple as possible.

It is better to start simple. Placing your subject in front of a coloured, white or black background is a great way to get started. You will be able to focus on posing your subject and spend less time worrying about what to include or exclude in more complex backgrounds.

Posing

The best advice for starters is to work with your subject. He or she will be comfortable with certain poses. Get them to start the posing. Then, when you see how they like to pose, you can ask them to vary it to get your light right and get them showing their best side (the left side of the face is best).

Remember that that definition of the features of the face are defined by light and dark. Your poses should be aimed at using the shadow/light relationship to bring out your subjects facial and body features.

find out more...Photokonnexion tips by email
Enjoying this article? Please sign up for our
daily email service.
                                                Find out more…
#11030#

Props

It is difficult to provide resources about props. There are as many props as there are things people can hold, wear, sit on, stand next or or play with. Yes, props can be pretty much anything you want. However, one thing is certain. Your portrait subject will suddenly come alive when they have a prop to distract them from the daunting prospect of the camera. Try to get them to work with a prop they are familiar with – get them to tell you about it or show you how they use it while you photograph. These things will make the comfortable and help them to relax. It will also show you the character of the person they are.

Camera settings and lenses

Some people will tell you this is the most important point. Others will say the posing, still others will focus on the other things above. How you set up your camera, and how you place your subject are very closely related. But there is a lot to learn here. Start simple so you can feel in control. If you are not yet working with manual controls then be comfortable with auto mode – try to become aware of the types of settings that seem to work.

Exposure settings are an important study. There are some exposure links in the link box below. However, you should be concentrating on natural colours. The type of light you use is important to your exposure. I have one piece of adice on this. Beginners at portraiture almost always over-light. Keep your lighting soft and your exposure moderate and not over-bright to start. If you are using flash, turn it down. Bright flash always washes out flesh colours and sometimes causes nasty highlights on the face. It is worth reading up about how you can ruin your shots with flash.

I hope that this article has provided you with some options for getting started in portraiture. Please spend some time going through the links on the portraiture resources page to get more detailed information.

By Damon Guy (author and Photokonnexion editor)

Damon Guy - Netkonnexion

Damon Guy (Netkonnexion)

Damon is a writer-photog and editor of this site. He has run some major websites, a computing department and a digital image library. He started out as a trained teacher and now runs training for digital photographers.
See also: Editors ‘Bio’.

Getting started with a new lens

Got a new lens? Or perhaps you want to buy one?

• Got a new lens? •
Or, perhaps you are thinking of buying one? External link - opens new tab/page
How do you start using it?

Getting a new lens?

The most important items that photographers own are lenses. It is best to approach a new lens with a method in mind. That way you will get more out of the lens. In this article we are going to look at learning about your new lens.

A new friend

You are probably going to spend a lot of time with your new lens. It will become like a friend to you. Treat it well, and with respect, it will last a lifetime. Abuse it and you will lose it.

To get to know your new lens you need to make its acquaintance. Here are some suggestions as to how you should get to know it.

Read the manual: You would be surprised how many people pop the lens on and disappear over the horizon. Then they get into trouble and wonder what to do. My dad used to say “If all else fails, read the manual!”. Well, I prefer to do it the other way around. Read it first. Stop, think, and read. I find that a quick skim is usually enough. Lens manuals are usually pretty thin. Then, as I slip out the door to try my new lens I pop the manual in my bag so it’s on hand in case I need to solve a problem.

Make sure you find out where the various controls are located and what they do. It would be tragic to miss a good shot because you did not know which vibration compensation mode to select for example!

Shoot off about ten shots: You probably won’t achieve much, but it will make you feel better. I always feel better once I have used a new lens, then I can concentrate on learning it properly.

Minimum focusing distance: Get in close to a test subject. Take a shot. Take a step back and take another. Repeat this a few times until you are well into the normal operational zone for the lens. Do the same for a few other angles on your subject. Now go and download the pictures. How does the new lens cope with close ups? Does it do a good job or does it need a little separation from the subject before it comes into its own?

Testing its zoom ability: Zoom lenses make it too easy to shift up and down focal lengths at will. It’s great for getting the view you want. But it is terrible for understanding how the new lens performs at each focal length. Try setting the focal length in one place then leaving it fixed in position. Don’t shift up and down when taking shots. Walk back and forth so that you get a feel for the lens at one fixed focal length. After taking say, twenty shots, at one focal length, try a slightly longer one. Take another set of shots at that one, then move up the scale again. Try to build up a picture of how your lens behaves at each focal length. The pictures will enable you to see the photographic quality and lens effect at each point in the zoom range. This exercise shows you what sort of perspectives the new lens will give you.

Aperture effects: Change of aperture has a big impact on a picture. In particular the depth of field is affected. Get a feel for the Depth of Field expressed by the new lens. Start by taking a few pictures with the aperture open wide. Then, work through the different F-stops (f4, f5.8, f8, f11, f16 etc) taking pictures each time to get a feel for the different depths of field this will give you.

The depth of field is affected by three factors…

  1. Aperture.
  2. Distance-from-subject (or “focus distance”).
  3. Focal length.

You should test the impact of your aperture at a range of “Distance-from-subject” points. You should also do so at various focal lengths. Then you will have a good idea of the way that depth of field behaves with all aspects of the lens.

One other point on depth of field. Check your sensor size. A small sensor will give you sharpness right through the picture at larger aperture sizes than a large-sensor camera. Large format cameras will need much smaller aperture sizes to get the same right-through sharpness. If you are swapping your new lens between cameras this will have an impact. I use several of my lenses on a small format Canon and a full frame Canon. Be aware they will behave in a different way on each camera.

Testing the telephoto capability: If your lens has telephoto components then you should look to doing a few longer distance shots or landscapes. Repeat the telephoto shots at different apertures and focal lengths. You are looking for how the wide-angle shots compare to the long focal length shots when the field of view is narrow. When you examine these on the computer check for any distortions and check to see how the background comes out.

Auto-focus: It is difficult to test the auto-focus control without setting up instruments to calibrate it. Most of us don’t have those. So what I do is focus along things. For example, I put my test subject next to a wall so I have to look down the wall to shoot it. Try the auto-focus out on each of the focus points. If they focus accurately on the subject and are not confused or affected by the wall then what is the quality of the result in the final pictures. Do it first on one side then the other so all the focus points get a go at being next to the wall.

Another test for the auto-focus is to try and focus on something tiny like a bird at twilight. Auto-focus finds low contrast light situations difficult. So test them out. When will it hunt rather than focus? At what sort of light intensities will hunting begin? Also, try out any auto focus modes to ensure you know, for example, how your autofocus will behave when panning compared to a still subject.

Beyond the start tests

Getting to know your new lens takes more time than a few tests. Honest appraisal requires continuous use in lots of different situations. When I buy a new lens I shoot with it every day – sometimes for months. This really gives you the feel for what it can do. And, you will be learning to rely on it. Once you can rely on it, that will be when your best pictures will come – because you will be using it instinctively.

If you are looking for a new lens, here’s how to do it… Amazon’s lens finder External link - opens new tab/page. The lens finder is a great tool. Use the selection boxes to set up the sort of lens you need and it will return suggestions for you to choose from. It is a great way to refine the ideas you have to identify the perfect lens for your needs.

By Damon Guy (author and Photokonnexion editor)

Damon Guy - Netkonnexion

Damon Guy (Netkonnexion)

Damon is a writer-photog and editor of this site. He has run some major websites, a computing department and a digital image library. He started out as a trained teacher and now runs training for digital photographers.
See also: Editors ‘Bio’.

Can you write? Of course you can!
Write for Photokonnexion...

We would love to have your articles or tips posted on our site.
Find out more…
Write for Photokonnexion.

A quick tip to help you see the light (or darkness)

What is the nature of darkness?

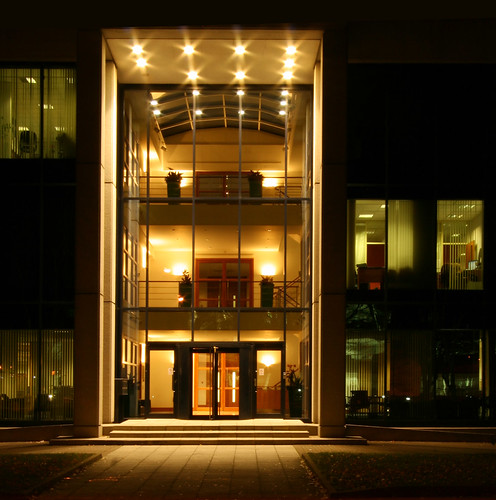
• Tall Entrance •
What is the nature of darkness?
Click image to view large.
• Tall Entrance • By Netkonnexion on Flickr External link - opens new tab/page

Of darkness and the essence of photography.

Dark is an obvious candidate to be the opposite to light. But is it in real terms the opposite of light? Darkness clearly makes for significant food for thought. Here are some ways to think about darkness with respect to cameras.

Darkness is the absence of light…

Er… no. It is easy to say that dark is the opposite of light. However, it clearly is not, because a shot like the one above successfully portrays the light as well as the dark in close proximity. Well… that depends how you see it. Or rather, that depends on how the camera sees it.

I cheated – slightly. The image was underexposed in the digital developing to accentuate the essence of the lights in the entrance. That prevented them blowing out, over-exposing the area surrounding them. It would have been easy to blow out large areas of the internal walls with bright patches of white. The cream colour in the entrance allowed me to keep the brightness down and still preserve the true colours. This would have been difficult in a long exposure with whites as the wall colour. The whites would have made the range of brights-to-darks too much for my camera. Details would have been lost at the ends of the light range (in the blacks and whites).

The cream paint in the entrance, and the tungsten lights gave me flexibility. It allowed me to keep most of the light and dark areas within the dynamic range of the camera. In other words, the camera could see both blacks and whites without losing detail in the important part of the image. Remember a camera will normally only work within a narrow range of light. Typically a (good) camera will be able to see (at maximum) across a range of between 8 and 12 stops of light. Not all that will be visible in the final photo – some detail will be lost depending on the display media. Using RAW will help you bring out lost detail but depending on the camera you may get digital noise. Nevertheless, about twelve stops of light will be retained in the data. Which allows a certain amount of editing freedom (in RAW).

What you need to do is make sure that the exposure captures the light intensity you intend as the focus of your image. I could have exposed to brighten the side windows. That would have made the entrance too bright (and blown out). However, I chose to expose for the brighter central entrance area, but lost the brightness in the side windows. I did that because I had a picture in my head of what I wanted to be the visual focal point of my picture – the entrance.

This picture shows us that darkness in photography is different to that which we see with our eyes. Understanding the nature of exposure helped me to spot that the light in the entrance could be contained within the range my camera could see. Although, a lot of detail has still been lost in the blacks. The darkness in this picture is an artificial creation of my cameras inability to see a wide range of light. Even to our eyes, darkness is relative to our eyesight and its ability to see contrasts.

The essence of photography is…

With this type of shot you need a clear idea in your head of what you want to produce. Also you need an idea of what the camera can do – it does not see the scene as you do. So, before you press the button you need to have clearly formulated your vision of the finished shot. You need to think your image into existence before pressing the button.

Great images are produced long before the shutter button is pressed. The ultimate aim of photography is to conjure up a vivid representation of the scene in the viewers mind. The essence of the act of photography is to create that before you take the shot. If you can do it you will truly be making images instead of taking pictures.

Ten obvious reasons to change your approach and how to do it

Your photograph is not perfect.

You see good quality photographs every day. Why does your photo not match up to the photographic quality in a publication? What can you do? The answer is simple. You need to look at your overall technique.

Things add up…

Assuming a great idea and composition – what can go wrong? In photography every step of the process counts. The more you get right the better the result.

Professional photographers often repeat a shot tens of times to get it right, sometimes more. They aspire to excellence. Care, dedication, persistence and attention to detail add up to technical quality.

What can go wrong?
  1. Bad lighting: There’s no substitute for suitable, interesting light that’s sympathetic to the subject. If the light is wrong, your shot will not work either.
    Solution: Learn everything about the quality of light, hard light, soft light, the colour of light and the properties of light.
  2. The whole picture is soft: You moved the camera while shooting.
    Solution: Pros use tripods – good ones. They use them fast and efficiently because they practice.
  3. The whole picture is soft: You had to hand-hold the shot.
    Solution: Professionals know how to set up a manual exposure that suits the light. Learn to shoot in manual modes. Know what shutter speed/ISO combinations you can use without movement.
  4. The exposure is too dark/light: Common when learning manual camera control.
    Solution: Use RAW, then you can compensate. With RAW you can deliberately manage your exposure too. There is no ‘perfect exposure’ – there is only the result you want. To get the result you want you have to adjust your exposure. (Hint: you can’t adjust your exposure effectively in *.jpg unless you use exposure compensation).
  5. Colours off: If you are shooting in *.jpg you deserve all you get. The white balance is probably wrong. The manufacturers settings are limited. You can’t fix it in processing. Remember, *.jpg is a RAW file developed in-camera to manufacturers settings, not yours. The settings are applied to your shot blind. No wonder they are not what you want.
    Solution: Get it right. It’s easier to shoot in RAW and develop the shot yourself. It gives you fine control and you can develop your shot work the way you want. Something *.jpg cannot do.
  6. Poor focus: Focus is critical to the right technical and artistic result.
    Solution: Learn about: Depth of Field; aperture, Bokeh, Circle of confusion and how they relate to your lenses. Pros know these things intuitively. You can too with practice.
  7. Poor or soft focus from movement: Focus mode is on the wrong setting.
    Solution: Learn to use the correct focus mode (eg. single shot or continuous etc). Also, learn to focus manually. There are situations where auto-focus is poor (eg. in poor-contrast light). Switch off auto-focus to get better results.
  8. The shot is not sharp: A suspect, poor quality or broken lens.
    Solution: Buy decent lenses. All lenses have sweet and sour spots – even professional ones. Cheap lenses have a poorer optical quality and have more sour than sweet spots.
    Solution: Quality costs money. However, look after a good lens it will last longer than your camera. If you choose right, it’ll fit your next camera. It pays to buy the best quality lens you can afford.
  9. Great lens and tripod! My shot’s still not sharp: Sharpness requires attention to the above and these specific details too…
    Solutions:
    one: Turn off vibration reduction functions. On a tripod motors cause vibration, not stop it.
    two: Turn off auto-focus (another motor), or at least the continuous-focus setting (use the ‘one-shot’ setting).
    three: Use ‘mirror lock-up’ (DSLRs). Mirrors clunk up causing tripod vibration.
    four: Keep out of wind, away from vibration and keep your tripod low (don’t fully extend legs).
    five: Use a remote shutter trigger. Button pushing causes vibration.
  10. I did all this and it’s still not right!
    Solutions:
    one: Practice – putting this together takes time and effort.
    two: Return to locations many times to get the right light and conditions.
    three: Post processing! RAW users, this is where you polish the shot up. Since the earliest photography developing the shot has been a key process. RAW processing is another skill to learn. It’s essential, so learn it. Only *.jpg’ers should worry because they have disabled files. If you used *.jpg there is no hope of properly completing the job.

There is a lot to do! Follow the links and keep at it – you WILL succeed.

By Damon Guy (author and Photokonnexion editor)

Damon Guy - Netkonnexion

Damon Guy (Netkonnexion)

Damon is a writer-photog and editor of this site. He has run some major websites, a computing department and a digital image library. He started out as a trained teacher and now runs training for digital photographers.
See also: Editors ‘Bio’.

How Safe Is Your camera sensor from dust?

The camera sensor is incredibly sensitive to dust. Your shots can be ruined!

The camera sensor is incredibly sensitive to dust. Your shots can be ruined!
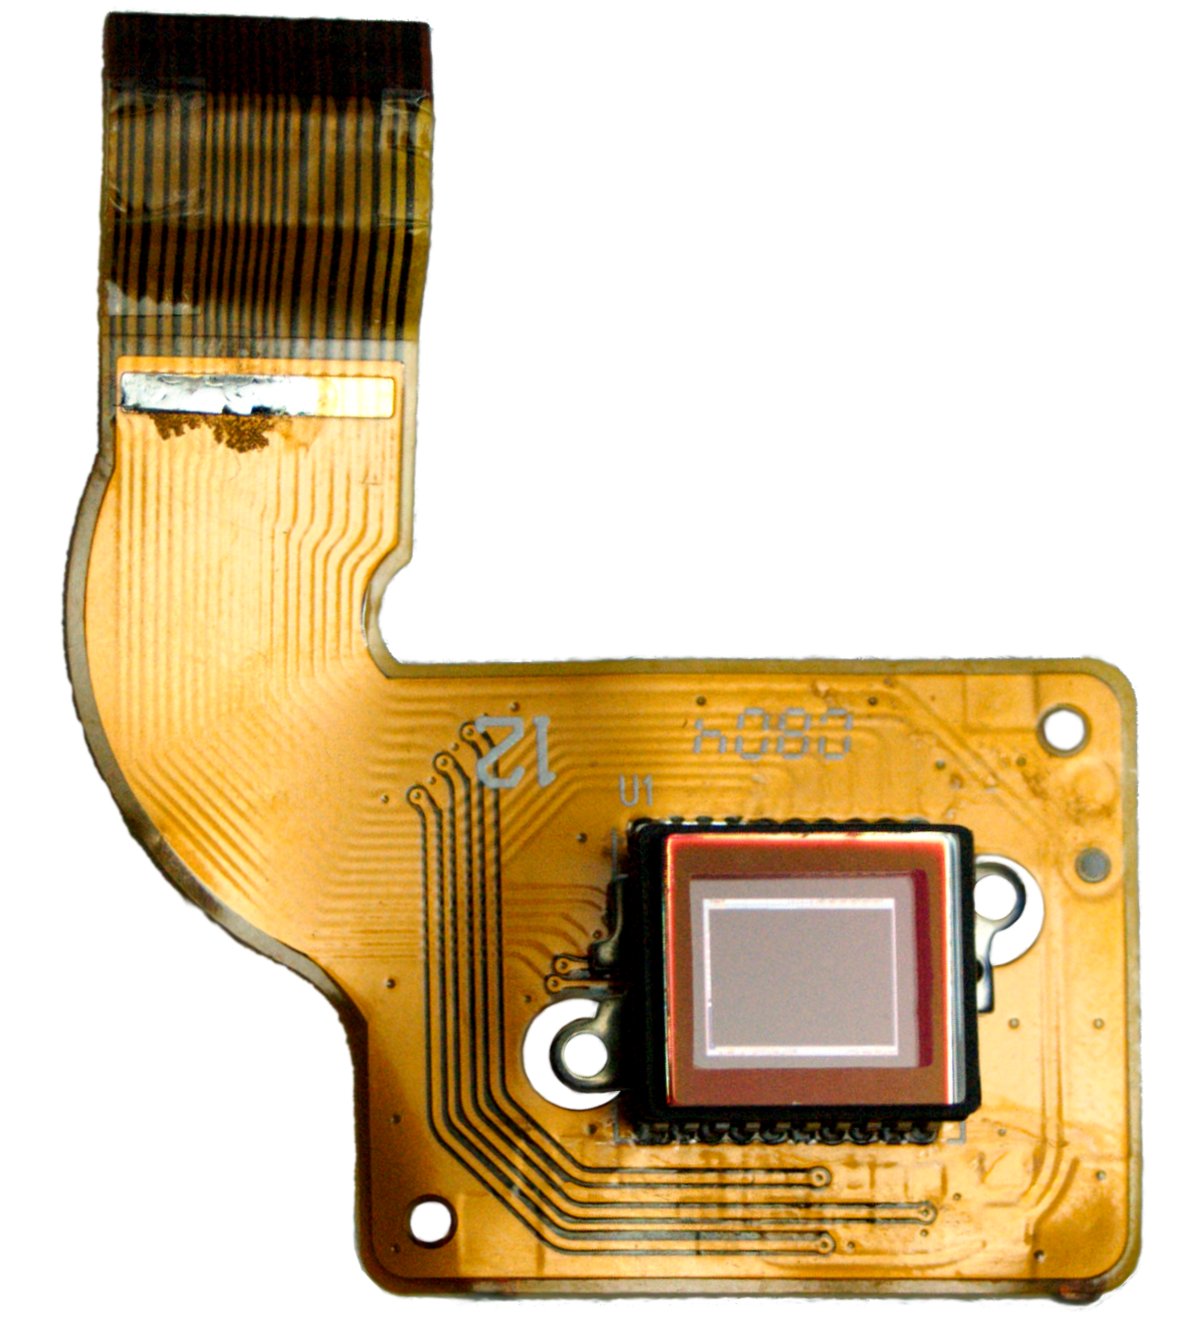
Image Sensor picture curtesy of Wikipedia  External link - opens new tab/page

Your image sensor is your camera!

Without it, you have no means of taking pictures. It makes sense to look after it and to prevent dust from getting onto the working surface. What can you do if it does get dust or other substances on it?

How does dust get onto your sensor?

In a variety of ways… The main entry point is the lens hole. Every time you open your camera, you expose the inside to dust. It is impossible to avoid this. However you can minimise the potential for dust entry…

  • Avoid any opening of your camera unless necessary.
  • Avoid dusty environments. Wipe down your camera with a slightly damp cloth and wipe dry before opening.
  • Avoid windy environments. Get out of the wind before opening.
  • Avoid damp environments: dry before opening. Moisture kills cameras and takes dust inside.
  • Hold your camera with the lens hole pointed toward the ground so that dust/skin/hair cannot fall into it.
  • Avoid having an open lens hole for any longer than necessary.
  • Do not breath or blow directly into the lens hole!
  • Avoid opening the camera in the warm soon after coming in from the cold. The same when entering air conditioned places from hot out-doors. Temperature differences cause air to be sucked in and moisture to condense inside the camera. Allow several hours to equalise temperatures inside and out before opening.

Some cameras leak in other places too… The battery cavity, plugs and jack holes for cables may allow air and dust inside. Every time you put a battery into the camera you are creating a piston to push air (and dust) into your camera. Beware – apply the same rules above for all plugs, batteries and cards movement.

I suspect dust on my sensor – how can I tell?

It’s sometimes difficult to tell if dust is on the lens or on the image sensor, or even if it is on the viewfinder. Here is how it is done.

A dust spot most often shows up on your pictures in the lightest areas. If you are looking for dust, hairs and specks then photographing blue sky does the trick. First, thoroughly clean your lens with lens cleaner and a proper lens cloth. It is best to do the photographs in aperture priority mode. Choose f22 or the smallest aperture. Zoom out to the maximum amount. Then, manually focus to infinity (the camera will probably not be able to auto-focus in a clear sky). Take a few pictures of the sky – the blue areas only.

Download the pictures to your computer. Enlarge them on-screen to the full size. Any dark spots, specks or lines you see on every picture in the same place are dust, other detritus or hairs. Birds, aircraft and UFO’s will be in different positions on the pictures.

What can I do about dust I find?

The simple answer is, clean it. This sounds terrifying. It really is not. It can be done in a few seconds with one simple piece of equipment. You will need to buy a blower. They are simple pump-action nozzles that expel fresh air against the sensor and blow off the dust. Here is the one I recommend… I have used them for years without any problem.


The Rocket Blower

Once you have your blower find out how to lock the mirror up on your DSLR. The mirror lock-up function will be somewhere in your menus. Check in your manual.

The procedure below is best with the camera on a tripod. You can look into the camera with your hands free to use the blower. There will be no danger of moving the camera while doing the blowing.
To blow-clean the sensor with the Rocket Blower:

  1. Mount camera on a fixed position/tripod away from contaminants.
  2. Take off your lens so the lens hole is open.
  3. Turn on your camera.
  4. Set mirror lock-up to enabled in your menu.
  5. Activate mirror lock-up for cleaning (as advised in the camera manual).
  6. There will be a click and you will now be able to see the sensor.
  7. Hold the blower so the nozzle points at the sensor, at about 60mm to 100mm from it.
  8. Squeeze the bulb of the blower about 3 to six times, directing the air at the sensor.
  9. Unlock the mirror lock-up (as advised in the camera manual).
  10. The mirror will click and drop.
  11. Turn off the camera.
  12. Replace the lens.
  13. Retest for dust – re-take sky pictures and view on the computer.
  14. Repeat if dust is still present. (Normally once or twice is enough).

The whole procedure for one test and clean-up should be about five to ten minutes.

Check that the procedure is compatible with instructions in your camera manual before proceeding. Follow any variations suggested.

Common Sense

Be sensible. While you are cleaning your sensor make sure you…

  • Use only air.
  • Use only the type of blower shown above (any similar brand).
  • Do not use compressed air (especially canned). It may damage your camera beyond repair.
  • Do not use other gases (they may contain particulates, corrosives or moisture).
  • Do not use anything to directly touch the sensor.
  • Do not use your mouth to blow into the hole – grease and bodily fluids will be forced onto the sensor surface and will not come off again.
If after three or four attempts you still have dust…

The next level of cleaning involves wiping the sensor with a sensor cleaning fluid and using a cleaning implement. This is a much more delicate operation. It should only be carried out if you are confident dealing with delicate electrical components. I do not cover this operation here. If not confident, take it to a properly accredited service agent for your camera manufacturer.

By Damon Guy (author and Photokonnexion editor)

Damon Guy - Netkonnexion

Damon Guy (Netkonnexion)

Damon is a writer-photog and editor of this site. He has run some major websites, a computing department and a digital image library. He started out as a trained teacher and now runs training for digital photographers.
See also: Editors ‘Bio’.