Tag Archives: Blown out

A quick tip to help you see the light (or darkness)

What is the nature of darkness?

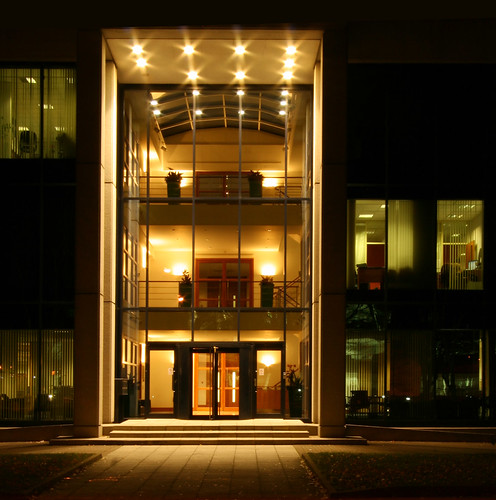
• Tall Entrance •
What is the nature of darkness?
Click image to view large.
• Tall Entrance • By Netkonnexion on Flickr External link - opens new tab/page

Of darkness and the essence of photography.

Dark is an obvious candidate to be the opposite to light. But is it in real terms the opposite of light? Darkness clearly makes for significant food for thought. Here are some ways to think about darkness with respect to cameras.

Darkness is the absence of light…

Er… no. It is easy to say that dark is the opposite of light. However, it clearly is not, because a shot like the one above successfully portrays the light as well as the dark in close proximity. Well… that depends how you see it. Or rather, that depends on how the camera sees it.

I cheated – slightly. The image was underexposed in the digital developing to accentuate the essence of the lights in the entrance. That prevented them blowing out, over-exposing the area surrounding them. It would have been easy to blow out large areas of the internal walls with bright patches of white. The cream colour in the entrance allowed me to keep the brightness down and still preserve the true colours. This would have been difficult in a long exposure with whites as the wall colour. The whites would have made the range of brights-to-darks too much for my camera. Details would have been lost at the ends of the light range (in the blacks and whites).

The cream paint in the entrance, and the tungsten lights gave me flexibility. It allowed me to keep most of the light and dark areas within the dynamic range of the camera. In other words, the camera could see both blacks and whites without losing detail in the important part of the image. Remember a camera will normally only work within a narrow range of light. Typically a (good) camera will be able to see (at maximum) across a range of between 8 and 12 stops of light. Not all that will be visible in the final photo – some detail will be lost depending on the display media. Using RAW will help you bring out lost detail but depending on the camera you may get digital noise. Nevertheless, about twelve stops of light will be retained in the data. Which allows a certain amount of editing freedom (in RAW).

What you need to do is make sure that the exposure captures the light intensity you intend as the focus of your image. I could have exposed to brighten the side windows. That would have made the entrance too bright (and blown out). However, I chose to expose for the brighter central entrance area, but lost the brightness in the side windows. I did that because I had a picture in my head of what I wanted to be the visual focal point of my picture – the entrance.

This picture shows us that darkness in photography is different to that which we see with our eyes. Understanding the nature of exposure helped me to spot that the light in the entrance could be contained within the range my camera could see. Although, a lot of detail has still been lost in the blacks. The darkness in this picture is an artificial creation of my cameras inability to see a wide range of light. Even to our eyes, darkness is relative to our eyesight and its ability to see contrasts.

The essence of photography is…

With this type of shot you need a clear idea in your head of what you want to produce. Also you need an idea of what the camera can do – it does not see the scene as you do. So, before you press the button you need to have clearly formulated your vision of the finished shot. You need to think your image into existence before pressing the button.

Great images are produced long before the shutter button is pressed. The ultimate aim of photography is to conjure up a vivid representation of the scene in the viewers mind. The essence of the act of photography is to create that before you take the shot. If you can do it you will truly be making images instead of taking pictures.


How to shoot bright white backgrounds

Shooting with a high-key background

Shooting with a high-key background – a two stage process.

Simple shots focus attention on the subject.

The bright-white background technique, known as high-key, is used in a wide variety of different photographic situations. It’s fun, easy to do and produces great shots. Here is how it’s done.

The technique is always the same if you are photographing a car or person in a big studio, or a tiny table-top still life. The aim of the technique is to get the subject surrounded by a seamless white surface. This will mean your subject is thrown up in stark contrast to the background. Then the viewer’s attention is directed at the subject because the eye has nowhere else to go. Effective, powerful and bright, the technique really makes your subject pop off the page.

There are two basic methods of doing high-key backgrounds. The first is to spend a long time in photoshop with masks, cloning and painting. You can, with some skill, make your image look like it was produced in camera. Good luck with that. It really does take a lot of time and effort.

The other way to do high key shots is create the bright-white background effect using lights and a white background.

Setting up

You will need something to create the white background. You can use a painted wall, white wallpaper, white card, sheets or pretty much anything else that is white. The brighter the white the easier it is to use.

You need a bright white light. An off-camera flash unit is great. If you don’t have one then you can use very bright house lights. Be careful there is no colour cast. It is advisable to consider some test shots to get the colour right.

To set up your shot you will need to put your subject in front of the white background. In the case of the shot above I was shooting downward onto a piece of card. In this case I put a small support under the hand-carved soapstone heart. This lifted it off the background a bit.

If you want no shadows at all, like the shot below, then you must present the subject far enough off the background that you can get a bright light in behind it.

High key shot with no shadows

High key shot with no shadows. The background is strongly lit up so it blows out to a perfect brilliant white. The subjects in the foreground are lit as they would be normally.

Lighting

Next, you need to position the light so it is pointed directly at the white background. In most cases you will want to point it so that the brightest point is immediately behind the subject. In the shot above it was positioned slightly at the top of the image because I was trying to create a little shadow under it. This made it look like it was floating. However, if you want no shadows then you must have all the bright light behind the subject.

Now take a test shot. The idea is that when the camera sees the white it will be so bright that it burns out the image wherever the white is exposed. If your white looks grey… then you need to brighten the white with more light (or take a longer exposure). If your subject is so overwhelmed with white from the background, you need to reduce the intensity of lights pointing at the background.

As with most photographic lighting, its a balance. To get your background just right you need to play with the light intensity up/down until you have a nice bright seamless background.

Now for the subject

Now you can, if necessary, adjust the lighting on the subject. If you are working with a person, ideally they would be one to two meters in front of the lighted background. So they might need to be lit with a separate light like a flash. Or, if you are working with a still life, the ambient light might be fine.

You are aiming at lighting the subject so the background is much brighter. The idea is that the contrast between the two is so great that the white is blown out… it becomes pure white because of the intensity of the reflected light. The subject needs to be lit normally so it is just how you would like it to look. To achieve that you might need to turn off the back light. You can use the normal exposure mode you use on your camera. Take the picture using flash if you want. Do a few test shots to get the lighting right on your subject with the back-lighting off.

The high-key shot

By now you have hopefully got some blown-out white background shots. You should also have some normally lit subject shots – just how you want it to look. Now it is time to switch on the background lights and, using the lighting you set up on the subject, take the shot with the bright background.

In photographic terms, you are aiming for the background light to be about one or two stops of light brighter than the subject you are shooting. An increase in light of one stop is a doubling of the light intensity. You will need to test that with a few shots.

To get it right you can test the lighting of the subject and background separately with a light meter, or with your on-camera light meter. You could just experiment using test shots and changing the lighting around. Or, you could use the ‘blinkies’ and ‘chimping’ method.

Whatever you choose, a few minutes experimenting will give you some idea of the brightness. Have fun!

By Damon Guy (author and Photokonnexion editor)

Damon Guy - Netkonnexion

Damon Guy (Netkonnexion)

Damon is a writer-photog and editor of this site. He has run some major websites, a computing department and a digital image library. He started out as a trained teacher and now runs training for digital photographers.
See also: Editors ‘Bio’.