Tag Archives: F-Stop

A simple way to make and use a seamless white wall

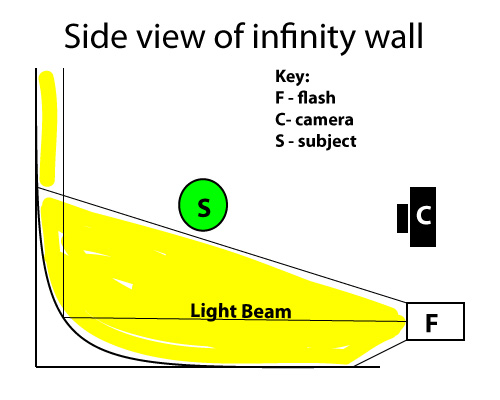
The infinity wall is a way of completing a seamless white background

The infinity wall is a way of completing a seamless white background. Notice the flash (F) lights the background NOT the subject (S). The latter needs to be separately lit.

Seamless white backgrounds are popular and fun.

White is the perfect background for high brightness shots. Sufficient brightness will blow out the white image areas to pure white. The white highlights your subject giving it prominence. To produce this High Key effect you need to create a curved wall to project light onto. As the wall is made from a curve no lines will be apparent on the shot. It is only lines and shadows that show up. So the curve, if brightly lit, will create a seamless wall. When you look at it in the shot it will appear to go on for an infinite depth. The brightness in this technique will create a high key shot. This is a popular technique in photography and is enjoying great popularity in fashion and magazine media.

Creating the wall

As you can see from the diagram above (simplified) the principle is easy. It can be applied at any scale. I create a small table-top studio for product shots and still life. Here is how it is done…

  1. Create a flat surface up against an upright surface. I push a table against a wall.
  2. Use a large piece of white card say, European size ‘A0’ 1189 x 841 mm (46.8 x 33.1 in); or ‘A1’ 841 x 594 mm (33.1 x 23.4 in.).
  3. Fix it so the card is bent gently into a curve between the table and the wall. The side-diagram above shows the approximate shape.
  4. The diagram shows the flash below the camera. This position is for diagrammatic reasons. Normally the light will be alongside the setup or the subject (more on this below). The light beam shows the direction of light. This illuminates the card along the table and bounces off the curve lighting the wall above. This provides a well illuminated white surface.
  5. If the flash is about 2 stops brighter than the subject it will show as brilliant white in your photo. If you don’t have a light meter you can test the brightness with a few shots. If the white is brilliant white and seamless in your test shots you can start to set up the subject.
  6. The ‘subject’ in the diagram is your photo-target. Find a way to mount it, hang it or support it off the white surface. The aim is to make the light pass under, behind or around the subject. You are NOT trying to illuminate your subject. The light or flash is for the background curve only, to create a shadowless white depth. If you need to illuminate the subject do it separately – see below.
  7. Place the subject a clear distance from the infinity wall. Too close and the bright light reflecting from the wall creates a hazy white back-light on the subject. Experiment to position it away from the bright background. About 2 or 3 feet separation on a small wall is good. In a studio with people or larger objects the subject can stand about 2 to 3 Meters (6 to 12 feet) from the wall. This allows sufficient space to illuminate the wall clear of the subject.
  8. Placing your subject on something will create a shadow. Place the flash to the side of the subject. The idea is to create a light that goes around or between the wall and the subject. The reflecting back light will illuminate the space between the wall and the subject and over-ride any shadow created by the subjects own light.
  9. The illumination of the curve and white areas is created by an off-camera flash. If you don’t have one you can use any bright light(s) that you can direct at the curve/white areas behind the subject. Beware of any colour cast it may create. If you get the light bright enough the colour cast will go white anyway. You should make sure you compensate for any colour cast you detect.
  10. Positioning light(s) for the background is a matter of experiment. Try out different positions to get the optimum lighting. Sometimes you can place the light completely behind the subject. Other times you might place them either side of the subject. It could be just one side of the subject. In fact you can place the lights anywhere as long as they don’t illuminate the subject. It all depends on:
    • The size of wall/curve you are lighting
    • How close you can get the lights without illuminating the subject
    • The power of the lights

    Each shot is different. A few test shots will reveal the best position(s).

Illuminating the subject

Since the subject is not illuminated by the infinity wall light(s) you will need to consider separate flash or light sources for that. You could use a pop-up flash on your camera, the ambient light or off-camera lights.

Creating the blown-out brilliant white effect is the result of bright light on the infinity wall AND the difference in light intensity to the subject. You may need to experiment. A light meter will help you judge for about a two stop difference between the two. However, you can do it by experimenting. Your subject should look normally exposed. It should not be over-bright. Skin tones should be normal if photographing people in a larger set-up.

Using artistic licence is of course up to you. Some photographers like high-key shots to be almost all white. In this case a white sheen is found all over the shot including the subject. Others like to have the subject in a moodier lower light situation to create a strong contrast. This latter approach is difficult. A very dark subject and a very bright background creates a silhouette. So, again, try experiment. Here are some examples on Google…
High Key lighting/photography images on Google.

Taking the shots

Once you have illuminated your subject you can take the shot in the normal way. If you are using a manual mode you should be careful to meter off your subject. If you meter too close to the bright white area the meter will expose for the white background. This will create a silhouette of your foreground subject. If you are using auto-mode you must make sure your focus points in the viewfinder are pointed at the subject.

You can set your aperture as you would normally. You are working relatively close. So with bigger subjects and people working at f5.6 is great. Working with larger apertures (say f4.0 or larger) gives you a shallow depth of field. This is an advantage because the white background will not reveal bokeh but will make the blown-out white a more even colour. If you find you need to work with very small apertures (say f14 or smaller) you are probably over-lighting your subject.

To master the high key technique takes practice like all other photography work. However its fun and interesting to get this technique right. Please leave comments or questions below. I would be happy to provide feedback too. Please send links so I can look at your shots.

Six things you must know for a night shoot

Night photography is fun. A little foreknowledge makes your night shoot easy

Night photography is fun. A little foreknowledge helps make it easy

Night shoots can yield great images with a little thought.

There are a few things that will help you get better results. Understand your equipment, ensure you have a steady base, work with your settings. After that it’s about your photographic skills.

1. Before your shoot

Plan ahead for your night shoot. A little thought about night composition is useful. Consider your safety too. In the dark it’s easy to injure yourself, break equipment and lose things. These two articles will help to prepare you:
Preparing for a Night Shoot
Out on a Night Shoot – Night Composition

2. Equipment

You will need to use longer exposures on a night shoot. This means that to get a sharp image you should use a tripod. Most night exposures in an urban environment are from about two seconds to about 30 seconds. Some could be much longer than that, especially if you are outside urban areas where there is little light pollution.

You cannot get a sharp image hand-holding your camera for extended exposure periods. Tripods provide a stable platform at at any time. At night they are essential. If you don’t have a tripod there are alternatives, although I have not found any as effective and flexible as a good tripod.

You can use any of your ordinary day equipment on a night shoot. Lenses, cameras and even flash can be used with no problem. However, you may need to use your equipment in very different ways to the daytime. Also, be prepared to get very different results. You will need to experiment to get familiar with your equipment in night conditions.

You can’t use a Flash-light (torch) when you are shooting, it will affect your local light conditions and the shots you take. Switching a torch on and off will also cause night blindness. You have wait while your eyes adjust to the change in light levels each time. You can get away with a red-light LED torch. I have one that I can wear on my head and it has a red and white light. Red lights don’t spoil your night vision so much. They do affect the shot. So don’t forget to turn them off when shooting.

It’s best to work with the ambient light if you can, especially in urban areas. Using your equipment at night requires that you have a finger touch familiarity. You will probably be surprised if you have been using your camera a lot. You may know many of the buttons by touch anyway. However, some buttons you may not know. Practice builds familiarity.

3. Anti-vibration compensation

One button you may not be familiar with is the one to turn on/off vibration compensation motors. These motors, usually in your lens, help stabilise your shots (Canon: Image Stabilisation; Nikon: Vibration Reduction). They help reduce movement from hand-shake. On a tripod the motor causes vibration which is amplified by the tripod – making the situation worse. This is not just a night shoot trick to reduce vibration, it should be used any time you are using a tripod. It helps your image to be sharper if you reduce anything that causes vibration or movement.

4. Auto-focus (AF) and Manual focus (MF)

At night it is quite likely AF will not work. It might appear to be ‘hunting’ for a focus but not find it. Don’t worry! If you focus on the margin between a light and dark spot it will work again. AF works by detecting contrasts. Anyway, it is better to turn off AF and use MF. Manual focus is much more precise at night. It also stops the lens from ‘hunting’ for a focus point.

5. Flash

Think about how you want to use your flash. If you are using auto-settings your flash may fire when you don’t want it to go off. Read your manual to find out how to turn it off. You will also find a way to change the light intensity of your flash. On-camera flash is a particularly poor tool at night and is very difficult to use to any effect at all. My advice is turn it off for your night shoot work. If you must use flash, consider off-camera flash. Now that IS fun!

In general, you don’t need flash on a night shoot for general shots. In an urban environment the lights are sufficient from the streets. However, the length of your exposure could be very long. You might usefully use off-camera flash to manually fire to illuminate something, a statue, a tree, a car… whatever. The pattern of flashes you fire will determine your local lighting. In the dark flash will only effectively light a small area around where it is fired. So, don’t expect it to light up your whole shot. There will be an article later on night-lighting shots.

6. Settings for a night shoot

If you are using auto-settings on a night shoot you will have problems. There may be a night-mode setting on your camera. Don’t expect to get great results with it. Best results come with manually setting the camera up yourself while doing a night shoot. You should consult your manual if you really want to use pre-programmed settings.

Learn how to use manual settings from the start. A night shoot is great fun. Getting the results you want makes it really worthwhile. Use ‘M’ – manual mode. This is the only certain way to get the results you want. Remember, the length of the exposure is the critical setting on a night shoot. You will be working with long exposures all the time. The shutter may be open between a tenth of a second through to, well, possibly hours. It’s more likely you will start with settings of around 1 to 30 seconds. After 30 seconds you will need to change to the ‘B’ or bulb mode setting on DSLRcameras.

Long exposures are like filling a bucket with water. Over time the bucket gradually fills up. Over a long exposure light fills the shot making it brighter and brighter. Even moderate local lights may overwhelm areas of your long exposure with brightness. However, without a longer exposure you will not get enough light for the darker areas of the scene. Here are some basic pointers.

  • A wide Aperture lets in more light (settings around f4 or less are wide open). You will have a lot of bokeh in the background with a wide aperture. To avoid that you will need a longer exposure (and a narrower aperture).
  • A high ISO will permit faster exposures. High ISO settings will create a lot of digital noise in the final image. To avoid that you should use low ISO and a longer exposure.
  • Longer exposures (shutter speed or time value) give you greater clarity and a wider depth of field in your shot. However, the camera will be much more vulnerable to vibration. (Tripod – remember?).

You will need to adjust your settings to create the correct exposure. If you have not used manual settings before you should consider this simple set up…
(Assumption: urban environment at night, some street lights and other lighting)
– Set ISO to 100 (Low ISO will give low noise – the best quality image).
– Set aperture to f8 for close focus. Landscapes/long focus, use f14.
– Set Time value (shutter speed) to about two seconds.
Now take a shot and check the screen to see what it is like (“Chimping”)
Black? Too dark? – OK, turn the shutter speed on one click and try again, and again, until your shot looks right.
In fact the internal light meter will show you when the exposure is correct. When you push the release button half way, the needle in the bottom of the viewfinder (DSLR) will be centred.

A little experimental work with longer or shorter shutter speeds will give you an opportunity to try out a few shots. Having a go is the best way to move forward with night shots. Everyone messes up quite a lot of shots to start with until you get the feel for the correct exposure. It’s really rewarding when it goes right! Have fun…

By Damon Guy (author and Photokonnexion editor)

Damon Guy - Netkonnexion

Damon Guy (Netkonnexion)

Damon is a writer-photog and editor of this site. He has run some major websites, a computing department and a digital image library. He started out as a trained teacher and now runs training for digital photographers.
See also: Editors ‘Bio’.

Use window light for portraits

You don’t have to have strobes or flash for great light.

The quality of your shot is not proportional to how much equipment you have. You can create great shots with simple equipment and great light. Got a camera and window? You are nearly there.

In the video below you can see simple steps to create great shots often come from simple set-ups. It is the simplicity that often makes these shots work well. A great portrait shows off the subject and if the environment is understated they become the main focus. Simple light and simple props are the key.

The photographer, JP Morgan, uses lighting contrasts, hard and soft light with reflectors to manipulate the light in this portrait session. The use of the light is constantly aimed at creating shadows that flatter the face and colours that bring out the skin tones.

Although he does not mention it, look out for highlights on the skin of the subjects. Did you see any? Well, he used the light at a natural level to control the highlights. Flash often creates nasty bleached highlights on prominent features of the face. That distracts from the overall view of the face and destroys the balance. Natural light, especially soft light helps to minimise highlights and that brings out the character of the face more.

Notice that he explored the different potentials of the two girls to suit them. Skin tone, hair colour, clothes and posture were all considerations. Notice too that most of the poses were ones that suited the girls individual character. They probably had a lot of input to those positions. Remember to involve your portrait subject, they will respond better and photograph better if you work with them and make it about them.
More after this…

He worked the scene continuously. He used reflected light a lot to prevent the camera creating a silhouette against the window light. The reflector brought the natural light to the front of the shot, but toned it down. This meant there was a difference between the intensity of the window light and the subject lighting.

The creative use of shadows is great. They are endlessly fascinating to work with and they make a scene look deeper and more natural. The window frame on this shoot also made the shadows more dramatic which complemented the girls own shadow.

This video is an interesting insight to shooting with natural window light. There is also a lot about how to work with a model there too. Watch out for the way the girls seem to be enjoying themselves.

Some Quick Portrait Tips

It goes without saying that every photographer has to do portraits at some time. I remember that I took some great portraits back in the day… or did I? Well, I laugh at myself now because when I look back at my early portraits I made all the classic mistakes! I cut off bits, I got the lighting wrong, I fluffed the focus. Well I guess we all did those things at least once.

In this video are some very quick tips to improve your portraits. I expect that you have got past the mistakes I made above! So these quick points are nice easy ways to move forward with your portrait shots without too much effort. Small changes make for big improvements in the shots. So have a look at this…

Can you write? Of course you can!
Write for Photokonnexion...

We would love to have your articles or tips posted on our site.
Find out more…
Write for Photokonnexion.

How do you make a camera lens?

A lens is a high-tech piece of equipment

We don’t see what goes into their production and we also see straight through them. So it is easy to see why lenses are not appreciated as high-tech components. So when I saw these three videos I was suddenly intrigued. They are produced by Canon to show what goes into making lenses. Considering how much work and manufacturing technology is involved we should not be surprised by the cost.

The first video in the series especially fascinated me. I had no idea that creating the glass in lenses was such an involved process. It is not just glass, it is high-quality, high-technology, high production work all in one.

More after the jump…

The grinding of the lenses is also a very precise and time-intensive process. The coatings applied to lenses are high-tech processes too.

In the final video we see how a lens is actually constructed. There is a lot of very detailed and skilled work done by hand. The use use of a whole range of special tools and adhesives makes it inadvisable to take lenes apart!

A personal recommendation…
This little lens cloth is a very handy item. It hangs on any ring or strap right next to your camera. It’s completely out of the way until you need it and then it is right on hand. It is a quality cloth and because if is always near at hand reminds you to keep your lenses clean. Clean lenses have a longer life and your images will be free of dirt smudges.
Lenses are expensive. Protect them for the long-run. Buy now while you remember!


Controlling the Depth of Field (DoF) – Three Tips

When we take a photograph the aperture (f/stops) controls how much light is allowed into the camera. It also controls the Depth of Field (DoF). The point at which the camera is able to get focused (in the foreground), through to the point where it loses its sharpness in the distance is called DoF. In other words the DoF is where the lens can focus.

Reviewing Depth of Field

A wider aperture lets in more light. However, the wide aperture creates a shallow DoF – the distance between points where the focus is sharp is close together.

When the aperture is small only a small amount of light is allowed in to the camera. In this case the depth of field is deep – the distance between points where the focus is sharp are far apart.

The terms Shallow/Deep can be changed for thick/thin or narrow/wide. The words are just describing the relative distance in which the focus is sharp.

The video below shows three ways you can affect the DoF. I have mentioned aperture above. The other two are revealed in the video. After the video are my tips for today.

As you can see from the video the three methods for controlling depth of field are…

  1. Changing the diameter of the aperture
  2. The distance you are from your subject
  3. The lens you are using
Tip no. 1

Changing your aperture size affects the near and far edges of focus differently. As the aperture is made smaller, the DoF extends faster into the distance than it does in the foreground. The DoF extends 2/3rds further away in the distance and only 1/3 toward the camera in the foreground. When placing your subject you should remember this. You will need to move the subject much further back to widen the DoF, than you would need to bring them forward to narrow the depth of field.

Tip no. 2

The further you are from an object the wider the DoF can be. With a 50mm lens at f/1.8 (Wide aperture) you may not get enough DoF to have a persons whole head sharp if they are near to you. The face may be in focus, but the hair and ears may well be out of focus. The DoF is only a few centimeters. If you keep the focal length the same, but move the person further away from you, the DoF increases. So, if you are having trouble getting enough depth of field when close, move back a bit. Simple!

Tip no. 3

The type of lens you are using does not actually affect the DoF. In fact it is the way most people use particular lenses that give the impression of a changed DoF. Using a wide angle lens people tend to view a wider perspective and so will tend to narrow the aperture to create sharpness in the distance. When using a telephoto lens they tend to use it to magnify. In doing so they magnify the out-of-focus area (bokeh) in the distance which makes it appear the DoF is closer. In other words, the degree of magnification causes an apparent (not actual), closer DoF.

By Damon Guy (author and Photokonnexion editor)

Damon Guy - Netkonnexion

Damon Guy (Netkonnexion)

Damon is a writer-photog and editor of this site. He has run some major websites, a computing department and a digital image library. He started out as a trained teacher and now runs training for digital photographers.
See also: Editors ‘Bio’.

The Aperture in Action

Seeing the aperture in action

In a previous post I showed a video that documented how a camera shutter works. Quite a short video, it looked at what happens when the shutter button is pressed and the shutter is activated. In the video below the authors have used a high speed video camera shooting at 1000 frames per second. They have used it to examine how a Nikon D4 shoots video at eleven frames per second. This Nikon is actually taking eleven still photographs per second.

From our point of view, in this video you can see, the shutter working, the cameras’ mirror lifting and the aperture opening and shutting. In particular the open/shut movement of the aperture shows how it changes the size of the hole in the centre of the diaphragm. It is worth taking a moment to see this in action. It is a great demonstration of the working aperture. If you read about the iris-diaphragm, you will understand how the aperture and iris mechanism works to create the aperture and to change its size. The part with the working diaphragm is near to the end of the video.
Video Authors: Scheimpflug Employees Jason Kolsch, and Jayson Jordan

Can you write? Of course you can!
Write for Photokonnexion...

We would love to have your articles or tips posted on our site.
Find out more…
Write for Photokonnexion.