Tag Archives: Exposure tips

Getting the right shutter speed

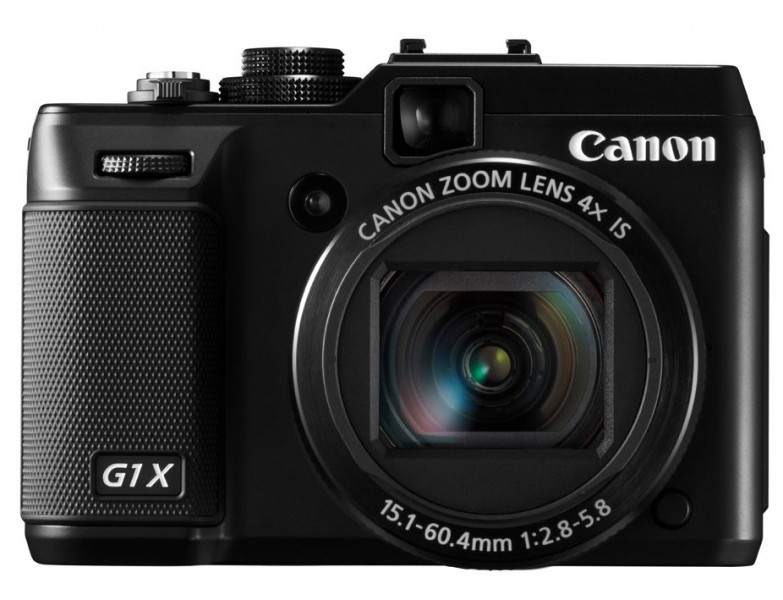
New Canon Powershot G1X Digital Point-and-Shoot With SLR control

The Canon Powershot G1X Digital Point-and-Shoot With SLR control. Billed by Canon as the “Highest Image Quality Powershot Digital Camera”

Getting sharpness right…

It’s not just about the right camera. It is also about technique and knowing the best way to set up your shot. Getting the right shutter speed takes a little knowledge when you are starting from scratch. Here are some pointers to help you make choices about shutter speed.

Why set your own shutter speed?

Getting full control of your camera is an important aspect of gaining creative control over the outcome of your photographs. Despite what the manufacturers say, you can only achieve so much by messing around with their ‘modes’. Capturing pictures using camera modes other than the basic photographic modes (ISO, aperture, shutter speed) is going to give you a programmed result. In other words ‘modes’ are what some boffin back at the lab has formulated as ‘about right’ for the average photos people take. But, you are not average are you? You want to produce the shot your way. So gaining control over your shutter speed is important.

The long and short of it

Shutter speed gives us creative control in a number of ways. A very shallow depth of field will give great bokeh in the background. But it is difficult to create on a bright day unless you have a fast shutter speed (to reduce the incoming light). Bokeh is created by a wide aperture. A wide aperture lets a lot of light in. If the shutter is open too long the photograph will be overexposed. So a shorter shutter speed is required.

Shutter speed also controls movement blur. If you are taking a photo of a moving object a relatively long shutter speed will create greater blur (example 1/15th sec). A very short shutter speed will tend to freeze the action preventing blur (example 1/500th second).

Sharpness counts

Starting to control your shutter speed is often about finding the best shutter speed that you can handle for a sharp result. So what is the lowest hand held shutter speed you can apply?

Actually, in practical terms, the slowest hand-held shutter speed is reliant on a number of factors…

  • Physical fitness: If you are not strong enough for using your camera weight it is more difficult to hold it steady. Regular practice with your camera will help you build muscles to steady your hand and therefore shoot at lower shutter speeds.
  • Focal length: Longer focal lengths tend to need higher shutter speeds. As you shoot further into the distance the angle of movement seen at the point of focus is more exaggerated.
  • Optical stabilisation: If your lens is optically stabilised this means it will compensate for the tiny movements of your hands. This compensation will help you to reduce hand shake and therefore give you potentially longer shutter speeds.
  • The picture you want to create: Obviously, the picture you want to produce is dependent on how much blur you want in it. So if you want no blur (for the sharpest result) you want a fast shutter speed.
  • The amount of light: Brighter light allows you to have a shorter shutter speed. Knowing when to use a tripod instead of hand-held is the crucial issue here. Most people simply give up if a low shutter speed demands a tripod… For the accomplished photographer many of the best shots are found in low light situations. So shutter speed control is of crucial importance – as important as using a tripod at the right time.
Rule of thumb

Those factors aside here is a rule of thumb. In practice most people do not shoot with a steady enough hand to produce sharp hand-held shots below 1/60th second. Of course, optical stabilisation on the lens will help you get longer shutter speeds. But even then a practical limit of 1/30th of a second is about as low as you can go and be sharp. That is not a shutter speed I would suggest you work with regularly when hand-held.

Best guide to shutter speed

The shutter speed you need to work to is often related to the focal length you are working with. There is a reasonable rule that can help you get a good guide to picking the best shutter speed for your focal length. It is said that the longest shutter speed you can use hand-held for a lens or zoom setting is:

1 divided by the Focal length times 1.5

So, if your lens is a normal lens at 50mm it will have an effective lowest hand-held shutter speed of 1/(50 x 1.5) or 1/75. The nearest (rounded up) setting on your camera is likely to be 1/80th second.

If you are working at 200mm then, 1/(200 x 1.5) or 1/300th of a second will be your lowest working shutter speed. The nearest setting on most cameras will be 1/320th second.

These apply if you are not using optical stabilisation. You can of course work one or maybe two stops faster if you are using stabilisation. You will need to check that figure against your lens specification. Most optical stabilisation systems will give you between one and two stops extra control.

Shutter speed standard

shutter speed is standardized on a 2:1 scale. When you open the aperture on single aperture stop and at the same time reduce shutter speed by a single step the result will be an identical exposure. This table shows the shutter stop standard steps…

  • 1/2000 sec
  • 1/1000 sec
  • 1/500 sec
  • 1/250 sec
  • 1/125 sec
  • 1/60 sec
  • 1/30 sec
  • 1/15 sec
  • 1/8 sec
  • 1/4 sec
  • 1/2 sec
  • 1 sec

The scale extends up above these figures to very high shutter speeds. Up to date DSLRs may allow have shutter speeds of less than 1/5000ths of a second. Very fast indeed. While at the other end cameras will allow long shutter speeds of up to 30 seconds in manual modes (M mode; or Manual) and longer in “bulb mode”.

Each of the steps in the table above will be equal to a change of one stop of light up or down. A change of one stop of light will double the amount of light entering the camera.

As one stop of light is quite a large amount, cameras have become more sophisticated. Most are now marked off with thirds of a stop for ISO, aperture and shutter speed. So your calculations can be quite precise and lie between these values in the table above.

You can read more about stops of light here: Definition: f number; f stop; Stop

Doing it right

Gaining control over your camera is of importance if you want to become a creative master of its full potential. Learning about shutter speed and other aspects of exposure are critical to learning that control. You can have great fun creating bokeh and controlling movement blur. At the same time you can remove that other type of blur – ugly hand-held shake-blur.

Please leave questions and issues for us to discuss if you want to take this further…

By Damon Guy (author and Photokonnexion editor)

Damon Guy - Netkonnexion

Damon Guy (Netkonnexion)

Damon is a writer-photog and editor of this site. He has run some major websites, a computing department and a digital image library. He started out as a trained teacher and now runs training for digital photographers.
See also: Editors ‘Bio’.

Correct snow scenes using exposure compensation

Bright snow scenes create a problem with the auto-settings for exposure

Bright snow scenes create a problem with the auto-settings for exposure
Click image to view large
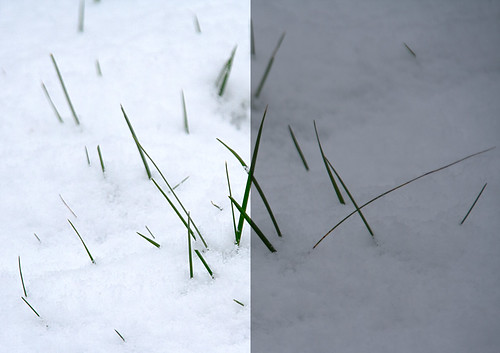
Green shoots through the snow By Netkonnexion on Flickr External link - opens new tab/page

Snow reveals a problem with auto-modes.

The brightness of a snow scene throws off exposure. Cameras in auto-modes work to a “normal” type of scene. When unusually bright scenes are encountered the camera cannot compensate. It leaves the scene grey. This is because the camera is calibrated to work with a mix of colours, light and darks that represent the sort of scene we encounter every day. It senses the luminance levels in the scene and sets exposure to the middle of the range between light and dark.

If the camera senses an unusually bright scene, like the snow scene above, it is unable to compensate properly. The brightness is outside its normal range of compensation. The camera responds by underexposing the shot, and the snow turns grey. The photograph above shows the scene as shot in the right hand panel. It is grey. The left hand panel shows the correct exposure after the underexposure is compensated by an exposure compensation of 1.66 stops (one and two thirds stops). (See: Definition: f-stops)

Photographers are more accurate than camera auto settings

In these bright (or dark situations) we can dial in exposure compensation to manually set the scene to be brighter. Using the exposure compensation we can increase the exposure to brighten the scene (+ settings) or even darken the scene (- settings) as appropriate. Then, we take another picture. By looking at the screen on the camera (“Chimping”) we can get the exposure correct by adjusting the exposure compensation to correctly whiten the scene.

This exposure compensation principle applies to the camera modes which are automatic or semi-automatic. In full auto, the camera calculates the exposure by balancing the ISO, shutter speed and aperture settings. However, in the semi-automatic modes the photographer changes one of the settings while the camera changes the other. In these modes, as in full-auto, the camera can still make the mistake of under-exposing (or over-exposing). Only the photographer can judge the exposure correctly.

When using aperture priority mode, you the photographer, makes the decision on the aperture size (f-stop setting). The camera calculates the appropriate shutter speed. If your camera cannot correctly interpret the scene, as with snow for example, then you will need to dial the exposure compensation to correct for the under-exposure. If you are using shutter priority, same again, the camera calculates the aperture (f-stop) setting. If the camera makes a wrong exposure decision, you can manually set the exposure compensation to over-ride the f-stop setting the camera would set.

Full manual mode, where the photographer sets all the settings directly, cannot use exposure compensation. In this mode the photographer makes all the decisions. The camera does not interfere with the exposure settings. In this case the photographer is free to make decisions to fix the exposure setting for all three factors of exposure – ISO, aperture and shutter speed. There can be no element of compensation for a failed camera decision. The photographer stands by their own settings and has full discretion to control the exposure as they wish. Deliberate over or under-exposure as well as accurate exposure are all possible. It is for this reason that I urge you to work in full manual where you can. You have far more control over the outcome of the shot. You also as a consequence have more artistic control over your image.

If you are working in RAW, the native data mode of image files in camera, it is possible to correct for camera exposure errors in post-processing. As I have argued elsewhere it is better to try and get all the settings correct in camera than to spend time processing afterwards for a number of reasons. So, no matter what file type you are using, try to set the shot up correctly from the start.

There you have it. Exposure compensation is a camera setting which is wholly dedicated to compensating for the mess-ups that the camera makes with its exposure calculations in auto or semi-auto modes. But when using auto-modes, and/or using *.jpg files, it is essential to be able to compensate for the cameras’ failings by using exposure compensation – otherwise your snow will be grey!

find out more...Photokonnexion tips by email
If you enjoyed this article please sign up for our
daily email service.
                                                 Find out more…
#11030#


By Damon Guy (author and Photokonnexion editor)

Damon Guy - Netkonnexion

Damon Guy (Netkonnexion)

Damon is a writer-photog and editor of this site. He has run some major websites, a computing department and a digital image library. He started out as a trained teacher and now runs training for digital photographers.
See also: Editors ‘Bio’.

How to do night photography when starting out

Night shots capture the imagination and the eye.

It is all about making sure that your viewer is drawn into your photograph. The rich colours and strong contrasts are really great for attracting the eye. In this post we will look at doing great night photography.

Night photography is simple

A lot of starters think night photography is difficult. Well it is not difficult, it is different. There is less light – obviously. There is also more light in some ways. This is because the difference between the light and dark portions of your picture are more extreme. In A quick tip to help you see the light (or darkness) we saw that the camera is not as good as the eye in distinguishing wide differences between light and dark. When shooting at night that is something we should remember.

We should not point our camera at a very bright light source at night. This is because it will over-expose quickly and the rest of the scene will remain dark. The darker parts expose slower. Try to find ways to expose your scene where the spread of light is of less extreme whites and blacks.

The concept of night photography is about exploiting light when the rest of the environment is dark. The aim therefore is to make sure you are exposing for the light you want to bring out in your picture. Almost certainly that will mean you need to do longer exposure than for the daytime. As you will see in the video this is not complicated to do. You will need to explore some settings you may not have used before. But photography is all about learning – right? OK…

Here is one idea that will simplify the thinking behind all sorts of exposure situations…

  • Picture a bucket in your mind.
  • Now picture filling it up with a hose.
  • At first you turn the tap a very little.
  • The water trickles out.
  • The bucket takes a long time to fill to the brim, but does get there.
  • Now repeat with the tap turned up more (twice as fast).
  • The bucket fills faster. In half the time in fact.
  • Now repeat again filling the bucket to the brim – tap open fully (speed x4).
  • The bucked fills half as fast again.

The bucket of water is like an exposure. To get the picture light enough you need to fill the camera with the right amount of light (to the bucket rim). At night you have to wait a long time for your exposure to fill to the brim (water at a trickle) because there is less light around. In early evening/dusk you have to wait for the exposure to fill in half the time (tap at half speed) because there is more light before sundown. During the day all that light pretty much zaps the bucket (sorry camera) full of light in double quick time.

OK, now you know all there is to know about exposure. That’s it. All you have to do is practice with the camera settings to wait for a while to fill up at night, wide aperture, long shutter opening to let in as much light as possible.

In the video the CameraLabs team have described the types of setting you might use and how to set them up. The explanation is clear and the settings simple. I think you will learn a lot.

DSLR Tips: Night Photography by CameraLabs
As an aside…

You notice in my bucket analogy how we tested fills? In photography each time you go up or down a stop of light you are halving or doubling the amount of light. Of course, in the bucket situation the timing and change-of-fill speed are not accurate – its only a thought experiment. But you get the idea. I am trying to show you how an exposure builds up over seconds (at night) or thousandths of seconds (during the day). And, the rate it fills is related to the amount of light around. That is measured in stops. Consider reading this article: Definition: f number; f stop; Stop. It will help you to understand the relationship between stops of light and exposure.