Tag Archives: Reflection

What good is a lens hood?

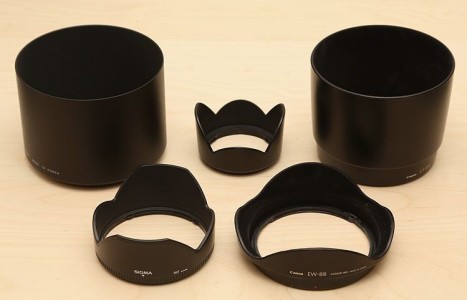
Five Types Of Lens Hood

• Five Types Of Lens Hood •
Attribution: Photo of five lens hoods for a mix of lenses; March 2013; Author: Geni; Permission: GFDL CC-BY-SA

Using a lens hood is important.

It is not always clear why we need a lens hood. Why do we need them and what are they for? Actually they are pretty important and can help prevent some nasty visual artefacts.

What is going on in the lens

Normally photographic lenses perform really well. They receive light reflected from your subject as parallel beams. These are focused by the lens into an image formed on the digital image sensor.

When light hits the lens from the side the situation is slightly different. Some of the light is refracted through the lens correctly. Some of the light however, is reflected off the surface and lost. But there is a percentage of light that goes astray in the lens. It can be bounced around in the lens – reflecting around from the surfaces of different lens elements internally. If it does so, on each reflection some of the light will get through to the sensor. Each time that happens there will be a slightly side-shifted ghost image. All sorts of light aberrations can be created by this internal reflection in the lens. It is these that cause the artefacts you see in the image.

Light is also scattered by inconsistencies in the lens glass. Chemical, and structural variations in the glass can impact on the way the light travels through the lens. This scatter contributes to the problem. These artefacts, and often an associated haze, are called lens flare and can be worse the further to the side that the light enters the lens. Flare and haze will not only form a distraction but also act to wash out the colours in your shot and reduce contrasts. These will make your picture look flat and lifeless. Unintended flare can simply kill the effectiveness of the shot.

A sharp angle of side-light can therefore cause all sorts of visual image ghosts which are not there in the scene. You can see a range of different types of flare in this Google image search…
Google images: Example lens flare images  External link - opens new tab/page

In general, poor quality glass and multiple elements in the photographic lens will tend to create more flare. Of course better lenses (read: “more expensive”) can help to reduce the problem. Higher quality lenses will incorporate a range of ways to reduce the problem. These include optimised lens-element design, surface coatings and non-reflective surfaces/parts internally as well as high quality glass. Despite that no lens is immune to flare.

What does a lens hood do?

The most common reason we use a lens hood is to reduce the incidence of a bright light source hitting the lens from the side. This will act to reduce the chance that the lens will suffer from the flare problem. In other words, the hood will help to keep the light coming in from the front of the lens in parallel rays.

It is simple really. Put up a wall at the side and the side light is cut out. However, it is not so simple to design a lens hood that will do that without obstructing the lens. The field of view of the lens cannot be allowed to catch the hood sides. If it does it will leave its mark on the image. So all sorts of hood shapes and sizes are required to match the visual characteristics of the lens. Lens hoods are quirky shapes because they have been designed to optimally reduce the side incidence of light and not interfere with the field of view.

Common design elements include “petal” shaped edges. These allow the corners of the sensor a wide field of view without interference in the corners from the hood. The long petal shape must be along the long side of the sensor (landscape view). If you put it on the other way the side of the picture will show the edge of the hood and light will also get in from the top (or bottom) because the cover is insufficient there.

There are conical shapes and cylindrical shapes too. When these don’t have petals they are designed to accommodate the full field of view of the lens from any angle. You may find that these types of hoods are common on lenses where the front of the lens extends when changing focal length. As the extension of the lens will change the field of view the hood shape must be wide enough for the widest angle of view. But it cannot have petals because they would rotate with the lens and at some focal lengths would interfere in the picture.

Lens hoods do more…

As you can see you should buy a hood for your lens that has specially been designed for it. If you don’t, you risk the hood intruding in your shot, or not providing sufficient protection against flare.

Hoods can help in other ways too. When you have a lens hood on the lens it acts as a primary protection for your vulnerable front element. Once, when I was panning to follow a bird with a heavy/expensive pro-zoom lens I whacked the lens hood off the glass of my car window. I am convinced I would have broken the window and damaged the front lens element if I had not had a lens hood on. It harmlessly bounced. Phew! I use hoods whenever I can these days.

Lens hoods also help to reduce over exposure generally from incident reflected light on bright days. There may be no direct bright light source shining into your lens. But it helps to reduce the high levels of brightness from the side regardless. That helps to reduce the overall high light levels and especially the contrast.

Lens hoods are worth the effort

Lots of learner photographers forget the lens hood. Yet it can have quite a significant impact. Even if it is not significant, when you are trying to get a sharp image and reduce the colour wash-out in bright light every little detail counts. Great images come from the attention to detail.

Comments, additions, amendments or ideas on this article? Contact Us
or why not leave a comment at the bottom of the page…

Like this article? Don’t miss the next — sign up for tips by email.

By Damon Guy (author and Photokonnexion editor)

Damon Guy - Netkonnexion

Damon Guy (Netkonnexion)

Damon is a writer-photog and editor of this site. He has run some major websites, a computing department and a digital image library. He started out as a trained teacher and now runs training for digital photographers.
See also: Editors ‘Bio’.

Save money and improve your scene lighting!

DIY Reflectors, Bouncer, and Absorbers

• DIY Reflectors, Bouncer, and Absorbers •

Professional equipment costs so much!

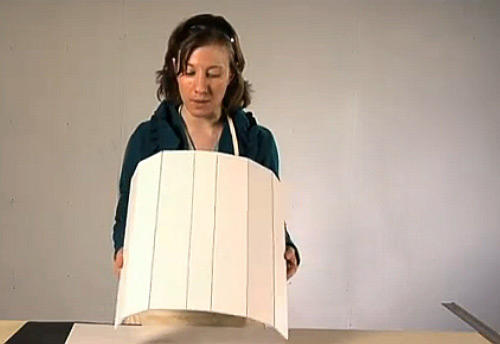
But easily made DIY lighting equipment can do the same as professional light diffusers and absorbers. There is so much you can do to create your own effects. It is pretty easy too. With some simple tools and materials you can have the same outcomes as from a professional studio. The video shows you not only how to make the simple reflectors, bouncers and absorbers, but also shows how they can be used. If you want to get really good with them you will need to practice your photography with them – that is the fun part!

Light reflectors, bouncers and absorbers

The use of flash or studio lights is a great way to light your subjects. However, flash is very harsh and studio lights are often expensive. You can make the reflectors, bouncers and absorbers very cheaply and they can also help adjust the light colour. Bright white board and silver reflectors help to modify the light colour from domestic lights. You may still need to adjust the light balance on your camera, but the reflections will give much more controllable light against the skin tones and clothes of your subject.

Why do we use reflectors and bouncers? These are part of a general class of photography equipment called light modifiers. Anything which changes the light from a light source is a light modifier.

With most lighting situations we have only one main light called the key light. Other lights should not be as strong as the key light. They should also have strength in proportion to the key light. We get that proportion by using reflectors and bouncers to distribute the light around our subject. This ‘fill’ light helps the light on the subject be less harsh. Bounced or reflected light creates soft shadows that wrap around curves and lessen the intensity of darkness in the shadows.

On the other hand absorbers actually cut down the reflections and help the darkness get more intense. This too has its uses. We can make shadows darken and help cut down the effect of light bounced off other things near the subject. The use of absorbers helps define shadows and create darker areas of the scene.

And now to the video…

DIY Ways to Reflect, Bounce, and Absorb Light


Playgallery

Comments, additions, amendments or ideas on this article? Contact Us
or why not leave a comment at the bottom of the page…

How to use camera angle to change body shape

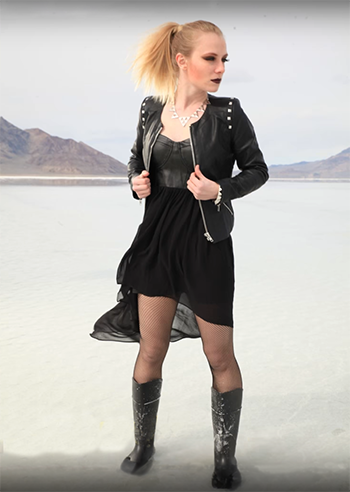
How camera angle affects body shape.

How camera angle affects body shape.
[Image taken from the attached video].

Camera angle affects body shape

How you approach your subject can significantly affect their shape. The camera height affects the relative size of parts of the body. The part of the body nearest to the camera appears largest. So the angle you take to the body can affect emphasis and shape. Your lens can also affect body shape too. These two factors in your shots can really change the view of your subject.

Basic shooting positions that show camera angle affects body shape
  • Getting down low gives your subject height and presence.
  • At waist level the angle is even across the body placing no strong emphasis on any one part of the body.
  • At eye level the head appears more significant and you can really draw out the features of the face, focus on the eyes for best effect.
  • From above the head and shoulders are emphasised and the legs are foreshortened.

From these basic positions you can also use different camera lenses. A 50mm lens is the lens that most closely matches the visual abilities of the human eye. Using one of these will help you to see the body as the eye will see it. On the other hand a wide angle lens (around 24mm) will help to bring out the emphasis of the body length. If you use a wide angle lens in portrait view from below you will tend to make your subject look statuesque – tall and grand. If you view the subject from above you will shorten the body and legs and make them look squat. These forms of emphasis have powerful impacts in pictures where you are trying to portray a persons presence. Statuesque tends to convey power and presence. Bodies that appear more compact tend to emphasis a more physical presence.

How camera angle affects the body shape – a video

The video brings out in detail the above points. The shoot is on the Bonneville Salt Flats, which is a wonderful location – even if it is flooded! The white of the salt brings out some great high contrast shots. You really can see how camera angle affects body shape.

TheSlantedLens External link - opens new tab/page (Published: 02.Apr.2013)

By Damon Guy (author and Photokonnexion editor)

Damon Guy - Netkonnexion

Damon Guy (Netkonnexion)

Damon is a writer-photog and editor of this site. He has run some major websites, a computing department and a digital image library. He started out as a trained teacher and now runs training for digital photographers.
See also: Editors ‘Bio’.

Can you write? Of course you can!
Write for Photokonnexion...

We would love to have your articles or tips posted on our site.
Find out more…
Write for Photokonnexion.

How to shoot bright white backgrounds

Shooting with a high-key background

Shooting with a high-key background – a two stage process.

Simple shots focus attention on the subject.

The bright-white background technique, known as high-key, is used in a wide variety of different photographic situations. It’s fun, easy to do and produces great shots. Here is how it’s done.

The technique is always the same if you are photographing a car or person in a big studio, or a tiny table-top still life. The aim of the technique is to get the subject surrounded by a seamless white surface. This will mean your subject is thrown up in stark contrast to the background. Then the viewer’s attention is directed at the subject because the eye has nowhere else to go. Effective, powerful and bright, the technique really makes your subject pop off the page.

There are two basic methods of doing high-key backgrounds. The first is to spend a long time in photoshop with masks, cloning and painting. You can, with some skill, make your image look like it was produced in camera. Good luck with that. It really does take a lot of time and effort.

The other way to do high key shots is create the bright-white background effect using lights and a white background.

Setting up

You will need something to create the white background. You can use a painted wall, white wallpaper, white card, sheets or pretty much anything else that is white. The brighter the white the easier it is to use.

You need a bright white light. An off-camera flash unit is great. If you don’t have one then you can use very bright house lights. Be careful there is no colour cast. It is advisable to consider some test shots to get the colour right.

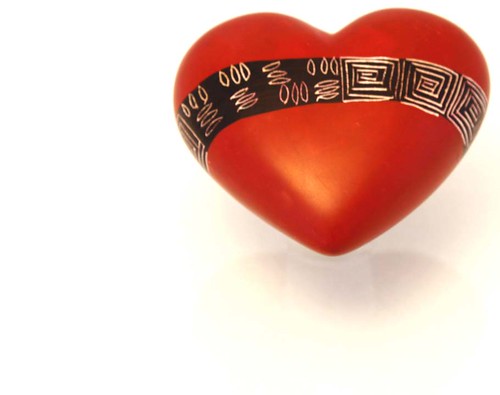
To set up your shot you will need to put your subject in front of the white background. In the case of the shot above I was shooting downward onto a piece of card. In this case I put a small support under the hand-carved soapstone heart. This lifted it off the background a bit.

If you want no shadows at all, like the shot below, then you must present the subject far enough off the background that you can get a bright light in behind it.

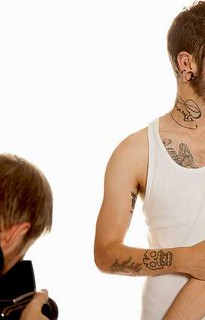
High key shot with no shadows

High key shot with no shadows. The background is strongly lit up so it blows out to a perfect brilliant white. The subjects in the foreground are lit as they would be normally.

Lighting

Next, you need to position the light so it is pointed directly at the white background. In most cases you will want to point it so that the brightest point is immediately behind the subject. In the shot above it was positioned slightly at the top of the image because I was trying to create a little shadow under it. This made it look like it was floating. However, if you want no shadows then you must have all the bright light behind the subject.

Now take a test shot. The idea is that when the camera sees the white it will be so bright that it burns out the image wherever the white is exposed. If your white looks grey… then you need to brighten the white with more light (or take a longer exposure). If your subject is so overwhelmed with white from the background, you need to reduce the intensity of lights pointing at the background.

As with most photographic lighting, its a balance. To get your background just right you need to play with the light intensity up/down until you have a nice bright seamless background.

Now for the subject

Now you can, if necessary, adjust the lighting on the subject. If you are working with a person, ideally they would be one to two meters in front of the lighted background. So they might need to be lit with a separate light like a flash. Or, if you are working with a still life, the ambient light might be fine.

You are aiming at lighting the subject so the background is much brighter. The idea is that the contrast between the two is so great that the white is blown out… it becomes pure white because of the intensity of the reflected light. The subject needs to be lit normally so it is just how you would like it to look. To achieve that you might need to turn off the back light. You can use the normal exposure mode you use on your camera. Take the picture using flash if you want. Do a few test shots to get the lighting right on your subject with the back-lighting off.

The high-key shot

By now you have hopefully got some blown-out white background shots. You should also have some normally lit subject shots – just how you want it to look. Now it is time to switch on the background lights and, using the lighting you set up on the subject, take the shot with the bright background.

In photographic terms, you are aiming for the background light to be about one or two stops of light brighter than the subject you are shooting. An increase in light of one stop is a doubling of the light intensity. You will need to test that with a few shots.

To get it right you can test the lighting of the subject and background separately with a light meter, or with your on-camera light meter. You could just experiment using test shots and changing the lighting around. Or, you could use the ‘blinkies’ and ‘chimping’ method.

Whatever you choose, a few minutes experimenting will give you some idea of the brightness. Have fun!

By Damon Guy (author and Photokonnexion editor)

Damon Guy - Netkonnexion

Damon Guy (Netkonnexion)

Damon is a writer-photog and editor of this site. He has run some major websites, a computing department and a digital image library. He started out as a trained teacher and now runs training for digital photographers.
See also: Editors ‘Bio’.