Category Archives: Composition

composition: aesthetics, arrangement, balance, beauty, combination, concord, configuration, consonance, constitution, content, design, distribution, form, formation, harmony, layout, make-up, placing, proportion, relation, rhythm, shape, spacing, structure, style, symmetry, weave

How many types of blur are there in photography?

Blur by Netkonnexion - types of blur

Blur by Netkonnexion
Click image to view large
Blur By Netkonnexion on Flickr External link - opens new tab/page
There are many types of blur in photography.

Not all blur is equal.

There are various types of blur. It sounds odd. In fact there is a lot more to blur than most people realise. It is quite a varied subject. It is used in nearly all aspects of photography. From abstracts to zooming, we will find some aspect of blur. Lets take a look…

Okay bokeh…

First up, and one of the best known types of blur, is Bokeh. This Japanese word means haze or blur. It originally referred to the quality of blur. Today we use it to describe the actual blur. A sharp subject and a blurred background is created by a blur of tiny circles where each of the tiny points of light are not focused, that is bokeh. It is created by the lens and aperture.

When you use a wide aperture, say f4.0 (or wider) you get a shallow depth of field. The depth of field is the sharp part of the picture. The rest, the out-of-focus part, is blurred. That blur is the bokeh.

Bokeh can add a whole range of composition effects. It is also has its own aesthetic quality. The quality of the little ‘circles’ varies as does the true circular shape of the circles themselves. Photographic lenses with apertures that are more circular produce the best bokeh. Some apertures are more like regular polygons (say a hexagonal). Polygon bokeh is not as pleasing to the eye as circular bokeh. Fewer sides on the polygon forms a less circular bokeh circle. It may even form an obvious bokeh polygon. Manufacturers go to some lengths to make the bokeh pleasing. One way to make the bokeh more circular is to add blades to the aperture diaphragm. That can raise the cost of the lens.

Subject-movement types of blur

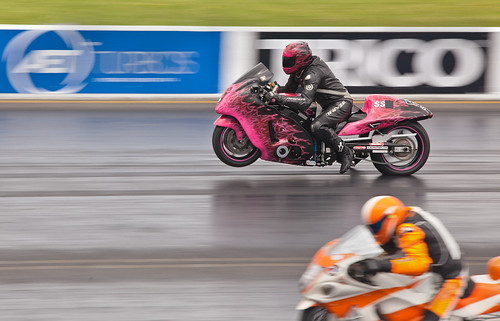
When a subject moves in front of your stationary camera the resulting image has a blurred subject. This is movement blur. The types of blur which include movement can be varied. In the picture above the motor bikes are moving at around 90 miles per hour. When taking this shot I was panning with the far bike resulting in that bike being sharp. The pan meant that my camera was not paced at the same speed as the nearest bike. As a result its movement was relatively out of synchronisation with my camera. The nearest bike was in relative movement and thus blurred.

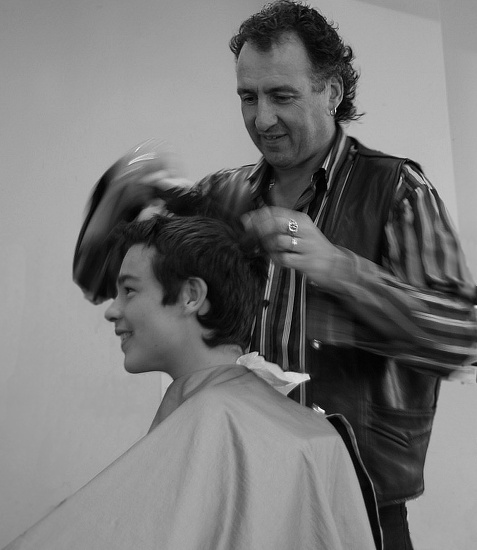
In “The Barber”, below, I have set my camera to capture the blur of his working hands. As with any movement shot, you want some of the shot blurred and some sharp. If it is all blurred it just looks badly taken.
The Barber

• The Barber By Netkonnexion in 365Project •
Click image to view large
The Barber By Netkonnexion in 365Project External link - opens new tab/page
The movement of the hands is blurred to simulate his hair cutting work. Types of blur created in-camera are most effective.

Movement of the subject is controlled by shutter speed. To get it right you have to practice with the speed of that subject. Try the subject at slow speed first. Once you have an idea of the settings, speed the subject up. As you develop a feel for the speed-of-movement versus the shutter-speed you will be able to get a sharp background but a blurred subject.

More types of blur… Camera movement

When a subject is moving pan your camera with it. I did that in the bike picture at the top of the page and got a sharp bike placed against a blurred background. That is not bokeh in the background. As the camera panned with the bike it captured a stationary background. However, as the camera was moving it created a movement blur on the background.

Movement blur of the background normally occurs when panning. If you hold a stationary camera out of a car window and take a long exposure and the same type of blur will result. However, nothing will be sharp in that case (unless something next to you is travelling at your exact speed).

Done right background blur from camera movement has great impact. In the motorbikes above it gives a race feel. It looks really fast.

Some blur is not so good

Hand movement during a shot causes all sorts of blur. You get blurred shadows, blurred faces, possibly jerky tracks… not good at all. However, you can have some fun with this sort of movement. Some famous pictures have been created by deliberate hand movements. There are lots of shots, like tree shots  External link - opens new tab/page, where the movement of the camera creates a surreal or abstract view of the subject. Some people have tried throwing their camera and triggering it in mid-air – some bizarre results can be obtained (including a smashed camera).

Out of focus types of blur

Of course it is possible to completely blur a shot quite deliberately. Some pleasant aesthetic effects can be achieved. Wedding and romantic photographers love the “soft focus” shot. This is a deliberate very slight lack of sharpness. It emphasizes the romantic, soft nature of something… kittens, brides, the first kiss, baby and so on. Google images of soft focus shots provides quite a good range of possibilities for this type of blur.

The soft focus shot can be created different ways. Each give slightly different types of blur. You can literally set the lens to manual focus. Then when properly focussed pull the focus slightly back. so as to create a small amount of blur. Another way to do it is to use a soft focus filter. These are simply screwed to the end of the lens and give the same effect. When I was first starting out in photography many wedding photographers carried a flesh coloured or white nylon stocking. Pulled tight over the lens while the photograph is taken it creates a soft focus effect. Others like a skylight (ultraviolet) filter with a tiny amount of grease smeared on it. All these work, but give you a slightly different soft focus effect. Experiment… have fun!

Zoom blur

One of the less well known types of blur – zoom blur. You need a steady hand or better, a tripod. It makes the picture look like the world is rushing toward you very rapidly.

Adjusting the zoom during exposure creates zoom blur. Set your camera to have a long exposure – around one second is good. Balance the shutter speed with the ISO and aperture to get a proper exposure. You will need to use manual focus to adjust the zoom in the shot. Press the shutter button and rotate the zoom focus ring. A short turn or through its full arc – the amount of turn gives different effects. With a bit of practice you can reduce hand-shake blur. A smooth zoom throughout the exposure creates some great effects. Look through this page of zoom blur images on Google for some ideas…  External link - opens new tab/page.

Artificial blur

Most image editors have software filters to create types of blur. In fact there are a variety of different software filtersavailable. Gaussian blur is one common type. It softens or smooths the image, but also causes loss of detail. There is also rotational blur (self explanatory); linear blur or movement blur – you choose the direction of the blur. Other editng packages will have other blur types too.

Artificial types of blur do not have the same effect as blurs created in-camera. Artificial blur tends to lack depth. Whereas, blur using depth of field gives depth to a picture. The bokeh and movement blurs both have the impact of realism and depth as they vary throughout the depth of the image. Applying a uniform artificial blur can affect the realism. Applied with care and artful work you can make artificial blur look real. It is all about care and attention.

Are there more blurs?

There are probably other types of blur. They may fit into one or more of the categories above. Why not let us know about others. I would like to hear of new ideas and types of blur.

Comments, additions, amendments or ideas on this article? Contact Us
or why not leave a comment at the bottom of the page…

Like this article? Don’t miss the next — sign up for tips by email.

By Damon Guy (author and Photokonnexion editor)

Damon Guy - Netkonnexion

Damon Guy (Netkonnexion)

Damon is a writer-photog and editor of this site. He has run some major websites, a computing department and a digital image library. He started out as a trained teacher and now runs training for digital photographers.
See also: Editors ‘Bio’.

A quick and simple method to make brilliant water droplet images

water droplet

• Water Splashes •
The most beautiful scenes in the world include water. Here you can make your own water droplet.
(Image taken from the video)

The close-up world of the water droplet – endlessly fascinating

The captivating thing about water is that it is ever changing and creates a sense of magic in every scene. When you get in close some simple techniques make wonderful images.

How to photograph water droplet impacts

Ever enthusiastic Gavin Hoey takes us through the simple process of creating wonderful water droplet photos. Colour, light/shade and magic water droplet sculptures are the result.

The best bit about this is that you can make these wonderful photos yourself. It is very easy and great fun. When I first did this I spent hours of time on it and got lost in a world of wonderful colours and effects. There are three things to remember that will help you make this a personal and effective shoot…

  • The more shots you take the more great effects you will see.
  • Background colour should be varied. I’ve used wrapping paper to brighten colours.
  • The angle of the camera can affect your shot (not mentioned in the video).
  • Try different camera heights with respect to the water.

After yesterdays blog, the way you see it is about your style. Don’t look for “new”, look for you!

This is a short video (six minutes 50secs), but one that will give you hours of fun and excellent images.
Gavin Hoey  External link - opens new tab/page

No removable flash? Read this: Off-camera flash. It’s a great introduction and recommends an affordable flash unit.

Comments, additions, amendments or ideas on this article? Contact Us
or why not leave a comment at the bottom of the page…

Like this article? Don’t miss the next — sign up for tips by email.

By Damon Guy (author and Photokonnexion editor)

Damon Guy - Netkonnexion

Damon Guy (Netkonnexion)

Damon is a writer-photog and editor of this site. He has run some major websites, a computing department and a digital image library. He started out as a trained teacher and now runs training for digital photographers.
See also: Editors ‘Bio’.

Ten reasons not to take pictures for free

You and your camera go beyond your hobby

• You and your camera •
Don’t let your hobby take over your life or put you under undue pressure.

Don’t feel guilty saying no to “photography-for-free”.

Keen photogs will probably be asked to take photos for friends. OK. Don’t be shy. The odd shot is fun. It’s about being friendly. What about when that ‘ask’ is really a ‘job’? Here are the ten reasons you need to think carefully before committing to a job without pay…

1. What is a job?

There’s no clear definition. The line between amateur and professional is blurred. Making good or great images is not the only factor involved. Being a professional photographer involves a whole lot more. A keen amateur can produce great images. But can they do it under the same pressure that professionals work under? This is the key to the issue. When you agree to do a “pictures-for-free-gig” you are doing what a professional will do – and not getting paid for it. Can you perform to professional requirements and provide the goods despite the pressure and no pay?

2. When it does not come out right who is at fault?

You! The person who agreed to do this is you. And, the responsibility is yours to deliver. Can you – deliver? You had better be clear about that; and happy to provide a comeback when it fails. Professionals carry professional indemnity to cover serious disasters and legal proceedings. Do you have cover? Have you thought about the consequences for something priceless – your friendship? A possible law suite and loss of friendship can both be devastating.

3. Unforeseen problems

Your friends have asked you to do a job. Do you know what problems are likely to crop up? They probably do not… and they rely on your expertise. You might be happy to produce the shots but do you really know what else is needed? Jumping in blind can be a minefield. What are the expected shots for this type of shoot? Do you even know to ask that question? Do you know what you will need to do to get that information? If you have not worked out what is needed to cover eventualities when problems arise you are in a difficult situation. If you do not see the problems it will be your fault. Are you sure you have covered everything? Think again. And again. For you it’s about photos. For your friends it is about their memories. You really need to be sure you know it all and what will happen.

4. Your time will not be respected…

Your “friends” will expect you to be on call. You may be happy with that. But you have your life to live too, right? Nevertheless, you are doing the job and you will need to be the one who covers the time. Some events have a lot of meeting time and provision for professional input. Do you have that time? Rehearsals, shoot lists, requirements and principle characters are all important and as the photographer you may have to meet them all. You may be required to meet people both during working hours and at evenings and weekends. You may be involved in planning for months ahead of the event. You will need to be ready to fall in line. If you are not being called to these meetings then you are potentially building up a legacy of problems for the day. When you don’t know the details of the event minute by minute but are required to get all the shots, who is at fault? Your time is important to the event. Or at least that is the way it will be seen by the event organisers. Can you really provide that resource? For free?

5. Professional standards

Sure, you will be told, “We don’t expect professional standards”. Your friends have seen your images. They know you are good. Will they feel so forgiving when you do not produce one hundred top quality images with all the expected and formal variations for their wedding, party, engagement, event etc.? One or two good ones from a shoot is great. For your personal interest it may be what you want. When you are working for someone else their expectations are more exacting. Professional standards are expected for all the shots, not just a few. Be ready to provide for that.

6. Things do go wrong!

You are the ONE! The person for the job. Do you have the eventualities covered? Here are some of the sort of things photographers might encounter…

  • You drop and break your camera on the day;
  • Your memory card is defective;
  • You get sick;
  • On the day you discover you are not allowed to use flash in church;
  • You break a lens;
  • Your daughter breaks an arm the day before the event;
  • You’re asked on the spot for shots you’ve not agreed or were not prepared to do;
  • A passing pedestrian steals your camera bag  External link - opens new tab/page;
  • A drunk guest wants to take “up front pictures” while you are doing the formal shots;
  • Extreme sunlight outside the church will blow out the white on the brides dress;

A professional photographer will have contingencies, strategies and cover for things like these. Things always go wrong in some respect. You need to cover for all these and be prepared for more. And, you need to do it for free.

7. People don’t value things that come free

It is almost a cliché – “the best things in life are the most expensive”. It may not be true. But it is a public perception. If you are doing this “job” for free there can be consequences. Your advice will be devalued because you are free. You will be on the same advice level as Aunt Mavis, the brides father and others. Worse, the chap down the road who is a retired photographer and family friend (who has never used a digital camera) will also be advising out of your earshot. Working in those conditions adds a pressure that is a new dimension beyond friendship (and professionalism). Be aware that doing the job – even if you get it right – may still damage your friendship.

8. Post production

A professional photographer provides an after-shoot service. Within a week the processed images are provided as contact-sheet choices for final prints. There may be a need for a book; a cd; other types of mounted images. Be prepared for about four or five days processing work. Then you will need to provide for the future requirements. You will need to be ready to send out images, keep copies available for updates and reprints for several months. You will also need to retain the images on file indefinitely (securely). You will need to make solid editorial decisions about which images you allow to be seen and which you do not. You may have a thousand images… common for amateur digital photographers. Post production is a big part of a professional shoot. Can you resource it? Can you make the grade in post production? Can you resist when your friends says she wants all the images, not just the ones you chose? Feel good about that?

9. One for free… many more to go

Once people know you do professional work – without the cost – you will be in the front line. All sorts of pressures and unreasonable requests will be made. You will be taken for granted. And, it will be up to you to resource it. Travel, printing, expenses, processing, insurance, time, new equipment – there is more to shooting regularly than simply turning up with your camera. You have to provide resources too. Remember, you will not have the benefit of income for it either. How do you say no to other friends and family when you have done a professional job once already?

10. Photography is fun – right?

Doing the free stuff is fun when you are doing it for you. There is a completely different spin on it when you are doing something under pressure for someone else and not getting anything but hassle in return. Professionals enjoy their job. They are prepared and resourced for the problems and pressures. You need to have the same resources and cope with those pressures too – free. Where is the fun in that? Taking a photography “job” for free takes the fun out of your work. And, it is no fun being taken for granted.

The overview

Despite the opinion of many people, photography is a job. There are professional standards, costs, requirements and pressures. You may want to take up professional photography. That’s fine. However, be prepared. I have pointed out the professional dimensions.

The key point is simple. There are additional pressures on you and your friendships when you let yourself be taken for granted by doing free work. Sometimes they go beyond professional pressure.

Feel free to do family shots, fun activities and enjoyable photography. Even a little charity work and some contributions to local groups are fine – on your terms. Be prepared for something that looks like a “job”. A polite withdrawal will be looked on with respect and friendship once you explain the pressures involved. Failing to make the grade will not be looked on with simple forgiveness.

Comments, additions, amendments or ideas on this article? Contact Us
or why not leave a comment at the bottom of the page…

Like this article? Don’t miss the next — sign up for tips by email.

By Damon Guy (author and Photokonnexion editor)

Damon Guy - Netkonnexion

Damon Guy (Netkonnexion)

Damon is a writer-photog and editor of this site. He has run some major websites, a computing department and a digital image library. He started out as a trained teacher and now runs training for digital photographers.
See also: Editors ‘Bio’.

Can you write? Of course you can!
Write for Photokonnexion...

We would love to have your articles or tips posted on our site.
Find out more…
Write for Photokonnexion.

Reflecting on ways to work with the best light

Reflectors

• Reflectors •
A session with reflectors is a way to control the sun
and get the lighting you want on your subject.
[Image taken from the video]

The control of light is not always obvious.

Reflectors and other shapers of light make a big difference to the scene. Often photographers go to great lengths to work with reflectors. Here are a few simple tips to bear in mind when you want to shape light – particularly outside.

When you need a reflector

You can use reflectors in any type of environment. They are best used where you need to even out the light on your subject. Remember that if you are using a reflector the source light is the main or key light. The reflection from your reflective surface is in proportion to the power of the key light. This proportionality is important. Often, more than one light is difficult to balance. Using only one light source you can create a natural balance with the reflectors. It is difficult to get reflected light out of proportion. There is always some loss in the reflection. This ensures that the light on your subject will be less intense than the key light but related to it by its proportion. The result looks more natural.

Shade is as important as light

When you are working in the fullness of light it is common to be confronted with strong reflections from the subject itself. Specular highlights, reflections off of curved surfaces and shiny areas are the most difficult to control. However, bright reflections on larger areas like flat areas of glass or even areas of flesh like bare arms can also be really difficult to control.

If you have these sorts of reflections you can reduce the worst of them using a polarising filter. Of course the only sure way is to reduce the intensity of light overall. This means creating shade. Again, the most important issue here is to reduce the light in proportion to the ambient light around you. This helps the light to remain looking natural because it is derived from the main light once again.

Don’t spend a fortune

For most of us expensive reflectors and shade creators are out of reach. As with most things however, the amateur can create the same effects as the professional without the expenditure.

Reflectors can be created from white sheets, curtains, even large pieces of card. These things can be purchased inexpensively and propped up easily to create the effect you want. What is more important than the material that creates the reflection is the way you use the reflections themselves. It is important in very bright light that the reflections are used to infill darker areas of shadow to even out the contrasts. Then your camera can cope and you will see a more controlled light on your subject.

Shade too can be created easily. Use solid card sheets or even blankets on poles. I do quite a lot of car photography. Often specular highlights can be eliminated by hanging a thin white sheet on two poles in the line of the light. The main light – normally the sun – will penetrate a thin sheet so that a proportion of the light will continue to illuminate the subject. Again, the proportionality is important. Things always look more natural if the light is proportional to the surrounding ambient light.

Using Reflectors – Photography & Video Tutorial

In the video J.P. Morgan, a successful photographer, uses lots of resources and equipment to manipulate light in all sorts of ways. First, he looks at how the light is best exposed to the subject. He uses the light to create a rim light. This helps to reduce large, strong areas of reflection and helps to define the body shape.

When he has the light direction right and well controlled he uses a gold reflector to give the light a pleasant colour – an evening sunlight yellow. This lifts the colour of the faces in the shot.

The other thing that J.P. Morgan does is use the shade and reflectors to create fill. The sun provides the main light but the levels of light off the reflectors allows a lower level light intensity creating a natural light. This does not look like it has been deliberately projected at the subjects. It is a soft light that beautifully wraps around the children. It evens out the contrast between the brighter light and the darker areas.

Look at the way the equipment is used in the video. But spend your time afterwards thinking about how you can substitute affordable reflector materials and ways to create shade. Making your own kit can be fun and just as effective brand equipment.

The video is just over six minutes.

The Slanted Lens DSLR Lighting Tutorials  External link - opens new tab/page

If you want to buy an affordable reflector set, here is the one I use. These reflectors work very well and are flexible in the way they can be used. The whole set also folds away into a great compact bag. The pack contains five effects (silver, gold, white reflector/diffuser, grey and black)…

42″ Photographic light reflector set (5 in 1)
Ex-Pro 5 -in- 1 Photographic Light Reflector – 42″ (110cm) Silver, Gold, Black, White & Translucent, Collapsible.
This is an excellent reflector set, robust and effective as well as easy to store. I highly recommend this as a standard piece of equipment.


Comments, additions, amendments or ideas on this article? Contact Us
or why not leave a comment at the bottom of the page…

Like this article? Don’t miss the next — sign up for tips by email.

By Damon Guy (author and Photokonnexion editor)

Damon Guy - Netkonnexion

Damon Guy (Netkonnexion)

Damon is a writer-photog and editor of this site. He has run some major websites, a computing department and a digital image library. He started out as a trained teacher and now runs training for digital photographers.
See also: Editors ‘Bio’.

Seeing the subject… refining your vision

Beat it up!

• Beat it up! •
Click image to view large
Beat it up! By Netkonnexion on Flickr Photographers eye :: Seeing the subject… refining your vision | External link - opens new tab/page
To really look at a subject you have to see it as you have never seen it before.

Cultivating the photographers eye…

What the “eye” really means is difficult to define. One thing’s sure. As “photographers eye” develops you see things differently. Refining your vision to see differently is how you develop your version of the ‘eye’.

Looking at the scene

In Working the scene I described how to walk through the scene, understand the angles and ideas that relate to the scene and ways to find “the” shot. At first it is not a simple process. You are developing a habit. Doing things that you would not do naturally.

Standing up and using the camera from your normal eye position makes your subject look like you always see it. Surprisingly, it is also the same way most others see it too. Where is the novelty, interest and insight in that? Photographers eye, Seeing the subject in a different way requires refining your vision.

Well, you can change it all by studying your subject from new angles, new light and with new perspectives.

What if the scene is a close up subject?

A wonderful thing about photography is the ability to isolate a subject, get in close to it and examine it in a way we normally do not try to do with our eyes.

The challenge is to do things differently so we can see things differently. In this blog I often urge people to get in close – fill the frame. That is one way to see a subject anew. There are others. Below, there are some ideas to get you to see your subject differently.

Photographers eye – Getting in close:

Really close means a macro lens. If you don’t have one then you can get some macro extension tubes. These are an inexpensive way to do macro photography. However, the way to see things differently is to try and see the subject in ways that are different to the everyday perspective. Using a macro lens, tubes, or even very close with an ordinary lens you need to be versatile. Get around your subject, see it from at least ten different positions. Try to make every shot different. Take every shot as if you are seeing the subject as a new object. Don’t just look at the whole subject, get right into the tiny detail, all of the tiny details. (See Amazon search results for macro extension tubes External link - opens new tab/page).

Photographers eye – Getting the Angles

Developing your vision is not just about details, even if there are lots of them. Try taking each detail from a whole range of angles, under, over and from the back too. Angles on a subject help to start you looking at the aesthetics of an object. Look for curves, pleasing intersections, great lines, diagonals… Anything that helps you to see the beauty in a subject and shows it in a new way.

Photographers eye – Using different lenses

If you have them, explore the subject using a range of lenses. Get wide. Go long. Try fish-eye. Work with a prime. Go with whatever lenses you’ve got. The idea is to show the subject in a variety of different ways. Every lens has its peculiar characteristics and distortions. Training your eye to see a subject in different ways by using different lenses is one way to become sensitive to photographic perspectives. You will begin to see how a camera sees. If you only ever use one lens you will begin to see everything in a plain way. If you can see things in a variety of different ways you will begin to start looking at things differently.

Photographers eye – seeing different light, different exposures

Light is the essence of everything we do in photography. While you are working with small subjects (like in my picture above) you can make changes to the light. You can use ambient light, window light, natural light, reflected light and domestic lights. Then there are coloured lights, soft light, hard light, and even laser light. Then, you also have dozens of different ways to use artificial photographic lights too. Added to these different illuminations you can also develop a whole range of exposures. You can explore your subject as under-exposed, over-exposed, dark or bright. You can use shadows, different light angles, different light heights. There are literally thousands of ways to light and expose any one subject. Explore as many of them as possible.

Other variables:

Try different backgrounds, different colours and different textures on your subject. Vary through monochrome, colour, colour intensity… try it against black or against white. Use different depths of field, more bokeh, less bokeh. Blur, movement… Try everything. Just make it you mission to look for the different way of doing it.

Refining your vision – developing photographers eye

Developing your vision as a photographer is about understanding the way you can shoot things differently to other people. You are trying to deliver to your viewer a different view of the world. To find what you are good at, what your unique perspective is, you must explore a universe of different approaches. Work with new angles, light variations, colours… well everything discussed above and more.

When you see a new subject get into it, explore it, by trying everything you can to see it anew and in a new light (literally). After a while, with practice, you will develop the photographers eye. To do that you must learn to see new ways that you can take a shot without actually needing to take it. Then you will be envisioning the shot in advance. You will also be developing your eye – your unique eye. You will have learned to see differently and to have put your particular style into your shots.

Comments, additions, amendments or ideas on this article? Contact Us
or why not leave a comment at the bottom of the page…

Like this article? Don’t miss the next — sign up for tips by email.

By Damon Guy (author and Photokonnexion editor)

Damon Guy - Netkonnexion

Damon Guy (Netkonnexion)

Damon is a writer-photog and editor of this site. He has run some major websites, a computing department and a digital image library. He started out as a trained teacher and now runs training for digital photographers.
See also: Editors ‘Bio’.

Visual toolbox for photographers

Sharpen up your creative photography…

It’s easy when starting photography to over emphasis the importance of gear. In fact it’s ‘photographers eye’ that really makes the difference. Your vision and insight into a scene are critical to producing a wonderful image.

Sage advice from a world master

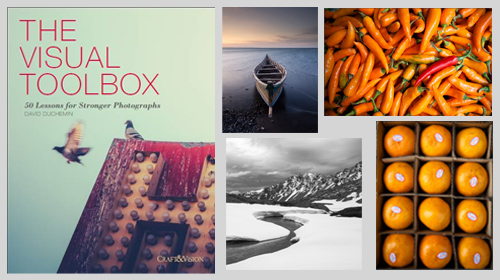
The Visual Tool Box by David duChemin is all about the skills of composition. He goes into depth around the background ideas which help you look at a scene. The ultimate success in photography is to make your image a pleasure to view. Aesthetics rule – it’s as simple as that. This book is dedicated to teaching you the tools you need to develop the ‘eye’.

David duChemin says,

These are the lessons I wish I’d learned when I was starting out.
The Visual Tool Box by David duChemin

This is my kind of book. He writes superbly, in simple, readable form. His examples are excellent and the pictures are just amazing. But most of all the book is organised for learners to extend their knowledge in easy, well structured steps. This book is all about putting new tools in your photographic tool box and it achieves that with an ease that any beginner will find a joy.

Composition

The book is packed with examples of the sort of compositional ideas that really work – for anyone. Just look at some of the topics covered…

  • Manual
  • Optimize Your Exposures
  • Master the Triangle
  • Slower Shutter Speed
  • Learn to Pan
  • Use Intentional Camera Movement
  • Use Wide Lenses to Create a Sense of Inclusion
  • Learn to Isolate
  • Use Tighter Apertures to Deepen Focus
  • Use Bokeh to Abstract
  • Consider Your Colour Palette
  • Lines: Use Diagonals to Create Energy
  • Lines: Patterns, Lead my Eye, Horizons
  • See the Direction of Light
  • Light: Front Light, Side Light, and Back Light
  • Quality of Light: Further Consideration
  • White Balance for Mood
  • Light: Reflections, Shadow, Silhouettes, Lens Flare
  • People
  • Experiment with Balance and Tension
  • Use Your Negative Space
  • Juxtapositions: Find Conceptual Contrasts
  • Orientation of Frame
  • Choose Your Aspect Ratio
  • Use Scale
  • Simplify
  • Shoot from the Heart
  • Listen to Other Voices (Very Carefully)

And there is plenty more content to complement and extends these ideas. What’s not shown in a list is the excellent and sage advice throughout the book. I will let David duChemin have the last word…

Pace your-self. Anyone can master a camera; that just comes with time. It’s the other stuff — learning to think like a photographer — that takes so much work and allows this craft to become the means by which you create art.
The Visual Tool Box by David duChemin

And it is thinking like a photographer that you will quickly learn from reading this book.

How to buy this great book

This book was originally published as an ebook. However, it is no longer available in that form. The book has moved into the real world. It will be available on Amazon as a Paperback From 31 Mar 2015.
The Visual Toolbox: 60 Lessons for Stronger Photographs (Voices That Matter)You can per-order the book from Amazon.

Comments, additions, amendments or ideas on this article? Contact Us
or why not leave a comment at the bottom of the page…

Like this article? Don’t miss the next — sign up for tips by email.

Damon Guy - Netkonnexion

Damon Guy (Netkonnexion)

Damon is a writer-photographer and editor of this site. He has run some major websites, a computing department and a digital image library. He started out as a trained teacher and now runs training for digital photogs.
See also: Editors ‘Bio’.
By Damon Guy see his profile on Google+.

Six tips for reigniting your photographic passion

Reignite passion in your photography - try charity Work

• Charity Work •
Doing a bit of charity work can really uplift your photographic spirits while helping others. It is a great way to make contact with new people, get interested in new things and Reignite passion in your photography.

Discover your passion again…

Sometimes it can all go wrong! You just cannot get it right and you’re not bursting to take the next shot. When things look down don’t give up. This is the time to take new steps to invigorate your approach. Photography with a passion is one of the most exciting and interesting pursuits. When the passion fades it is not because photography is not engaging. There’s enough in photography to keep you captivated for a lifetime. More likely your vision has become distracted, stale or you’ve lost the creative spark. These are not long term problems. Lets get you fired up again! Here are six tips to reignite passion in your photography.

Reignite passion :: Take a photogs break

We are not talking holidays here. Although that would be nice, actually it would not solve the problem. Holidays make you want to take the camera out. When you are down in the dumps about your photography, more photography can be off-putting.

Take a real break from photography. Have a month off. Tell yourself to put all your equipment away and don’t be tempted to touch it. A rested mind is a freshened mind. Just forget your photography, your composition, your equipment. Rest.

Reignite passion :: Do something different

One of the most creativity stimulating activities is to learn something new. It helps you to cross fertilise your ideas and introduce new perspectives to your thinking. Adding a new dimension to your outlook can only be a good thing for your photography. So read something you would not normally read. See something you would normally not be interested in. Do something your partner wants to do without taking along a camera. If you had an interest in the past that you have neglected, spend a little time getting up to date on it. The wealth of our experience is the greatest gift we can give our creativity. Try this little trick. Pick out ten techniques from another interest. Think about ways to incorporate those skills into your photography. This new synergy will be sure to reignite passion in your photographic work later on.

Enjoy a few weeks of photographic respite, and immersion in an alternative area of insight. Bath in its luxury. Now you are ready to reignite your passion…

Personal contact will help you reignite passion

I have always found that meeting new people and having new discussions helps me get really fired up about photography. Every year I do two or three charity events. It is a really fun and cleansing experience. I come away from each of these events feeling refreshed and tingly – as if I had stood under a hillside waterfall. The sharpness of the water making my skin sting and turn ruddy.

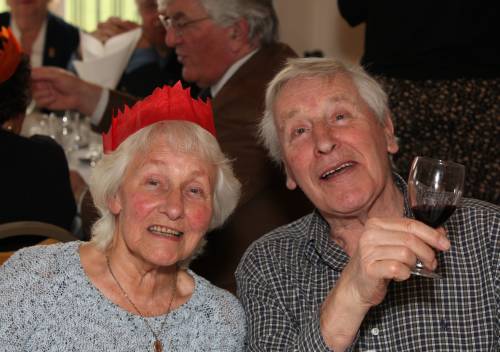
One of my charity activities is to take the photographs at a local event held for senior citizens. Sobering too. As they sit eating their lunch I chat at each table for about ten minutes then take photos of each of the guests. During the course of about two hours I talk briefly with over 100 people and take a quick and candid portrait of them all. Wow. What stories I have heard – of war and love, action and sadness. It has not only helped my photography to be more passionate and expressive, but it has helped me grow as a person too. I have some great pictures as well.

Find something to get you involved in something new. Charity is great, but schools, drama groups, local clubs and even sports organisations all love photographers. Get involved. You might learn something new and you will certainly find a new way to express your photography and reignite passion in your hobby. The most important thing is getting involved with the people. That will spark off new contacts, opportunities and enthusiasms.

Reignite passion through commitment to a project.

Give yourself something to develop. It could be learning how to photograph your new interest in the club or group you have got involved with. Or, equally, it could be some aspect of photography that is new to you. I spent a lot of time two years ago developing my table-top work. It re-invested my interest in photographic art, as well as complementing the product photography I started to do for my work. Funny how things come together in your life when you start exploring new angles.

If you are working up a project for yourself enjoy it, but have some goals. A project with no plan or goals soon gets forgotten. Then the point will be lost and so will your passionate commitment. Sit down at the start of the project and have a good think about what you want to achieve. Then, set a deadline for completion. The key to a good project is to make it time-bound and challenging; cover new material and have specific targets. You will reignite your passion by just having those positive goals and thoughts in mind.

Reignite passion :: Learn a new technique

We would all like to learn more about photography. The simple away is in bite sized chunks. Pushing the boundaries to learn it all at once will simply lead to failure. That will make things worse for an already down time. So, find out about a particular technique. Practice in lots of different situations and with a variety of equipment. Put it to use in your project, your charity work or in your every day shots. Before long you will be a proficient and enthusiastic user of that technique. Sometimes you can help this process along by buying a new piece of equipment. It does not need to be expensive. Make it something you have never tried before – try to extend your experience and your approach with it.

Change your work flow

I have often noticed with developing photographers that when they learn to be more effective editors their success as photographers improves. Obviously a more effective editorial process relies on good knowledge of post production, and composition too. The more important point is that being more ruthless about what is an acceptable photograph also helps you when you are looking through the viewfinder too. Your eye develops, your acceptance of what should be in the frame is more discerning and your satisfaction with your shots goes up.

If you are in the photographic doldrums studying editing will sort out your problem. But, it can be a great way to sharpen your awareness of your good points and what needs improvement. Once you have a framework to improve your whole attitude will lift and be more positive. So think about this as a way to positively sharpen your photographic wit and reignite passion and feeling in your work.

The path to success

If you want to become a good or great photographer, or if you just want to make a better job of photographing your grand children… its possible to get stuck along the way. There are a variety of ways you can get out of the down times. Being positive, resting and then trying new things will set you off in ways you never suspected you would enjoy. Give it a try. Extend yourself, push the boundaries, try something new – have fun!

Comments, additions, amendments or ideas on this article? Contact Us
or why not leave a comment at the bottom of the page…

Like this article? Don’t miss the next — sign up for tips by email.

By Damon Guy (author and Photokonnexion editor)

Damon Guy - Netkonnexion

Damon Guy (Netkonnexion)

Damon is a writer-photog and editor of this site. He has run some major websites, a computing department and a digital image library. He started out as a trained teacher and now runs training for digital photographers.
See also: Editors ‘Bio’.