Tag Archives: Tones

Review your own photographs

Low flying aircraft

• Low flying aircraft •
Click image to view large
• Low flying aircraft • By Netkonnexion on Flickr External link - opens new tab/page
Every picture has its merits. However is there enough in the picture to interest and invigorate the attention of your viewers? Sometimes, like this picture, if you don’t have a point worth making then you should not really bother with it.

A picture is a wonderful communication.

But like speech if there’s no point there is no impact. To help you see if you have made a great picture here are some guiding points.

We are going to consider…
• What you are communicating:
• Presentation:
• Camera technique:
• Technical Quality:
• Visual Awareness, Visualisation, Seeing and aesthetics:

Looking critically at your own picture

When you make a picture your previsualisation of what you want to achieve is critical to the outcome. If you don’t know what you are trying to make how can you make it convincing? So try to have a mental image of what your picture it going to look like when you make it. If you can see the image before you make it you should have a good point in mind – a reason for making it. All too often snappers see something and just ‘snap’. That being the case, few of the images will have real meaning or impact.

When looking at your own picture you must see if there is really something there. Are you really saying anything? Are you really communicating with the viewer of your picture? Or, is what you have just made only a simple picture? To have real impact is to create in the viewers mind an image. An image that means something to them. So look at your picture and honestly ask yourself what is the viewer going to get from it? What will it mean to them? If you find that you have really said something in the picture then the first criteria for success has been passed.

To this end you should consider how successfully each of these things has contributed to the success of the image…

  • Personal input: have you understood and connected with the subject
  • Appropriate communication the message, mood, ideas, and information you want to pass to your viewer
  • Complementary use of the photographic media (mounting, projection, printing, texture of print etc.)
  • Appropriate imagination and creativity / suitable timing for the shot
What about the other things?

• Presentation: It is important to have a good presentation for your picture. Have you edited out distractions and sensor/lens spots, removed the errant sweet rapper littering the foreground etc. In other words, have you done the little tidying up tasks that make the image stand up as clean representation of your original vision for it? If it is a print, is it well mounted in a non-distracting way. Is the printing immaculate or are there streaks and spots; over-run and smear.

• Camera technique: Is the sharpness the way you want it – deliberate softness is fine as long as that is making an artistic point in a way you intended. Is the depth of field right for the composition? Have you emphasised the point or simply missed the point. Is the digital noise too high, or the contrast too low. What you are looking for here is to see if your prowess with the camera has come through. Did your technique work or were there any errors or mistakes that detract from the delivery of your point? Some of the other things to consider are…

  • Viewpoint to the subject – exciting, interesting, different, right?
  • Choice of lighting – does it complement or complete the subject or is it at odds with your point?
  • Accurate focusing – accurate choice of focus for the subject.
  • Appropriate quality and choice of exposure.
  • Suitable use of depth of field (aperture).
  • Appropriate shutter speed for the subject (and shot timing).
  • Highlights and shadows (ensuring detail is retained)
  • Appropriate quality and choice of exposure – does the balance of light and dark complement or detract from the subject?
  • Is the quality of the light effective or bland; does is make a statement or is it of little consequence?

• Technical Quality:
In this category you should consider exposure, colour and tonal control…

  • Absence of processing faults (dust, spots, hairs, processing artefacts, image damage by sharpening etc.)
  • Appropriate adjustments of colour temperature; hue, saturation, colour balance etc.
  • Appropriate tonal use and control of the range of tones.
  • Good image finishing: removal of distractions, removal of abrupt or discordant features.
  • Appropriate use of levels, curves, colour management, filters, overlays etc (post processing)

In this category you are looking to make sure that the image is digitally developed properly. Is the exposure even or has it been obviously enhanced and changed. Is the light effective to make the point or has the exposure not been fine tuned. It is easy to take a picture, but all these thing go into making an image. Think about what you are trying to achieve and does this picture achieve it with its colour and technical delivery/

• Visual Awareness, Visualisation, Seeing and aesthetics:
Do you think that your shot, the one you have in front of you sees anything different? Are you reporting what you saw or expressing a point, message, communication, feeling… does this picture have IMPACT?

  • Is the composition, design and cropping of the image an effective aesthetic construction?
  • Appropriate simplification (minimising complexity and clutter)
  • Distractions / intrusions should not divert the viewers eye
  • Good use of light, mood, texture and colour
  • Good use of masking/manipulation where appropriate
What you are doing…

Each time you want others to look at your picture you want to impress them, to lift them, to… well, get out your message or point for the picture. The type of questions I have asked above are aimed at getting you looking at your images with a critical eye. If you are honest, you will find that none of your pictures will be satisfactory in all of the above. But if you find you are gradually improving your standard of delivery you will see that the above get closer to ideal with every new picture. Critically reviewing each picture before you publish print or show it to other people helps make sure you are producing something worth showing.

You won’t be right every time. But you will see as you develop, your comments will begin matching those of other people. You will than have a benchmark that tells you if your work is measuring up to peoples view of it. Or, more importantly to see if your picture is measuring up to your original vision of how you wanted the shot.

Comments, additions, amendments or ideas on this article? Contact Us
or why not leave a comment at the bottom of the page…

Like this article? Don’t miss the next — sign up for tips by email.

By Damon Guy (author and Photokonnexion editor)

Damon Guy - Netkonnexion

Damon Guy (Netkonnexion)

Damon is a writer-photog and editor of this site. He has run some major websites, a computing department and a digital image library. He started out as a trained teacher and now runs training for digital photographers.
See also: Editors ‘Bio’.

Five simple composition tips for great snow images

Snow in the deep South - Vestavia Hills

Snow in the deep South – Vestavia Hills
Loosing detail in the whites is a big problem in snow photography. Lack of contrast is the main cause. Look for subjects that have contrasts or ensure you have an exposure that pulls all the detail out of the whites.
Snow in the deep South – Vestavia Hills – IMG_5382 by Bahman Farzad, on FlickrExternal link - opens new tab/page

Snow images requre special compositions.

As you can see from the photo above, snow photography can present special problems. In the case of this photograph the lack of contrast could have spoilt the image. Loosing detail in the whites is a big problem in the snow.

In the photograph (above) the author has made a good exposure and the whites are well defined and detail is not lost even with a white building in the scene. However, be careful with your snow compositions. You can lose a lot of detail and normal compositional features because of the way the snow obscures many of the normal features in the landscape that we use to draw the eye.

# Tip one: Contrasts – Make sure you are able to see the details. Too much white and the detail is lost. Too little white and the snow looks grey. Use exposure compensation or full manual mode to make sure you have the right whiteness without losing the detail. See: Correct snow scenes using exposure compensation. (Photo above).

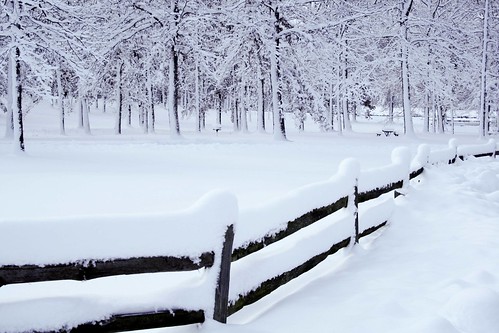
# Tip Two: New compositional and curvey lines – Find a scene where strong lines are well defined. Snow often covers major lines in the scene. Look for new lines. Snow is great for creating curvy lines. As it settles on a fence or wall top, the snow creates great shapes presenting different lines to the ones you normally see. Search out new types of snow defined lines and tracks to help define your composition. “Fencing” By tgroeger_canada  External link - opens new tab/page.

# Tip three: – When you have a strong line make the most of it. Try to make the scene simple so it stands out without confusing things with other features. Snow is a notoriously soft environment to compose a shot within so try to work with soft compositions. Gentle curves and easy lines are inviting to the eye and promote a sense of peace and well-being.

“Snow”
Click image to view large
“Snow” by Kathy~, on FlickrExternal link - opens new tab/page

# Tip four: – Rule of thirds Of course the general principles of composition apply in snow. The rule of thirds and the rule of odds are both strong contenders to helping to improve your snow shots. Just because everything is lost under the snow don’t lose sight of these old compositional tools.

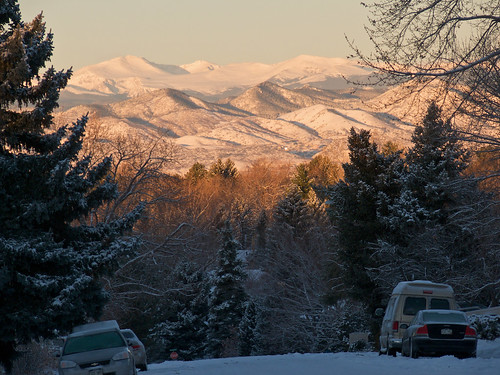
# Tip five: Tonal variations – With snow being so white it is easy to make the picture too bland. In fact the light you shoot in has a big effect on snow. There is nothing more exciting than a snow scene in a golden sunset. Sunset and Snow External link - opens new tab/page. Snow is especially good at reflecting tonal changes in light. One way to bring those out is to look for changes in light locally. A road disappearing into the trees, or snowy mountainsides with different angles to the light both cause exciting variations in the colour and tone of the snow.

Snowy morning, golden light

Snowy morning, golden light
Click image to view large
Snowy morning, golden light by Mike Thomas, on FlickrExternal link - opens new tab/page

Finally, try to make your composition as different as possible. Don’t just do landscapes. Snow changes the shapes of everything. So try to find things that are barely recognisable under snow because the snow has created unusual or unexpected shapes. Then you will have the viewer guessing… that will draw them into the picture.

Have fun! Snow photography is not something we can all do daily so make the most of the great opportunities.

find out more...Photokonnexion tips by email
If you enjoyed this article please sign up for our
daily email service.
                                                 Find out more…
#11030#


By Damon Guy (author and Photokonnexion editor)

Damon Guy - Netkonnexion

Damon Guy (Netkonnexion)

Damon is a writer-photog and editor of this site. He has run some major websites, a computing department and a digital image library. He started out as a trained teacher and now runs training for digital photographers.
See also: Editors ‘Bio’.

Are Your Colours Too Colourful? Don’t Over-Saturate!

What IS wrong here... too much colour! Horrible.

Picture one: What IS wrong here? Too saturated! Horrible.

When your picture is dull…

A common mistake made by photographers doing their first few post-processing jobs is to over-saturate the colour. It’s very easy. You have a photograph that for some reason just does not seem to stand out. When something fails to stand out it is natural to want to pep it up. Should you change the saturation?

A picture with no vibrancy rarely has colour saturation issues. Usually it is something else. The light may be poor. The contrast between the blackest blacks and the whitest whites may be limited. There is also a high chance there are few tones between the colour variations (flat colours). Yet, when you put the picture into an image editor you can seem to make it pop off the page by raising the colour levels.

Well, here is a piece of advice. Don’t change the saturation except in very, very rare situations. Even then keep it to a minimum. In perhaps only one picture in 500 do I consider adding any saturation and then rarely more than one point on the scale.

Picture one (above) has poor, flat lighting. It has not been improved by bombing it with colour. In fact I have strongly over-saturated to make an example. However, even adding one or two points of saturation with your editor can really ruin the natural colours.

Here is another revelation. Many photographers getting started in post-processing often cannot spot their own over-saturation errors. Their eye is not well trained in colour matching. It takes very little to really unbalance the colours. Worse still, everyone else can see the colours are too strong. Whats going on?

Have you ever written a paragraph and someone tells you there is a mistake? Did you spot it straight away? Did you read it several times and still not see it? Wow! That’s happened to me dozens of times. And, it has happened to most writers. When it comes down to it – we are not good at spotting our own mistakes. In fact over many years working with writers and photographers I have found the same thing many, many times. Looking into your own work somehow makes you go a little blind. Colour vision is very much like text vision… you go a little blind when you are doing your own editing.

Here is the original of the picture above…

It is just poor light. Lack of contrast and flat lighting make this picture dull.

Picture two: Poor light, lack of contrast and flat lighting make this picture dull. It is not going to be improved by colour bombing!

If the light is poor, you are pretty stuck. Picture two above is straight out of camera. The subject is mundane with flat lighting and poor contrast and limited colour tones. Colour bombing it would not help. However, for those with little colour editing experience it might look better when you raise the colour saturation. But this is because you cannot spot the dizzy tones that come with over-saturating the colours. It is an illusion. You want to be proud and pleased with your picture. Sadly, it is just not a good picture – and you refuse to admit it to yourself.

What can you do about it?

Editing your pictures is a difficult task. Your pride-of-authorship is strong. You have a lot invested in your shot and you want it to work. So the first tip is… be very harsh with yourself.

Harsh editing is something that only comes with a lot of practice. One way to get that practice is to find someone who you trust and respect to be a critical friend. Ask them about your edits. Make sure they actually do tell you what they think is wrong. Train them to tell you what is right too. Ask them to be honest but supportive. Try not to judge them if they don’t like a shot. Find out what they suggest to improve it. There is no right or wrong here. Their opinion is valid even if you disagree. Try to see their point of view, and question your own actions in editing. Once you are able to ask yourself questions about your own editing you will be on the way to spotting your errors.

The second tip I give you is to check against the original as you work. When editing I normally have a copy of the original file open while doing the edits. It is then easy to have a point of reference. You can look from one to the other and see if you have strolled too far into the realms of editing fantasy. It helps you see what you have changed and how much those changes have impacted the original.

Editing is a skill. It takes time and effort to get right. No editing is perfect. Edits are judged by the viewer which is sometimes hard to accept when just starting out. Someone will always find fault. However, with time and the help of trusted critics you can gain a great insight. You will learn to spot the right and wrong moves when doing your processing. When getting started try to keep it real. Develop your skills from there.

By Damon Guy (author and Photokonnexion editor)

Damon Guy - Netkonnexion

Damon Guy (Netkonnexion)

Damon is a writer-photog and editor of this site. He has run some major websites, a computing department and a digital image library. He started out as a trained teacher and now runs training for digital photographers.
See also: Editors ‘Bio’.