Tag Archives: Speed

Shutter speeds – An easy guide

Shutter Speeds Cheat Sheet

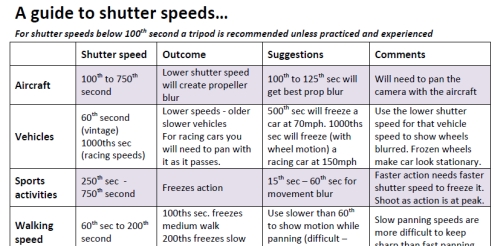
• Shutter Speeds Cheat Sheet •
Click on image to download full .pdf cheat-sheet.

Shutter speed is easier with a start point.

One of the difficulties with shutter speeds is knowing what sort of setting to use with various speeds of an event in the real world.

Here is a short guide to get you started :: A guide to shutter speeds.

There are no rules about shutter speed

The actual speeds of real world events vary a great deal. In a race one car may move at 90 miles per hour (mph) and another at only 70mph. You should vary the shutter speeds depending on the objects speed, light intensity and the aperture you are using. Remember, the download cheat sheet is a guide not a set of rules. It’ll get you started, then it’s down to good old experimentation.

There is no substitute for experience

I do a lot of panning with race vehicles. I have learned to assess the speed and light then make quick guesses to set my camera up for a few test shots.

Once I took an experienced bird watcher to a drag race event. He was used to panning fast moving birds in flight. It took him time to adjust his eye for working with cars at up to 250mph. The best way to get good at doing shutter speed settings is to practice with a wide variety of moving objects so that you can get a general feel for the shutter speeds at each speed of your object.

Experience is the best master. So practice different settings a lot to get the settings and speeds for your interest properly fixed in your mind. This gives you a head start when setting up for a new subject.

Test shots

If you are going on a shoot where shutter speed is important, practice at the likely shutter speed for a few days before going. Try out different light conditions too. This will get your eye into the subject and help you know what variations you can use to get the best shots on the day. This post might help too… How to overcome frozen movement in panning.

The difference between freeze and blur

If you freeze the action you show some amazing stuff the eye does not normally see. Facial expressions and body movements as well as other details can be stunning. It can also look a little artificial. It is strange to see, for example, water droplets fixed in mid-air or a fast car with its wheels not blurry.

You can lower the shutter speed off the peak-action speed for freezing until you get some very slight blur in critical areas. Wheels on moving vehicles or propellers on aircraft are typical examples. They look artificial as frozen features, but give life and movement to an otherwise sharp rendering of high speed action.

Work your blur in naturally and show it as you would see it. Be especially careful where you have a lot of blur. Ensure there are still sharp elements in the picture. If everything is blurred it looks like a bad case of hand-shake.

The key

The key to controlling blur or freezing and other shutter speed effects is… practice! Lots of it. So, just get out there and have a go. Gradually you’ll forget the cheat sheet, you will have it in your head from practice.

Comments, additions, amendments or ideas on this article? Contact Us
or why not leave a comment at the bottom of the page…

Like this article? Don’t miss the next — sign up for tips by email.

By Damon Guy (author and Photokonnexion editor)

Damon Guy - Netkonnexion

Damon Guy (Netkonnexion)

Damon is a writer-photog and editor of this site. He has run some major websites, a computing department and a digital image library. He started out as a trained teacher and now runs training for digital photographers.
See also: Editors ‘Bio’.

Practicing and Improving your Panning – Seven Hints

You can improve your panning technique by following the hints below

You can improve your panning technique by following the hints below.

Hints to improve your panning (Action shots Part 5)

In the article Action Panning Shots with Motion Blur we looked at basic panning technique. In this post we look at some things you can do to improve your panning shots.

How to practice

Getting started is easy, just follow this simple plan…

  • Consult some local maps. Find a road with regular, spaced traffic. I find an ‘A’ road is best – it’s not too fast. A road with a green space alongside it is best. You should be able to stand back from the road and see about 200 meters in each direction. Thirty mile an hour traffic is a good practice speed.
  • Take an hour for your first practice. Light weekend traffic is best. Stand on the grass roadside space in the middle of your chosen stretch – about 10 to 20 meters back from the road.
  • Stand facing the road, legs slightly apart, so traffic passes right in front of you. Swivel your body to look sideways down the road. Now, without pushing the release button track a car as it comes toward you, passes and recedes. Follow all the way through, keep control.
  • Your tracking movement should be smooth, level, and based on the speed of the vehicle. Keep the subject vehicle in your viewfinder throughout the pan into the distance. Repeat at least five times without taking a shot. Your aim is to feel the speed of your rotation. Concentrate on the smooth flow of your tracking as you pan. Learn how long the pan takes, judge your button push point. Ensure you follow through.
  • Now you will have a ‘muscle memory’ of your moves. Try your first shots. The camera settings are in this article: Action Panning Shots with Motion Blur. Press the button and keep it pressed.
  • Inspect your first shots on your camera. Pick out the good and bad points. Try to spot where the subject vehicle was sharp and where it was not – where it was in the frame, where it was not. Repeat the shots for practice and analyze it each time. As you get better with practice you will find the ‘memory’ of the practice will help you keep your panning consistent.
  • Practice once a week or more for a few weeks. You will find that it gets easier and easier. You develop a ‘muscle memory’ of how to pan after a while. Then it is easier to adapt your tracking speed and tempo.
More ideas to help

Hint 1. Motion blur of the background of a panned shot is created by the camera movement. As you pan the camera through the shot the background blurs. The idea is to keep your panning motion consistent with the speed of your subject. The subject will then be stationary relative to the camera – so you get a sharp shot. The trick is to pace your shot. Keep your body swivel-movement tracking to keep the subject in the viewfinder.

Hint 2. When doing your practice try to pan with different subjects at different speeds. Bicycles are fun, but the panning is slow. You will find that you may make up/down movements when panning slowly. It takes practice to pan slower and still be level and consistent. Try to gets lots of practice at the same speed as the pans you want to do. I photograph a lot of water sports. At first it was difficult to get it right because the panning speed is slower than a vehicle. After practicing with rowing boats for a few hours and working with a shutter speed of 1/15th of a second I began to return some decent shots.

Hint 3. While panning a subject your body turns slowly at first. It gets faster when the subject is right in front of you. Then your swivel slows down again as the object recedes. You will need to feel that happening and compensate for it as you track the object while panning. Your swivel motion is NOT the same speed throughout your pan. There is a good reason for this. As the subject comes toward you it is in the viewfinder for relatively longer when at a distance. When it is right in front of you it is moving a very short distance across your view at full speed. So you need to be fast tracking there.

Hint 4. If your subject changes speed/direction you must anticipate that and stay with it. Corners and straights (acceleration) are examples where changes occur. So you will need to work the shot a few times before you get the tempo of your new panning motion where the change occurs.

Hint 5. While panning you will find that you are able to hold the camera evenly at the same level if you swivel smoothly through the pan. However, if you go slower or faster than the subject you will introduce blur to the subject – they will no longer be stationary relative to the camera. So you must practice accurate tracking of the speed of the subject while panning.

Hint 6. The vibration control in your lens is important. Canon cameras have ‘image stabilisation’ (IS). Nikon has ‘Vibration Reduction’ (VR). These systems compensate for vertical and horizontal vibration and movement. More expensive lenses allow you to turn off the horizontal component. When panning, if you swivel smoothly from the waist you will find the horizontal movement through the pan is quite consistent. To take advantage of the lens control, turn off the horizontal stabilisation. This will help the sharpness of the shot compensating for any vertical movement. If you leave the horizontal compensation on it will act against your panning movement.

Hint 7. Finally, I have met some people who think you can pan successfully with a monopod or tripod. It is a practically difficult thing to achieve. Think about it. A fixed turning point in front of you will not allow you to track a subject unless it is going in a circle around the tripod centre point. To keep tracking around the centre of turning on the tripod you will need to move or bend yourself off-balance. You may make a few shots, but your record will be inconsistent. Proper panning is a sweep of the body rotating about your centre. That rotation point is right between your legs. Proper rotation takes practice and free-holding of your camera. Your hand-held practice will definitely pay off.

By Damon Guy (author and Photokonnexion editor)

Damon Guy - Netkonnexion

Damon Guy (Netkonnexion)

Damon is a writer-photog and editor of this site. He has run some major websites, a computing department and a digital image library. He started out as a trained teacher and now runs training for digital photographers.
See also: Editors ‘Bio’.

Can you write? Of course you can!
Write for Photokonnexion...

We would love to have your articles or tips posted on our site.
Find out more…
Write for Photokonnexion.

Action Panning Shots with Motion Blur

Fast action demands a prepared shot

Fast action demands a prepared shot. Work the shot before it happens; keep your finger on the shutter button for multiple shots; pan and follow through to the end.
EXIF data for this shot… Model – Canon EOS 5D Mark II
ExposureTime – 1/125 seconds; FNumber – 14; ISOSpeed – 200
ExposureProgram – Shutter priority
Sequence mode – Continous; Focus mode – AI Servo

Motion blur is created by panning (Action shots Pt 4)

In Getting Started With Action Shots I showed how to ‘fix’ the action using fast shutter-speeds. Fixing the action creates a picture that is not quite as the eye sees it. In life, when watching fast motion we keep our heads and eyes following the action. The background is of little interest – it blurs with motion and we see the subject sharp in the foreground while we track its movement. Here is how we create a still photograph reproducing that background movement blur.

Setting the shutter speed

The principle exposure control we need to work with is shutter speed. This means you can either work with manual control, or set your camera to use the Tv (time value setting). If you are not happy using manual then set your camera to shutter priority (Tv).
More after the jump…

We previously set a fast shutter speed to ‘fix’ the action. To capture background motion-blur the shutter speed should be slow. Start your panning experiences with a shutter speed of 1/125th second. At this speed you get some motion blur and it is easy to capture a sharp image. Later, after some practice you can decrease your shutter speed to 1/60th second and even lower to an ideal 1/30th of a second.

These suggested shutter speeds are relative to the type of action you are photographing. Very high speed action, like racing cars, can be taken at faster shutter speeds. That is more forgiving for your panning. The drag racing car (above) was traveling at around 130mls per hour when the shot above was taken at 1/125th second. Action at lower speeds should be at slower shutter speeds. Athletics and body motion shots should be panned at around 1/30th second, or if you can do it, 1/15th second. With practice you will be able to judge what is best. Once you have mastered the technique with faster shutter speeds, then try with lower speeds. A good rule to set shutter speed close to the approximate miles per hour the subject doing…
  • 150-200 mls/hr – s/speed 1/200th sec. – Racing car, small aircraft landing
  • 130 mls/hr – s/speed 1/125th sec. – Fast motorcycle
  • 70 mls/hr – s/speed 1/60th sec. – UK motorway driving limit
  • 30 mls/hr – s/speed 1/30th sec. – typical Urban free-flowing traffic
  • 15 mls/hr – s/speed 1/15th sec. – Sprinter, running dog
  • 3 – 8 mls/hr – s/speed 1/15th sec. – jogger
Other camera settings

If you are working in shutter priority your camera will adjust the aperture. You should leave the ISO on automatic. The camera will take care of itself while you shoot the movement.

If you are working with full manual set your aperture to give you a good depth of field – say f11 on a bright but cloudy day. In this case set the ISO to an appropriate setting. Probably around 200 ISO (bright day) or 400 ISO (bright/cloudy) will be best. On a very bright sunny day you could try 100 ISO. Do some chimping to get the right exposure.

If you are using either manual or shutter priority you should also set the ‘burst mode’ – otherwise known as continuous shooting. The burst mode will let you fire shots continuously. You will need to fire more than one shot at a time when panning your camera. At least some of the shots will come out sharp. Your camera will shoot off about four to six shots in a burst (RAW) – more with some cameras. You will need to judge the best place to start continuous shooting.

And so to the panning…

By now you have your camera set up. The fun bit is actually capturing your shot. The aim of panning is to follow your subject with your camera shooting as you go. Here are some pointers to get you started…

  • Stand with feet shoulder width apart for stability. Ideally you want the action to pass right in front of you. Place yourself so your subject comes from one side and passes you when you are facing forward. It will then recede again on your other side.
  • Turn your body toward where your subject is going to come from. Don’t move your feet. Point your camera at the oncoming object.
  • Start tracking the subject with your camera as it comes toward you. As the object comes nearer you must smoothly swivel your body from your waist. Note that your camera/head face the object, it is your body that rotates. As the object passes your body will be facing full forward. Then, you continue to swivel keeping it in your sights as it recedes the other side. Smoothness in the rotation of the body is essential.
  • When your subject is large in your viewfinder you can press the shutter button and hold it down continuously shooting as you pan along with the subject.
  • Do not stop tracking the subject when your ‘burst’ is finished. It is important to follow through With the panning so there is no sudden jerky move at the end.
What you are aiming for

Ideal panning shots provide the following outcomes…

  • At least one element (the subject) will be sharp, preferably ‘pin sharp’.
  • The background will be too blurred to see any details.
  • Moving parts on the subject (legs, wheels, oars, propellers etc) may also be blurred.

By Damon Guy (author and Photokonnexion editor)

Damon Guy - Netkonnexion

Damon Guy (Netkonnexion)

Damon is a writer-photog and editor of this site. He has run some major websites, a computing department and a digital image library. He started out as a trained teacher and now runs training for digital photographers.
See also: Editors ‘Bio’.

Space To Move Into… Action Needs Space

Plausible movement needs space

'Sunday morning drive'. Make space for the object to move into.

'Sunday morning drive'. To make a picture with motion plausible, have somewhere for the moving object to go. Click image to view large.

The picture above was taken one Sunday morning while out for some panning practice. The shot shows some space in front of the vehicle. The movement becomes convincing when there is space for the moving object to occupy as it progresses. The next picture, a crop of the one above looks far less convincing. It looks more like it is going to crash into the frame of the picture…
No space to move into? Suddenly the picture looks static despite motion blur.

No space to move into? Suddenly the picture looks static despite motion blur.


The second picture has become static compared to the first. Cropping it appears to have taken the motion out of the picture. With no space for a moving object to move forward the way the eye sees the picture changes. Somehow it loses its character.

In movement and action shots the space that surrounds the moving object is important. Try to provide some context. In order for the eye and brain to interpret the movement our imagination follows the implied line of the movement. Deny the eye a line of movement and that relationship disappears.

In truly dangerous situations it is the fear of what will come next that creates the energy and fascination of the action. If you sacrifice the space in your image where the action will happen next you also sacrifice the anticipation that makes the shot. All high-stakes action shots rely on the imagination to create an atmosphere of expectation or impending doom. Look for that and bring it out in your pictures.

All movement needs somewhere to go. Help the eye to follow an implied line that will take the moving object forward. Give the imagination somewhere for the next instant to happen. Your movement will be much more dynamic and your viewer much more involved.

By Damon Guy (author and Photokonnexion editor)

Damon Guy - Netkonnexion

Damon Guy (Netkonnexion)

Damon is a writer-photog and editor of this site. He has run some major websites, a computing department and a digital image library. He started out as a trained teacher and now runs training for digital photographers.
See also: Editors ‘Bio’.

Getting Started With Action Shots (Action shots Pt. 1)

Action shots capture the eye and the imagination...

Action shots capture the eye and the imagination… you must work to give the viewer something to think about. Make them think ahead about what might happen if it all goes wrong! The excitement will capture the imagination.

Three tips to think about when taking an action shot

Action shots are fun to do and great when you pull them off. Like in any other aspect of photography, it is the preparation that creates the best shots. Here are three tips to get you prepared. We will be providing other articles to look at some of the techniques later too.

Knowing where to be

For action shots to make an impact the viewers imagination has to be fired by the photograph. They have to feel two things…

  • Wow! I could never do that!
  • He/she is going die (or be badly hurt)

An action shot gets people involved because the viewer is at once fascinated and repelled. So, to capture their imagination you have to be in the place that best brings out these emotions. Of course there is no one way to do this. You need to be able to spot the breath-taking points. Bring on the excitement!

Study the sport carefully. Get the magazines. Read the papers. Get to know where the great pictures are taken. Get to know the pictures themselves. The pictures taken by others are a lead for you. In particular, before an event make sure that you pick the right place to be for the best shots. Get a map of the event site. See if you can spot where to find the best jumps, the worst corners… whatever makes the shot. Try and match previous photos in magazines to the map so you know where to be. And, when buying tickets make sure you get one that gives you access to the action locations. Otherwise, your whole shoot will fail. You may have to pay more to be at an action point.

On location

The good action shot is often more about how the picture portrays the action than just the location. The first thing you should do is scout out the location. Often an early arrival will help a lot. You will have less crowds and can pick your spot. Believe me this is important. Getting challenging and thrilling shots is impossible if you have to do everything over the heads of the crowd in front of you.

Chosen your place? Now see what sort of shots you can get. Remember, the essence of good action shots is in the fear. Fast, off-the-ground, dust, up-side-down, vertical… look for the fear factor, then make it look worse. From your chosen point you need to be able to get under it, get behind it, be in front of it. You need to face the danger with your picture. I obviously don’t mean get injured. You need to have your lens positioned to capture the decisive action. Bring out the defiance of the moment. Try angles from above, from below, on the side, from the front, from the back… all views possible.

Capturing the moment

Work the action. Often, especially at events, you will need to take the same shot time and time again. Each time you will be hoping to capture the right attitude, angle, height etc. The frustration will be a low hit rate. I have frequently been to events and taken over 1000 action shots during the day. I may be lucky to get 30 good keepers. When the action is fast, uncontrollable, and action packed, it is difficult to control what you are capturing at the exact moment you press the button. So you need to try and try again. Practice will pay off.
More after the jump…

The best way to get started is to freeze the action. Here are a few things to help you…

  • Use Shutter priority and set your shutter speed to fast. 1/320th second upwards for body sports; 1/500th sec for fast action sports; maybe as high as 1/1250ths second for high speed motor sport. The timing is relative. Be prepared to try it out and check what works later by reading the EXIF data on the computer. Then you can analyze the shot for use in the next event.
  • Pre-focus and pre-position on the point where you want to catch the action. Set your focus up in advance and have the auto-focus off so you just click and catch when the action fills the frame. Then, hold your position until the shot comes together and CLICK.
  • For each shot know what you are trying to capture. If you have seen a rally car take a corner six times look for the best vantage. Then capture that one. Once you have captured it a few times look for another vantage point. Don’t just blindly fire off shots. Watch for the action and quite deliberately go for that shot and nothing else until you think you have it right.

Frozen action shots are exciting and fun. However, it takes time with any skill to get the best results. So don’t be afraid to keep practicing.

By Damon Guy (author and Photokonnexion editor)

Damon Guy - Netkonnexion

Damon Guy (Netkonnexion)

Damon is a writer-photog and editor of this site. He has run some major websites, a computing department and a digital image library. He started out as a trained teacher and now runs training for digital photographers.
See also: Editors ‘Bio’.