Tag Archives: How to Shoot

Everybody Street… a new documentary about street photography

Video

Video

Documentary released for Film Festival.

Released at the “Hot Docs International Film Festival”, Everybody Street is about the street photography art of New York. Focusing on a range of street photogs it opens up the everyday reality of street photography.

The trailer for the documentary has been released and provides an insight to what may be in the documentary. It shows some stunning shots and some powerful insights. However, it also takes a rather voyeuristic and antagonistic view of street photography. While I personally don’t aspire to that approach there are others that do.

I believe that to act as an antagonist on the street is both dangerous and unnecessary. Personally I believe in respect, contact and participation in the street scene. But I do acknowledge that there are some people that take a different view.

I think it is worth seeing this documentary and I hope that one day it will be widely available. For now I leave you with the trailer. See what you think. The video is just over two minutes.

EVERYBODY STREET – New York City

Everybody Street Trailer from ALLDAYEVERYDAY on Vimeo.

Visit the website for the documentary at: http://everybodystreet.com/  External link - opens new tab/page

Comments, additions, amendments or ideas on this article? Contact Us
or why not leave a comment at the bottom of the page…

find out more...Photokonnexion tips by email
If you enjoyed this article please sign up for our
Tips by email service.
                                                 Find out more

By Damon Guy (author and Photokonnexion editor)

Damon Guy - Netkonnexion

Damon Guy (Netkonnexion)

Damon is a writer-photog and editor of this site. He has run some major websites, a computing department and a digital image library. He started out as a trained teacher and now runs training for digital photographers.
See also: Editors ‘Bio’.

A fast and simple introduction to portrait photography

How to make a digital camera

A rapid but full introduction to portraiture


When I introduce a new idea or a concept in these pages I often provide a video to help put the point across. Well, here is a video that stands up on its own. It is a light and simple introduction to portraiture. It bombs along at a great rate and has plenty to say about good principles in portrait photography. So, without further ado here it is. It’s 4mins 15secs long.

How to take great portrait photos


VideoJug  External link - opens new tab/page
Portraiture – Resources on Photokonnexion.com

Comments, additions, amendments or ideas on this article?
Contact Us
or why not leave a comment at the bottom of the page…

The simplest way to add depth to your pictures

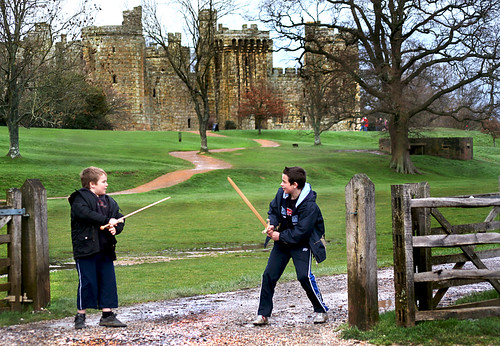
• Young Knights battle at the gates to the castle •

• Young Knights battle at the gates to the castle •
Click image to view large
• Young Knights battle at the gates to the castle • By Netkonnexion on Flickr External link - opens new tab/page
The foreground interest fools the eye into seeing depth. In this case the path line and undulations in the mid-ground also help.

Understanding the power of the foreground…

Is the first step to creating a sense of depth in your pictures. Our eyes use markers like foreground, lines and background to gauge depth in the landscape. If we provide these in a two dimensional picture we fool the eye into seeing depth there too.

Foreground Interest – Video

Bryan Peterson explains in the video how to take a position that brings out the foreground interest. It’s easy. Make sure you shoot past something close when shooting into the scene so you can see a progression of depth… foreground, mid-ground and background. Simple.

adoramaTV  External link - opens new tab/page With Bryan Peterson

Scale

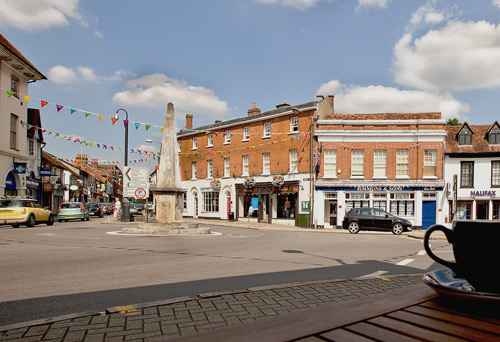
In fact you can use this landscape trick in the studio, or even a small room. Position yourself close to a foreground object and shoot past it into the room or scene. For example, use a chair or a table to occupy a part of the near end of the picture. That gives you a close marker allowing the eye to gauge a distance into the room. Here is an urban shot using the same principle…

Monument

• Monument •
The presence of the coffee cup on the table gives an immediate scale marker to the eye. The rest of the scene has depth because the eye can match the scale differences progressively as it looks into the scene.


The very well known scale of the size of a coffee cup in the picture is the clue to the depth of the rest of the shot. The eye/brain system does the rest. Simple principle – simple composition.

Comments, additions, amendments or ideas on this article? Contact Us
or why not leave a comment at the bottom of the page…

By Damon Guy (author and Photokonnexion editor)

Damon Guy - Netkonnexion

Damon Guy (Netkonnexion)

Damon is a writer-photog and editor of this site. He has run some major websites, a computing department and a digital image library. He started out as a trained teacher and now runs training for digital photographers.
See also: Editors ‘Bio’.

find out more...Photokonnexion tips by email
If you enjoyed this article please sign up for our
Tips by email service.
                                                 Find out more

Give your holiday landscapes a little extra punch

How to make a digital camera

How to make a digital camera

Do something different with your summer shots.

Holiday times always give us a chance to capture a few landscapes. Often they are a more difficult to get right than is appreciated. In fact a little thought can make all the difference. Think about your composition and your colours. The key to a good landscape is to find impact and contrast. In the video below Gavin Hoey shows you two things. First he shows how to think about your composition and colours. Next in the context of colours he shows how to turn your landscape into black and white in Photoshop (actually you can use any full featured image editor to do the same thing).

B&W Landscape Tips


AdoramaTV

Making black and white images

In the video Gavin Hoey made a great point about shooting in RAW. Landscape pictures often look great to the eye when in the field but they lose their appeal when the image is created on-screen. So in order to make your landscape pop some post processing is essential.

This video shows how to bring out contrasts to make the scene look great in black and white. However, he makes an important point about shooting in RAW. You don’t lose the original colour, it is retained in a RAW file. Then you convert to black and white afterwards. This is not possible in *.jpg. That format does not have the colours stored like the RAW format. If your black and white *.jpg is less than successful you lose the colour option too.

Gavin Hoey points out that you should test that your camera will process a RAW file in monochrome mode on its screen, but still leave a full colour RAW file. It is possible your camera converts the RAW file to a *.jpg file in the colour scene mode. So cover your options and try it before going in the field.

Gavin showed the conversion method to black and white using the colour sliders. Most image editors have two basic ways to create monochrome shots. Your shot can be simply colour converted to shades of grey, or you can use the colour slider method where you have some control over the intensity of colour which greys are created from. This latter method gives you much greater control over the contrasts in the picture. When working in monochrome that is the most effective way to ensure the picture has visual impact. So always choose the colour slider method to get better control of the conversion.

There are some additional links below to show how to improve your black and white shots in other ways.

Comments, additions, amendments or ideas on this article? Contact Us

find out more...Photokonnexion tips by email
If you enjoyed this article please sign up for our
Tips by email service.
                                                 Find out more

By Damon Guy (author and Photokonnexion editor)

Damon Guy - Netkonnexion

Damon Guy (Netkonnexion)

Damon is a writer-photog and editor of this site. He has run some major websites, a computing department and a digital image library. He started out as a trained teacher and now runs training for digital photographers.
See also: Editors ‘Bio’.

Simple portrait tips, excellent advice

Simple portrait tips - Excellent Advice

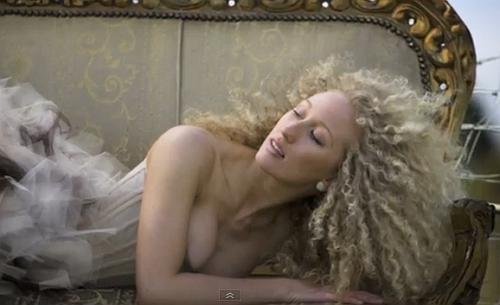
• Portrait by Bambi Cantrell •
Simple portrait tips: seeing the person, seeing the light, seeing simplicity.
(Image from the video)

The best portraits show the person

When photographer and subject gel the magic of portrait photography bursts forth. Bambi Cantrell just bubbles over with enthusiasm about portraiture. And, she gives simple portrait tips and great advice. See the person, see the light – make it simple. In this short video she explains about her portraiture. Really worth watching for the enthusiasm and the advice.

Wedding & Portrait Photography Tips & Advice by Bambi Cantrell

This video is all about simple portrait tips although Bambi also includes wedding photography ideas. But much of wedding work is about portraiture.
Marc Silber – Silber Studios

Simple portrait tips and light

The simplicity in seeing light passes many beginners by when they are starting. These simple portrait tips reveal how light can be used to good effect. But in real terms many of the most important tips about photography are lost if you don’t get great light. So follow up these simple portrait tips with a study of light – especially in your portrait work. Check out these Light and Lighting resources, articles and links

Comments, additions, amendments or ideas on this article? Contact Us

find out more...Photokonnexion tips by email
If you enjoyed this article please sign up for our
Tips by email service.
                                                 Find out more

Damon Guy - Netkonnexion

Damon Guy (Netkonnexion)

Damon is a writer-photographer and editor of this site. He has run some major websites, a computing department and a digital image library. He started out as a trained teacher and now runs training for digital photogs.
See also: Editors ‘Bio’.
By Damon Guy see his profile on Google+.

How to tackle the problem of reflections and highlights with glass

• Photographing anything translucent requires treatment that defines the shape •

• Photographing anything translucent requires treatment that defines the shape •
Photograph by Phillip McCordall

Make the best of your resources.

Making the best of your resources is important. Expensive equipment is out of reach for many photographers. Using simple equipment and home resources helps. Glass presents particular problems. This tutorial will help you to tackle the problem with glass and learn more about using simple resources.

The problem with glass

By its nature, the translucence and reflectance of glass creates special problems for photographers. Translucence means that the definition of glass is lost against the background. Reflectance means that general highlights and specular highlights in particular can cause problems. Success in photographing glass is about learning to control those things. It is all a matter of using reflectance to define the glass and placing the light in the correct way for it to illuminate.

Using a simple house light and white and black cards, this tutorial helps you to control highlights to emphasise the glass and not create nasty highlights. You learn about good quality composition with a glass and a few tricks of the trade. Win:win I think.

find out more...Photokonnexion tips by email
If you enjoyed this article please sign up for our
Tips by email service.
                                                 Find out more

By Damon Guy (author and Photokonnexion editor)

Damon Guy - Netkonnexion

Damon Guy (Netkonnexion)

Damon is a writer-photog and editor of this site. He has run some major websites, a computing department and a digital image library. He started out as a trained teacher and now runs training for digital photographers.
See also: Editors ‘Bio’.

Can you write? Of course you can!
Write for Photokonnexion...

We would love to have your articles or tips posted on our site.
Find out more…
Write for Photokonnexion.

A simple lighting technique with lovely light

The mobile phone light... soft and effective.

The mobile phone light… soft and effective.

Table-top photography works with soft light.

When you are doing still life shots you want soft, gentle light. Exposures can be longer so you can create lovely gentle shadow graduations. Your mobile phone provides an excellent light source for this. Here is how it is done.

White source image

The basic technique is to put a bright white image onto your mobile screen. When you display it on the mobile screen the illumination produces a white light. This is a wonderful, quite localised soft light for your shot. The steps in detail are…

  • Open your favourite image editor
  • Create a new image (approx size 800 pixels by 600 pixels)
  • Paint it brilliant (pure) white
  • If you are on your computer save the image then upload it to your phone
  • If you are on your mobile phone save the image to a known folder
  • When you want to use the light, display the image on screen

The white image on screen produces enough illumination to create the light you want for your table top image.

Other ways to use your mobile as a light source

Of course many mobiles are also capable cameras in their own right. So here are two other ways to use them:

Photographic light: Lots of mobiles have a “flashlight” app. This will allow you to use the camera flash as a photographic light onto your still life scene. Many on-camera (pop-up flash) flash units are very strong and have a harsh light. The flash on a mobile is often much softer and sometimes is coloured to be a similar colour to daylight (approx 5500 Kelvin). This ‘daylight balance’ is a great light and worth using if you have it. Prop your phone up with the flashlight app activated and start shooting.

Coloured light source: Traditionally coloured light is produced using colour gels. However, some apps on mobile phones can create both a white light or a range of other coloured lights. One such app for example is: Tiny flashlight + LED. This is an app. for Android phones, but there are other apps. for different operating systems. If you cannot find a suitable app. you can produce a colour image like the white one above. Store that on your phone and open the image when you want that colour light.

Versatile

While the light from the screen of your phone might not be very strong, for a long exposure that is not too important. The light is wonderful and soft. As it comes from a wide source it creates lovely wrap-around shadows. These are just great for still life. Other features of phones can help with the lighting for your photography too. So, have a look at your mobile in a new light – see what you think.

By Damon Guy (author and Photokonnexion editor)

Damon Guy - Netkonnexion

Damon Guy (Netkonnexion)

Damon is a writer-photog and editor of this site. He has run some major websites, a computing department and a digital image library. He started out as a trained teacher and now runs training for digital photographers.
See also: Editors ‘Bio’.