Tag Archives: How it works

The secrets of good backgrounds

• Backdrops •

• Backdrops •
Wallpaper can be used extensively as a backdrop. There is plenty of variation and the material is relatively cheap.

Get more out of less.

One of the central ideas behind photography is to reduce the “clutter” especially in the background. We want to simplify our shots to help focus the viewers attention on the subject we have chosen. Often, by way of controlling the scene we use backdrops. For the modern photographer a backdrop provides a simple uncluttered background that can be used to off-set the colours of the subject, or to complement them or remain neutral.

Backdrop secrets

Modern backdrops have a wide range of finishes. However, strong patterns and fussy details draw the eye off the subject. So most backdrop patterns are designed to reduce the impact on the eye. Rather than regular strong lines or shapes these back drops will tend to have random and subdued variations in the theme. Other backdrop types are solid colours. The best backdrops are minimalist.

Black backdrops are often used for darkening and absorbing the light. White backgrounds are frequently used for high-key photography. Reds, purples and blues are often used for different types of shots, but can also form effective variations for monochrome work (single tone shots or a single colour and white).

Bright green backdrops are called chroma-key (chromakey). They are often used to provide a set colour ready for post processing technique called compositing. This is where new colours or entire images are to swapped into the image. The subject is retained but the green colour is replaced with an entirely new image. This technique is the digital replacement of the old ‘back-projection’ or painted backgrounds techniques used to make it look like there was something solid in the background in the days of film. Actually there was a blank screen behind the subject. This technique is also known as “green screen”.

Backdrops can be used anywhere but are used extensively in two particular branches of photography. Portraiture and fashion photography use backdrops to simplify the scene as much as possible. This allows the person or model to be the strongest element in the scene. The eye is therefore drawn to the person which is where the photographer wants people to look. A fashion or portrait shot where the eye is not on the person is a disaster!

Still life

The other area where backdrops are used extensively is in various types of still life. Again the intention is to create a simple scene so the subject is the centre of interest. However, in still life the relatively close up nature of the work can allow the use of stronger elements in the backdrop.

Heart in hand

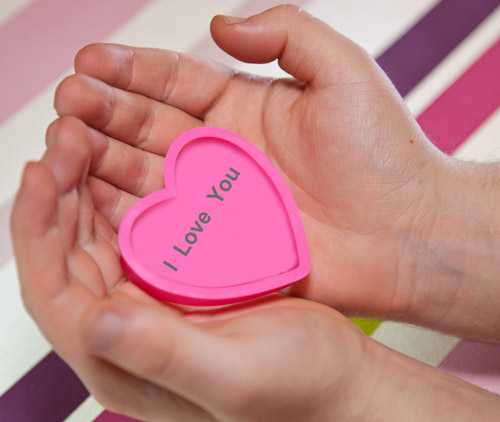
Heart in hand • By Damon Guy
In smaller scenes or still life backdrops can be stronger. The diagonal wallpaper pattern here helps the flow of the eye.


In the picture above the hands are the centre of attention. The backdrop is used in this case to provide a dynamic feel (from the strong diagonal) and to direct the eye along the line of the phrase in the heart. Eyes naturally tend to follow lines like that.

Wallpaper

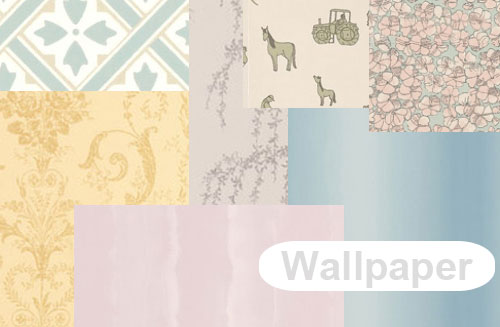
While solid colours and simple patterns are well catered for in the market, specific patterns on backdrops are limited. However, in the picture at the top of this page you can see that I have arranged a variety of different wallpaper samples. Wallpaper is easy to find – it is in every DIY store and great patterns, plain or textured can be found at relatively cheap prices. If you are working at small, still life, sizes one piece of wall paper might be sufficient. However, I have sometimes worked with wallpaper on a full sized portrait backdrop. In this case I use strong tape to stick the wallpaper sheets side by side to make the backdrop wide enough. Then, I staple the wall paper to two light wooden battens, top and bottom. This helps hold the papers together with less damage. It also helps pull the paper out so it hangs flat. Wallpaper has a tendency to curl. Then the top batten is clamped to the backdrop cross bar. Hey presto! You have a cheap but patterned backdrop.

Other patterns, shapes and marks can be used to do other things in a picture. In fact if it is used properly the use of backdrops can be complementary, can be contrasting, can form effective reflections, light dampening, and many more things. Understanding backdrops is a great way to ensure that you can control what is going on behind the main subject.

Decor

Backdrops have rich history in the theatre. Today, in modern still photography they are relatively simple and uncluttered. However, if you have a specific scene in mind you can use wall paper to provide fun and varied backdrops to complement or change your scene. While proper cloth or paper backdrops can be quite expensive; wallpaper is a relatively cheap way to use fun patterns and interesting backdrops.

By Damon Guy (author and Photokonnexion editor)

Damon Guy - Netkonnexion

Damon Guy (Netkonnexion)

Damon is a writer-photog and editor of this site. He has run some major websites, a computing department and a digital image library. He started out as a trained teacher and now runs training for digital photographers.
See also: Editors ‘Bio’.

find out more...Photokonnexion tips by email
If you enjoyed this article please sign up for our
daily email service.
                                                 Find out more
#11030#

How to buy a new camera…

Buying a new digital camera

Buying a new digital camera

Buying is a big decision.

Photographers should be wary of the simple answer. Buying a camera is a deeply personal matter and a big investment. You live with the consequences for a long time. Look carefully at considerations that really matter to you and your performance as a photographer. Impulsive buys may spoil your photography. If you’re comfortable with your buy you will be more likely to get to know it, use it and have fun with it.

1. Work out what you need

Impulsive buying means something will not match your need, then you won’t get the use you want. The points below will help refine your thoughts. Write down your ideas to ease your research later.

Budget: Fix a budget – it may define the type of camera you can buy. So write down what you want to spend before starting. Change your mind later, but start with an idea to guide initial research.

Usage: What type of photography will you do? There are broadly two types of photographer…
The ‘point-and-shooter’:

  • Interested in recording fun, family, events and memories.
  • Love things they do when they have a camera around.
  • Take pictures as reminders. (Holidays, family, fun, action, friendship).
  • The camera is an accessory to the activity.
  • The camera is easy to use, probably in auto mode.
  • Simple controls – lighter, lifestyle-type design.
  • Less interested in the art of photography, more the style of life.

The ‘photographer’:

  • Take pride in every shot.
  • Indulges other passions through photography.
  • Wants more equipment.
  • Interested in “functions” and “controls” – technical cameras/DSLRs.
  • Camera is an essential part of the activity. (Landscapes, macro, action, nature, still-life, fine art…).
  • Loves photography for its art, technology, skills and techniques.
  • Documents passions and communicates interests through photography.
  • Take pride in camera control.
  • Enjoys the technical aspects of the capture as much as the images.

Each has an associated type of camera. A heavy DSLR is not well suited to the carefree life of the point-and-shooter. A compact, colourful, wrist-strap camera is not suited to landscape shots and large prints. Preferences and lifestyle should be shorted out early on. Are you are a point-and-shooter or a committed photographer (DSLR style)?

Conditions: Indoors/outdoors, weather, underwater, holiday, abroad, air travel? The situations in which you use the camera affects what you buy. Consider protection, travel, camera size and special equipment needs.

Experience: Skill level affects purchase – your aspirations for your future photography will too. If you’re just starting out, buying a camera with a bewildering range of functions is daunting. Take simple steps. Entry level DSLRs provide for years of growth into your hobby and produce great images. This allows you to develop skills without confusion.

Features/flexibility: Spending more on a camera means more features and flexibility. However, while this gives more control it increases cost for relatively little increase in picture quality for starters. Don’t waste your money. Focus on what you need, not “feature bloat”.

Physique/fitness: When buying you don’t get a feel for using a camera. Little, disabled, or not very fit people may find big cameras unusable. Fit, but not shooting daily? You might struggle to hold up a big camera for long periods. Buy a camera you can hold steady and use all day (if necessary). I know people who bought great cameras and had to sell them again to buy another great, but lighter, camera. Also ensure you can grip it properly and comfortably. Can you reach all the buttons easily?

Size of prints: More megapixels is NOT a better camera today. Good quality cameras have sensors to produce great images. High megapixels are only necessary for high resolution pictures – mostly for large prints. You pay a lot of money for top-megapixel cameras. Only buy them if you frequently do big prints in high definition. Don’t worry about megapixels in the market mid-range.

Lenses: To a committed photographer lenses are key. Buying the right lenses is more important than a camera body. Lens investment pays you back for a lifetime, or many camera bodies. Spend less on the body than you intended and save money for better quality lenses (not more lenses). Consider retaining at least half your budget for lenses.

Other equipment and accessories: New cameras require other items affecting your budget. Consider…

  • Lenses (Wide angle, Zoom, macro etc)
  • Camera/equipment bag
  • Tripod
  • Spare batteries (two)
  • Light modifiers (diffusers), filters, reflectors
  • Specialist equipment for specific interests
  • Memory cards (at least two – eg. 2×16 Gb not 1×32 Gb – cheaper and more secure)
  • Off-camera flash (pop-up flash is rarely useful)
  • Remote trigger to fire the flash/camera

There may be other things too.

Compatibility: Is your existing equipment compatible? Buying a camera could mean buying those extras again, straining your budget. Consider the camera brand you want to buy. That may affect the other equipment you buy later. Lenses are a particular consideration. Top brands make good lenses, but other brands may not. That could be important for your buying strategy.

Picture quality: Quality digital cameras produce great picture quality. However, large, high resolution images (especially for printing) may need larger digital-sensor size (cropped or full frame?) and type of lens and lens quality. Buy up-market lenses as far as you can. For a point-and-shoot camera consider the quality of zoom. ‘Optical zoom’ is best, the lens does the enlarging. The quality will be better with a good optical zoom. With a large digital zoom component expect lower quality prints. Digital zooms crop the picture in-camera to make the picture appear bigger. You will see more detail, but the picture may be a lower definition/resolution.

More after this…

find out more...Photokonnexion tips by email
Enjoying this article? Please sign up for our
daily email service.
                                                Find out more
#11030#

2. Research

Now look at what is available. examine a range of reviews on different websites. Check out what’s popular around the web and get a “best fit” camera to your specification from above. Talk to experienced photographers. Join a club. Leave questions on Internet forums. Ask in shops.

Be prepared for this stage to take quite a long time. You may be committing to a brand for a quite a few years, or your career. Take it slowly so you can understand all implications. Keep notes and be prepared to check definitions and learn about features.

3. Try it out

Once you have identified your dream machine, see if you can try one out. Beg, borrow or hire. You will be unlikely to try everything but spend a weekend or week with it to really get a feel for it. That will help you to feel confident about your ideas or start new research. Ensure you are on the right track.

4. The purchase

From a shop: Local camera shops often have deals and committed staff. They will have knowledge and experience too. Remember they are on commission and a different focus to you. So go to a shop with a really good knowledge from the above before you buy.

Online: There are some great deals but also a lot of scam artists. Consider…

  • Who you are buying from.
  • Does the site cover losses?
  • Is delivery and packaging good?
  • Delivery times?
  • Are there proper cancellation and returns procedures?
  • Transit/purchase insurance (the company or your credit card)
  • Is the online store reputable and well known?
  • Do not click from email ads to the site – insecure.
  • Check with friends to see which online stores they used.

If it sounds too good to be true, it probably is. A reputable company will have protections built into the purchase and made clear on the site.

When you are ready consider negotiations. Lots of websites will do deals. Shops will too. Make sure you get the right deal, but don’t compromise security or safety.

5. After purchasing

Check your purchase properly – has everything arrived? Retain all paperwork and orders for future reference, returns and insurance. Test to see that it works properly. Get signed receipts and correct paper work for returns, delivery shortages or damage.

Satisfied you have the correct equipment and it works? Put it through its paces in a logical way. In Getting started with a new lens I show how to work through testing and getting to know new lenses. Many of the principles apply to the purchase of a camera and help you get to know your camera properly.

Other ideas?

Please share your other ideas, tips or experiences on buying a camera with us below in the comments…

By Damon Guy (author and Photokonnexion editor)

Damon Guy - Netkonnexion

Damon Guy (Netkonnexion)

Damon is a writer-photog and editor of this site. He has run some major websites, a computing department and a digital image library. He started out as a trained teacher and now runs training for digital photographers.
See also: Editors ‘Bio’.

The simple secrets of dodge and burn – post processing

• Dodge And Burn •

• Dodge And Burn
Important techniques for affecting the light and dark in an image. (Video below).
lynda.com on YouTube  External link - opens new tab/page

Dodge and burn – powerful light/shadow effects

Two of the oldest techniques in the photographic skill set are dodging and burning. In the old days of chemical baths and film developing they were the most effective way of changing the image out of camera. Simple stuff really. During the development of your film you allowed parts of the developing film to become overexposed. Other parts of the film you allowed to become underexposed. The effect on the final print was to increase the brightness in some areas of the film and darken others.

In modern post-processing we still use these techniques. Most post processing software packages have ways to create dodges (whitening or brighten) or burns (darkening or blacking). The aim of this? Well its simple really. If you have a picture and you want to do any of these things you need these techniques…

  • Increase/decrease the intensity of shadowy parts of the image
  • Increase/decrease the intensity of brighter parts of the image
  • Brighten the bright spots and darken the dark spots to increase contrast
  • Darken down intensely bright spots in the image to prevent distractions
  • Brighten the darker areas in the image to bring out detail
  • Pick out highlights

More after this…

find out more...Photokonnexion tips by email
Enjoying this article? Please sign up for our
daily email service.
                                                Find out more
#11030#

Dodge and burn

Although this tutorial is based in PhotoShop, most of the techniques shown in this video can be used in most editing software. If your software does not have the same tools as those found in PhotoShop check your help files for more information.

You may have to do some trial and error experiments to get these techniques working – after all, the practice will give you control of your software. Trying out these skills will give you the basic command of light and dark in the post processing context. Dodging and burning are really important techniques. Watch the video for how the techniques are used.

Photoshop dodge and burn

lynda.com on YouTube  External link - opens new tab/page

By Damon Guy (author and Photokonnexion editor)

Damon Guy - Netkonnexion

Damon Guy (Netkonnexion)

Damon is a writer-photog and editor of this site. He has run some major websites, a computing department and a digital image library. He started out as a trained teacher and now runs training for digital photographers.
See also: Editors ‘Bio’.

Can you write? Of course you can!
Write for Photokonnexion...

We would love to have your articles or tips posted on our site.
Find out more…
Write for Photokonnexion.

Why pro-photographers insist on using lens hoods

Lenses

Lenses

Lens hoods are all about control.

The control of your lens, control of difficult light and control over lens damage. Yes, believe it or not even pros make mistakes with flare and break or damage lenses. Lens hoods provide cover for you and perform a specific and important control function over the light that can create ugly flare or the sheen of overexposure.

In the video Phil Steele looks at the way that lens hoods help your shots get properly exposed. Remember, the best shots are taken by the photographer finalising every last detail in the chain of events that lead to releasing the shutter. Knowing about lens hoods is one of those shot makers-or-breakers. Get it right and the blacks in your picture will show just that little extra saturation and contrast that intensifies the shot bringing out depth and realism.

Lens Hoods – Why, When, and How to Use Them

SteeleTraining

By Damon Guy (author and Photokonnexion editor)

Damon Guy - Netkonnexion

Damon Guy (Netkonnexion)

Damon is a writer-photog and editor of this site. He has run some major websites, a computing department and a digital image library. He started out as a trained teacher and now runs training for digital photographers.
See also: Editors ‘Bio’.

Can you write? Of course you can!
Write for Photokonnexion...

We would love to have your articles or tips posted on our site.
Find out more…
Write for Photokonnexion.

This one peculiar idea can transform your photography

Compositional elements :: Look at a large number of photographs every day

Everything you see in a photograph is a composition. Looking at lots of photos every day, particularly good ones, helps you appreciate good images. The article shows you how to identify simple Compositional elements.

Involve yourself to improve

Every day, expose yourself to great images. The mind soaks up the goodness. But to make it effective you should also be seeing into the image. It is surprising, but the the good things about a photograph are seen with the first glances. Compositional elements in a photo jump out at you, even if you can’t tell me about them. I am going to show you how to find them with a simple exercise.

What is in an image? Compositional elements

When we look at an image it is often difficult to see what is good about it. Obviously our personal taste plays a part. Often however, other people who do not share our taste, also like it. The common appeal comes from the compositional elements of the image. Often these elements are very simple structural lines or edges. They help the eye through the image or lead the eye to the key subject. Composition is all about helping the eye to appreciate the main point of the image.

How do we pick out the compositional elements?

Knowing about composition is important. The “Rule of Thirds” and other simple rules help you to analyse a scene. You can use them to understand ways the eye uses compositional elements in a scene. Find out more about composition from our page: “Composition resources on Photokonnexion”. There are lots of posts there to help you with composition.

You can already spot basic compositional elements

The main compositional elements can be picked out by eye. Anyone can do it. This is what you do…

  1. Take a small piece of paper – postcard size is ideal.
  2. You are going to draw on the small piece of paper…
  3. Pick out a photo – any picture.
  4. Study it for five seconds.
  5. Put the picture out of sight.
  6. Using simple curved and straight lines make a skeleton sketch of the picture. Do it from memory take no more than thirty seconds.

That’s it. You have simply isolated the elements of the compositional structure.

Here is an example. Click this link and follow the short procedure above. to create the skeleton sketch.
Test Picture

Here is a good example of what you should see when you have finished your sketch: Test Picture Compositional Skeleton. It was done by my wife, who is not a photog or artist. Despite that, she has successfully isolated the major compositional elements in the picture. It shows how effectively this exercise can work

More after this…

find out more...Photokonnexion tips by email
Enjoying this article? Please sign up for our
daily email service.
                                                Find out more
#11030#

Analysis

The test image is of Honister Pass in the English Lake District. All the lines lead the viewer to one point. The exit in the hills in the distance is dynamically off-centre. That keeps your search for symmetry. You feel like you know where the road is going. It draws the eye into the picture. Your eye does not exit upward – the clouds hold the eye into the valley. You are drawn along the road into the image, giving it depth. The picture has a 3d structure and a strong mood.

The strong lines and balance of this picture make it simple to pick out compositional elements. With practice this procedure will help you analyse complex examples. With a few practice examples you will be able to pick out compositional elements by eye. If you do this in your head you’re on the way to doing compositional analysis through the viewfinder.

As you learn new compositional ideas you will pick out more compositional elements. Use them as tools of analysis. They will help you understand and compose in the frame while taking a shot. Soon you will compose to draw the viewer into the picture.

Rules don’t make things beautiful

Rules of composition are limited in many ways. They are more guidelines than rules really. So do not fear to break them. Instead, know the things that work well for the eye. Develop harmony and balance, learn to appreciate beauty. Look at as many great images you can every day. Knowing a little about why they are attractive will help you to create more beautiful and effective images of your own.

By Damon Guy (author and Photokonnexion editor)

Damon Guy - Netkonnexion

Damon Guy (Netkonnexion)

Damon is a writer-photog and editor of this site. He has run some major websites, a computing department and a digital image library. He started out as a trained teacher and now runs training for digital photographers.
See also: Editors ‘Bio’.

Can you write? Of course you can!
Write for Photokonnexion...

We would love to have your articles or tips posted on our site.
Find out more…
Write for Photokonnexion.

Simple videos showing how camera settings work

Understanding the relationship between ISO, Aperture and Shutter speed…

These are the three critical factors in the exposure relationship. Getting a feel for how they work together is the essence of controlling your camera. Several people asked me to find a simple explanation for the way this relationship works after seeing this post yesterday: How to work with your camera settings – a simple, fun lesson.

The key point

The three settings, ISO, Aperture or Shutter Speed are set up on your camera in stops, or fractions of stops. The stop is a photographers way of measuring light in the camera.

The most important thing to remember is that a stop of aperture is the same as a stop of ISO, and in turn a stop of shutter speed. As they equal each other, you can keep them in balance. If you put one setting up a stop (or fraction of a stop) you can put one of the others down a stop (or fraction) and you will get the same exposure. This allows you to change your settings to get a different result (more bokeh, less movement blur etc) but retain the same exposure levels.

The two videos below will help you to understand the way the settings work. I have given you two versions of the same information. They both present differently, and they both have snippets of information that are different from the other. However, they both cover the same material. I hope that one or both of them will help you to see how the settings work. Enjoy!

Aperture Shutter Speed and ISO, Photography 101

The second video covers almost identical material but shows some of the points through the camera viewer. This helps you to see the context of the settings easier.

Exposure (Aperture, Shutter Speed, ISO)

Now try out your new knowledge…

Now you can try out CameraSim in yesterdays post. Try varying the settings for yourself like they did in the videos and see how they work together to get an exposure balance.

By Damon Guy (author and Photokonnexion editor)

Damon Guy - Netkonnexion

Damon Guy (Netkonnexion)

Damon is a writer-photog and editor of this site. He has run some major websites, a computing department and a digital image library. He started out as a trained teacher and now runs training for digital photographers.
See also: Editors ‘Bio’.

Can you write? Of course you can!
Write for Photokonnexion...

We would love to have your articles or tips posted on our site.
Find out more…
Write for Photokonnexion.

A little known idea that will help your photography every day

Learning photography is about understanding light.

There is a ready source of learning about light you see every day. Photographs and television provide valuable lessons in light. You can learn a lot by observing how light is used in different productions. Look for the way light is cast, which direction it comes from, its colour and it’s intensity. Also look for the way it is used to create mood and atmosphere – these often show off how shadows and hard light or soft light are used. Good producers of still photography, television and film are masters of creating scenes with and manipulating light. Looking carefully at the light itself in such productions will provide great insights for your own photography.

[More about eyes: The Eyes Have It… nine ways to emphasize eyes]

Portrait Reverse Engineering – It’s In The Eyes

In the video we see one aspect of how to see the light. I have written about catchlights before. They are the bright spots in peoples eyes that are reflections of the nearby lights. In this video an examination of catchlights is used to understand the nature of the light used in the portrait session. This is a clever and interesting way to understand portrait lighting. It is also something of a study in television too. Directors use lights to create catchlights for nearly all close shots. So watch out for them as you watch television.

The Michael Andrew Photography School External link - opens new tab/page

By Damon Guy (author and Photokonnexion editor)

Damon Guy - Netkonnexion

Damon Guy (Netkonnexion)

Damon is a writer-photog and editor of this site. He has run some major websites, a computing department and a digital image library. He started out as a trained teacher and now runs training for digital photographers.
See also: Editors ‘Bio’.