Tag Archives: How it works

A quick look at image stabilisation

Image Stabilisation

Image Stabilisation

Image stabilisation helps you get a sharper picture.

Good images rely on a steady hand or a tripod. You also get a help from the image stabilisation in your camera or lens. These systems help your lens stay steady. Here we are going to get a look at what is involved and how to use it.

What is image stabilisation?

The term “Image stabilisation” represents a number of technologies used to reduce blurring caused by camera movement during exposure. It compensates for movement in two planes. These are referred to as pan (lateral twisting or yawing movement) and tilt (vertical or pitching movement).

Camera movement is recorded as blur when the shutter is open long enough for the movement to be captured. The slower the shutter speed the more likely it is that the movement will be detected. The tiny, but continuous movements of our hands tend to make hand held shots a little soft. Longer exposures will be even softer since the tiny movements will continue blurring the shot throughout the exposure.

Using an image stabilisation technology allows a mechanism to off-set or compensate for the movement not prevent it. Extreme or large movements will still cause blur during the exposure. However, image stabilisation systems are designed to compensate for the movements created by the almost imperceptible movements of our hands while hand-holding a shot. Typically recent image stabilisation systems will compensate for exposures four to sixteen times longer than could be hand held without the compensation. This would mean that instead of using a shutter speed of 1/250th of a second, you can use image stabilisation to get a shutter speed of around a 1/30th of a second and still get similar image quality. This could significantly improve the light levels in your exposure.

Types of image stabilisation

Optical image stabilisation: This type is mounted in the lens. It uses high speed motors to shift a lens element around changing its orientation to compensate for the movement of the camera. It is highly accurate, compact and fast. It does add quite a lot of weight (and expense) to the photographic lens unit overall. However, it performs really well under all types of movement even fairly extreme movement that might be found in panning for example. It will not prevent the gross movement blur, but will compensate for the tiny variations while panning for example.

In-camera stabilisation or sensor shift stabilisation
This technology uses motor technology to move the Digital Image Sensor to compensate for the movement of the camera. This method concentrates the stabilisation in the camera body and therefore it is only paid for once on the purchase of the camera body (unlike lens-based systems). Sensor shift technology tends to mean the lens is lighter too making handling easier for some people. This type of system does not cope as well as lens-based systems for more extreme movements. Long focal lengths and telephoto lenses will tend to exaggerate the degree of movement of a beam of light hitting the sensor. Consequently the sensor needs to be able to compensate for more extreme vibrations or movements to get the same image quality as a lens system. As the sensor shift system is limited by its range of movement it has limited tolerance at the more extreme end of the range.

Stay sharp!

Many learners find that the softness they get when using a DSLR is very frustrating. While image stabilisation helps, it does not cure the problem. Remember that these systems can only compensate, not prevent, movement blur and softness. So you need to take other steps to make your shots sharp. Here are some issues to consider regarding image stabilisation…

High ISO (in manual control modes): Raising your ISO can help reduce movement blur because you are making the sensor more sensitive to light. Your image sensor will be exposed more readily allowing you to still have a faster shutter speed to take your shot – then movements don’t have time to make the shot soft. Remember, high ISO may increase your digital noise, particularly with very high ISO levels (say 800 or more).

One way to overcome this softness created by hand movement is to raise the and set a faster shutter speed The point and shoot mode or auto mode of your camera will do this to ensure your get sharp shots in most daylight situations. Of course this means a short exposure which may not be suitable for your shot.

Wide aperture(in manual control modes): This too will allow more light into the shot and will allow you to have a faster shutter speed. However, the depth of field will be reduced and that will reduce your sharpness in some areas of the shot.

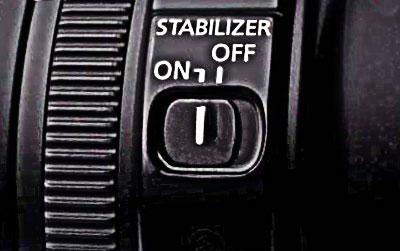
Use a tripod: Using a tripod is probably the best way to get a sharp shot. In most situations you should turn off your image stabilisation to use a tripod. The motors that do the stabilisation actually create vibration in the tripod and can cause softness. Some systems compensate automatically for being on a tripod so read your technical manual to get guidance for your camera.

Panning: This will definitely create movement blur. But some image stabilisation systems have mechanisms to reduce the vertical movement while panning. In this case make sure you know how to switch to this mode. The difference it can make to getting a moving object sharp is surprising.

Mirror lock-up: Vibration is caused when the reflex mirror in a DSLR flips up. You can lock up these mirrors while you take the shot. The procedure for that is different on every camera so check the manual for the correct method. The image stabilisation mechanisms will not compensate for movement caused by the mirror movement.

Careful use of the shutter button
Don’t stab the shutter button. Roll your finger onto the button gently depressing it. If you stab at it there will almost certainly be an erratic movement that the image stabilisation will not be able to compensate for.

Eagerness!
While enthusiasm is great, taking the camera away from your face too quickly can induce movement before the exposure is complete. Image stabilisation will not compensate for this type of action. Try to count to two before taking the camera away from your face.

Improving overall

Image stabilisation systems vary in their effectiveness according to model, camera, lens, use and how much movement there is. They can be very effective in helping you gain control over your sharpness but they are not the final answer. Sharpness involves a range of techniques and procedures which you will need to learn and practice to improve. Nevertheless, if you are hand-holding a shot you will get significant improvements in sharpness by using these systems. If you want to know a little bit more detail about image stabilisation you can see some more detail in Definition: Image stabiliser; Image stabilisation.

find out more...Photokonnexion tips by email
If you enjoyed this article please sign up for our
daily email service.
                                                 Find out more
#11030#

Can you write? Of course you can!
Write for Photokonnexion...

We would love to have your articles or tips posted on our site.
Find out more…
Write for Photokonnexion.

By Damon Guy (author and Photokonnexion editor)

Damon Guy - Netkonnexion

Damon Guy (Netkonnexion)

Damon is a writer-photog and editor of this site. He has run some major websites, a computing department and a digital image library. He started out as a trained teacher and now runs training for digital photographers.
See also: Editors ‘Bio’.

Simple explanations of camera exposure modes

Choose your settings from a range of modes.

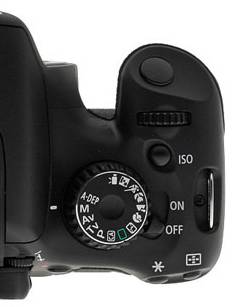
Canon550DModeDial

Camera Mode Dial
Choose the most suitable setting for your shot.


The DSLR contains a sophisticated computer providing a wide range of exposure options. They may seem bewildering. In this post we will provide simple explanations for the most common exposure modes to help you choose the best method for your next shot.

Exposure…

The modern Digital Single Lens Reflex (DSLR) can accommodate so many options that it is often difficult to know how to get started. So it is helpful if you have some idea of what exposure is about.

As photographers we are concerned with the use and manipulation of light. Everything else is secondary. We need to understand the concepts relation to how the camera detects light and the impact that has. Basically there are three controls which affect way the camera uses light. These controls are:

  • ISO – controls how sensitive the camera is to light. However, at high ISO levels there is an increase in digital noise.
  • Shutter speed – controls how long the camera sensor is exposed to light. The shutter speed also affects the amount of movement blur in the shot. The slower the shutter speed the more blur.
  • Aperture – controls how much light is allowed into the camera. Aperture also controls the depth of field. The wider the aperture the shallower the sharp zone in the picture.

(The links above take you to a full explanation of each control).

Between them these three provide control over your exposure. Co-ordinating them requires a little practice. Nothing too difficult. It is about balance. For the camera to create an exposure it has to collect a fixed amount of light. Too much light and the picture will be over-exposed. Too little light and the pictures will be underexposed. Getting it right requires a little knowledge of your camera light meter and how to change the controls to create the balance that makes the exposure.

In addition to the direct controls listed above there are the others called “modes” found on most cameras. These have been developed by the camera manufacturers to try and assist beginners who don’t understand the exposure process. The modes are intended to provide easy pre-selections for certain situations.

The different modes range from fully controlled by the camera (fully automatic mode) through to fully controlled by you (full manual mode). That is a range of controls from where the camera does everything for you through to where you make all the decisions. These modes differ from camera to camera but in general terms they are described below. The names may be different with each manufacturer too…

Full Auto: Basically this puts your camera into “point-and-shoot” mode. The camera uses its sensors to make an exposure. It responds to its programming and creates a picture which is of good quality but which you have no creative control over at all. It will even activate the flash if the camera detects insufficient light to create a balanced exposure.

Auto with No Flash: This is the same as the full auto setting, but the flash will not work under any circumstances. This leaves the camera to make the exposure without the additional light from the flash.

Program: The camera responds to its programming and makes an exposure by controlling the settings on your behalf. However, you have the option to make changes to that pre-programmed exposure – small adjustments that allow you to have a small amount of creative control.

Scene settings:
The scene settings on your camera includes a number of scene variations. These are likely to vary widely between the manufacturers and various models they make. Here are some of the more popular options:
• Portrait (for taking portraits)
• Landscape (landscapes shots and long distance shots)
• Night-time (night and dark shots)
• Sports and/or Action
• Macro
The above are standard modes. In most recent cameras these may be extended to include other additional modes to cover children, pets, specialised filters for colours and vintage settings for example. All sorts of other modes may be included depending on the target market for the camera.

These automatic modes above are pretty much camera controlled. Aside from tweaks, the camera has all the control. The problems with all of these is that the manufacturer is calling the shots. You can compose the shot, but have little control over what it looks like in the exposure. The discerning photographer wants to take creative control and use the main three controls mentioned above. Then they will be able to use the depth of field, movement blur and sensitivity to light to create the exposure that expresses their interpretation of the scene they are shooting. As a result there are three modes to deal with this. The first two are “semi-automatic” and the third gives you full manual control of the camera.

Aperture Priority:
The aperture semi-automatic mode relates to the manual control of aperture and the automatic control of the shutter speed and ISO. When you are in ‘A’ or ‘Av’ (aperture value) mode you are able to change the size of the aperture. The different sizes of the aperture are measured in “f-stops”. You can find out more about f-stops in this Definition: f number; f stop; Stop. The term aperture relates to the size of the hole which allows light into the camera. As the aperture varies the depth of field changes. Controlling the depth of field gives you discretion over the sharp area of the picture. The sharp parts of the picture attract the eye. Controlling where the sharpness is in the picture therefore affects where the viewer looks. This makes aperture control a valuable aspect of your composition.

Aperture also determines how much light is allowed through to the digital imaging sensor. A wide aperture allows more light in (say, F2.8) and has a shallow depth of field. A narrow aperture allows less light through (say, F22) but has a deep depth of field – at F22 sharpness will be more or less right through the picture.

Aperture priority allows you true control over the creative aspects of the light levels in the exposure. However, the camera balances your exposure control to make a good quality exposure because it sets appropriate ISO and shutter speed. You have creative control, it provides the quality exposure you need to make a great image.

Shutter Priority: This too is a semi-automatic mode. However, using this mode you have access to the shutter speed. Nominated as S, T, or Tv (time value) mode allows you creative control over the length of the exposure. Using this mode you can set yourself up for longer or shorter shutter opening. If the shutter is open for longer anything moving in the field of view will tend to blur. If the shutter is open longer the movement will be more blurred.

Shutter speed allows for control over the creative aspects of the total amount of light allowed to influence the exposure. While using the shutter speed the aperture setting and the ISO are under the control of the camera so it can balance the overall exposure while you control the creative part.

Manual or Full manual setting: The manual setting or “M” setting on the modes dial of your camera is used to give you full control. If you do it right your exposure will allow for depth of field control as well as creative use of movement blur. This mode gives you full control of all three aspects of the exposure.

So which mode do you choose?
In essence the automatic modes and scene modes are manufacturers programming – they do all the work for you. They represent an attempt to create classic ways of doing certain shots without you needing to take part in the exposure control. However, as a result these modes respond to make a picture that is not of your vision. Instead it is the suggested settings that manufacturers have researched about what the average shot of that type. These modes are in effect telling you how to take the shot.

On the other hand, the semi-automatic modes allow you to take control of major aspects of the control of the camera. As you have control of only one of the controls it allows you to concentrate on working on the creative part of the shot. That leaves the camera the make a balanced exposure to support your creativity. As this mode gives you an important aspect of the control without upsetting the outcome of the exposure it is an excellent mode to learn control of the camera.

Likewise, when using the shutter speed as a way of controlling the camera. You have the creative control over the length of exposure and any movement blur. This too is a great mode to learn control of the camera.

Both Av and Tv modes are affected by the other controls when in use. So, it stands to reason that you do not have the total control needed to get an exact overall exposure. However, for you to make full use of such a full manual control you should also have quite a sophisticated vision of what you want to achieve in your final exposure. While that is quite a normal requirement for a picture it does require some practice. The semi-automatic modes allow you to learn about the use of these controls and to develop the vision you need to start using the full manual mode. Learn to use these semi-automatic modes and you are not only on the way to full manual control, but also learning about how to envision your final exposure.

find out more...Photokonnexion tips by email
If you enjoyed this article please sign up for our
daily email service.
                                                 Find out more
#11030#

Three easy photography time savers

Making time by saving time.

We would all like to spend more time with our camera. If we can save time on our shots we will have time to take more of them. It is about being photographically efficient.

1. Plan your shoot

Most photographers find out the hard way. They go to do what they think is a great location to do a shoot. When they get there they find out that all is not as they thought. Here are some common problems encountered because of lack of planning…

  • No photography allowed – eg. public buildings, churches, malls and private offices.
  • Area is too large to complete everything you wanted to do.
  • You cannot find what you want. Wild life is especially difficult to predict.
  • Did not check the weather at the destination before leaving.
  • Failed to check up on local information with local people/camera clubs.
  • Do a little planning and you could save your whole day or get more shooting done.

    2. Use a tripod and work sharp

    The aim of great photography is to do as much as possible to create sharp images in camera. Sharpness is much sought-after among those who are trying to improve their photography. Oddly enough most improvers are too anxious to move onto the next shot. In their haste they sacrifice sharpness, or fire off a machine-gun-like series of shots in the hope that one of them will make the grade. During a day you will get hundreds of shots of not very many subjects.

    OK… here is the news. After the shoot you will spend hours going over all those shots choosing the sharpest and doing the post processing. Professional photographers know that they want two things: a sharp shot and a good composition. Consequently they take a little more care and time making the shot in the field. They use a tripod and follow a procedure for checking their composition and ensuring sharpness. Check these posts out for some ideas…
    An old sailors trick to improve your photography
    The fifteen second landscape appraisal
    Three Tips for Pin Sharp Shots with a Tripod
    The Zen of sharpness – 12 easy ways to improve
    Here is the trick. If you learn to do sharp shots at the outset you save time two ways. First, you will be able to efficiently arrive on the scene, set up, get the shot, move on. Secondly, you will save hours of time on your computer trying to find the right shot and then spending time cleaning it up. You will have fewer shots of more subjects.

    Know how you are going to shoot your subject

    Every photographer has to learn what works and what does not. You can save a lot of time on that learning curve by researching the best way to take particular shots. Online photographs are perhaps the best way to do that. When researching a new shot Google Images is a great resource. Go to Google and select images, then enter the subject you want to shoot. There will be thousands of images to choose from so you can get some great composition ideas for your subject. Look at the angles of the shots. Check the point of view. Look at backgrounds… all these give you great ideas. It is not cheating. It is doing what every artist has done for centuries – getting a great understanding of their subject and then adding their own creative touch. Not only does this save you time on the shot, it helps you develop your creativity. That’s a win:win situation.

    Saving time is cool and gives you more creative time on the shots you want. Spend time on these points and you will earn the time back later hundreds of times over.

    find out more...Photokonnexion tips by email
    If you enjoyed this article please sign up for our
    daily email service.
                                                     Find out more
    #11030#

    By Damon Guy (author and Photokonnexion editor)

    Damon Guy - Netkonnexion

    Damon Guy (Netkonnexion)

    Damon is a writer-photog and editor of this site. He has run some major websites, a computing department and a digital image library. He started out as a trained teacher and now runs training for digital photographers.
    See also: Editors ‘Bio’.

    A simple introduction to tripod sharpness and tripod heads

    PhotographyPhactoids

    Photography Phactoids number 006.

    Buying a decent tripod can be quite taxing. Getting a quality result requires a quality tripod. Many photographers do not realise how important the tripod head is that fits on top of a good tripod. Today we have included a new article in our Photographic Glossary that explains all about tripod heads, how they work and the different types.

    Photographic accuracy and sharpness

    It is surprising how accurate your photography becomes as you develop. After all, improving your sharpness (see: The Zen of sharpness – 12 easy ways to improve) is about tightening up your camera control and minimising any movement in the process of taking the shot.

    Most starter photographers rarely use a tripod. After a while they realise that the softness they suffer is down to poor control of the camera and lack of a tripod. What they do not realise is that a poor tripod is as bad as no tripod at all. I know many, many people who have bought cheap and then had to buy again – because with tripods, cheap is rubbish!

    Well, the same can be said of tripod heads. A poor piece of engineering on a tripod head, or one that is too flimsy will give you as many problems as a poor tripod. Almost certainly you will get poor accuracy, bad alignment, wobble, poor locking and damage. Working to improve your sharpness is about being accurate, tightly controlled and stable in all aspects of the shot – including the tripod and tripod head combination. When everything is tight and there are no weak links you can expect tight and sharp photographs.

    Make sure you understand about tripod heads… they are an essential item. You may have a great tripod, but a poor head will let the whole combination down.

    See: Definition: Tripod Head for a detailed examination of how the heads work, the different types and some example pictures.

    By Damon Guy (author and Photokonnexion editor)

    Damon Guy - Netkonnexion

    Damon Guy (Netkonnexion)

    Damon is a writer-photog and editor of this site. He has run some major websites, a computing department and a digital image library. He started out as a trained teacher and now runs training for digital photographers.
    See also: Editors ‘Bio’.

    The Zen of sharpness – 12 easy ways to improve

    Sharpness factsSharpness facts

    Making sharp images takes knowledge and practice.

    Photographers often wonder why they cannot reproduce publication sharpness. It’s not difficult, but there is more to it than clicking away. Here we look at all the factors that may affect sharpness.

    Seven common problems

    1. Poor focus:
    • Frequently, focus problems occur because the focus has been taken from the wrong part of the scene. Choose one of the auto-focus (AF) points you can see in your lens (see how in your manual). Use that point to select the point of focus in your scene. The choice of where you focus is also critical. The eyes are often the most important point of focus. (See: The Eyes Have It… nine ways to emphasize eyes).

    2. Camera blur:
    • Movement of the camera during the shot will create a softness or complete blur. The solution is to improve your actual shooting technique. Holding the camera, your stance, your breathing and even the way you click the shutter button can all create camera movement. (See: Simple tips for a good stance). Camera blur can also be created because the shutter speed is too low. If you have a relatively long exposure the camera is more likely to move during the shot. If you have a higher shutter speed the chance of movement is reduced – sharpness is improved. Most people find they cannot hold the camera steady at 1/60th of a second or longer. With practice you can get better. A good starting shutter speed for hand-held shots is about 1/200ths of a second. It is possible to also change the ISO to enable higher shutter speeds and still maintain a good exposure.

    3. Motion blur:
    • If the subject moves and the camera is stationary the subject will be blurred. You may need to change your focusing mode to to compensate for movement. Use Continuous focus mode for constant movement [AI Servo AF (Canon)/AF-C (Nikon)]. Alternatively you can use autofocus mode [AI Focus AF (Canon)/AF-A (Nikon)] for slight movements or unpredictable/unexpected movement.

    4. Poor quality lens:
    • It is a common mistake to spend a lot of money on a camera then skimp on the lens. In fact it is best to spend as much as you can afford to buy quality lenses. They will pay you back with quality sharpness much more than the camera body will. Poor lenses can give you colour fringing, poor focus, distortions, softness and limited depth of field.

    5. Depth of field too shallow:
    • The depth of field (DoF) is the zone of sharpness in a picture. You can determine the DoF by changing the size of the aperture. (For more information see: One big change – one easy step forward).

    6. Diopter set wrongly:
    • If your eyesight is poor, or does not match the optical properties of the viewfinder, you will need to adjust the diopter. Most people can use it to adjust the viewfinder sharpness for their eyesight. If your sight through the lens is sharp it helps you fix a good focus to ensure sharpness.

    7. No sharpening in RAW:
    • When the picture is uploaded to your computer it’s file format effects sharpness. RAW, the native file formate for your camera, is created as a file without sharpening. The *.jpg file format is highly processed in the camera. It is sharpened as part of the processing. So *.jpg files may look sharper than RAW files on screen. The solution is to make sure you apply some sharpening to RAW files as the last action of any post-processing you do.

    How to Take Sharper Pictures

    By way of consolidating the above here is a video discussing the above points with examples…
    (More after the video)

    Beyond the basics

    Sharpness is about continuous improvement. Here are some more ideas to extend your skills…

    8. Stance and the anti-roll “bar”:
    Many self-made photographers don’t recognise the importance of stance. Holding the camera steady is part of a “whole-body” effort. You should create a stable platform to comfortably hold your camera to ensure a steady camera position. The way you hold your arms, the way you breath and other factors affect your focusing and the amount of camera movement.

    In addition to poor stance an additional unintentional movement causes softness. Some photographers click the shutter button then “roll” the camera away from their face prematurely. Doing the “roll” will induce movement in the camera – often before the shutter has closed. The solution is the “anti-roll bar” – you must “bar” yourself from doing the roll.

    Learn more about stance and the “anti-roll bar” in this article: Simple tips for a good stance.

    9. Test shots

    Today we have the digital freedom to take as many shots as we wish without paying for film developing. To improve your sharpness spend time making sure your shot is going to be sharp. Do test shots to familiarise yourself with the scene and to practice for ‘the’ shot. You can find out more here: How to take a test shot.

    10. Viewing the image at 100%

    When you upload your image files they are not sized to 100% on screen. They are presented much smaller so you can see the whole picture. Photographers often don’t look at their pictures in full size. What is not obvious is that when pictures are resized on screen they are sharpened. If you are not aware of this you might be disappointed when you print the image. It will not be as sharp as it could be because you never looked at it in full size. If you are aware of how sharp you have made your image (at 100%) it will help you to develop your skills. You can find out more about viewing at 100% here: The benefits of 100% viewing.

    11. Use a tripod

    The vast majority of shots can be taken from a tripod. Using one is undoubtedly the single most effective sharpening technique. You can find out more about using a tripod here…
    Three Tips for Pin Sharp Shots with a Tripod
    Definition: Tripod
    The Tripod
    The Third Most Important Piece of Kit

    12. Practice, practice, practice

    Knowing all these things is different to actually being able to put them into practice. Making your pictures sharp is about doing all of the above. Then, reviewing your own achievement after each shot. You must practice all these regularly and consistently in order to succeed in producing the sharp images you want.

    #11030#

    By Damon Guy (author and Photokonnexion editor)

    Damon Guy - Netkonnexion

    Damon Guy (Netkonnexion)

    Damon is a writer-photog and editor of this site. He has run some major websites, a computing department and a digital image library. He started out as a trained teacher and now runs training for digital photographers.
    See also: Editors ‘Bio’.

    Entering competitions is easy… here’s how

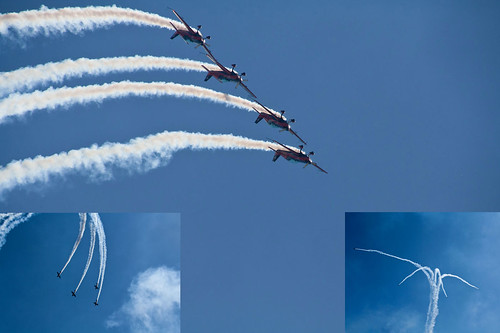
    Air Display Montage

    • Air Display Montage •
    Entered in a competition as three projected digital images today
    Click image to view large
    • Air Display Montage • By Netkonnexion on Flickr External link - opens new tab/page

    Competition is fun and improves your photography.

    The essence of improvement is getting feedback and learning from it. Photography is no different. Competition provides feedback and helps you streamline your technique. Improve for competition and you will improve for your viewers.

    Is there a problem?

    You would think so. I know lots of people who are really rather reluctant to enter competitions. The reasons for this reluctance tends to fall in to three categories:
    I am waiting for the perfect picture to enter…
    • Ever heard the saying, “Excellence is the enemy of good”? You can waste your whole life waiting for the right circumstance, picture, money, gift, break, whatever. In most cases excellence is only achieved by practice, application, focus and persistence. And, of course, lots of mistakes along the way. If you don’t start now you will never get to a position where you can consistently create excellence. To work toward something excellent in the long run work with the “good” now and test out your skills. If you work at it excellence will follow.

    I’m worried someone may say something horrible about my work…
    • No one likes to be criticised. Except that is when it is positive and a learning experience. In photography clubs the world over competitions happen all the time. Yes, they are competitive, but they are also learning experiences. Photographers go there to learn what they can do to match up to future competitions. Judges have no investment in crushing people. Judges try to enable more competitors to enjoy photography and improve their skills. When they talk about a picture they want to emphasise the good points and highlight the things that need to be considered in the light of experience. A good judge will make you feel great about successful aspects of your picture and help you learn about the less successful ones.

    I worry my effort is shamefully bad and I will be a laughing stock…

    • Children are cruel to each other. The playground is a hell of a place to learn tact and diplomacy. Yet, most of us do learn it. We are grown up now and this excuse does not hold water. Most of us have been through the university of hard knocks. Really this is just a throwback to childhood. There is nothing like just doing it… have a go! There is really nothing to be afraid about.

    Who will I be up against?

    • One of the great things about competitions is they are usually graded. If you are a beginner then get into the novice or starter class. If you have been doing competitions for years then go for it, enter into the advanced competition class. But exercise common sense. If you have never entered a competition, swallow your pride and enter the novice class. You need to know the way these things are played and the gentle approach will allow you to learn and do well. Get the lay of the land before your all out attack! joining a local photographic club is a good start.

    Of course you may want to enter a national or international competition right out. Well, feel free. However, the stakes are higher and so is the field of entry. The “Veolia Wildlife Photographer of the Year”, now in its 49th year, usually has more than thirty thousand entries. It is a revered world-wide competition with big prizes. Of course there are far too many entrants to give feedback on them all. So my advice is to start small. Enter club or local competitions. You will be up against people who have similar talent levels. Even if your picture is not commented upon you can often find feedback on the winners photos that will help you see your own errors.

    What is expected of me in a competition?

    • Competitions are great at putting people on the same level. Everyone is treated the same. There is only one real expectation…
    Enter your best picture that matches the brief for the competition

    You would be surprised at how many people fall at that simple hurdle. Most beginners simply do not read the brief and provide a photograph to match it. If you want to win, you have to provide a photograph that the judges are looking for when they judge. Sounds simple. It does take some thinking about. The rules (example) and the guidance documentation (example) are essential reading. You should know them inside out. What you think about the rules is irrelevant. No mercy will be shown for people who do not fulfil them and the brief. The image will just be excluded. If you do everything the rules and the competition brief asks, then your picture will be reviewed.

    find out more...Photokonnexion tips by email
    Enjoying this article? Please sign up for our
    daily email service.
                                                    Find out more…
    #11030#

    What will the judges be looking for?

    The answer to this varies from competition to competition. Normally you can get a feel for it from the guidelines for the competition. However, as a general rule, the judging will cover the following sorts of criteria:
    Fit to the brief
    • Does the photo actually meet the competition requirements
    Presentation: Overall Impression of the photograph…
    • Editing, mounting (if mounted on something), printing (if a print)
    Camera Work Technique: (photographic skill)
    • Choice of viewpoint or angle taken to the subject
    • Choice of lighting (should be appropriate for the subject)
    • Accurate focusing
    • Appropriate quality and choice of exposure
    • Suitable depth of field (aperture)
    • Appropriate use of shutter speed for the subject
    • Highlights and shadows (ensuring detail is retained)
    Technical Quality: (of prints or editing, finish etc)
    • Absence of processing faults, dust spots, processing artefacts, image damage by sharpening etc.
    • Appropriate tonal use and control of the range of tones
    • Good image finishing
    • Appropriate use of levels, curves and colour management (post processing)
    Visual Awareness, Visualisation and Seeing:
    • Composition, design and cropping of the images (aesthetic considerations)
    • Appropriate simplification (minimising irrelevant complications)
    • Distractions and intrusions should not divert the viewers eye
    • Good use of light, mood, texture and colour
    • Good use of masking and manipulation where appropriate (or where allowed) depending on the rules of the competition
    Communication and meaning:
    • Personal input, understanding of, and connection to the subject
    • Appropriate communication of any message, mood, ideas, and information
    • Complementary use of the photographic medium to suit the subject (mounting, projection, printing, texture of print substrate etc)
    • Appropriate imagination and creativity as well as suitable timing for the shot

    That is quite a list. It is a lot to take in. Some of the terms may not be familiar to you either. That is why you are advised to go through club channels to learn what is involved in these different processes.

    What if I win?

    • Congratulation are in order. However, there are usually some post competition issues to consider. For example often competitions put restrictions on what you can say to the press about the competition. You may also be required as a condition of entry to allow the competition organisers to be able to use your image in some way. Be sure that this use is compatible with your use of the image. Some commercial photographers have fallen foul of competition restrictions in the past. Again, the only guidelines you should follow are those of the competition. As to awards and prizes you will normally be told in the instructions for the competition what those are. They differ widely.

    Finally…

    I can only wish you luck. Competitions are great fun and I have learnt a huge amount from competing over the years at club and other levels. I think if you enter a competition you will learn too. It is all about improving your photography and having fun. If you join a club it will also be about doing it with your friends and with their help too.

    By Damon Guy (author and Photokonnexion editor)

    Damon Guy - Netkonnexion

    Damon Guy (Netkonnexion)

    Damon is a writer-photog and editor of this site. He has run some major websites, a computing department and a digital image library. He started out as a trained teacher and now runs training for digital photographers.
    See also: Editors ‘Bio’.

    Simple ideas about sepia effects

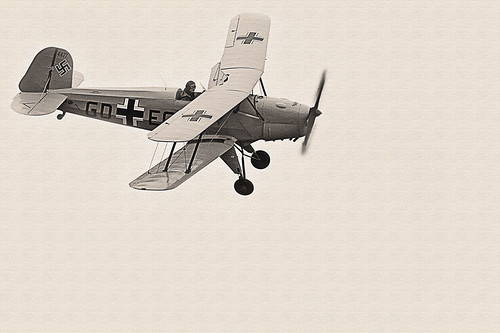
    • Sepia biplane •

    • Sepia biplane •
    Click image to view large
    • Sepia biplane • By Netkonnexion on Flickr External link - opens new tab/page

    Sepia is an old photographic effect.

    It’s a photographic chemical process dating back to the 1800’s. Sepia creates a brown tone in the photograph. Today we sometimes colour our photographs in sepia tones too. What is the background to this old technique?

    Print toning in sepia

    In the days of chemical processing black and white pictures were processed using metallic silver in chemical emulsions. In the sepia process the silver was replaced by an alternative, silver sulphide. Silver sulphide is a more stable toner than the metallic silver counterpart. Sepia toned photographs have a longer life than alternative compounds making them ideal for archiving and preservation. However, there are in fact a whole range of chemical toners and some of them have brown tones. In some cases the non-sepia toners are not safe to handle. Be careful if you are handling lots of old films and wear protective gloves.

    Sepia, the colour, gets its name from the rich brown coloured ink derived from the cuttlefish Sepia. The ink had been used in art and writing for centuries before photography. The richness of the browns in the chemical development process was a close match to the sepia ink. In fact sepia has a considerable tonal range. While it can be used to create rich brown and white photographic prints it can be printed in such a way as to parallel greyscale in its effect.

    Modern sepia chemical processing involves three stages. During those stages processes and chemical variations can be applied that allow the compounds to have different toning capabilities or mixed with alternative toners. As a result the modern chemical sepia process can create multi-toning effects, mid-tones and shadow forms. These allow multiple tonal forms in the final print.

    Modern digital sepia

    Photographic toning is a way of changing a black and white picture to a different, warmer tone – a brown hue. Black and white are starkly contrasting. Sepia is a softer colour and easier on the eye. The sepia tone, while brown produces a ‘brown-scale’ picture, rather than a greyscale picture that would incorporate the black and white tones. As such, both are monochrome.

    Of course today we use sepia in many ways. It can be used as it was in the past to create a softer, warmer colour in a print which is easier on the eyes than stark black and white. However, modern sepia no longer carries the archival or protective functions of the previous chemical process. Here are some other ways it is used today…

    To:

    • Induce warmer tones
    • Softer colour impact
    • Give a picture a traditional or aged appearance
    • Give the appearance of a more natural tonal range

    As a result of some quite flexible toning processes in using sepia the modern equivalent of sepia is a very loose term. In many ways digital sepia use is really just toning. Its the same as would be applied if we used a blue, green or red tone. Of course each image editing package has its own sepia toning colour. As a result you should experiment to make sure that your editor colour is appropriate to the way you use it.

    find out more...Photokonnexion tips by email
    Enjoying this article? Please sign up for our
    daily email service.
                                                    Find out more…
    #11030#


    In fact sepia is, like black and white, a fairly flat colour. Variations in the intensity of the toning can create quite variable light and dark shades. In the final print the flatness of the colour can be enhanced by using textured papers. On a screen image or digital projection textures can be incorporated into the image as I have included above. This relieves the monotony of the sepia when there is a large area of one tone in the image.

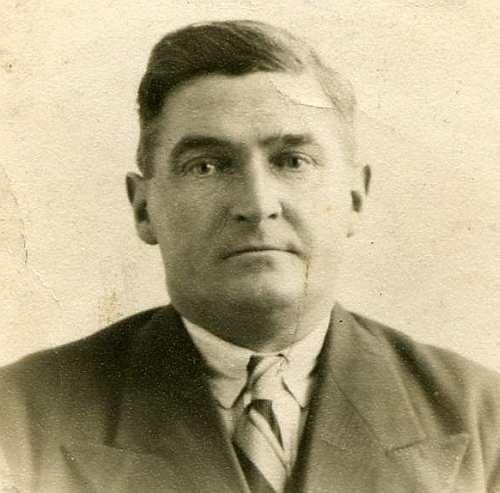
    If your use of sepia is intended to give the appearance of age then other measures can help too. One idea is to give the impression of a distressed print. The photograph below is a scan from an old print. I have kept the dirt and creases on the image in order to give that “distressed” effect that makes the image look like it has been around for a long time.

    The photographs of the past are often distressed by damage and age.

    The photographs of the past are often distressed by damage and age. Modern images can be given the same appearance with a little work in an image editor.


    The distressed appearance can be reproduced carefully in post processing to give the impression of age and deterioration. You will have to practice such skills to make them realistic, but worth it if the final outcome is effective.

    Finally, one of the things that people often forget is consistency. If you are going to do a photograph in sepia in order to make it look old, then remember to make the clothes, objects and environment within the picture match the age of the intended shot. There is nothing more confusing to a viewer than mixed messages. An appearance of old processing, but modern clothes, just looks odd. So try to make your image and processing match.

    By Damon Guy (author and Photokonnexion editor)

    Damon Guy - Netkonnexion

    Damon Guy (Netkonnexion)

    Damon is a writer-photog and editor of this site. He has run some major websites, a computing department and a digital image library. He started out as a trained teacher and now runs training for digital photographers.
    See also: Editors ‘Bio’.