Category Archives: Starters School

Articles essential for starters

Beginners mistakes and how to overcome them

Beginners mistakes :: We all make them.

Beginners mistakes :: We all make them.

Everyone has to start somewhere

Most aspiring photographers make simple, easily avoidable, mistakes. What’s surprising is how many photographers go on making the same mistakes despite information being freely available. To save you frustration here are the top mistakes I have come across and how to overcome them.

Beginners mistakes :: 1. Buying the first serious camera

Most beginners lack guidance. They look in camera magazines and buy a camera according to a budget. The mistake is to assume a big spend is a better spend. In photography a bigger spend buys more control. Beginners don’t yet know how to control a camera. So more control is just more bewildering and more expensive.

Learning camera control takes a lot of practice. It is like any complex skill. Most modern DSLRs are complex machines. This is true even of the entry level ones. They are complex enough to last the average beginner quite a few years. Even then they will still be learning skills within the capability of the camera. An expensive camera is wasted. It will probably be way beyond the skill level of a beginner. Normally beginners will not even get off ‘auto mode’ for a while. This means that the expensive camera is essentially doing what a point-and-shoot camera will do.

The beginner rarely goes beyond the-point-and shoot skill level without help from more experienced photogs. The background skills needed at the start is a lot to cope with. Here’s what beginners should do to learn quickly and without frustration…
1. Join a club. Learn a little about composition, editing, camera control, light and lenses. Try out things.
2. Produce some fun and interesting pictures.
3. Try out a few cameras from friends.
5. Make friends who know a lot about photography.
6. Ask someone to help them consider a new camera.
With help, the beginner can buy an entry level camera to move to the next stage. They will be more informed. Most important, it will be less bewildering.

Beginners mistakes :: 2. Shooting without understanding the camera

The beginner is often forced to put a complex camera into auto-mode. Lack of experience and knowledge keeps them there. To get off the starting blocks find out what the camera can do. Read the manual. They are pretty dry to read and have few examples. So, dip in and follow up with Internet reading to help you learn.

Beginners mistakes :: 3. Working on your own

Working on your own is disheartening and isolating. At a club you can get and meet kindred spirits. Working with experienced people and other beginners you realise that questions you want to ask, are the same questions everyone needs to know. It boosts confidence and you learn more. Go meet people, share, have fun and learn.

Beginners mistakes :: 4. New gear will solve the problem

People think a new piece of gear will help them improve. A famous modern photographer said,

Gear is good, vision is better.
David DuChemin

And he was right! There is little new in conceptual terms in photography. Most shots can be done with a pretty simple set-up. Piles of expensive equipment do little to improve beginners. New equipment will definitely not sort out your beginners mistakes. You would be better concentrating on the next point…

Beginners mistakes :: 5. Eyes open but not seeing

Photographers realise most people have their eyes open but do not see. Most of what a photographer learns is vision. Colour, light, dark and shadow all define the world. Most people miss this. I did too. I think there are three dimensions of photography. The length of photography is seeing light; the width is distilling simplicity and the height is capturing meaning. To understand image-making one needs to learn vision. You need to know how to think an image out of a scene, create it in the camera. Great images are produced before the shutter button is pushed. A gifted few know these things and can see. For the rest of us we have to learn it by patient study, practice and interaction with those who can do it.

Beginners mistakes :: 6. Shooting *.jpg not RAW

It is an irony, most beginners think that shooting in *.jpg format is easiest. Actually nothing could be further from the truth. The *.jpg format is severely disabled.

When the camera creates a *.jpg file it does a lot of editing according to the manufacturers ideas. Then the camera dumps the data that the image does not need. As a result there is very little editing potential in the file. If you work with the RAW file, the full and original data from the capture, you have a huge editing potential to work with. RAW is also much more true to the original image. Don’t let the camera manufacturer make decisions for you. If your camera can produce RAW files, work with RAW. You will then be able to create images according to your vision. If you can’t make RAW, put that on a list to ensure in your next camera.

Beginners mistakes :: 7. Shooting the wrong resolution

Beginners frequently work with the wrong file resolution. Always shoot with the biggest size and highest file resolution – even if you must work in *.jpg. You will get bigger images and can do more with it. Read your manual and set to the largest, highest resolution image.

Beginners mistakes :: 8. Insufficient memory card space

The largest, highest resolution image will need more memory. However, memory is cheap today. There is little excuse for running out of space. Buy larger memory modules than you think you need. Always have at least one spare. Better still, have more than one spare. Also, memory does develop faults, so keep spares to cover a problem. Check out memory card issues with these articles…
20 Ways to Protect Files on Memory Cards (Part 1) (and then link to part 2).
Memory Card Rotation – play it safe.

Beginners mistakes :: 9. Relying on the LCD screen

The lowest resolution picture your camera makes is on the LCD screen. Making decisions about an image on the basis of such a low resolution image is difficult. Use the screen to see if you captured what you wanted. Don’t delete or edit an image in-camera. You simply cannot tell what you are deleting. And, you cannot even see what you have done wrong. Get all the images home. Then, in comfort and full size you can analyse exactly, and in detail, what you did right or wrong. That is a great learning point. You can also see in proper detail if the image is what you wanted and what editing is needed.

Beginners mistakes :: 10. Deleting Pictures

Most beginners ruthlessly delete images they think are no good. In hindsight most photographers realise that as a beginner you are in no position to make that judgement. Beginners often make bad decisions about images. Decisions which later they would not make. You could easily be deleting your best and not realise it. Keep everything but the worst case no-hopers. Memory is cheap. If they are bad images they are great learning points in the future.

Beginners mistakes :: 11. Not interested in exposure

Most beginners do not understand ‘exposure’. They think the camera does all that stuff! Well, it can do it – that is auto-mode. But, “auto” is the manufacturers attempt at an average job for the light conditions. Learn about exposure. Work toward controlling your own exposures. There is no perfect exposure. There is only the image you want. So create the exposure you intend, instead of the one you wanted. This will allow you to change your pictures into images and your seeing into vision.

Beginners mistakes :: 12. No back up, no safety net

Back up, back up, back up. If your hard-drive fails you will lose everything. Buy two external hard drives. Back up to one every time you download pictures from your camera. Back up to the other as soon as you can. Keep the second one at a different location. This will protect your images against fire and theft at your home. Remember this procedure…

  1. Download your photos from the camera to your hard drive.
  2. Back them up to a second drive.
  3. Now format your memory card in the camera.

I have seen a grown man cry when he downloaded wedding photos, then formatted his memory card. Only then did he find the download did not happen. All the images were destroyed.

Beginners mistakes :: 13. Only one battery

Buy at least one extra battery. They run down, get left uncharged, get dropped and break, or get lost. In cold weather they last for a shorter time. No battery will mean your shoot is ruined. Spend a little extra and cover yourself.

Beginners mistakes :: 14. Not doing editing

If you think your image does not need to be opened in an editor and digitally developed, you are probably shooting *.jpg. In which case the manufacturer has done the developing for you in-camera according to their ideas. Get over it. Photographers always had to develop. What comes out of the camera is an unfinished piece of work. To turn a picture into an image takes your input and finishing.

Beginners mistakes :: 15. Software and hardware is inadequate for the job

Beginners underestimate the power needed to do image processing. They wonder why their computer is so slow. Buy the most powerful hardware and most flexible software you can afford. It will pay you back in speed and quality.

Beginners mistakes :: 16. Use a tripod

A properly used tripod gives you sharp images. Use one every opportunity. If you are serious about photography you will use tripods a lot in the future. Start now and give yourself a head start. Most photographers don’t buy them for years. Then they find they have got really bad habits. Then it takes a lot of time and effort to get past the problem. Buy a proper tripod. They are not cheap. However, they are definitely worth it.

Take your time to understand…

These simple points are those that most beginners will benefit from at the start. A lot to take in. Read this article several times over the next six months and your photography will improve enormously. Enjoy your learning!

Comments, additions, amendments or ideas on this article? Contact Us
or why not leave a comment at the bottom of the page…

Like this article? Don’t miss the next — sign up for tips by email.

Damon Guy - Netkonnexion

Damon Guy (Netkonnexion)

Damon is a writer-photographer and editor of this site. He has run some major websites, a computing department and a digital image library. He started out as a trained teacher and now runs training for digital photogs.
See also: Editors ‘Bio’.
By Damon Guy see his profile on Google+.

Simple ideas about perspective in photography

Perspective is all about using visual clues to emphasise dimension

Perspective is all about using visual clues to emphasise dimension. Your picture needs to use defined edges, lines and direction to give the eye something follow into the image.
• Perspective • By Netkonnexion on Flickr External link - opens new tab/page

The concept of perspective is related to visual clues.

What we see in the world around us is created in our heads. We see things in the environment and from that build up a picture. Here we look at the sense of perspective.

Visual clues

Previously in ‘The easy way to give depth to landscapes’ and Easy introduction to ‘visual elements’ in photographs I introduced ‘visual elements’. These are strong signals in the world that help us see. They are mostly edges, lines, curves, shapes, form and so on. We see things because the edges of objects have a detectable contrast with something beside it. Our eyes spot that change and, in doing so, see depth. Edges give us strong clues about the nature of our world so our eyes are trained to follow them.

The nature of perspective

Our innate sense of perspective has always been there to enable us to function as biological animals. Perspective in art is a different matter. In terms of human history reproducing perspective has been a late arrival (see: Perspective – compositional ideas). What made the difference was understanding the relationship between lines, or in natural terms, edges.

Three dimensional geometry explained the way lines created depth. This geometric depth also mimicked form in nature. On mastering the idea of a cube or other geometric forms we see how the lines work. If you look at a cube corner you see three edges trending away from you. You are looking at depth created by the edges.

Parallel lines provide strong perspectives. In the picture above there are lots of parallel lines which give depth to the picture. The main red line – the bus lane – is a vanishing point perspective or ‘single point’ perspective. It is notable by its coming together (convergence of the lines) near the horizon. By experience we know this is a long distance away. The convergence has created distance into the picture.

In the bridge there is ‘two point’ perspective. You can see depth because the darker underside is defined by its lighter up-edge (the wall of the bridge). This two-point perspective exists for us even though we cannot see the roof or the other side to confirm ‘form’ (3D) rather than shape (2D).

Of course the glass stairway to the bridge has three point perspective. Like the cube we can see depth – the top edge of the building, the bottom edge of the building both converge (two point). The convergence imparts depth. However, the width of the building (shown by the top and bottom edges), and the height gives us the three dimensions. Our visual clue for this. on the front-face. is the non-convergence of lines in the width/height plane. Although this front-face is a curved glass wall we can still see it does not have a distance perspective away from us.

All the clues are there

You now have the clues, or visual elements to determine depth through perspective. Converging lines with distance from the eye impart a feeling of distance away from you. Parallel lines with no convergence give you flatness or non-distancing when they face you. This works with both height and width.

I chose the picture above for the strong perspectives that it imparts. The powerful lines make it easy to see the almost exaggerated proportions that contribute to perspectives. Sometimes its not so easy in nature. Have a look at the picture below…

Looking up the River Thames from Marlow, Bucks, UK

Looking up the River Thames from Marlow, Bucks, UK. The perspectives are not as clear as direct straight lines. Yet the picture has depth because we are adept at seeing ‘edges’ and trends in lines when we look at nature.

Click image to view large.
• Looking up the River Thames • By Netkonnexion on Flickr External link - opens new tab/page

The edge on the right hand side looking up river barely exists – it disappears off the side of the shot. Yet the small part that is there at the top implies there is a bank all the way down the right. The left bank on the other hand is not well defined as a line. However, our eyes are trained to see it as a ‘trending’ line. The line of trees (left) and the implied line (right) therefore creates a converging pair of lines in the distance to where the river rounds the bend.

Despite there being no strong lines in this picture we can see a converging point perspective. Dimensionality is added by the height of the trees and the width of the river. The width diminishes between the two banks as we look progressively up stream, more evidence of distance and convergence. The height and width we intuitively know because our eye determines sizes by measuring them against boat and people sizes (known element sizes). Perspective is all in the visual elements.

Understanding is not precise

We do not all understand perspective in the same way. Some notable art schools have denied our innate understanding of perspective and space. The Cubists are an example of this, notable among them Pablo Picasso  External link - opens new tab/page the famous Cubist painter. Nevertheless, we all understand depth in the world around us. We don’t live in a two dimensional world. However, in our images we have to create the sense of depth in a two dimensional medium.

The second picture, the river scene, shows us how to define depth. We need, as photographers, to become observers of lines and trending lines. Similarly, we should be able to spot shapes and forms that are both defined and ill-defined. Then we need to be able to view them as if a geometric model. If we can see these lines, in nature and in man-made things, then we can find ways to compose our picture to bring them out. It is this last part that is the most important part of the composition process.

If we give the viewer a perspective in our shots, we create a world. We want it to be a three dimensional world that the viewer can imagine going into. When we choose compositions that emphasise these lines we dispose of the two dimensional picture and create an image to look into.

By Damon Guy (author and Photokonnexion editor)

Damon Guy - Netkonnexion

Damon Guy (Netkonnexion)

Damon is a writer-photog and editor of this site. He has run some major websites, a computing department and a digital image library. He started out as a trained teacher and now runs training for digital photographers.
See also: Editors ‘Bio’.

A few powerful words to help you be successful

We all have doubts about our photography.

And, sometimes it’s like we are never going to get there. We are on the edge of success yet we never seem to tip the balance. At times like this it helps to know we are not alone.

This video is not directly aimed at photographers, but the message conveyed is valid for us. In this short video Ira Glass, broadcaster, author and story-teller, explains about the gap between aspiration and achievement…

Persistence

As photographers we fall into the same traps to which all other creative people succumb. The weak willed give up, no matter how much time and effort they have put in. The mediocre will carry on doing what they did before. The persistent will look at the situation and try to find ways through.

For my part, I urge you to be thankful for each image you make. If it doesn’t make the grade, you have set yourself standards that push the boundaries. Good! If you are wilful, each not-quite-success builds your strength and character. Aspire to improve with every shot. Eventually, you will get there. The more you put in, the quicker it will be.

If you have a Twitter account follow me @photokonnexion  External link - opens new tab/page. I Tweet motivational words for photographers every day, as well as links and other ideas.

Easy introduction to ‘visual elements’ in photographs

Look into your photograph, go deeper than it’s content.

Examine the composition of your image. Go beyond it’s immediate pictorial display. Look into the basic structure and you will be able to break your picture down into its component parts. Consequently, understanding individual “Visual Elements” in an image can help you to capture the eye of the viewer too. It’s these simple elements that make the eye work to absorb the content of an image.

Visual elements shown in a slide show.

Image taken from the slide show below shows how the visual elements work.

What are the ‘Visual Elements’?

We make sense of the world by building a picture of it in our heads. Objects in our environment are visible to us because our eye/brain system is able to see and analyse the edges, contrasts, light/shadow/dark, colours and perspectives we see. Subsequently, our ability to analyse these patterns gives us an understanding of the world around us. So, if we can isolate these simple visual elements it will help our composition.

To make an image, photographers should look for strong visual elements through the lens. A great deal of the creative work in photography is to remove content that doesn’t contribute to the point of an image – these are distractions. So, to make the image effective we should also seek a point of view that isolates elements that we want to show.

Having isolated distractions the next job is to ‘see’ the subject in the ‘best possible light’. This English idiom is not just waffle (especially for photogs). It is really about using the edges, contrasts, light/shadow/dark, colours and perspectives mentioned above. Finding ways to use these effectively is what will draw the eye into our images. As a result, we should be finding simple, eye-catching features that make the scene realistic and easy to understand.

The Elements of Art

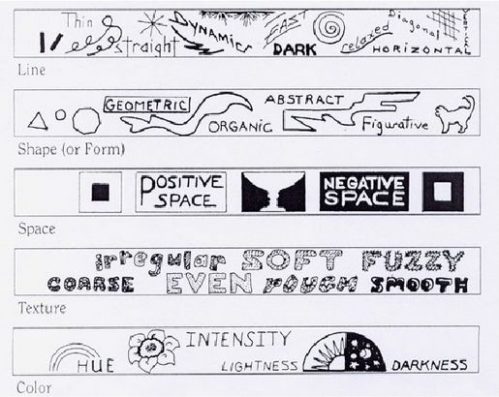
Research in art shows, that we can pin-point specific ‘visual elements’ in a photograph as powerful, but fundamental parts of our images. Artists have isolated these visual elements. They are called, “The Elements of Art”. There are seven of them…

  • Line (The path of a point, or implied path of a point, through space or over a surface.)
  • Shape (A two dimensional enclosure created by a single line – may be geometric or freeform.)
  • Form (A three dimensional object which has a ‘mass’ or ‘weight’; a shape with depth; physical width/height/depth.)
  • Space (Positive space: the subject or dominant object in the picture plane; Negative space: the background area. Space can occupy the outside, inside or surrounds in a depicted object.)
  • Value (The relative brightness/lightness/darkness/colour intensity. Photographers usually refer to Value as ‘Tone’.)
  • Colour (Light of particular wavelengths in the visible light spectrum.)
  • Texture (The presence of an apparent surface that would have a touch/feel character of its own.)
Examples – a slide show!

Perhaps, some of my definitions above are difficult to understand. If you can put them into context it will help. Here is a short slide show by Kelly Parker. The examples really show the visual element of colour well. Click the bottom arrows to move back or forward on the slides. Furthermore, you can find examples of the other ‘Elements or Art’ available in many other articles. Search “Elements of Art“.

The Elements of Art – A glossary Entry

To follow up, the Photokonnexion Glossary has an extended article on the Elements of Art. You can see that here… Definition: Elements of Art


Download a Presentation Transcript of the slide show.

Damon Guy - Netkonnexion

Damon Guy (Netkonnexion)

Damon is a writer-photog and editor of this site. He has run some major websites, a computing department and a digital image library. He started out as a trained teacher and now runs training for digital photographers.
See also: Editors ‘Bio’.
See also: Profile on Google+.

One easy way to enhance your creativity – patience

Mythical creature and gull - patience, is an essential skill for creative photography.

Mythical creature and gull – patience is an essential skill for creative photography. Mythical Creature And Gull by Netkonnexion, on Flickr External link - opens new tab/page
Click image to view large.

Patience is definitely a virtue in photography.

The wonderful thing about photography is that it suites all temperaments. Everyone can get something out of our pastime. When it comes to creating something patience pays off. Here are some insights into waiting and creating…

There are times when photography is all about getting the shot as fast as you can. Immediacy is essential. Anyone who doubts that should take a look at my short series on panning and Action Shots – how to

There are also times when it pays to wait for the right moment. Without a doubt there is a ‘right’ moment to take a photograph. It comes in all sorts of situations and ways. However, for me, it nearly always comes when the creative decision is made in advance of the shot. This demands patience.

A famous photographer once said:

To me, photography is the simultaneous recognition, in a fraction of a second, of the significance of an event as well as of a precise organization of forms which give that event its proper expression.
Images à la sauvette; Henri Cartier-Bresson – 1952

Henri Cartier-Bresson’ book was published in English under the title, “The Decisive Moment”. That is not a direct translation from the French title. It made the point though. The most effective images are created at the right moment. Cartier-Bresson felt that a moment in time, it’s immediacy, was the key element. He was a creative genius. The huge legacy of brilliant photographs he has left are testimony to that. His intuition was superb. He saw into a situation and in an instant create an immediate masterpiece.

Plan, prepare, predict – but be patient

The insight needed to make a photograph flows from intelligence. But I am not a genius. For me intuition is the result of training, experience and understanding. I see the world, experience it, think about it. Then I create.

The insight to plan a photo, or to see an opportunity, comes only to the photographer who is patient and creative. For those who are not a creative genius, creativity only comes when fulfilling a pre-conceived outcome. Beauty, expression, timing and impact is the ultimate goal. To create at that level takes not only planning, but patience. The moment of creation, ‘the decisive moment’ when it all comes together, is a unique synthesis. To capture that I have to plan, prepare for it and predict the moment. It is patience that helps me make the shot.

Work on your patience.

By Damon Guy (author and Photokonnexion editor)

Damon Guy - Netkonnexion

Damon Guy (Netkonnexion)

Damon is a writer-photog and editor of this site. He has run some major websites, a computing department and a digital image library. He started out as a trained teacher and now runs training for digital photographers.
See also: Editors ‘Bio’.

Easy introduction to light modifiers – don’t miss out (pt 1)

The "Honeycombe Grid" is a simple device to direct the light in a tight beam.

The “Honeycombe Grid” is a simple device to direct the light in a tight beam. It is an example of a range of grids used in front of lights to harden the light source and prevent the light from spreading out into a wider, more diffused beam.

We use light modification all the time.

Light bounces off everything. The unique light found in every location is from this bounce effect. We also deliberately modify light to create the right light for photography. Look at the options we have available…

Honeycombe

Shown above the honeycombe is a tightly arranged grid. It’s affixed to a studio strobe or an off-camera flash. The light shines through…

Softbox

There are very many different types of soft boxes. However, they have a lot in common. They create a really great soft light…

Do you make this one awful mistake in your photos?

The horizon has only got to be off a little bit to make things look odd.

The horizon has only got to be off a little bit to look odd. It’s not just the horizon – other lines may cause problems too. In this image a quick shot meant the beach line across the bay was off the horizontal. After straightening, the black cut-outs show how much the picture was skewed. View large External link - opens new tab/page

The horizon is a main focus of viewing.

It’s a strong feature to orientate yourself in the image. When the main line in the shot is wrongly positioned it irritates your audience. This mistake is easily fixed in-camera or in processing later.

A major line like the horizon needs careful presentation. Strong lines catch the eye. You tend to match them to the edges of the image frame. They look peculiar when slightly out of line. That is not to say you should not take dynamic or action shots at interesting angles. It is the slightly skewed angle that is irritating. Interesting angles is about something special, not slight photographic inaccuracy. Make your special angle shots a statement.

Get the horizon straight in-camera

Being aware of strong lines is half the battle. When composing your shot, watch out for them. Line them up. There are two ways to do this…

  1. Use your focus points in the viewfinder. Make the strong line lie across two or more of the focus points. If you have a grid, line up with the lines on it. Many compact cameras and recent DSLRs also have an electronic level on the screen. Check in your manual how to activate it. This will enable straightening too.
  2. Using a tripod? Many have a spirit level built into the tripod head. It’s invaluable for setting up and saves making the mistake from the start. If you don’t have one built-in, you can buy cheap hot-shoe mounted spirit levels.
Later, back at the computer

Sometimes a quick shot prevents perfectly lining things up. Straighten the picture in post-processing. Image editor applications have straightening tools. Normally they are really easy to use.

In Adobe Photoshop the straightening tool is used on importing the image. It looks like an angle bracket on the tool bar in the developer module (RAW format only). Drag it along the straight line you want straight. You can also swivel the picture when using the crop tool. Just go to a corner and move the cursor away from the corner at 45°. A quarter-curve cursor arrow appears. Hold down the right button and swivel.

In Irfanview the straightening tool is in: Edit Menu | Show Paint Dialogue. When the paint toolbar comes up hover over each tool. The tooltip will pop-up and tell you which is the straighten tool. Drag the cross-hairs along the line you wish to straighten. The image will swivel to fix the problem (see the image above with black infill showing the reorientation). Then you crop the image to get rid of the odd edges.

By Damon Guy (author and Photokonnexion editor)

Damon Guy - Netkonnexion

Damon Guy (Netkonnexion)

Damon is a writer-photog and editor of this site. He has run some major websites, a computing department and a digital image library. He started out as a trained teacher and now runs training for digital photographers.
See also: Editors ‘Bio’.