Category Archives: Starters School

Articles essential for starters

Five easy ways to learn about the light/shadow relationship

Practice blocks provide a great way to understand light/shadow relationship.

Practice blocks provide a great way to understand light/shadow relationship.
View large About the light/shadow relationship :: External link - opens new tab/page

Our first priority is light – second is shadow.

The relationship between them is one of the great pillars of photography. Learning about them is essential. The key to understanding the use of light is seeing the effect of shadow. In this article I am offering some ways to learn about the light/shadow relationship. If you have not already done so I recommend you read Three little known facts about shadows External link - opens new tab/page first.

The light/shadow relationship – a transition

When looking for a scene the right light and shadows can make or break a shot. We are looking at the light/shadow relationship so we can convey the right message to the viewer. Things with harsh and sharp shadow-lines tend to indicate hard, masculine, tight, dark, angular, tough, solid, artificial, technical. Things with soft shadow-lines showing gradual light-to-dark change are the opposite. They tend to be gentle, mild mannered, lighter, soft, rounded, meek, curved, natural and feminine in appearance. Using the wrong light sends conflicting messages to the viewer. The right light will help your message. The defining aspect of this relationship is the transition from light to dark. The shades between light and shadow are the definition of form. “Form” being the three dimensional shapes we see. The harsh sharp shadows of hard light are great for angular forms. The soft rounded and gradual shadows of a softer light are great for showing rounded three dimensional forms – like faces, eggs and balls.

Creating the right light

Creating light of the right sort is the quickest way to understanding the different types of light and the shadows they create. So, we are looking to bring out the transitional light/shadow relationship through the use of different types of light. This will help us define form in our images and bring out the 3D feel that makes pictures appear to have depth.

You need to be able to create two types of light for these experiments. Hard light – created with an intense beam from a relatively small light source. A torch like this one is excellent for this purpose…

 
The ‘Lenser’ LED Torches

The ‘Lenser’ LED range of torches External link - opens new tab/page is available on Amazon. I personally recommend the excellent LED Lenser 8407 P7 (Black) External link - opens new tab/page torch (advert – left). It is excellent for all types of photography. At night you want a rugged and powerful torch for safety, lighting and to prevent losing equipment. Lenser also sell a coloured filter set for it making this torch great for light painting External link - opens new tab/page too. It’s the top seller (5 star) in the range. Experience has shown it to be an exceptional piece of technology.

You also need soft light – usually generated from a large light source like a window, softbox or photographic umbrella.

Make sure you are using only one light source for your tests. Multiple lights confuse the shadows. The hard and soft lights are best used at the same intensity so you can compare results between them later. If you have one, an off-camera flash with the appropriate modifiers would do the same work. Use a honeycomb or snoot to get the tight beam of a hard light. Use a diffuser or bounce the light off reflectors or walls to create a soft light.

For your first experiments with soft and hard light try out your different light sources. Place a simple object of your choice on a table. For the subject see a small vase, a simple ornament, a small box or something similar. Take a few photographs with both hard and soft light. Then open them on your computer and compare them. What you are looking for is the quality of the shadow. How intense is it – light or dark. How quickly does the light change from light to dark. Is it an abrupt, sharp change? Or, is it a slow, gradual transition? Study your shots to see which you prefer. The light/shadow relationship is best shown in gradual steps. So your shots should show very hard light right through to very soft light.

Experimenting with curves

The use of curved subjects is going to create gradual transitions of light anyway. But curves can also have quite hard shadow-lines if the light is also hard. Using something rounded will show the point. A small ball, an egg or something similar are great for testing the hard or soft light effects. I have several wooden eggs for this purpose. They make test subjects for thinking through individual or group portrait shots. They help in planning shoots and lighting set-ups. They are a very cheap way of making your mistakes before the shoot! Give them a try.

Using a rounded subject, try your hard and soft tests again. This time take shots from at least eight light-positions in a circle round your egg. You must stay in the same position to take each shot. That way you will see all the different angles of the light/shadow relationship as a graduation as you move the light round for each shot.

In your computer ask the same questions about the hard edges and soft graduations of light through shadow. Imagine the eggs are faces. Which will work best on a face – those hard sharp lines or the soft graduations?

Experimenting with lines

For working with more hard-edged objects I have 50 wooden children’s building blocks. I use these in the same way as the eggs. They help me plan lighting and sets/props positions for shoots.

Use one block to start. Repeat the exercise as you did with the eggs. Take eight shots using different light positions around the cube. Keep the camera and cube in the same position from the start. Just move the light to each of the eight positions around the cube. Repeat the exercise for the hard and soft light sources. You will see that the results for a hard edged object is very different to the soft edged eggs in the previous experiment. Concentrate on how the light transitions in the light/shadow relationship shown by each shot.

This time, you are asking the same types of questions… about the quality of the shadow. How intense is it? How quickly does the light/shadow relationship transition, and so on. Again, study your shots to see which you prefer. You will have a different type of result because the edges are much harder than the rounded eggs. The shadow shapes will be very different too.

The wooden blocks are useful. The set I use for this purpose is advertised to the left. It has rounded blocks and a variety of shapes. This gives you the opportunity of trying out a whole range of effects and test lighting set-ups.

Experimenting with specifics

You have experimented with rounded subjects and hard edged ones above. Now it is time to look at the other possibilities.

Try mixing rounded and square edges. Try out a few scenes using the blocks to map out props. If you have other toys around use the blocks to create little still life scenes with the toys or other objects. The idea is to try and creatively use the toys, blocks and egg to make a scene. But you must concentrate on creating sympathetic shadows. Look always for the way you can understand the balance in the light/shadow relationship and make it complement your theme.

Suppose you depict a robot war. Your best light will be hard and very direct. The harsh sharp curves will help create a chaotic and harsh environment. Try depicting a love scene between two figures. You want to use soft, diffused light to carry the romantic mood.

You see my point. You are trying out in miniature what you want to do in the real world to emphasis your message.

I used to use several action figures for testing out scenes with people. But the kids broke them eventually. These days I use cheap wooden artists dummies. They are fun to use and give a very good idea how to set up lighting for poses. The one I use is advertised to the left. It is really great for lighting tests.

The Importance of Eggs

Finally, here is a video which I posted earlier this year. It focuses on the angles of light in the light/shadow relationship. It will show you the point of the eggs exercise. So you can see how it is all done. He shows you the principles. However, you will need to try out for hard and soft light and hard and soft edges – which the video does not show… Enjoy!

The Importance of Eggs (a previous post on Photokonnexion).

Five warning signs that your photo should not be posted online

Some photographs are not impressive.

You feel proud of them. You want to get them posted straight away. Unfortunately, not every photo is suitable to put online. Concentrate on getting your best shots up there. Here are five ways to think about the posting decision.

Fast tracking is a disaster!

Beware the quick snap. I have rarely seen anyone make a great shot from an instant snap. Sure, journalists and professional photographers seem to be able to do it. They have a vast experience of shooting in difficult situations. They are more accurate, frame better and shoot faster than the average hobby photographer. For other photographers careful shooting is essential. After the shot, to just download and post will be to compound any errors you make. If you want your photos to have impact then think about every part of the shot through to final posting. Every detail will affect the quality of your final result. Rush it and you may as well flush it!

Is there anything there?

Before you post a picture do one thing. Ask yourself, “is there anything there”? This simple question will tell you – if you’re truthful – if the shot is worth posting. You must look with care to see if there is something in the photograph that will make your viewers sit up and pay attention to your shot. Is it pretty? Is it emotive? Will it draw them in? Will they stare into the picture transfixed? In your heart, as a photographer, you will know the answer to that question. If your shot does not have ‘something’ there… reconsider!

Is it technically good enough?

Look at your shot. Is it really sharp enough? Some things may not need to be sharp, but are they expressing the right thing? Or, are they expressing anything? If the technique fails, the point of the picture is often lost. The interest in a shot is often a fine balance – if something distracts the balance is tipped the wrong way. Softness, bright spots, clutter… whatever is causing the fault will cause the shot to fail. Discard the technically poor shots.

Is it artistically effective?

This is difficult. We may completely disagree on the artistic success of a shot. You be the judge. Think carefully about your style. Do it your way. Express it your way. Just make sure that it meets or exceeds the standard you have attained. Each picture you publish should make your artistic point slightly better than the last. Edit your shots so they say exactly what you want them to say. If your shot does not say it – then don’t post it. If your image ‘sort-of’ says it, then don’t publish. You have a duty to your photography to express yourself. Make that expression as clear and effective as you know how. A confused or weak message will be lost and that is a photo you should not publish.

Do you love it?

If the answer to that is “YES, IT’S THE BEST THING SINCE THE WHEEL WAS INVENTED” then don’t publish it. You are probably drunk or suffering from an extreme case of authors pride. We have all been there. Walk away from it. Leave it 24 hours. Get a grip. It may well be the best picture you have ever made. If that is true then you will be able to savour it like a fine wine. You will be able let it breath in the processing so it is improved for the final posting. A picture as good as that deserves to become a vintage. And, you will be able to better able to judge it (and process it) when you have become less heady about it. Then again, you may find it was all a dreadful mistake and it should never see the light of day again! When you are suffering from authors pride you cannot make that judgement. Take the time for your editing head to catch up before you publish. Try to establish a new personal best every time you post. To achieve that work with a reasoned, objective judgement in mind.

A thought on improvement

Our improvement journey as photographers needs to be validated. It is difficult, if not impossible, to improve without people giving us feedback. This short essay is intended to help people accomodate principles in thier workflow that help them to take a personal and critical look at each post. Take time, consider your work, do your best. If your post is not ‘perfect’ it is because we need to aspire to improve. If you have tried your best then put it out there. The feedback you get will help you exceed your best next time. Improving as artists and photographers is an incremental journey. We cannot jump to perfection. Every artist in history has risked revealing their latest work knowing it is not perfect. Self-doubt helps us move forward. We can only seek to improve and to provide some pictorial pleasure for others along the way.

I hope that helps you take a step back and look at your images before shooting and especially before posting. Your photography will be all the better for it if you watch these points.

A simple introduction to colour for photographers

Photographers use colour all the time but do they understand it?

Colour can be quite complex. However, there are some simple principles that help you to work with colour. Like other compositional elements colour can change your picture in many ways. If you use it you can enhance your picture. If you are not aware of its significance you can spoil the impact of the picture.

These two videos provide introductory principles as an insight into understanding how colours work together and their effects within the image.

Colour in photography – The colour wheel explained
http://www.imagemaven.com

Complementary Colours in Photography
http://www.lourceyphoto.com

How to tell a story with your picture

Photo storytelling :: Spoken With Humour My Lady

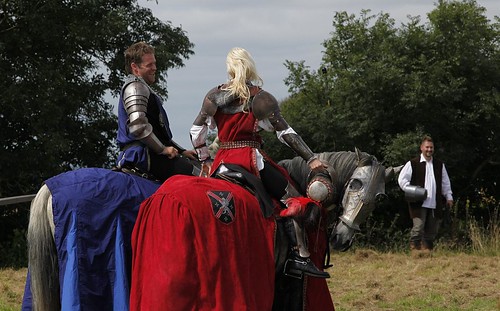
“Spoken with humour my Lady”
Photo storytelling with your picture will capture the imagination of your viewer and draw them into the image.

What is photo storytelling?

Help your viewer to be involved in your picture. Get them thinking. Then they will look hard at it. So, tell a story with it. To get viewers thinking draw out the threads of a story with a time line. Aim to help them see how the story came about. Show clues for what might happen next. Photo storytelling is about making your image clear on what is happening.

The best photo story-tellers are photo-journalists. They capture an event or activity. They try to show the progress of a story. Things you see in the shot tell you what’s happened, what is happening now, and what is possible. In short, it is a time-line.

Photo storytelling :: Keep it simple

Don’t obscure the story. The more interesting you can make the shot, the more viewers will want to look at it. Your story should portray the fullness of events.

Try to make the shot as simple as possible. If there is too much going on it distracts the viewer. Too much clutter does the same. If you do distract the viewer it will confuse or obscure the story.

Have a plan

Ensure clarity in your story. Have a complete plan of what you want to convey. You should:

  • Know what you want to say.
  • Have a clear idea of the main subject.
  • Know the story line (as simple as possible).
  • Know how to express the storyline.
  • Know the composition you will use.
  • Be aware of light, mood, time.
  • Know what to exclude (de-clutter).
  • Know how you are going to work the scene.
  • Have technical settings worked out.
Behind the subject

It is easy to confuse the viewer with the background. Ensure it is consistent with the story. The little romantic exchange in my picture above fits with its background. If this were an urban scene the knights would be out of their expected context. That throws the story off.

How people and things relate to each other

As the story unfolds show the relations between people. That is juicy eye-candy for viewers. The relationship between people and things, in the scene helps too. Working with one photograph, your photo storytelling is going to have to show these links.

There are three relationships in the photo storytelling above. The horse is engaging with the viewer. It stares back at us. The knights are engaging in light-hearted flirting. The peasant is clearly amused by the whole scene. The story tells the viewer where the people are, but also about the feeling between them. Looks, and the direction of gaze, are important. Facial expressions speak volumes. The position of things and people show how they relate to each other.

You must be careful to pick up these traces of relationships. Without them you don’t have the sense of interaction. Then you don’t see photo storytelling in progress.

Time

Time in photo storytelling usually comes from action, expression or movement. In this picture the horse shows boredom. The knights show an on-going and flirtatious conversation. The peasant clearly enjoys the moment. These things show the story is not static. And, it has a future because the knights are clearly enjoying the exchange.

In another type of photo storytelling you might see strong movement. A race is a story. The action shows the progress of time. The race positions tell of the competition. The place where the race is sets the scene.

Clearly there are many ways to express progress through the story. The important thing is that you do actually make sure that it is obvious to the viewer.

The fresh, candid look

Clearly, if the story is staged and forced, the fresh look will be lost. Capture it as if it was unscripted. Captured on the spur of the moment makes it look fresh. Even better if it was a complete candid shot. Nothing beats an honest, true expression. The best scenes are spontaneous. The whole discipline of street photography is based on that concept. However, make sure that the elements of a story still hold true. It will look false if they are not.

If doing candid street shots your post-production work can help. In your editing look to find the shots with the elements above. Then crop or work your post processing to bring it out. Don’t try staging them through a plan. Urban scenes make poor acting scenes for photography.

Patience

Photo storytelling takes patience. So does trying to spot a story in progress. To shoot a scene like the one above takes a few moments. It may only involve a few quick few shots. But the right result may not happen the first time. Take your time and work on the elements needed for your Photo storytelling. As you get better at the things mentioned here you will bring out the story easier.

Photo storytelling :: In Post-production

A story is almost always completed in post-production. Often the composition has to be done quickly in order to capture the right moment. As a result you may need to think about the framing and the crop later. Also think about cloning out clutter and distractions. When Photo storytelling, that is especially true for candid shots.

Photo storytelling is helped by a title

If my image above was called “knights on horses”, there’d be less interest. The title sets the scene. It shows the viewer the link between the knights. A good human relationship or a juicy gossip-phrase gets attention. Photo storytelling is all about those human things. Bring them out in a title.

The actual story

Most important is the actual Photo storytelling itself. To get that right you have to check you have a story at all. That means finding the shot that expresses the story. That is an editorial task. Be ruthless when you try to tell a story with a picture. Show only the shots which actually tell one. Otherwise you will have a fudged concept. There is nothing worse.

Enjoy your Photo storytelling. It’s fun and a challenge. Your skill as a photographer and as an editor of your own work will improve.

Comments, additions, amendments or ideas on this article? Contact Us
or why not leave a comment at the bottom of the page…

Like this article? Don’t miss the next — sign up for tips by email.

Damon Guy - Netkonnexion

Damon Guy (Netkonnexion)

Damon is a writer-photographer and editor of this site. He has run some major websites, a computing department and a digital image library. He started out as a trained teacher and now runs training for digital photogs.
See also: Editors ‘Bio’.
By Damon Guy see his profile on Google+.

Ten important additions to your camera bag

After camera and lenses your camera bag should hold some other essentials.

The things you need are not always obvious. But things happen when out shooting. Some extra items in your bag help you to carry on without a hitch.

What people commonly carry in their camera bags

Well, camera and lens(es), of course, but also most people carry something to wipe the lenses clean and possibly a tripod. The latter being the third most important piece of photography equipment. Lots of people also carry an off-camera flash too – it is much more useful than the on-board flash.

Items that might save the day…

Here are some things that when the chips are down you will find most useful to have in your camera bag.
Spare battery: Everyone should have a spare battery or batteries. Batteries can be a problem for many reasons. I dropped one onto concrete once when trying to put it into the camera after charging. It split – and, well, it took three hours to buy another one. That was most of my shooting time gone. I learned a lesson there!
Modelling putty: or something similar. A small spot of putty can be used to stick things down while you photograph them. Wedding photogs use it for holding the rings in place for the ring shot. But there are dozens of other on-location reasons for holding something in a particular position. Small and easily hidden the putty can do the job and be out of sight. You can buy it in craft shops or there are sticky putty packs for putting pictures on walls. That works too.
Memory Cards: These get old and sometimes fail to work. If you get an error on your camera check the card. It may be the cause. They are also easily lost, damaged and stolen. You may lose your pictures, but if you have spare(s) on hand you can at least shoot some more. Check out theses articles for more on memory cards…
20 Ways to Protect Files on Memory Cards (Part 1)
20 Ways to Protect Files on Memory Cards (Part 2)
Always keep more than one memory card. I actually carry quite a few and rotate them. Memory cards on Amazon
Light modifier: if you use a pop-up flash or an off-camera flash you should have a way to diffuse or deflect light from the flash. It is often the case that you will want to create fill in light, especially on a bright day. It counteracts the contrast created by strong ambient light. A modifier can also be used to create deflected or diffused light for portraits. This helps to avoid nasty highlights or washed out colour on the face.
Two clothes pegs (clothes pins): I use these for a number of things. Most often I use them to pin back my camera neck strap when the camera is on a tripod. This stops the strap from blowing in the wind which reduces the vibration. However, they are also great for hanging reflectors up or clipping back wires so they don’t catch on things and damage the wire.
Remote button release: (essential) If you want your tripod shots to be sharp you will definitely want to be able to fire your camera without touching it. A cable release, or hand-held remote are quite cheap items and will make your shots sharper by a long way.
Spare lens caps: Lens and end caps for your camera are small, light and fit in a bag tucked away. If you lose one you will have to put your precious lens into the bag without a cap – against that harsh material. You can bet your lenses will be scratched. No fear if you have spares.

Macro extension tubes: You can buy them for most cameras. They weigh ounces, fit into a small place and are quickly fitted to any lens. They extend your capacity to be able to do macro work without carrying big, heavy and expensive lenses. They cost remarkably little and can be bought online. A full range of macro tubes can be found on Amazon for all cameras.

Camera manual: My dad used to say, “If all else fails, read the instructions!”. One of the best pieces of advice I ever heard. So keep your camera manual on hand. You never know when you need to use one of its functions and don’t know how. Or, this classic… your camera shows an error and you don’t know how to get out of it. The manual tells it all.
Compass/sunshine calculator: OK, this one is not for everyone. But I always carry a compass when out taking landscapes. You never know when you are going to get caught in fog, or just lost off-road. My compass is also set into a small card used to calculate sun angles so I can calculate sunset or dawn times. Again, not for everyone. But I like to be prepared!

There are probably some other wonderful things we could carry. If you have an essential item you think we should know about please leave a comment!

Tips for improving your use of flash

Simple tips about flash help all aspects of your photography.

The use of flash is all about increasing the light intensity in the area where you are working. There are many ways that flash can be used. Here is a great round up of flash tips to get you started.

In Six tips for photographing silhouettes we talked about how to create a silhouette. One of the reasons for flash is to prevent a silhouette. Often when you have a bright background you want to light the foreground to prevent your subject being too dark. You can use your on-board flash, an external flash or studio lights to fill that foreground light and bring your subject up to a brightness level that makes them look natural and well lit.

One thing to remember is that your flash is adjustable. This is a fact that many people forget. Look in your camera or flash manual to see how to make the adjustment. Then make sure that you do not have too much power. Nearly always photographers have the flash too high. Very bright flash makes faces look washed out and tired. It will also cause nasty and distracting highlights. You can turn your flash off, down or sometimes up. It is certainly worth experimenting with it to see how much you can adjust it and what effects the adjustment has on your subject.

On-board flash and off-camera flash are two different things altogether. You can easily do some things with the off-camera flash that you can with you pop-up (on-board) unit. However, there are some things you should know about on-camera flash – it is pretty limiting.

The differences between types of flash, and many other useful tips, including more on the tips above, can be found in the video below. It explores quite a few aspects of flash and is a great background for you to get started.

Posted on YouTube by: http://www.steeletraining.com

By Damon Guy (author and Photokonnexion editor)

Damon Guy - Netkonnexion

Damon Guy (Netkonnexion)

Damon is a writer-photog and editor of this site. He has run some major websites, a computing department and a digital image library. He started out as a trained teacher and now runs training for digital photographers.
See also: Editors ‘Bio’.

Three photography lessons from this one weird old trick!

Holding down the shutter button he peppered the area with repeat images... :: What happened to quality?

Holding down the shutter button he peppered the area with repeat images…
he was hoping for at least one good shot out of that lot!
(P.S. What every happened to forethought and quality?)

Ever hold down the shutter button and hope for the best?

We all have – in modern times at least. In the days of film we didn’t. It was just too expensive to do that. So, here is a lesson you can learn from changing your behaviour. Go for quality in your photography.

The wonderful world of digital has set us into a new era. We can take an individual shot for free, download it for free, process it for free, store it almost free. Wow! It could not be better. Little wonder that we see a shot that is just a little bit difficult and we press the button and start firing off our exposures like we had machine guns. What do we achieve? Dozens of shots that are almost identical. Many of them a waste of time and effort. We are really just hoping against the odds that the shot will some how work out. Think for a moment… Why did you not go for a quality shot that got what you wanted?

Have we lost the ability to ‘make’ a decisive, quality capture?

Try this exercise next time you go on a shoot. Pretend your memory card can only hold 36 exposures. That was the number of negatives you would get from a large roll of film. Next, given that you can only shoot off 36 frames, you need to do three things…

  • Think about each shot – carefully. Plan it, savour it. Make sure that you know what you are going to do before you even put your finger to the button. Set your camera up for it. Aim for a quality result.
  • Frame the shots. Compose each as if there was payback of $64,000 for every good shot. Pick the perfect composition for each press of the shutter button – make that shot pay!
  • Wait for just the right moment… add up all the variables in the shot until you have confidence it will work. At the right instant capture the image – make a photograph.

We seem to have forgotten the power of these three things that went into every photograph in former times:
Forethought;
Framing;
The decisive moment.

These simple things did a lot for photographers. They enabled us to learn what was important in a shot before we started. They helped us to know what we were trying to achieve. They taught us to get it right at the right moment. These simple things made us better photographers and produced quality results.

Comments, additions, amendments or ideas on this article? Contact Us
or why not leave a comment at the bottom of the page…

Like this article? Don’t miss the next — sign up for tips by email.

Damon Guy - Netkonnexion

Damon Guy (Netkonnexion)

Damon is a writer-photographer and editor of this site. He has run some major websites, a computing department and a digital image library. He started out as a trained teacher and now runs training for digital photogs.
See also: Editors ‘Bio’.
By Damon Guy see his profile on Google+.