Category Archives: Light and Lighting

Anything to do with light, lighting, soft light, hard light, light work, light use, light quality, etc.

Ansel Adams – Master Photographer

Ansel Adams Video

• Ansel Adams BBC Master Photographers (1983 •
Ansel Adams speaks about his photography and his development.
Picture taken from the video.

Exquisite insights to a legend.

The videos I show are usually for you to quickly watch and learn. This one’s different. It’s longer (34 mins.). And, there is so much in it that you will want to watch it over and over again. The wonderful insights run deep and some show us how much photography has changed.

Ansel Adams’ ideas, photographic insights and depth of feeling is magnetic. He was probably one of the first philosophers of photography. He was one of the undoubted masters too. I hope you enjoy this video as much as I did.

Ansel Adams – “BBC Master Photographers” (1983)

Uploaded by: Rob Hooley External link - opens new tab/page

Can you write? Of course you can!
Write for Photokonnexion...

We would love to have your articles or tips posted on our site.
Find out more…
Write for Photokonnexion.

By Damon Guy (author and Photokonnexion editor)

Damon Guy - Netkonnexion

Damon Guy (Netkonnexion)

Damon is a writer-photog and editor of this site. He has run some major websites, a computing department and a digital image library. He started out as a trained teacher and now runs training for digital photographers.
See also: Editors ‘Bio’.

When to ignore the rules

 Symmetry • by aebphoto, on Flickr

The arrangement of your pictures can be so much more than a simple rule followed.
Click image to view large
Symmetry • by aebphoto, on FlickrExternal link - opens new tab/page

What works tends to get overworked…

The “rule of thirds” works in more than 95% of photographs. OK, maybe there is not a certain statistic like that. But it sure is effective to the eye. For that reason it helps us to compose most of our photos.

The principle behind the rule of thirds is not a universal “Law”. No one went to prison for violating it. It is more what we might refer to as a guideline. The rule helps us to compose a picture to meet the expectations we have wired in our brains about what is pleasing. Aesthetics is a funny thing – we all have our own preferences about what we like. However, we all seem to have some generally appreciated ideas. The rule of thirds seems to be one of them.

What if you feel like breaking the rules?

No problem. Do it!

A cavalier attitude to breaking the “rules” when you are learning photography, or any art, is a good thing. The difficulty is knowing what will work when you stray from the guidelines. That is a fair point. But there is no need to be fearful. You need to have a go to see what will work. And, like any experimentation, you will more likely be unsuccessful than successful.

Ah! But if I am going to be unsuccessful then why try? The simple answer to that is so that you can know yourself and your audience better.

No artist is born as a seasoned and finished creative. They all devote long hours to learning, experimenting and listening to the thoughts of others on their work. In other words, they practice, practice, practice. They get feedback. Then they practice some more. There is a lot of work and experimentation in becoming an artist.

Breaking the rules is about trying out something lots of times. If you have one particular passion for your photography then go for as much variation and feedback on your work as you can. You will perfect your shots only when you know that the work is capturing attention and holding it.

A more general approach to your photography, photographing many different things, is another approach. However, it is reasonable to take a similar attitude. Instead of trying out lots of shots about one subject you can try lots of different angles around each subject. I am not talking about a machine gun blast of pictures from one button push. I am talking about genuinely working the scene. Try all the angles, all the possible ways to frame your subject. Do some of the shots in a traditional way (Rule of thirds etc). But do some shots that are decidedly not traditional. It is all about experimentation.

As long as your approach is considered…

Louis Pasteur External link - opens new tab/page, the father of modern microbiology said, “Chance favours the prepared mind”. He did not mean you should go shooting off random shots at everything in sight. What he meant was you should consider your options. Know your subject. Experiment with a good knowledge and background in your subject. Move forward in a logical and consistent way. It is this approach that will help you to learn to successfully break the rules. Know what the different shots are about, how the different methods of composition can affect the shot. Understand how the different shots would affect your subject, or experiment until you know.

Practice, practice, practice… and careful thought about what you have done and what you are going to do is a route to success. Enjoy the journey as well as the outcome!

By Damon Guy (author and Photokonnexion editor)

Damon Guy - Netkonnexion

Damon Guy (Netkonnexion)

Damon is a writer-photog and editor of this site. He has run some major websites, a computing department and a digital image library. He started out as a trained teacher and now runs training for digital photographers.
See also: Editors ‘Bio’.

Can you write? Of course you can!
Write for Photokonnexion...

We would love to have your articles or tips posted on our site.
Find out more…
Write for Photokonnexion.

The power of light and shadow

Facial shadows

• Facial shadows •
Image taken from the video.

Great portraits rely on shadows

Shadows define a portrait. So it is no surprise that good lighting to get the shadows right is a wonderful idea. But what most people don’t realise is that, almost every time, more lights make things more complicated. One light is almost all you will ever need to get a face right. The rest can be done with a reflector.

Shadow work

In the video Mark Wallace shows us how the face can be properly illuminated, how to do it and more important how to make it look beautiful. He looks at ugly shadows and hard light and explains how to remove them and subdue them using soft light. In all, this is one of the best best portrait lighting tutorials I have seen on video. Enjoy it. There is some really useful stuff presented in a simple and understandable way.

Adorama TV  External link - opens new tab/page

Comments, additions, amendments or ideas on this article? Contact Us
or why not leave a comment at the bottom of the page…

Like this article? Don’t miss the next — sign up for tips by email.

By Damon Guy (author and Photokonnexion editor)

Damon Guy - Netkonnexion

Damon Guy (Netkonnexion)

Damon is a writer-photog and editor of this site. He has run some major websites, a computing department and a digital image library. He started out as a trained teacher and now runs training for digital photographers.
See also: Editors ‘Bio’.

Action portraits… easy to do

Action Portraits

• Action Portraits •
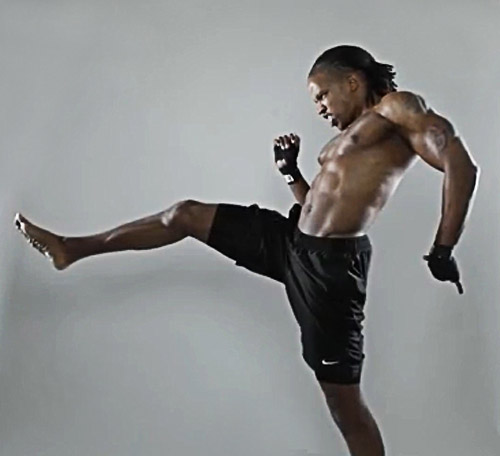
Getting the shot in action situations is not difficult although the lighting can prove a key aspect of success. (Shot taken from the video)

Getting it right…

Most photographers have a go at action shots. Vehicles are common targets – they are easy to find and fun to do. Action portraits can be great fun too and you can do them at home.

Lets talk flash…

 Set up pictures at home to show some action.

Easy action shots at home for anyone.
“Some more bed-jump!!” by Mr Din, on Flickr  External link - opens new tab/page

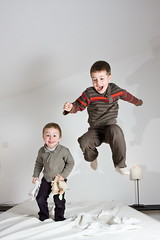
In its most basic form, it’s a portrait of someone in motion (action?). The wonderfully muscled fighter in the shot above is one way to go. On the other hand pictures of your grand children jumping into the air can be just as effective – and probably more relevant for many of us!

Use off-camera flash for best results

The basic technique is to capture the action with a flash. You can use the on-board flash on your camera. However, it will tend to leave tight shadows on the wall behind the action because the flash is directly in line with the optical axis of the camera. Such shadows look artificial and are difficult to remove in post processing. They look as if there is a slight double image. In the picture of the jumping children the flash is from the left hand side. If you look carefully the shadows are projected away from the kids giving a more realistic feel.

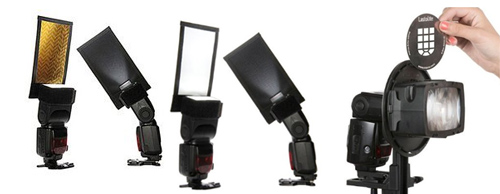
Off-camera flash can be placed to the side of the shot and used to illuminate the scene, give it a little depth and off-set those harsh shadows. For this you can use an off-camera flash. I use this one…

YONGNUO YN460 Flash Speedlite for Canon Nikon Pentax Olympus…  External link - opens new tab/page
This is an excellent buy… it is inexpensive and can be used for any off-camera flash situations. It is reliable, robust, flexible and effective.

I have several of these flash units. At about one fifth of the price of a branded product they are excellent value. If you want to get something a little more sophisticated you can get the YONGNUO YN-560 II Flash unit  External link - opens new tab/page – also a great product. With inexpensive remote flash triggers  External link - opens new tab/page you can set them off when not connected to the camera.

What are you going to capture?

Plan out your scene in advance. You will need someone to be the action taker. You could use more than one person. Then, work out what they are going to do. Jumping on the spot is a favourite. You also try jumping or stepping off something like a chair or low table. You can do skipping, walking, Kung Fu, Juggling, tumbling, hula-hoop, playing ball… well all sorts of things.

How do you do it?

I am assuming that you will be working in a domestic room with a white wall behind the actions.

It is best to use a robust tripod to mount your camera. This is essential. Action shots often cause floor movement and you want a good tripod (Manfrotto 055XPROB)  External link - opens new tab/page and tripod head (Manfrotto 322RC2 Grip Ball Head)  External link - opens new tab/page to give you a chance.

You will need to pre-focus your shot and have it ready to take because you cannot easily compose for action in progress. So set up the camera in advance. Here are some typical settings to get you started…

  • Turn off image stabilisation on your lens.
  • Focus your lens on your subject then turn off the auto-focus.
  • Set white balance to the appropriate ambient light setting.
  • Set ISO to 200 (or 400 experiment).
  • Aperture priority (select F5.6 as a start) [Shutter speed will be set by the camera].
  • Flash synchronisation – 200ths or 250ths of a second (if you need to set it check your manual).
  • Flash setting, try the lowest setting or 1/16th or 1/8th power – again, experiment.

This will give you appropriate starting points. Check you shot and then make any changes to the settings. If you click up or down a setting – say aperture or ISO – then the camera will compensate with a different shutter setting for you. Experimentation is good!

OK, now you are ready for action… this part takes a little practice. The idea is to sit next to your camera ready to push the shutter button as soon as the action is where you want it. As you have already lined up your focus the person can now perform and you can press the button as you see fit to capture your shots. Fire away, enjoy yourself.

Two tricks you have learned here

1. The pre-set-up of your shot is important. There are lots of situations where you can do that. So think about it – that is one of the benefits of having a tripod.
2. Flash! The way to capture a good shot like this is to have a very fast shutter speed. That freezes the action. However, I have suggested you hand the shutter speed to the camera by using the “aperture priority” mode. Well, you can in fact control shutter speed another way. By varying the flash duration. “What?”… I hear your cry. “You did not tell us about that control! But I did. Flash intensity is always the same for any given micro-second. It becomes more intense for the sensor if you leave it on longer. When you set the power of the flash to low power you are actually shortening the length of the flash. Hence you are more able to freeze the action. However, to do this you will need to have your ambient light lower. So using natural light rather than bright room lights works better for this technique.

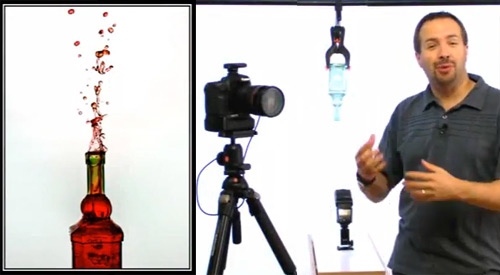
See how its done in a video

In the video you can see all this action in a full process. The photographer, Joel Grimes, starts off by some discussion about how he came to discover this secret and how he used it in a studio context. Then from about six minutes into the video he shows you how to take the shots.

Remember that the settings are important. He mentions about low power and says that it works to freeze the action IF the flash is more intense than the ambient light. Watch out for that.

One other thing worth looking at is the shot progression. He is constantly assuring his model that he has done a good job. Then he is at the same time developing his shot. He is constantly evolving the positions and situations until he gets the shot he wants. This is critical. Make sure you look out for odd lighting effects, hands over face, bits of body out of the frame etc… He works the shot to reach his ideal as he visualised it – then stops. Even great photographers have to practice and perfect a shot. This is quite a helpful lesson about that. Enjoy!
“Special FX, High Speed Action”

Framed show  External link - opens new tab/page

Comments, additions, amendments or ideas on this article? Contact Us
or why not leave a comment at the bottom of the page…

Like this article? Don’t miss the next — sign up for tips by email.

By Damon Guy (author and Photokonnexion editor)

Damon Guy - Netkonnexion

Damon Guy (Netkonnexion)

Damon is a writer-photog and editor of this site. He has run some major websites, a computing department and a digital image library. He started out as a trained teacher and now runs training for digital photographers.
See also: Editors ‘Bio’.

Understanding depth of field

Pebbles

• Pebbles •
Depth of field helps the background lose distinguishing features which makes the subject stand out.

It is an important artistic tool.

Depth of field (DoF) provides a way to isolate the subject from the background. Sharpness inside the DoF is of critical importance to our image. The blur outside the DOF helps divert the eye to the sharp subject. So how does DoF work?

Depth of field defined…

The depth of field (DoF) is an easy concept to remember. The DoF is the sharp part of a picture. It is defined by the out of focus parts of the picture on either side of it. A lens can only focus at one point. It is at that point that the image is sharpest. However, on either side of the sharp point is a zone where, to the naked eye, the sharpness is still good enough to be convincing.

The eye can distinguish sharp detail inside the DoF and we want to ensure our subject is in that zone. However, we also want to compose our picture so the unimportant parts of the picture are out of focus. To achieve these things we need to know how to control the DoF. In fact there are three ways to control it…

  • Change the size of the Aperture.
  • Change the focal length
  • the distance of the subject from the lens

As the aperture changes size so does the zone of sharpness we call the DoF. As we open up the aperture wide the DoF gets shallow. As we make our aperture smaller the DoF gets wider and eventually we get sharpness all through to the horizon. Similarly changes to the distance from the subject affects DoF. If I walk away from a subject (and do not change the aperture) the depth of field gets wider (and visa versa). Focal length changes affect the DoF in a similar way.

A Simple Guide to Depth of Field

In this video Dylan Bennett provides the best explanation I have seen on why the DoF changes with the three factors I mentioned above. He uses a simple explanation and some great diagrams to show what is involved.

Dylan Bennett  External link - opens new tab/page

Just to clear up a point…

The analogy that Dylan Bennett uses, “toothpaste squeezed in a tube”, works well for most people learning the idea of DoF. What really causes the DoF to elongate is related to something called the Circle of Confusion (CoC). For more detail you can see information in: “Definition: Circle of Confusion”.

The CoC projected onto the sensor is (notionally) a tiny point of light representing one point of light from the subject. When that part of the subject is in focus the CoC is very small and individually indistinguishable from those around it. Like this it’s a sharp representation of the subject point of light. However, at a point outside the DoF an individual point of light can no longer be represented by a sharp point on the sensor and begins to blend with points around it. It has lost its sharpness. This is because the lens focuses points outside the DoF slightly before the sensor or slightly after it.

Diagram showing various sizes of Circles of Confusion (CoC).

Diagram showing various sizes of Circles of Confusion (CoC) on the sensor sized according to the focus (not to scale). Only CoCs projected from within the Depth of Field are sharp. Our eyes cannot perceive them well as they form sharp points. Ones projected from outside the depth of field are unsharp to our eyes.

Here is the reason why the DoF widens as the aperture gets smaller. When the aperture is small the angle of light that can pass through it from the subject is also small. As a result the CoC for each point of light is relatively small. This is because it can only originate from a small angle of light.

A very small aperture means that the circles of confusion are never big enough for our eye to see. This allows the lens to focus at infinity (say f11 and smaller). When the aperture is wide open the reverse is true. The circles of confusion can be much bigger. Only those rays that the lens will naturally focus will be sharp (a shallow depth of field).

Comments, additions, amendments or ideas on this article? Contact Us
or why not leave a comment at the bottom of the page…

Like this article? Don’t miss the next — sign up for tips by email.

By Damon Guy (author and Photokonnexion editor)

Damon Guy - Netkonnexion

Damon Guy (Netkonnexion)

Damon is a writer-photog and editor of this site. He has run some major websites, a computing department and a digital image library. He started out as a trained teacher and now runs training for digital photographers.
See also: Editors ‘Bio’.

Know how to use a gobo? You have probably used them…

A gobo can be used to fit on off-camera flash units

• A gobo can be used to fit on off-camera flash units •

A simple idea – but so useful!

A gobo is used to block or shape light – normally using black screens of some sort. They’re commonly used in the movie industry, and more recently photography. Find out all about them here…

Of light and shadow

It sounds like a grand and mysterious name. In fact the term gobo is a rather straight forward. Here is what the Oxford English Dictionary (OED) Gobo - Oxford English Dictionary | External link - opens new tab/page says…

gobo, (noun); gobos (plural)
Etymology: Unknown. Originally from the U.S.
1930 – Gobo, portable wall covered with sound-absorbing material.
1936 – A ‘gobo’ is a small black screen used to deflect light.
1970 – A gobo is anything that goes between, e.g., the light and the set.
OED (online) Seen 08/08/2013  External link - opens new tab/page

So, this wonderful little word seems to have been a compound word from “go between”. Hmmm! I would like to see some proof of that. The side entry in the OED says in red “This entry has not yet been fully updated (first published 1972)”. Seems a long time without full qualification.

What is the Gobo really about? Manipulation of light and shadow. Our more technical definition in the Photographic Glossary (gobo) goes into more depth about how it is used in five broad ways in modern photography…

  • To block light or create shapes or patterns of light and shadow together.
  • A mask with a shape cut out of it fixed to the light and used to project a light shape (eg. a logo).
  • Cards/screens to create shaped shadow or deeper shadow in a scene.
  • A jury rigged light modifier on a light to shape or direct the light.
  • A mask placed in the light beam which shapes the light/shadow in the scene.
  • A light modifier allowing some light through and casts a specific shadow or diffusion shape

It is interesting that both the Hollywood studios and the OED use the term to manipulate and absorb sound. Of course in photography sound is less important. You can see however, that gobos are used to shape light and shadow in various ways.

How do gobos affect you?

If you have ever held your hand, a hat or a piece of card up to shade your lens to prevent flare or lens reflection you have used a ‘flag‘. Originally a gobo was the term used for protective devices to keep a lens out of incidental light. Now days the more specialist term, flag, is used for shield or blocking of light especially when it relates to the protection against lens flare. Understandable the two terms are easily mixed up. A flag seems to be used mainly for blocking light out. A gobo more for manipulating light, especially where that involves creating shadows.

Today I was photographing a white van in very bright overhead light. I keep a black blanket in my equipment for this type of situation. My assistant held up the blanket behind me to create a broad shadow across the corner of the van I was photographing to cut out the strong sun light. This is one form of gobo. It was not cutting out the light completely. I was reducing the very bright sunshine to an area of pure white so I could more easily pick out the details.

In a studio you might use a a black screen to intensify the darks in one area of a scene. It is a mood enhancer in this situation.

On another day I was working on business portraits. The office was a bright, but grey colour. We used plants on a trellis with a light behind it to create a shadow-pattern of leaves and diamond shapes onto the wall giving added interest to the background, breaking up the grey. This is a gobo too – being used to enhance the light/shadow ambiance.

More after this…

A solid light of the same colour and intensity across a still life is boring. Use cards or diffusion surfaces to vary the light and create slight shadows or graduate the light. One side of the still life use a black card to darken and block light. On the other side use white card to intensify and diffuse it.

A gobo is often used to shield the camera from light too, but it is not a flag. In A quick shoot using water? Tips to get you started… from yesterdays post a gobo could have been placed in front of a flash unit on the table. This would prevent the light getting directly back to the camera lens, but still project the light onto the back wall. A two in one gobo.

There is one further really fun use of gobos that is growing in photography. The recent growth of interest in light painting has renewed the interest in projecting shapes onto surfaces to be photographed. A black card with a logo or shape cut out of it can be placed directly in front of a light source. The light shining through the shape projects it onto a far surface. Then, in the dark, light painters can photograph the projection. Light painting is the intrepid art of photographing deliberately manipulated bright lights in the dark. It’s great fun!

What have we learned

A gobo is a term that describes the manipulation of the light shadow relationship. We use a range of blocking and masking techniques to manipulate the light and the gobos are the instruments of that manipulation. A flag on the other hand is a pure blocker of light.

Have fun thinking this one over. It is a useful concept and one that has infinite uses for mood, variation of shadow and creating settings.

Comments, additions, amendments or ideas on this article? Contact Us
or why not leave a comment at the bottom of the page…

Like this article? Don’t miss the next — sign up for tips by email.

A quick shoot making water splashes? Tips to get started…

Water splashes :: Have a go at water from a bottle

• Have a go at water from a bottle •
Water splashes :: Great fun, easy to do at home.
Picture taken from the video.

Photographing water splashes is great fun!

Every photographer has to have a go at water splashes some time. It is fun, can be done at home, and produces some creative. exciting and visually interesting shots. To get started you need very little kit. Here’s how you can have a go…

Water splashes :: Fine art water droplets

Everyone wants to do water droplets splashing up. Typical fine-art water droplets shots produce brilliant shapes and forms that we don’t see every day. I am sure you have seen them… if not here is a page of examples ::
Fine art water droplet images on Google  External link - opens new tab/page

Water splashes :: Working with water to get started

Fine art water splash shots need quite a bit of practice and precise measurements. It is better to get some practice working with water first. Then you will learn about the equipment and working with water. You will also get some great shots.

Start off with an easy exercise. The video is going to show you how you can do photos of water tumbling out of a bottle. You get some great results and there is a twist to add a little pizazz. You can show the bottle with the water splashes going upwards!

The video will show you how to set up the water splashes shot with a bottle. Here are a few things you need to do for this exercise. In the video Gavin Hoey has some expensive equipment. We can do it using only household items.

What you need…
  • A water tray – to collect the water splashes coming out. Use a baking tray or large bowl.
  • Use a broom stick or pole to hang the bottle. Put two chairs on a table with the the pole between them Use the backs to hang the bottle. This gives you enough height for the shot at a comfortable level.
  • Use a smallish, thin-necked bottle. Large bottle necks let the water out too quickly. Start looking for the right bottle now. You will have found what you want by the weekend!
  • To suspend a bottle without a studio clamp, tie the bottle around with a length of string long enough to hang it from your pole. Then use some packing tape, or electrical tape to stick down the string tied around the bottle. This stops the bottle from slipping out of the string. This method actually does a better job than shown in the video because the bottle hangs slightly to one side – a pleasing composition. Tape the string onto the bottle near the end of the bottle so your shot captures the top part of the bottle without seeing the tape.
  • If your bottle swings too much while the water is coming out, tie it up using two strings affixed to the bottle. Tie them to the pole wider apart than the width of the bottle and this will stop the swing.
  • In the video Gavin suggests using an off-camera flash. OK, lots of you do not have these. Use the pop-up flash flash on your camera. The problem is that the on-board flash may create a bottle shadow on your background. This is because the flash is in-line with the shot. Notice how the flash is below the bottle in the video. Pull your working table away from the background. Then, well away from the water, point one or two bright domestic lamps at the wall. These will stop shadows and make sure that you have a perfect white background. I usually stand them on the floor behind the table and point them at the wall from there.

Apart from these tips the rest of the equipment is much as shown in the video.

One trick not in the video…

Cleaning! Don’t we all hate it? Yes, but it can really make a difference to your shots. Make sure you clean your bottle really carefully. Did I mention carefully? One thumb mark, dirty trace or blotch and the beautiful clarity of your shot will be ruined. Wash it in detergent and make sure it is dry (free of drips) before you start. It really makes a difference.

Please remember safety…

This is a safe exercise if you remember a few tips…

  • Make sure any electrical appliances are well away from any water splashes.
  • Ensure there are no trailing electrical wires near any water or equipment.
  • Have a towel on hand. Mop and dry wet patches on the table and floor as soon as they spill to prevent slipping.
  • Keep your camera and especially any flash equipment away from the water splashes. You don’t want to break your camera or get it wet.
  • Flash guns, even ones with batteries, release very high power jolts of electricity and can be dangerous if wet.
  • With chairs on the table make sure they are safe from falling.
  • This may seem a fun environment for kids… it’s not. Keep them clear. Have fun with the pictures later.
  • Remember, food dye can mark certain clothes, table tops and carpet materials. Keep it clear from these things, wear old clothes.
How to create amazing photos with water and a bottle


PhotoGavin  External link - opens new tab/page

A fun extension activity…

I have found that this bottle exercise can be huge fun. However, it’s also fun to experiment. I have on occasion placed various items under the falling water. Place them within the range of your shot frame. It takes a little lining up. Fun things like brightly coloured objects work well. Try grapefruit, lemon, bright colour balloons a bath duck and so on… Make sure you have something large enough to catch the water splashes. This makes way-more mess over a larger area!

If you want to make it really fun you can do the water splashes falling on someone’s head. Yeeha!

Have fun with your water splashes. With only a few tries you can get some great results and have some excellent shots to show your friends.

Comments, additions, amendments or ideas on this article? Contact Us
or why not leave a comment at the bottom of the page…

Like this article? Don’t miss the next — sign up for tips by email.

find out more...Photokonnexion tips by email
If you enjoyed this article please sign up for our
Tips by email service.
                                                 Find out more