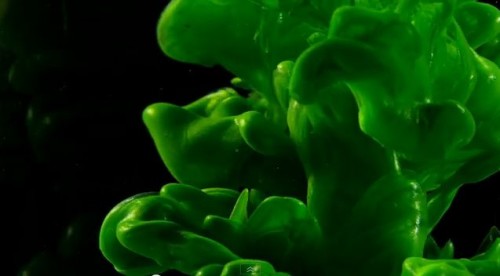
Tag Archives: Droplets

Three minutes of peace and tranquility and endless fun later!

Ink Drops

• Ink Drops •
The feeling of peace and tranquillity can come with many aspects of photography. This is something you can think about and possibly do yourself.
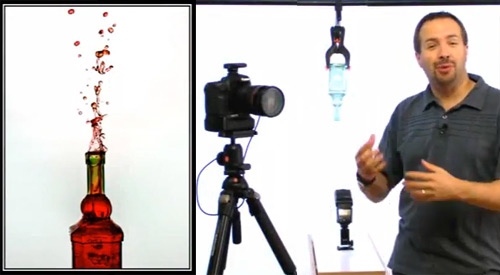
Image from the video.

Seeing and capturing

Every interest has its peaceful side. Photography is no different. For a change here is a video which delivers three minutes of peace and tranquillity. It is possibly something you can have a go at yourself…

Whats going on – can I do it?

What you see in the video is very simply drops of ink into water. The water is sometimes still and sometimes moving very gently. It is simple to do but infinitely complex in the outcomes. Anyone can do it.

There are literally hundreds of different inks on the market. Have a look at this…

Drawing Inks Assortment Set of 12  External link - opens new tab/page
A great set of varied colours. Can be used to create coloured water and for droplet mixes. Great for experimentation.

Here are a few other types of ink you can choose.  External link - opens new tab/page

I have a range of colours I use for water work. You can also use food colourings. Basically the technique is like this…

  • Set up a glass jug, vase or small tank (flat sided is best).
  • Make sure it is very, very clean.
  • Have a dry cloth available to wipe the glass dry if you spill.
  • Use a remote flash or domestic lamp set to the side.
  • Place a black or white card behind your glass vase.
  • Mount your camera on something solid. A tripod is best.
  • Set your camera to auto-white balance.
  • Set the ISO to 100.
  • Use Shutter Value [Sv, Tv etc.] as your shooting mode
  • Use f11 as your setting to shoot right through the water.

You will need to have the light on from the side of the shot. An on-board flash will cause the ink to appear very flat with the light coming from the front. This will ruin the effect.

If you want added brightness from behind you can add a light shining onto the background card. This will lift the internal colours.

Then, as with everything in photography you will need to experiment with the light and conditions you are working with to get the best shots.

The technique

Your water should ideally be about six inches deep. Drop the ink into the water and start clicking your shutter button. You can do it quite a few times as the ink forms up the shots. Once you are satisfied there is no more shots to be had then replace the water and start again.

People spend literally years working with this sort of effect. It is not only great fun for everyone from beginners onward, it is also great art. There are many fine art photographers who work on this sort of image for a living. There is also endless amusement, beauty and some wonderful images. The technique works for both still photography and videography.

INK DROPS

And now for your three minutes of peace and tranquility – enjoy!

Jacob + Katie Schwarz  External link - opens new tab/page

Comments, additions, amendments or ideas on this article? Contact Us
or why not leave a comment at the bottom of the page…

Like this article? Don’t miss the next — sign up for tips by email.

By Damon Guy (author and Photokonnexion editor)

Damon Guy - Netkonnexion

Damon Guy (Netkonnexion)

Damon is a writer-photog and editor of this site. He has run some major websites, a computing department and a digital image library. He started out as a trained teacher and now runs training for digital photographers.
See also: Editors ‘Bio’.

A quick shoot making water splashes? Tips to get started…

Water splashes :: Have a go at water from a bottle

• Have a go at water from a bottle •
Water splashes :: Great fun, easy to do at home.
Picture taken from the video.

Photographing water splashes is great fun!

Every photographer has to have a go at water splashes some time. It is fun, can be done at home, and produces some creative. exciting and visually interesting shots. To get started you need very little kit. Here’s how you can have a go…

Water splashes :: Fine art water droplets

Everyone wants to do water droplets splashing up. Typical fine-art water droplets shots produce brilliant shapes and forms that we don’t see every day. I am sure you have seen them… if not here is a page of examples ::
Fine art water droplet images on Google  External link - opens new tab/page

Water splashes :: Working with water to get started

Fine art water splash shots need quite a bit of practice and precise measurements. It is better to get some practice working with water first. Then you will learn about the equipment and working with water. You will also get some great shots.

Start off with an easy exercise. The video is going to show you how you can do photos of water tumbling out of a bottle. You get some great results and there is a twist to add a little pizazz. You can show the bottle with the water splashes going upwards!

The video will show you how to set up the water splashes shot with a bottle. Here are a few things you need to do for this exercise. In the video Gavin Hoey has some expensive equipment. We can do it using only household items.

What you need…
  • A water tray – to collect the water splashes coming out. Use a baking tray or large bowl.
  • Use a broom stick or pole to hang the bottle. Put two chairs on a table with the the pole between them Use the backs to hang the bottle. This gives you enough height for the shot at a comfortable level.
  • Use a smallish, thin-necked bottle. Large bottle necks let the water out too quickly. Start looking for the right bottle now. You will have found what you want by the weekend!
  • To suspend a bottle without a studio clamp, tie the bottle around with a length of string long enough to hang it from your pole. Then use some packing tape, or electrical tape to stick down the string tied around the bottle. This stops the bottle from slipping out of the string. This method actually does a better job than shown in the video because the bottle hangs slightly to one side – a pleasing composition. Tape the string onto the bottle near the end of the bottle so your shot captures the top part of the bottle without seeing the tape.
  • If your bottle swings too much while the water is coming out, tie it up using two strings affixed to the bottle. Tie them to the pole wider apart than the width of the bottle and this will stop the swing.
  • In the video Gavin suggests using an off-camera flash. OK, lots of you do not have these. Use the pop-up flash flash on your camera. The problem is that the on-board flash may create a bottle shadow on your background. This is because the flash is in-line with the shot. Notice how the flash is below the bottle in the video. Pull your working table away from the background. Then, well away from the water, point one or two bright domestic lamps at the wall. These will stop shadows and make sure that you have a perfect white background. I usually stand them on the floor behind the table and point them at the wall from there.

Apart from these tips the rest of the equipment is much as shown in the video.

One trick not in the video…

Cleaning! Don’t we all hate it? Yes, but it can really make a difference to your shots. Make sure you clean your bottle really carefully. Did I mention carefully? One thumb mark, dirty trace or blotch and the beautiful clarity of your shot will be ruined. Wash it in detergent and make sure it is dry (free of drips) before you start. It really makes a difference.

Please remember safety…

This is a safe exercise if you remember a few tips…

  • Make sure any electrical appliances are well away from any water splashes.
  • Ensure there are no trailing electrical wires near any water or equipment.
  • Have a towel on hand. Mop and dry wet patches on the table and floor as soon as they spill to prevent slipping.
  • Keep your camera and especially any flash equipment away from the water splashes. You don’t want to break your camera or get it wet.
  • Flash guns, even ones with batteries, release very high power jolts of electricity and can be dangerous if wet.
  • With chairs on the table make sure they are safe from falling.
  • This may seem a fun environment for kids… it’s not. Keep them clear. Have fun with the pictures later.
  • Remember, food dye can mark certain clothes, table tops and carpet materials. Keep it clear from these things, wear old clothes.
How to create amazing photos with water and a bottle


PhotoGavin  External link - opens new tab/page

A fun extension activity…

I have found that this bottle exercise can be huge fun. However, it’s also fun to experiment. I have on occasion placed various items under the falling water. Place them within the range of your shot frame. It takes a little lining up. Fun things like brightly coloured objects work well. Try grapefruit, lemon, bright colour balloons a bath duck and so on… Make sure you have something large enough to catch the water splashes. This makes way-more mess over a larger area!

If you want to make it really fun you can do the water splashes falling on someone’s head. Yeeha!

Have fun with your water splashes. With only a few tries you can get some great results and have some excellent shots to show your friends.

Comments, additions, amendments or ideas on this article? Contact Us
or why not leave a comment at the bottom of the page…

Like this article? Don’t miss the next — sign up for tips by email.

find out more...Photokonnexion tips by email
If you enjoyed this article please sign up for our
Tips by email service.
                                                 Find out more