Category Archives: Camera control

Buy a good tripod – nothing beats it

Good tripod as an all-rounder - Manfrotto 055XPROB Tripod

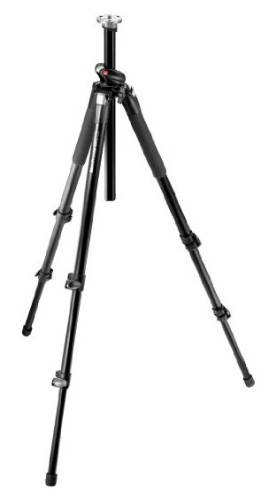
A quality, versatile and robust tripod is essential. Buy a good tripod – you will not regret it! The result will be seen in every image.

A good quality tripod?

Nothing beats a good tripod. Most people don’t use them until they have struggled with sharpness problems for a long time. Then, without thinking, they buy a cheap tripod. Later they have to think again. That’s because cheap tripods fail, wobble and don’t give you the shot flexibility you need. To save problems later, I suggest you buy a good tripod now.

Why buy a good tripod?

Too many of my students and colleagues have told me tales of three legged woes. Remember, it is a common mistake to think any old ‘three legs’ will make your camera stable. This is simply not true. In all cases, a quality tripod really will help stability – and other things.

So, here are some reasons to go for a quality purchase from the start…

Quality Tripod:
Cheap & cheerful:
 Solid, stiff at the joints and stable.  Limited by poor engineering. Variable stability.
 Reliable, highly engineered and robust fittings.  Fittings regularly break.
 Quality, hard wearing paint or specialist coatings.  Poor or no paint – highly reflective aluminium. Liable to corrosion/wear.
 Quality footings seal the legs to stop water/dirt entering tubing.  Legs left unsealed let dirt in and grit quickly wears the joints.
Strong enough for a specific DSLR size and lens. Check the tripod specifications. Wobbly with anything larger than a bridge camera. No specifications available.
Quality materials used in construction. Materials matched to designed use and weight needs. Unknown quality aluminium/plastic.
 Top platform precisely engineered – no movement and good fitting for the tripod head/camera.  Wobbly platform, poor clip, loose fitting. Screws sometimes damage the camera. No interchangeable head option.
Quality joints on legs for long life and stable grip. Leg joints quickly wear and become wobbly with poor materials.
 Multiple leg positions to allow adjustment on uneven ground/tight spaces.  Fixed leg position.
 Fully adjustable top column to allow multiple height/angle adjustments.  Wobbly top column. Only up and down adjustment available.
 Legs can be adjusted to many wide/varied angles.  One angle for legs.
Stiff tripod legs to prevent movement when the legs are fully extended. Wobble increases as the legs extend to full length because joints are poor fit.
 Reversible top column – so you can under-sling your camera to get near the ground.  Not reversible.
 Proper hand grips.  No hand grips.
Quality Tripod head:
Cheap & cheerful head:
 Well engineered, interchangeable tripod head option available.  No interchangeable head fitting – or low quality flip-up with low quality quick release.
Well engineered, camera safety lock on the tripod head to prevent camera unlock/drop off. No camera safety catch.
Strong, accurately engineered, wear resistant, quick release plate on the tripod head for fast camera fitting/removal. Fixed camera position – or low quality/breakable flip-up with plastic quick release.
Manufacturer has a range of well engineered tripod heads and other accessories available. Manufacturer not committed to market and does not make tripod heads or non-interchangeable tripod head fitted.
A cheap tripod will not be your friend

There are other reasons to buy a good tripod, but you get the idea. A cheap tripod will do little for camera stability. The engineering quality is reduced to keep the price down. I am not one to advocate gear lust or spending money where it is not worth it. However, I have come across each of the design and quality flaws above. From personal choice and experience it’s clear only the best is good enough when making your camera stable.

Adaptability

While a quality tripod is great, you normally need to buy a good tripod head too. Cheap tripods usually without them, or have poor quality ones. A good tripod head is an investment for life. Inter-changeable heads are very useful. I have five heads for different purposes: for macro work; small cameras; panoramas; and one for precise adjustment. My most versatile head I use every day for general purpose work. The Manfrotto 322RC2 Heavy Duty Grip Ball Head External link - opens new tab/page is precise robust, reliable, versatile and has never let me down.

Buying a tripod

Buying a tripod is not simple. There are many online advertisements and many brands. How do you choose the right one for you? Largely it is about personal requirements. Look closely at the type of photography you normally do. Try to isolate the important aspects of your photography that will influence the way you use a tripod. Find the properties that best fits the purpose for your tripod. For example, if you do a lot of beach photography you should look for a tripod that has good seal caps on the legs to keep seawater and sand out of the legs. If you do macro photography in the field then you might want a tripod that will turn your tripod head upside down to hang your camera just above ground level.

You should also consider the tripod head. That is the part of the tripod that the actual camera is mounted upon. It gives you flexibility to point your camera without moving your tripod around. Good quality tripods are usually sold only as a set of legs. The tripod head is purchased separately to ensure a good match to its intended use. Reputable tripod manufacturers normally also have a range of heads to match their tripod products.

Weight is a big issue in the field

Many photographers forget about weight. A heavy tripod is great in a studio. It is stable and floor vibration is reduced. However, when you are out and about the studio tripod is just too much to lug around.

I have one tripod model with a steel frame I use in my studio. Also, I have a nearly identical model in carbon fiber. I keep the latter in the car for field work. The difference in weight is just over a Kilo. For practical field use the studio tripod is useless. Unfortunately, it is simply too heavy to carry far.

On the other hand, my carbon fibre tripod is a delight to use in the field. It is easily carried and it performs as well as my studio tripod. However, there can be shortcomings.

Near a road or in windy conditions, vibrations are a problem. So, I hang my camera bag under the tripod platform. The additional weight cuts down vibration and keeps the tripod feet stable. In fact, that is a small price to pay for the reduced weight. Furthermore, it keeps my camera bag off the ground.

The camera bag trick is only possible because carbon fibre is really stiff. Remember, flimsy (but light) aluminium frames are vibration prone. They cannot perform well in windy field conditions or where vibration is found. Moreover, cheap tripods often do not have an under-slung hook to hang your bag.

What should you pay?

Almost certainly, the cost of a tripod indicates its quality. Good tripods use quality materials and tend to be highly engineered. Good engineering and good materials are not cheap. So, if the price of a tripod is in the range £15 – £30 it is unlikely to be long lasting. Further, it will be of limited stability – especially after a little wear under field conditions. Tripods can actually transmit vibrations to your camera from the ground and wind. So, good stability and properly engineered joints are really important.

In the UK good quality tripods start at around £40. You can pay many hundreds of pounds, especially for a professional grade tripod. So, setting yourself a budget is important. Don’t overspend.

Balance quality and cost

The over-riding factor is what type of photography you will be doing with the tripod. Remember, the properties you need are your guide. However, as we said above, pay attention to the tripod quality you need too. There is a balance between good quality and cost. You have to be the final arbiter in how much you pay. Think about it, err on the side of quality with a tripod. A bad quality decision will impact the image quality of your shots.

The manufacturers

So, buying the right tripod is about knowing your own needs. It is also about knowing what type of properties your photographic interests demand of your tripod. Going direct to the manufacturers site and look at their explanations for each of their tripods. You will find more detail there. Moreover, make sure you look up the specifications. There lies the answer to many of your questions about the quality and performance of a tripod. Also, beware of the claims made for ‘general purpose’ or ‘light weight’. Without detailed specifications those terms indicate poor quality engineering or materials.

There are a good range of quality tripod manufacturers. Some names worth checking are listed below as a starting point…

    • Manfrotto – High quality engineering, wide range of accessories and designs for many purposes. Many models meet the needs of professional photographers.
    • Manfrotto on Amazon (associate link).
    • Benro – Strong, very robust, many designs for many different environments and purposes.
    • Benro on Amazon (associate link).
    • Gitzo – Quality engineering, some innovative ideas. Considered by both amateur and professional.
    • Gitzo on Amazon (associate link).
    Where to buy

    It is worth considering where you buy your tripod too. Manufacturers with proven reputations tend to have wide distribution networks. However, they often do not sell their products on their own websites. If they do have their own web shop, the products are often expensive.

    Reputable manufacturers depend on their agents and distributors world wide. If they undercut those agents they would not sell their products overseas. So, check their sites. Find what you want. Then, find a dealer near you who can supply it. Alternatively, go online to a dealer who sells the products. You will often get much better prices for shopping around. Another point, reputable manufacturers often have a list of dealers on their site you can contact who are local to you.

    Specialised tripods

    The range of quality tripods has become very broad. Today tripods are available for nearly every type of camera. Small point and shoot cameras, smart phones, bridge cameras, mirrorless and other cameras all have their own tripod requirements. Likewise, they also have their own quality requirements.

    I recently bought a cheap plastic smart phone clip to mount on a small tripod. It cost me very little. Because it was so cheap, I thought nothing of quality issues. It also broke the third time I used it. My phone dropped to the ground. Luckily the glass did not shatter. It could have been an expensive mistake. The replacement good quality, lockable smartphone clip cost about 25% more. However, there is no way my phone is going to fall out of the clip now! It was still cheaper than £20 (bought 2020).

    I have also benefited from buying good quality ‘Joby’ or ‘GorillaPod’ flexible tripods (associate link). They are quite expensive. However, you can do great things with them. Flexibility and adaptability are really useful in a tripod.

    The point is this…

    The lesson is, think carefully, find out everything you can. Then, make a quality purchase – get the best you can afford.

    Nowadays, I take my time making a tripod purchase. Consequently, my new tripod suits the purpose I have in mind. But, more important, my camera is safe. In addition, I have the flexibility I need to make the critical shot and I get sharp results. Taking care to seek out a quality tripod helps a photographer get stand out results.

    Comments, additions, amendments or ideas on this article? Contact Us
    or why not leave a comment at the bottom of the page…

    Like this article? Don’t miss the next — sign up for tips by email.

    Damon Guy - Netkonnexion

    Damon Guy (Netkonnexion)

    Damon is a writer-photographer and editor of this site. He has run some major websites, a computing department and a digital image library. He started out as a trained teacher and now runs training for digital photogs.
    See also: Editors ‘Bio’.
    By Damon Guy see his profile on Google+.

On-camera flash… advice for taming the beast

Taming on-camera flash

• Taming on-camera flash •
Left: harsh light and highlights are so unflattering!
Right: properly controlled you get proper skin tones and no highlights.
•••••||•••••
On camera flash can be a pretty tough nut to crack – learn how.
(Images taken from the video)

On-camera flash is pretty harsh…

In fact it’s often the source of ruined pictures from otherwise great dinner parties and family events. Dealing with with these little beasts takes a little work. You can make them do you bidding, you just need to know how.

A small powerful light source

The power of the little flash on your camera is misleading. For such a small light it puts out a lot of power. The learner is often caught off-guard. A great scene can be ruined by very unpleasant light, colour leached from faces, shiny reflections on faces and really hard-edged shadows. The whole thing is pretty ugly.

Here is some news. There are ways to control these little beasts and make them do your bidding.

Two of the most useful techniques for dealing with the problems are explained more fully in: Find out more about diffusing your on-camera flash. The other way is to help your flash work better in the room. Use the room itself as a way to bounce light around. Point your flash at a wall or ceiling so the light is reflected everywhere. It will make harsh flash into soft light – make it a more wrap-around light. This is always more flattering and shows the gentle curves of the face much better. It also means the light works its way around the back of the subject reducing harsh shadows cast onto the wall.

Practical use of the on-camera flash

For those quiet evenings where you are chatting with your friends and family here are some easy techniques. You can use your on-camera flash to good effect without the harsh shadows. You can escape the electric shock faces and startled expressions too. Have a look at the video and follow the sage advice of Mike Browne at a dinner party…

Using on-camera Flash Indoors – With Mike Browne


Mike Browne  External link - opens new tab/page

Using the proper tools is best

Let’s face it. On-camera flash is always going to be a bit difficult. As good as it looks in the video controlled results are always going to be difficult from such a little light source. Here is what Mike himself has to say about on-camera flash…

I’d suggest a speedlight is better because you can fit a diffuser and better still, turn the flash head in any direction and bounce the flash off a wall or ceiling.
Mike Browne  External link - opens new tab/page.

Have a look at some off-camera ideas. These are probably the most flexible options for moving your photography forward, especially for small intimate surroundings. Check out these options…

Off camera flash units

Canon Speedlite 430EX II Flash Unit – a great branded flash for general use  External link - opens new tab/page

Nikon SB-600 Speedlight – a great quality mid-range Nikon flash unit  External link - opens new tab/page

Special pick…

This high quality own-brand flash unit performs like branded units but is much more affordable. The unit provides a range of functions as well as being compact, light and robust. Great value for your money. YN560 III 2.4Ghz Wireless Flash Speedlite Support RF-602/603 YN560-III For Canon Nikon Pentax Olympus  External link - opens new tab/page

 
All these units will fire as normal when mounted on the camera. They will require an off-camera flash cord or wireless radio triggers for off-camera flash units  External link - opens new tab/page to connect to the camera when shooting off-camera.

Comments, additions, amendments or ideas on this article? Contact Us
or why not leave a comment at the bottom of the page…

Like this article? Don’t miss the next — sign up for tips by email.

Netkonnexion

Damon Guy (Netkonnexion)

Damon is managing editor of Photokonnexion.com with professional experience in photography, writing, image libraries, and computing. He is also an experienced, webmaster and a trained teacher. Damon runs regular training for digital photographers who are just starting out.
See also: Editors ‘Bio’
By Damon Guy :: Profile on Google+

Tripod myths – why are amateurs tripod shy?

Me and my tripod - reflected in paintwork - tripod myths

• Me and my tripod – reflected in paintwork – tripod myths •
I use a tripod most days in some pretty tight situations. They are
quick, effective and give great results!
[Image by Damon Guy • Click to view large]

Tripods improve your results – fact!

Tripod myths can be heard regularly. Actually they make life a lot easier and faster. So, why are amateurs tripod shy? Why buy cheap? Why is simplicity apparently so difficult for tripod starters? Read on…

What are the tripod myths?

Over the years I have heard all the excuses. Here are some things I have heard…

  • I’ll miss the moment!
  • Tripods are too much bother.
  • I can shoot great shots hand-held.
  • It slows me up.
  • I like to walk the scene…
  • They are cumbersome, get in the way and heavy.
  • It’s not possible or easy to use it all the time.

I am sure there are other issues. But let’s look at these in detail.

Tripod myths: Missing the moment?

Every photographer gets lucky sometimes. They happen to point the camera pointing right and, snap, they got it.

Let’s be honest. How many times does that lucky capture happen? “Journalists?”, I hear you say? Actually, they rarely get lucky either. Photo-journalists train in preparation, planning and investigation. Being there and aware when the event happens is not an accident. They get the story time and time again.

If you plan for your tripod you will get the shot too. You won’t miss the shot getting your DSLR out either.

Forethought and planning are good photographic habits. Cultivate and develop these skills. You get the shot, and it’ll be sharper. If you are going to shoot, do it properly. Have both camera and tripod ready. Don’t be a victim of tripod myths, be in control of your photography.

Too much bother? One of the tripod myths that is just silly

What can be too much bother about getting a sharp, properly framed image? Loading a tripod is no more trouble than putting your camera in the car. It takes only 15 seconds to set up. The tripod will also give you time and scope to take a great shot. It holds your camera for lens changes and while scouting the next shot. Bother? Not really.

Bothered people think tripods are hard work. Do they realise how much the picture is improved? Attention to detail over your shots is what makes excellent images. Taking a quick snap may be no bother. Its unlikely to yield a great image either. This is one of the tripod myths that does not stand up!

Tripod myths: Great hand held shots

There are lots of situations where great light and a steady hand can get a sharp result. Congratulations. The time and effort you put into your photography is paying off. However, of all the situations I take pictures in, only about a third can be hand held. High ISO might help. More likely digital Noise would spoil the image. Better to take a longer exposure and use, say, ISO100. Quality is important.

Tripod myths will limit you to one third of your potential as a photog. It makes you a limited photographer. Tripods extend your shooting time, flexibility and quality of image.

Tripod myths: It slows me up

Yes, finally, a fact! Tripods make you think about your photograph. Perhaps not one of the tripod myths, more of a tripod mistake.

Since digital cameras became common I see a lot of machine-gun photography. A keen photog arrives, sprays off a hundred shots… Then, off they go. Wow.

Spend the first few minutes considering options. Proceed with a plan and with care. Cover all the shots you need. Sometimes you will get new ideas. Great, get more shots.

Once, at an aircraft museum with a keen photographer I was alone in minutes. My friend shot out of sight. We met up later. He had over 1000 pictures. He was elated. I had less than seventy shots. “Ah!”, he said. “You should’ve left the tripod at home!”

Later that week things turned around. He had eleven fair shots and one really good one. He had spent hours and hours in post-processing and missed lots of sleep. My more careful approach paid off. I had more than 40 quality images. As he looked at them he kept saying, “I took a picture of that too, but it didn’t come out”. And, “How did you get that one to look so good?”. My care, quality and composition paid off. The tripod helped me think about my photography and take care. I only spent about two hours in post-processing too. Most on simple tweaks. I had plenty of time for other shoots that week.

One question… Who was really slowed up here?

Tripod myths: Working the scene

One of my regular jobs involves 15 – 20 finished pictures of a scene. Picture order and camera height is important. We often work in low light. Space is restricted at many sites. We are not allowed to do any post-processing.

This is fast work. In 15 minutes I make up to 35 shots at a high enough standard to meet the needs of a court case.

Does a tripod hold me up or prevent me working the scene? Does it prevent my shots? On the contrary. I could not do the job without it. I would have to take many more shots. My shots would be less flexible. I would not achieve court-ready sharpness and detail. Without a tripod I could not work the scene properly.

Tripod myths: Cumbersome, heavy, intrusive?

Sometimes. A tripod can be badly adapted for what you are doing. So, if you are going to do something a lot, buy the right tripod. Travel a lot? Get a light one. Work on beaches a lot? Choose sealed feet to keep the sand out. Working special scenes? Get a special tripod. General photography? Buy general.

If you have the wrong equipment you can rightly claim it’s no good! So, buy the right equipment for the job. Make sure you get a quality piece of equipment. You spend thousands on your camera and lenses, so there is little point in spending only ten on your tripod. Quality workmanship and materials are important to producing quality images. You would not accept less with your camera so why with your tripod? This is one of the tripod myths that does stand up – if you have the wrong equipment. Get it right and you have a friend for life.

Sometimes ya gotta go with the flow…

I am not saying tripods are everything. In fact there are many situations where they are not suitable or you can’t use them. Also, we all enjoy the freedom and creativity of hand-held shots sometimes. If we fall prey to tripod myths we will never get past auto settings and bright daylight shots.

All I am saying is, don’t limit yourself. Get past the tripod myths. Buy a tripod and make sure you know how to use it. Your photography will improve if you use it a lot. Use it only a little and you’ll pay a penalty.

Why not look at some of the options now…

General tripods for DSLRs  External link - opens new tab/page
Manfrotto – Quality tripods for committed photographers  External link - opens new tab/page.

Also check out this post and recommendation…
Buy a good tripod – nothing beats it
Manfrotto 055XPROB Tripod Legs Only – Black External link - opens new tab/page

Comments, additions, amendments or ideas on this article? Contact Us
or why not leave a comment at the bottom of the page…

Like this article? Don’t miss the next — sign up for tips by email.

Netkonnexion

Damon Guy (Netkonnexion)

Damon is managing editor of Photokonnexion.com with professional experience in photography, writing, image libraries, and computing. He is also an experienced, webmaster and a trained teacher. Damon runs regular training for digital photographers who are just starting out.
See also: Editors ‘Bio’
By Damon Guy :: Profile on Google+

Using the command dial to pick the right Mode

The Command or Modes dial

• The Command or Modes dial •
(Image taken from the video)

Setting up your shot.

The settings you use when taking a photograph affects the shot outcome. Before choosing camera control settings, first choose the camera mode. Here is an explanation on the ‘Command’ or ‘Modes dial’ where you make that choice.

Getting into manual mode

In “The Exposure Triangle” I looked at how you should balance…

These settings, when balanced, create an optimal exposure. You need to understand these settings to go manual with your camera.

What the dial offers

The Command or Mode dial sets the camera to use particular controls. You see a typical example of the command dial above.

‘Auto-mode’ or ‘Auto’ – the camera does everything for you. This setting is sometimes called the “green square” or Green mode. It’s normally green on the command dial. Using Auto you hand over full control to the camera. It provides a set of fairly average exposures. It’s used to snap basic shots in everyday situations.

To make your photography really effective you want full creative control. Learn to use the semi-manual modes and ‘Manual’ Mode. These give control to the three exposure factors. The picture shows these settings as ‘M’, ‘A’, ‘S’ and ‘P’ in a silver band.

  • M – the full Manual setting. You have full creative control over exposure.
  • A – Aperture – you set the aperture (f number) and the camera finds the right shutter speed for you.
  • S (or Tv) – the shutter speed setting or Time value. It sets the shutter opening time. The camera finds an aperture setting to match.
  • P – ‘Program’ allows some menu settings that ‘Auto’ will not allow. This auto setting gives only limited artistic control.
  • Also… B (not shown) means ‘Bulb’. It’s a setting for long exposures of more than 30 seconds. Bulb may not be available on all cameras.
Other modes

There are often other modes available. But these are really pre-sets. They do the same thing as manual and semi-manual modes. However, they give you less than full control over your shot. So I am not going into them here.

Camera Controls (intro) – command dial

Mike Browne goes through these settings (except ‘Bulb’). He explains the ideas and points out each mode. Remember, the command dial only sets the exposure controls for Auto-modes. The manual and semi-manual modes allow you to change the exposure factors from other controls.
Mike Browne  External link - opens new tab/page

Comments, additions, amendments or ideas on this article? Contact Us
or why not leave a comment at the bottom of the page…

Like this article? Don’t miss the next — sign up for tips by email.

Netkonnexion

Damon Guy (Netkonnexion)

Damon is managing editor of Photokonnexion.com with professional experience in photography, writing, image libraries, and computing. He is also an experienced, webmaster and a trained teacher. Damon runs regular training for digital photographers who are just starting out.
See also: Editors ‘Bio’
By Damon Guy :: Profile on Google+

The Exposure Triangle – An aid to thinking about exposure

The Exposure Triangle

• The Exposure Triangle •
Click the image to download an A4 *.pdf version to print.

Going manual with your DSLR.

For many people exploring manual settings is a challenge. There is a lot to learn. Without guidance it is difficult to work it out for yourself. Here is my approach to the subject.

Why the exposure triangle

The “Exposure Triangle” is a memory aid to help us balance light for a good exposure.

One thing you should remember. The exposure triangle is NOT a calculator. The aim is to help you get used to using the settings. The ‘Triangle’ loses its importance once you understand the settings. Instead you will see your visualisation of the shot as more important.

Beyond auto-settings

“Auto settings” in modern cameras are average types of shot. They are pre-set in the camera programming. Sports mode freezes the action; landscape mode gives deep focus in the shot; portrait mode promotes close focus and so on. The pre-sets make credible pictures but take creative decisions away from you. Controlling exposure gives you artistic control over our photos.

It’s all about control

Photographs capture light reflected from objects in the scene. Too much light – the object is over-bright, or worse, blown out (completely white). Too little light and the light does not excite the sensor enough. Thnthe object is dark, sombre, or worse – black. At the extremes we have blown out or black. In between are a whole range of capture intensities.

The trick is to balance the incoming light so the sensor can make the picture as we wish it to come out. the idea is to control the light in-camera to create optimal light conditions for the sensor.

Three essential elements

There are three critical elements that control the incoming light…

  • ISO: controls the sensitivity of the sensor and how we capture the light brightness. A sensitive sensor allows a shot in lower light conditions (example: ISO100). High sensitivity to light is referred to as High ISO (example: very high ISO = 3000). The penalty is the picture becomes noisy (Definition: Digital Noise) as the ISO gets higher. Noise affects the quality of the picture. The lower you keep the ISO, the better quality the final image will be.
  • Aperture: controls the amount of light allowed through the lens. It also controls the depth of field. As the aperture increase the amount of light entering the lens also increases. However, as the aperture gets bigger the lens loses the ability to focus at infinity. As the focus shortens part of the picture is not so clearly defined. Taking a photo at F4 means you might be able to focus on a face beautifully and with sufficient light. But you may not be able to discern any detail behind the head. The depth of field has been shortened by the wide aperture.
  • Shutter value or Time value: How long the sensor is exposed to light affects the amount of light you collect. Leave the shutter open too long and the shot is too bright, blowing out parts of the picture. Close the shutter too quickly – the result is underexposed. Long exposures tend to exaggerate movement introducing blur. Fast shutter speeds tend to freeze an object in place.
What is exposure?

There is no right or wrong for achieving the outcome we desire. But there is only ONE point at which the exposure (all three elements combined) is right for your picture. That is the one to make your photo come out the way you want. You must find the correct exposure balance for your visualisation of the picture using all three elements.

Exposure is the right balance of ISO, Aperture and Shutter speed which provides for your intended depth of field, movement blur, brightness and representation of the scene. It is a unique response to the sensor settings you think will make your shot come out right.

The Exposure Triangle is a concept to help you adjust the balance to get the exposure right. The key to using the exposure triangle is that the three elements of exposure: ISO, aperture and shutter speed, must always balance.

It teaches us to understand how the three exposure elements play off one-another. Shorten one arrow the others will need to accommodate by adjusting their length. You can increase one or both of the other elements to accommodate the change.

If you increase one element you will need to decrease one or both of the other elements to accommodate the change.

Full Manual Control

Our exposure settings aim to balance the three elements in the camera. This needs to be done on the ‘Manual’ setting or ‘M’ setting to get the desired result. To gain full creative control we must do two things…

  • First we must have a clear idea of what we are going to achieve for each shot. Do we want the water blurred in our stream or not? Do we want the final picture to look bright and breezy or dark and sombre? Do we want movement blur or sharp, frozen action… and so on. So look at the scene and determine what you want.
  • Secondly, on the basis of what we want we must adjust the camera settings to achieve the desired result.

How do we adjust the settings to get the optimal exposure? Simple. The camera light-meter indicates when exposure is optimal.

The DSLR light sensor is the key

Inside every DSLR is a digital sensor. It detects light intensity. If the light is correctly optimised it will be indicated on the exposure meter.

With the camera set to “M” look through the eye-viewer. At the bottom of the screen you will see a scale. There should be a needle above the scale. This is the indicator of the current exposure. The centre of the scale is the correct exposure level for most shots.

If the needle is off to the right the sensor is getting too much light. If it is off to the left there is insufficient light. The trick is to balance ISO, aperture and shutter speed so the needle is centred.

Your camera manual will show you how to change each of the three settings. There are normally three controls somewhere on the DSLR body to change each of them. Again, your camera manual should have a diagram of the readings in your viewer screen when you look through it. Check out that diagram. You will see the location of the settings on the screen that will change when you alter the controls.

A trick to get you started…

Put the camera on full automatic (the ‘green square’ setting). Take a shot like the one you want. Now look at the settings for that picture on your camera screen. Your camera manual will show you which setting you can look at on the screen. This gives you a guide to what your manual settings should be for this shot.

Now switch to ‘M’ or manual to vary the results. If you want movement blur then slow down the shutter speed (longer exposure, more light let in) and/or decrease the aperture (reduce incoming light) to keep the needle in place. One click of longer shutter speed needs one ‘f-stop’ less of aperture to keep the exposure optimal. But now you get the movement blur!

The aim here is to balance a change in one element by changing one or both of the other elements. In the process you try to keep the needle over the centre of the scale in your viewer. The centred needle tells you you have an optimal exposure that your sensor can use.

Experience…

If you practice regularly with your camera on ‘M’ you will get control of your shots. Try to relate the settings to the type of results you get. Relate shutter speed to the resulting blur/sharpness. Similarly, relate depth of field to aperture size. Relate ISO to balancing light sensitivity to achieve the correct sensitivity for your intended exposure. Gaining experience with these attributes will help you remember settings to use in particular situations.

Comments, additions, amendments or ideas on this article? Contact Us
or why not leave a comment at the bottom of the page…

Like this article? Don’t miss the next — sign up for tips by email.

Netkonnexion

Damon Guy (Netkonnexion)

Damon is managing editor of Photokonnexion.com with professional experience in photography, writing, image libraries, and computing. He is also an experienced, webmaster and a trained teacher. Damon runs regular training for digital photographers who are just starting out.
See also: Editors ‘Bio’
By Damon Guy :: Profile on Google+

Shutter speeds – An easy guide

Shutter Speeds Cheat Sheet

• Shutter Speeds Cheat Sheet •
Click on image to download full .pdf cheat-sheet.

Shutter speed is easier with a start point.

One of the difficulties with shutter speeds is knowing what sort of setting to use with various speeds of an event in the real world.

Here is a short guide to get you started :: A guide to shutter speeds.

There are no rules about shutter speed

The actual speeds of real world events vary a great deal. In a race one car may move at 90 miles per hour (mph) and another at only 70mph. You should vary the shutter speeds depending on the objects speed, light intensity and the aperture you are using. Remember, the download cheat sheet is a guide not a set of rules. It’ll get you started, then it’s down to good old experimentation.

There is no substitute for experience

I do a lot of panning with race vehicles. I have learned to assess the speed and light then make quick guesses to set my camera up for a few test shots.

Once I took an experienced bird watcher to a drag race event. He was used to panning fast moving birds in flight. It took him time to adjust his eye for working with cars at up to 250mph. The best way to get good at doing shutter speed settings is to practice with a wide variety of moving objects so that you can get a general feel for the shutter speeds at each speed of your object.

Experience is the best master. So practice different settings a lot to get the settings and speeds for your interest properly fixed in your mind. This gives you a head start when setting up for a new subject.

Test shots

If you are going on a shoot where shutter speed is important, practice at the likely shutter speed for a few days before going. Try out different light conditions too. This will get your eye into the subject and help you know what variations you can use to get the best shots on the day. This post might help too… How to overcome frozen movement in panning.

The difference between freeze and blur

If you freeze the action you show some amazing stuff the eye does not normally see. Facial expressions and body movements as well as other details can be stunning. It can also look a little artificial. It is strange to see, for example, water droplets fixed in mid-air or a fast car with its wheels not blurry.

You can lower the shutter speed off the peak-action speed for freezing until you get some very slight blur in critical areas. Wheels on moving vehicles or propellers on aircraft are typical examples. They look artificial as frozen features, but give life and movement to an otherwise sharp rendering of high speed action.

Work your blur in naturally and show it as you would see it. Be especially careful where you have a lot of blur. Ensure there are still sharp elements in the picture. If everything is blurred it looks like a bad case of hand-shake.

The key

The key to controlling blur or freezing and other shutter speed effects is… practice! Lots of it. So, just get out there and have a go. Gradually you’ll forget the cheat sheet, you will have it in your head from practice.

Comments, additions, amendments or ideas on this article? Contact Us
or why not leave a comment at the bottom of the page…

Like this article? Don’t miss the next — sign up for tips by email.

By Damon Guy (author and Photokonnexion editor)

Damon Guy - Netkonnexion

Damon Guy (Netkonnexion)

Damon is a writer-photog and editor of this site. He has run some major websites, a computing department and a digital image library. He started out as a trained teacher and now runs training for digital photographers.
See also: Editors ‘Bio’.

How many types of blur are there in photography?

Blur by Netkonnexion - types of blur

Blur by Netkonnexion
Click image to view large
Blur By Netkonnexion on Flickr External link - opens new tab/page
There are many types of blur in photography.

Not all blur is equal.

There are various types of blur. It sounds odd. In fact there is a lot more to blur than most people realise. It is quite a varied subject. It is used in nearly all aspects of photography. From abstracts to zooming, we will find some aspect of blur. Lets take a look…

Okay bokeh…

First up, and one of the best known types of blur, is Bokeh. This Japanese word means haze or blur. It originally referred to the quality of blur. Today we use it to describe the actual blur. A sharp subject and a blurred background is created by a blur of tiny circles where each of the tiny points of light are not focused, that is bokeh. It is created by the lens and aperture.

When you use a wide aperture, say f4.0 (or wider) you get a shallow depth of field. The depth of field is the sharp part of the picture. The rest, the out-of-focus part, is blurred. That blur is the bokeh.

Bokeh can add a whole range of composition effects. It is also has its own aesthetic quality. The quality of the little ‘circles’ varies as does the true circular shape of the circles themselves. Photographic lenses with apertures that are more circular produce the best bokeh. Some apertures are more like regular polygons (say a hexagonal). Polygon bokeh is not as pleasing to the eye as circular bokeh. Fewer sides on the polygon forms a less circular bokeh circle. It may even form an obvious bokeh polygon. Manufacturers go to some lengths to make the bokeh pleasing. One way to make the bokeh more circular is to add blades to the aperture diaphragm. That can raise the cost of the lens.

Subject-movement types of blur

When a subject moves in front of your stationary camera the resulting image has a blurred subject. This is movement blur. The types of blur which include movement can be varied. In the picture above the motor bikes are moving at around 90 miles per hour. When taking this shot I was panning with the far bike resulting in that bike being sharp. The pan meant that my camera was not paced at the same speed as the nearest bike. As a result its movement was relatively out of synchronisation with my camera. The nearest bike was in relative movement and thus blurred.

In “The Barber”, below, I have set my camera to capture the blur of his working hands. As with any movement shot, you want some of the shot blurred and some sharp. If it is all blurred it just looks badly taken.

The Barber

• The Barber By Netkonnexion in 365Project •
Click image to view large
The Barber By Netkonnexion in 365Project External link - opens new tab/page
The movement of the hands is blurred to simulate his hair cutting work. Types of blur created in-camera are most effective.

Movement of the subject is controlled by shutter speed. To get it right you have to practice with the speed of that subject. Try the subject at slow speed first. Once you have an idea of the settings, speed the subject up. As you develop a feel for the speed-of-movement versus the shutter-speed you will be able to get a sharp background but a blurred subject.

More types of blur… Camera movement

When a subject is moving pan your camera with it. I did that in the bike picture at the top of the page and got a sharp bike placed against a blurred background. That is not bokeh in the background. As the camera panned with the bike it captured a stationary background. However, as the camera was moving it created a movement blur on the background.

Movement blur of the background normally occurs when panning. If you hold a stationary camera out of a car window and take a long exposure and the same type of blur will result. However, nothing will be sharp in that case (unless something next to you is travelling at your exact speed).

Done right background blur from camera movement has great impact. In the motorbikes above it gives a race feel. It looks really fast.

Some blur is not so good

Hand movement during a shot causes all sorts of blur. You get blurred shadows, blurred faces, possibly jerky tracks… not good at all. However, you can have some fun with this sort of movement. Some famous pictures have been created by deliberate hand movements. There are lots of shots, like tree shots  External link - opens new tab/page, where the movement of the camera creates a surreal or abstract view of the subject. Some people have tried throwing their camera and triggering it in mid-air – some bizarre results can be obtained (including a smashed camera).

Out of focus types of blur

Of course it is possible to completely blur a shot quite deliberately. Some pleasant aesthetic effects can be achieved. Wedding and romantic photographers love the “soft focus” shot. This is a deliberate very slight lack of sharpness. It emphasizes the romantic, soft nature of something… kittens, brides, the first kiss, baby and so on. Google images of soft focus shots provides quite a good range of possibilities for this type of blur.

The soft focus shot can be created different ways. Each give slightly different types of blur. You can literally set the lens to manual focus. Then when properly focussed pull the focus slightly back. so as to create a small amount of blur. Another way to do it is to use a soft focus filter. These are simply screwed to the end of the lens and give the same effect. When I was first starting out in photography many wedding photographers carried a flesh coloured or white nylon stocking. Pulled tight over the lens while the photograph is taken it creates a soft focus effect. Others like a skylight (ultraviolet) filter with a tiny amount of grease smeared on it. All these work, but give you a slightly different soft focus effect. Experiment… have fun!

Zoom blur

One of the less well known types of blur – zoom blur. You need a steady hand or better, a tripod. It makes the picture look like the world is rushing toward you very rapidly.

Adjusting the zoom during exposure creates zoom blur. Set your camera to have a long exposure – around one second is good. Balance the shutter speed with the ISO and aperture to get a proper exposure. You will need to use manual focus to adjust the zoom in the shot. Press the shutter button and rotate the zoom focus ring. A short turn or through its full arc – the amount of turn gives different effects. With a bit of practice you can reduce hand-shake blur. A smooth zoom throughout the exposure creates some great effects. Look through this page of zoom blur images on Google for some ideas…  External link - opens new tab/page.

Artificial blur

Most image editors have software filters to create types of blur. In fact there are a variety of different software filtersavailable. Gaussian blur is one common type. It softens or smooths the image, but also causes loss of detail. There is also rotational blur (self explanatory); linear blur or movement blur – you choose the direction of the blur. Other editng packages will have other blur types too.

Artificial types of blur do not have the same effect as blurs created in-camera. Artificial blur tends to lack depth. Whereas, blur using depth of field gives depth to a picture. The bokeh and movement blurs both have the impact of realism and depth as they vary throughout the depth of the image. Applying a uniform artificial blur can affect the realism. Applied with care and artful work you can make artificial blur look real. It is all about care and attention.

Are there more blurs?

There are probably other types of blur. They may fit into one or more of the categories above. Why not let us know about others. I would like to hear of new ideas and types of blur.

Comments, additions, amendments or ideas on this article? Contact Us
or why not leave a comment at the bottom of the page…

Like this article? Don’t miss the next — sign up for tips by email.

By Damon Guy (author and Photokonnexion editor)

Damon Guy - Netkonnexion

Damon Guy (Netkonnexion)

Damon is a writer-photog and editor of this site. He has run some major websites, a computing department and a digital image library. He started out as a trained teacher and now runs training for digital photographers.
See also: Editors ‘Bio’.