Category Archives: Background Info.

General, articles of interest, information not under other categories, information to help inform and educate people about photography, interesting reading

Have you got a low photographic hit rate?

Hit Rate - How Many Do You Keep?

What’s your photographic hit rate? How many shots do you keep?

A good measure of your success…

The hit rate is something that we often artificially inflate. In fact it is common for learners to have a low hit rate. Knowing how to calculate it can help you understand your improvements.

What is it?

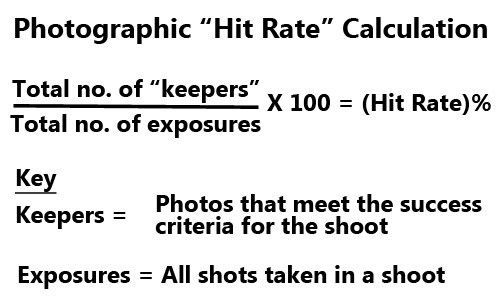
So what is the “hit rate” in mathematical terms? Simply put, it is the total successful shots divided by the total exposures for a given shoot. It is expressed as a percentage. You can see the full formula in the graphic below.

Hit Rate Calculation

• Hit Rate Calculation • What’s your hit rate?
The math is simple, deciding what is relevant to your pick of successful photos from a shoot is a value judgement made on your expectations for the shoot or from a brief in the case of a shoot for a client.


A more detailed look at the math, and the assumptions, can be found in “Photographic Hit Rate” in our Glossary pages. The examples there will help you to understand the meaning of “keeper” and how that relates to the hit rate percentage.

It’s all about choice

The full mathematical explanation of hit rate really is as simple as the graphic suggests. However, it is important to understand that the whole calculation is based on a value judgement. What you pick as success criteria for your shoot determines how harshly you edit out or accept the successful pictures you choose for “keepers”. Of course you may keep most of your shots, but the really good ones you should call your keepers (actually I call my keepers picks… it’s your choice).

My keepers, or picks, get separated out into a folder of their own for later use or for giving to the client. I keep the originals but I normally find I have a hit rate of around 25% to 35% depending on the shoot. Each shoot is different depending on the brief and the technical difficulty of the shots. You will have a low hit rate for the really fast action shots. You might have a higher number of keepers for the party and event shots for example.

Ansel Adams, the iconic landscape photographer, said…

Twelve significant photographs in any one year is a good crop.
Ansel Adams

Of course he is right. Truly great shots come at a very low hit rate. However, we don’t have the luxury of only relying on twelve shots a year for most personal and professional purposes.

How harsh should you be?

When deciding on keepers you can decide to be as harsh or slack as you wish. What is important is your ultimate goal. If you want improvement your picks should be the very best shots. Each shot should be taken at a high standard and only the best should be published. I tend to think that learners should be quite harsh on themselves and work to exceed their own standards. You may want to set yourself a slower pace. It is your choice. Just make it fun.

Why bother?

OK, this is the main point. If you are consistent over time in editing your shots you will begin to find you can push up your hit rate. Professionals tend to have a consistently higher hit rate than amateurs. After all they have to make a living from their shots. On the other hand if you keep tabs on the numbers you may find you are taking less shots because the ones you do take are returning more keepers as you improve. That saves time and especially editing energy.

What measuring your hit rate does is give you a feel for improvements and consistency in your photography. Don’t ruthlessly measure everything. Look back over your shots. Get a feel for your hit rate. It will help you to get a picture of your success rate overall.

I found that knowing my hit rate was a confidence booster when learning and an essential tool for my professional life. Give it a go. You might find it a great help too.

Comments, additions, amendments or ideas on this article? Contact Us
or why not leave a comment at the bottom of the page…

Lenses and designations? Confused? An easy guide

• Lenses •

• Lenses •
Buying lenses optimised for your sensor is confusing.

Lenses are a big investment…

It is difficult to know which lens is optimised for your digital image sensor. There seems to be so many different designations. Here is a guide to which lens designation you want.

Explaining the differences

Brands like Canon and Nikon have their own lenses range. Third party manufacturers, like Sigma, Tokina and Tamron etc. manufacture lenses for brands like Nikon, Canon and others. if buying lenses the third party manufacturers have lenses which are equivalent to the Camera brand manufacturer or possibly better. Look around at online reviews to see what standard of lenses and prices are available.

Make sure you buy lenses fitted with the correct lens mount for your camera. Older models of cameras may have the correct mount but some of the more recent lenses might not be suitable to work with the camera. So check the mount and camera are compatible before buying.

Why are lens mounts specific to brands? It’s mainly historical – the development paths of the manufacturers differ. However, they also want their customers to stay loyal to the brand. This unfortunate situation means you have to reinvest in a new range of lenses if you change your camera body. Hmmm! Expensive.

There are two types of camera sensor. There are cropped sensors – which is a small size. These are more often referred to as APS-C format.

The other sensor format is full frame sensor. These are the size equivalent of the old film SLR frames on a roll of film.

Full frame digital sensors are less common than cropped sensors. The cropped sensors are easier and cheaper to manufacture. However, in recent years we are seeing an increase in full frame releases of new cameras. The higher resolution (more pixels) and potentially bigger print sizes are attractive to consumers. As full frame format gets cheaper they are likely to become more common.

The full frame sensor size is the same size as a 35 mm (36mm ×24mm) film frame in old SLR cameras. Because of the historical significance of the 35mm format modern DSLRs are based on the same standard. Lenses are normally designed to fit either the full frame format or the cropped format.

Lenses designed for the full frame sensor have an image circle that covers the whole 35mm sensor. These lenses tend to be more expensive because they need a wide circle of light thorough them to cover the sensor. They have bigger glass elements as a result.

Full-frame sized lenses are able to fit a camera with the same mount and a cropped sensor. The image circle from the lens remains constant. The smaller sensor size (APS-C) is therefore only able to process the light from the centre of the circle – the rest of the light spills over the side of the sensor. The resultant photograph is like a zoomed-in crop of the image that would have otherwise been taken with a full frame sensor.

This image-cropping effect of smaller sensors is known as the “crop factor”. It represents the ratio of the size of the full-frame 35 mm sensor to the size of the smaller format. The apparent zooming effect also gives rise to an alternative name – the “focal-length multiplier”.

The ratio of full-frame to crop tends to lie in the range 1.3–2.0 for most cropped sensor DSLRs. You might say that a 100 mm lens on a camera with a 1.5 crop factor creates an apparent zoom multiplying the focal length by 1.5. A 100mm lens would then appear to produce the same picture as a 150mm lens. This is not a true magnification since the focal length of the lens is the same on both cameras. Instead the cropped sensor is likely to produce a lower quality result than than the full frame sensor while revealing a closer result.

You can use lenses designed for full frame sensors on cropped sensors. It does not work the other way. A lens designed for a cropped sensor creates an image circle smaller than the full-frame sensor. It would create a circular image with very strong vignetting around the sides. Manufacturers recommend not using lenses designed for cropped sensors on full frame cameras.

Designations

To ensure that buyers purchase the correct lenses for full frame or cropped sensor manufacturers designate them with specific marques. Here is the breakdown of the most common designations…

 Manufacturer  Full frame
(and APS-C)
 APS-C
(cropped)
    Canon           EF pEF-S
    Nikon          FX DX
    Sigma          DG DC
    Tokina          FX DX
    Sony     Various‑incl.
3rd party mounts
DT
    Tamron          Di Di-II
    Samsung   Not available‑2013 NX
    Pentax Check manufacturer
specification
DA
  Konica‑Minolta Check manufacturer
specification
DT
Other related sources…

Lens manufacturers (Wikipedia) External link - opens new tab/page
Photography equipment manufacturers (cameras, lenses etc) (Wikipedia)  External link - opens new tab/page

Comments, additions, amendments or ideas on this article? Contact Us

find out more...Photokonnexion tips by email
If you enjoyed this article please sign up for our
Tips by email service.
                                                 Find out more

By Damon Guy (author and Photokonnexion editor)

Damon Guy - Netkonnexion

Damon Guy (Netkonnexion)

Damon is a writer-photog and editor of this site. He has run some major websites, a computing department and a digital image library. He started out as a trained teacher and now runs training for digital photographers.
See also: Editors ‘Bio’.

Can you write? Of course you can!
Write for Photokonnexion...

We would love to have your articles or tips posted on our site.
Find out more…
Write for Photokonnexion.

Do you find it difficult to photograph art?

http://farm6.staticflickr.com/5345/8977458941_2c55c81a0e_o.jpg

• The World Is A Different Place When Viewed Through Art •
Click image to view large
The World Is A Different Place When Viewed Through Art By Netkonnexion on Flickr External link - opens new tab/page

It’s all about interpretation…

We all have a little difficulty photographing art. We know that interpretation is important to the success of a piece – have we got the interpretation right? Should we hesitate when shooting art by others? Analysis paralysis could stop us doing anything. My view is we have to give it a try.

When photographing art there are two broad approaches. One way is to create a record shot which tries to represent the art as seen. You are producing a sort of factual postcard representation. The other is to take the shot putting your own interpretation on the piece.

Both these approaches are legitimate.

Some general points…

As with all photography there are some general principles that need to be established. In a nutshell we should try to…

  • Declutter the scene so the eye goes to the subject
  • Make sure our subject is the main focus of the shot
  • Ensure we have a clear purpose for the shot
  • Work hard to remove distractions (eg. bad focus or burnt out highlights)
  • Treat the subject with complementary light to bring out its best features

…these help us to ensure that we are conveying the meaning of our shot to our viewers.

The purpose

Clarity of purpose for a shot is an important part of crystallising our idea about how to present it. If we make a conscious decision about why we are taking the shot, it will help us to make the distinction between a record shot or an interpretation.

A judge at a photography competition once told me, “you should never put a picture of a piece of art in a competition unless you have put your own mark on the piece of art”. “Otherwise,” he said, “it is a record of someone else’s art”. For a judge that’s important. If it is a record of someone else’s work, what has he got to mark that is yours?

So, with photography of art I think you need a clear idea about your intentions. A record shot is about preserving the piece, ensuring that it’s essence is retained.

That judge I mentioned told a story. His friend was passionate about public art – pieces on public display in the open air. He travelled widely photographing sculpture. He always had something with him that he put on the sculpture. A scarf. A hat maybe. Sometimes a teddy bear. The strategic placement of that one thing was enough to add a new meaning. It was a sort of reinterpretation. The judges friend was creating a new work of art.

This clarity about “representation verses interpretation” comes up in many aspects of photography.

Often beginners are not aware of its significance. That is the reason there is often “something missing” in their pictures. The pictures of beginners often look sterile because they have tried to represent reality. The standard of their photography is not good enough to make the picture stand out. The picture itself is insipid because it lacks interpretation.

When someone has an artistic eye, even if a beginner, the interpretation they bring to a shot trumps the lack of technical skill. That is why some artists can create great images within a short time of first handling a camera. They know how to create an event in the imagination of the viewer – even if they lack the skill to create a great photograph. That event is the image that stays with the viewer.

Making the difference

Once we have established the purpose of the shot we should have a clear idea about some of the things that we can do to actually make the image…

Record shots: You are looking to create a clear, technically excellent representation. Work on sharp outlines and clear colours which are as close as possible to the original. Try to capture any essential textures, but also try to show the piece in its entirety. You will probably need to take a regimented progression of shots to do this. Typically a good record shot is one of a series. Record the full detail of the piece, capture it from all sides. Try not to embellish or exaggerate. Make a plain statement of its existence. Use plain light. However, if you only have time for one shot then make it as faithful to the original as possible.

Interpretation shots: You can let your imagination run wild. Anything goes. You are doing it to express how you feel about this piece. Get your feelings out there, exaggerate, magnify, close in, show it all or just enough… wild angles, odd views. You get the point. You are making the shot yours. You are doing some thing different.

Photographing art is one example

The principle of “expression versus representation” runs right through photography. Natural history shots are a case in point. We want our pictures of birds to be essentially record shots. We are looking for a faithful record of them. The trick with wildlife is to show them performing some behaviour which is peculiar to them.

You can probably think of other examples of the way this split affects your shots.

Once you become aware of this essential tension within every shot you can begin to work on the imagination or the representation in your own area of interest. It is critical to conveying meaning in your shot.

By Damon Guy (author and Photokonnexion editor)

Damon Guy - Netkonnexion

Damon Guy (Netkonnexion)

Damon is a writer-photog and editor of this site. He has run some major websites, a computing department and a digital image library. He started out as a trained teacher and now runs training for digital photographers.
See also: Editors ‘Bio’.

Can you write? Of course you can!
Write for Photokonnexion...

We would love to have your articles or tips posted on our site.
Find out more…
Write for Photokonnexion.

Your part in the amazing explosion of photography

Daily number of photos uploaded 2005-2013YTD

• Daily number of photos uploaded 2005-2013YTD •
Source: 2013 Internet Trends – KPCB
(2013 Source no longer available online. Latest version is shown as a slide show below).

Photography is about you and several billion other people.

The global phenomenon that is photography is growing at an incredible rate. Online posting of photographs is on-trend to double every year. In fact the number of photographs posted daily is literally mind-boggling.

Figures out

Published May 29, 2013, the “KPCB Internet Trends 2013 Report” by Kleiner Perkins Caufield & Byers quotes some astonishing global figures for use of the Internet. The report publishes the graph above showing more than 500 million photographs are posted every day to just four online providers – Flickr, Snapchat, Instagram and Facebook. The figures are all derived from data published by the four companies.

Facebook the biggest photo-site

According to the report the biggest holder of photographs is Facebook. The social networking site handles more than 300 million photo  External link - opens new tab/page uploads per day. More than fifteen percent of the global population uses Facebook with more than sixty three percent of those using the site every month.

Despite the tsunami of photographs being posted online every day we must expect that many more photographs are not being uploaded. It would not be unreasonable to expect more than a billion photos are taken being taken worldwide everyday. Although the actual figure must remain speculation.

How many Internet devices are there in your house?

The KPCB Report gives figures for a wide range of global growth rates. Mobile Internet use and general mobile use has exploded too. Many families have more than ten Internet enabled devices in the home – computers, games machines, mobile phones, cars, televisions, tablets… the list goes on. Against that backdrop, photography is not an unusual growth case.

Video

Another area of growth of interest to photographers is video. A few weeks ago YouTube topped 1 Billion viewing hours in a week. In some countries young people are watching more YouTube than TV these days. Calculations from figures in the KPCB report suggest that about 1,008,000 hours of video are uploaded to YouTube each week. This is corroborated by the YouTube statistics page: YouTube Statistics page  External link - opens new tab/page. Certainly the video channel is becoming a global phenomenon as it appears to be taking on TV and winning  External link - opens new tab/page. However, there are also many other online video websites.

How many other photosharing sites are there?

There are thousands of photo-sharing and publishing sites globally. I personally publish photographs on seven different sites. How about you? One thing is for certain. The global growth industry that is photography has not yet peaked.

The KPCB report in full

The latest report is in slide form which I have included below for you.


KPCB Internet Trends is published annually by Kleiner Perkins Caufield & Byers

By Damon Guy (author and Photokonnexion editor)

Damon Guy - Netkonnexion

Damon Guy (Netkonnexion)

Damon is a writer-photog and editor of this site. He has run some major websites, a computing department and a digital image library. He started out as a trained teacher and now runs training for digital photographers.
See also: Editors ‘Bio’.

Can you write? Of course you can!
Write for Photokonnexion...

We would love to have your articles or tips posted on our site.
Find out more…
Write for Photokonnexion.

How to take photos – each important step in making a photograph

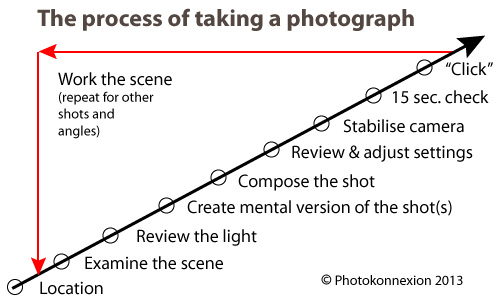
Infographic download - How to take photos

• Infographic showing the various steps in how to take photos •
A guide to what you should doing to make great images.
• Click to download printable full page version

Getting down to the detail…

Yesterdays article was How to take photos – each important step in making a photograph. Today I want to share the detail behind each step. Be warned! You might need to think again about your existing knowledge. Unlearning old ideas will help you to move forward and improve.

How to take photos – The location

Lots of people think you can just turn up and take pictures. Well you can, but often they are not good ones. Getting the best out of your location involves understanding what you’ll find there. Find out about the weather on the day. An idea of light levels and times of sunset and sunrise etc. is useful too. There have probably been lots of visits by others at popular destinations. Check “Google Images” for that site. Google will help with other details too.

When you arrive don’t just fire off loads of shots. Settle down and get into the location. Don’t make photography mistakes that mean you miss great shots. The first time you do this consider a variety of shots. Think about more than one shot, think about the whole shoot.

How to take photos – Examine the scene

Considering the scene is an important part of the work-flow on site. Unless you have been there before you need to get to know it. Use all your knowledge about camera angles, composition, lighting, camera settings and so on. Take the time to examine your location while thinking of these things. Consider your feelings about the scene too. How you feel will help your shot be an impassioned response to the location. What you feel about the scene is the best guide on how to take photos at that location.

How to take photos – Review the light

Most photographers forget this step. They are too wrapped up in the scene and the camera settings or the passion of it all. This step will make or break your shot. Look at the light. If you don’t know what I mean read these:

Ask yourself some simple questions about the light…

  • Is it hard or soft?
  • Is it coloured or more neutral?
  • Is it at the right angle to best capture the location/scene?
  • What is the best time for the right light?
  • Is it very bright and intense or dull and diffused?
  • Do I need any artificial illumination (flash, diffusers etc)?
  • Is the shadow hardly defined (sun up high) or strongly defined (sun to the side)?

Lean about the properties and vocabulary of light. It helps give you a greater understanding of photography. These questions, and others, help you make decisions about lighting for your scene. For more on “How to take photos – Light and Lighting” see the resource page in the SUBJECTS/ARTICLES menu at the top of every page.

How to take photos – Create a mental version of the the shot

If you want to make a great image – have a great picture in your head of your intended outcome. Visualisation has helped athletes, artists, thinkers, inventors and others to achieve amazing things. Train your mind to visualise in detail. If you see what you want to achieve it will guide you when setting up your camera. Take the time to create that mental picture – in detail. Consider how you are going to make the best of the light when you consider how to take photos. More about visualisation… 80 year old secret of world class photographers revealed.

How to take photos – Compose the shot

By now you have an intimate photographic knowledge of your scene. Composing the shot is about realising that potential. Long-time followers of this blog already know something about composition. For first-timers you can get lots of information from our Composition resources page in the SUBJECTS/ARTICLES menu at the top of every page. Composition is a skill that evolves as you develop as a photographer. Knowing more about composition helps your awareness and skill develop. Read about it to gain insight. Think about it every shot.

How to take photos – Review and adjust the camera settings

Now you have a picture in mind, composed, and are ready to set up your exposure. The exposure is defined by your camera settings. Camera makers will have you believe that the auto-setting on your camera is the perfect exposure. The fact is they made informed guesses to arrive at that exposure. It is different for every model of image sensor. Modern cameras do make a good representation of the scene. It is not always what you want however. You can change the exposure by under-exposing, over-exposing and by using different apertures, ISO levels and shutter times. That is your interpretation of the shot. When you think about how to take photos, plan how you want the image to come out.

Having a visualisation in your head helps you set the camera up to make that mental image. You do it using ISO, Aperture and Shutter speed. Even using one of the ‘mode’ settings is still a way of regulating your exposure. They all adjust those three basic facets of the exposure.

Here are some other links to pull together ideas about exposure:

How to take photos – Stabilise the camera

You want the photo to be sharp, crisp and clear. The faster the shutter speed the easier it is to get a sharp shot. But often, especially for a good quality shot, longer exposures are better. You need a good stance to hand-hold the camera. You will need a tripod (or other method) to steady it for longer exposures.

Stance is down to basic technique and comfort. The stance you use will be a personal thing for you. I have found many photogs have to relearn their stance after many years of a poor stance. It is best to learn a good one early. Here is my recommendation: Simple tips for a good stance

The use of tripods or other supports is a wide subject. It is also one that many learners tend to ignore- at least at first. When learning how to take photos sharpness is vital. Become acquainted with a tripod (preferably a good one) as early as you can. Your images will improve a huge amount. Here is some advice about tripods:

And, here is some basic advice about improving sharpness overall – The Zen of sharpness – 12 easy ways to improve

How to take photos – 15 second check

OK, that may seem like a long time. However, it is actually the time you need. You can get faster at it, but if you are taking a serious attitude to your shot then give it the time. You can find out all about the the 15 second check by reading these in order:

  1. An old sailors trick to improve your photography
  2. The fifteen second landscape appraisal
How to take photos – “Click”

This is where you press the shutter button. How you press that button can make a difference to your sharpness. Earlier, I mentioned this link, Simple tips for a good stance. It also gives advice on pushing the button without affecting sharpness.

An essential element of your shot is about confidence in what you have done. Today we are lucky. We just look at the back of our camera. Your first “click” may be a test shot. If your settings need adjustment then a simple technique called “Chimping” will help. Chimp and adjust. You will only need to do it a few times to get the shot right. You will not need to machine-gun the site with hundreds of “just in case” shots.

How to take photos – Work the scene

Chimping helps you set up for the shot and compose it. To get other possible shots you visualised earlier, you should work the scene. Repeat all the steps you have just done for each of the shots you foresaw. Working the scene is a skill and takes practice.

How to take photos – Time line

What is not obvious from the diagram is that the diagonal arrow is also a time-line of the shot. Of course it is a different length for every shot. You will have different problems to solve and ideas to consider for every shot. That’s fine. You have just learned a more careful, precise method for how to take photos. As you practice will quickly get faster at taking shots. But you will also make better images.

A promise

I can guarantee that if you follow the steps on this page you will…

  • Take less shots;
  • Get a better hit-rate (more usable shots per shoot);
  • Spend less time in post-processing;
  • Have better composition;
  • Improve your photography overall.

What is less obvious is that you will also save a lot of time.

By Damon Guy (author and Photokonnexion editor)

Damon Guy - Netkonnexion

Damon Guy (Netkonnexion)

Damon is a writer-photog and editor of this site. He has run some major websites, a computing department and a digital image library. He started out as a trained teacher and now runs training for digital photographers.
See also: Editors ‘Bio’.
How do you improve your photography?

• Determination •

• Determination •
The photographer who is determined and who pays attention to detail will make great images.

What you think you can do is what you become…

The essence of being good at anything is about demonstrating levels of competence, skill and consistency in performance that far exceeds anything that comes from “beginners luck”. Professionals and amateurs alike attain the highest standards of photography day after day because they have done three things…

  • Been determined to get there.
  • Learned how to review and improve with every shot.
  • Applied a ‘can do’ attitude to every aspect of their learning and practice.

Those that give up along the way are heard to say “Wow… I can’t do that”! Then I am reminded of a scene from Star Wars: The Empire Strikes Back, a great SciFi movie.

Here is a clip (25 secs.)…

Do. Or do not. There is no try.

Transcript

Yoda is trying to teach Skywalker to lift a spaceship from the swamp using only his mind…
Yoda: “Always with you it cannot be done. Hear you nothing that I say? You must unlearn what you have learned.”
Skywalker: “Alright I’ll give it a try.”
Yoda: “No. Try not. Do or do not. There is no try”.
(This is an abridged version).

For many years I struggled with that “try” thing. I realised eventually that I had been bought up in a ‘try’ culture. I was told at school and at home, “All you can do is try your best”. But to think like that is also to have an expectation of failure. When you ‘try’ you never actually achieve.

Failure and learning

Now I think more like Yoda. Failure is a part of learning. You do a thing and you succeed or you fail. If you fail it is because of inexperience and you need to learn a lesson. You succeed because you learned the lesson and are ready to move on.

Photography is like that with every shot. Each, and every time you press the shutter button, there is a new situation. Think ahead. Have in your mind a pristine version of what you want to achieve. Take your time to look at the light, assess the scene, review your settings and stabilise the camera. Then, when you have everything in harmony, click the shutter.

Yoda says, “You must unlearn what you have learned”. What does he mean by that? I believe this is a great line because Yoda is reminding us that ‘doing’ and ‘succeeding’ is about having an expectation of success, preparing for it, reaching for it and achieving it. You must first unlearn the lessons of a “try culture” where there is an expectation of failure.

If you make it your business to produce perfection with every photograph you take, you will not be disappointed. Your persistence will pay off.

How to write great captions for your photographs

A caption about captions

• About captions •
A picture and caption from 365Project, a photographers social networking site.
Click image to view large
About captions – By Netkonnexion on 365ProjectExternal link - opens new tab/page

The power of the image is not just in the picture.

Often the image itself is not the main reason for displaying a picture. Sometimes there is a need for an explanation about your picture or something associated with it. Diagrams, an illustration of a point in the text, secondary ideas, are some of the many good reasons to have a photograph on display. However, to make the point clear you frequently need a caption for the picture.

In What about the title? I discussed how titles impart meaning and context about the picture. They capture an essence of the image in a short phrase.

Captions on the other hand are about good communication. The image, the title and caption together speak to the viewer conveying full meaning. So writing a good caption is essential. If you say anything in your caption that is at odds with the reason for the rest of the communication (picture/title/caption) you will confuse your viewer. So here are some ideas to help your captioning…

  • Think first… Captions like all communications need to be planned. Think about what you want to say, structure it logically, say only what is needed. Once it’s clear why you want it and what it should say, then
    write the caption.
  • Be brief… Say no more than you need. Reserve long explanations for the wider text.
  • Stick to the point… Explain the point of the picture and its relevance. Make other points outside of the caption.
  • Match the text to the purpose… Make sure that the tone of the writing is consistent with the main text, the purpose of the image and the title. If the caption is in a different style to the rest of the communication it will confuse the viewer.
  • Use appropriate caption format… Headshots might just be captioned with a name. Products may be fully captioned. For example “Useful Thingy-Widget showing rear wiring arrangement” explains the product shot. Diagrams should be captioned with a precise abstract of what they show. Detailed explanations go elsewhere.
  • Layout your caption neatly… If the text is arranged in a lopsided way, or if there is a mixture of fonts or other imbalances these will be obvious in a short caption. Try to make the layout attractive to the eye.
  • Resist repetition… If you have a picture of a cake the pointless caption, “Picture of a cake” serves only to frustrate the viewer. “A moist carrot cake is an ideal mid-morning confection”, says a whole lot more and still points out it is a cake.
  • Avoid replication… Do not simply write something in your caption from the main text. Complex explanations in the main text are usefully off-set by a succinct summary in the caption.
  • Avoid cliché… The tired or clichéd phrase in a caption will put off your reader. Try to make captions fresh, invigorating and crisp.
  • Explain or name groups… Six different widgets, three people or four piles of different beans all need to be explained. Name them, number them, explain them – whatever – but make sure the viewer knows which is which and in the correct order.
  • Be consistent… Each of the photographs you use should have a caption. Make sure they are all formatted the same, written in the same style, use consistent references (eg. Dia. 1, Dia. 2 etc) mounted in the page using the same graphical scheme. Deviations will confuse the reader/viewer and throw off their concentration.
  • Include credit, attributes, acknowledgements and links… You would feel cheated if your work was used and not credited. So afford the same courtesy to others if you are using images by other authors.
  • Fact check… Mistakes are glaringly obvious in captions because they are so brief. Check everything, of course, but be especially careful about captions.

Remember, your caption is one part of the communication. The reader sees the picture, title and caption as the full communication. So treat them as a single method of making a point to your reader/viewer. Make all three carry the same message overall. Use this diverse way to communicate with as much impact as possible. Your caption is a vital part of the overall delivery of your point.

By Damon Guy (author and Photokonnexion editor)

Damon Guy - Netkonnexion

Damon Guy (Netkonnexion)

Damon is a writer-photog and editor of this site. He has run some major websites, a computing department and a digital image library. He started out as a trained teacher and now runs training for digital photographers.
See also: Editors ‘Bio’.