Category Archives: Background Info.

General, articles of interest, information not under other categories, information to help inform and educate people about photography, interesting reading

Three rules of lighting… simple, but effective

• Three Rules of Lighting •

• Three Rules of Lighting •

The simple explanations are the best.

Here at Photokonnexion we try hard to provide simple explanations for the things we all want to learn about our favourite subject. If you think anything is too complicated let us know on our Contact Us page or leave a comment below the article.

Well, here is a video in the spirit of simple explanations. I really do not need to explain before you see it… just watch and enjoy.

More after this…

find out more...Photokonnexion tips by email
Enjoying this article? Please sign up for our
Tips by email service.
                                                Find out more
#11030#

Three Rules of Lighting for Photography

“We talk about the three important rules regarding the behaviour of light. As photographers we can use these rules to achieve the type of lighting we want, including the look of soft light.” – Ed Verosky
© Ed Verosky 2012  External link - opens new tab/page

For more background on lighting

Don’t forget to check out our Light and Lighting resource pages and especially the links on Hard Light and Soft Light. These are essential to the understanding of light.

All our resources can be found in the menu at the top of the page.

By Damon Guy (author and Photokonnexion editor)

Damon Guy - Netkonnexion

Damon Guy (Netkonnexion)

Damon is a writer-photog and editor of this site. He has run some major websites, a computing department and a digital image library. He started out as a trained teacher and now runs training for digital photographers.
See also: Editors ‘Bio’.

Can you write? Of course you can!
Write for Photokonnexion...

We would love to have your articles or tips posted on our site.
Find out more…
Write for Photokonnexion.

UK Photographers image ownership rights threatened by new legislation

Copyright legislation may allow legalised theft of your images

Copyright legislation may allow legalised theft of your images

UK Government lets down photographers.

In an unprecedented move a recent piece of UK legislation threatens photographers’ ownership of their own image. The Act potentially legalises online theft of images from amateur and professional alike. The legislation, which gained Royal Assent on the 25th of April 2013, will enable “orphan works” to be claimed on the basis of a copyright search. The person claiming the image will be able to re-licence it and claim full compensation for its use or resale if the copyright owner is not found.

Enterprise and Regulatory Reform Act

The new Act, which comes into force early 2014, is a “framework” Act addressing various legislative issues. The copyright section of the Act provides the power for the Government to introduce licensing of orphan works. The Act leaves detail to be inserted later through secondary legislation. Photographers are angered that this small section of the Act has allowed this rights-changing Act to be sneaked in under the radar.

The new licensing powers will be an important re-mapping of UK copyright law. The existing emphasis on assumed copyright ownership will be shifted toward the users of copyrighted works. This represents a change of copyright ownership from a “property right” under author control to a new condition where copyright becomes a licensing/sales tool with the owner having less control over end use.

The detail of this shift in emphasis is yet to be determined. The secondary legislation will define a “diligent search” which will be needed to find the originator/copyright owner. Also to be clarified is how orphan works will be re-registered to new owners; to what extent images will be under the control of new copyright owners and how the transfer of copyright might occur.

One concern is how the process of monitoring, transferring and re-licensing orphaned images would be administered and the sort of organisation to do the work. This also raises other spectres…

  • Will works need to be registered to avoid them becoming orphaned?
  • What sort of costs are going to be involved?
  • Will artists and photographers working alone be able to register or bear the cost?
  • To what extent will amateurs be protected?

There are many more questions that need answers too.

Photographers concerns…

Last year a backlash occurred against the photography social networking site Instagram. The site implemented terms and conditions potentially passing usage rights to Instagram. In the end Instagram backed down in the light of public and user anger. Many people have seen a similar rights grabbing move in this new UK Act.

The cost of litigation against copyright abusers is prohibitive. Small photography businesses and amateurs do not have resources to fight expensive court battles. So corporations rip people off and smaller organisations hide in the tide of online images.

Photographers are worried that tide will make this legislation a free-for-all thieves charter. The concern is that anyone could claim “diligence” when searching for a copyright holder by simply doing a Google search. No immediately obvious copyright owner being found would enable them to apply for a licence to take over the copyright.

This legislation seems likely to create a new market for third party organisations to move in and manipulate the ownership of creative works. That represents a money-making bonanza for big business interests in the creative industries. It will also be a total disaster for the little guy trying to protect their life’s work and income. Amateur interests in particular are likely to be badly hit. Great images will be ripped off because amateurs will not be in a position of knowledge or resources to protect themselves.

The social media area is a particular concern. There are very real fears that the volume of images online are so huge that carrying out effective copyright searches in social media websites will not identify most image creators. This will make copyright takeovers the norm, rather than the exception, a position reinforced by weak protection for image creators.

What every UK photographer can do

This new Act is the start of a long road where the nature of copyright in the UK could change for the worse. At the moment the new landscape is shrouded in fog. However, the fact that this Act has been implemented in this way, under the radar, does not suggest a great outcome.

On the HM Government website a petition has been posted that tackles the issue. Help us raise awareness by signing the petition and telling your friends about it too. The more photographers who understand the issues the more likely we will be to ensure we have a voice in future secondary legislation on this issue. Visit this UK Government petition at:

Stop Legalised Theft of Copyrighted Works  External link - opens new tab/page

Please sign the petition and keep your eyes open for more information in the coming months.

By Damon Guy (author and Photokonnexion editor)

Damon Guy - Netkonnexion

Damon Guy (Netkonnexion)

Damon is a writer-photog and editor of this site. He has run some major websites, a computing department and a digital image library. He started out as a trained teacher and now runs training for digital photographers.
See also: Editors ‘Bio’.

find out more...Photokonnexion tips by email
If you enjoyed this article please sign up for our
daily email service.
                                                 Find out more
#11030#

Will I get my images stolen online?

• Transparent Covers •

• Transparent Covers •
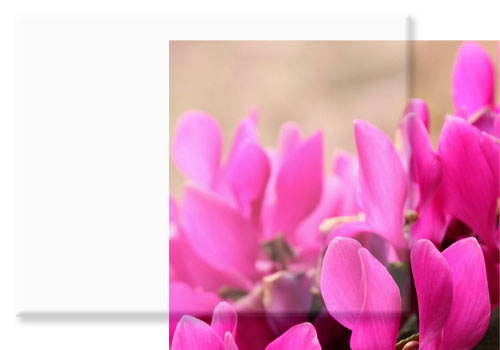
The picture shows a transparent image slightly lifted off the page demonstrating how a transparent image can be stacked on top of the image below. It is normally invisible when set up properly – it’s shown lifted here only for effect. If you right click/copy the on an actual transparency you only copy a transparent shape not the image you want below.

Can images be protected online?

There are a number of ways to steal an image off of a website. And, yes, there are a number of ways to protect an image on a website. How effective is that protection? When it comes down to it we lose sleep over our images being stolen. So if that protection is not 100% we have a problem.

What protection is available?

Probably the most common protection for images on a website is a programmed solution. A small piece of code detects a right mouse click over an image. The code disables the right click preventing you saving or copying the image or the image address.

The picture above shows another method of protecting images. It is possible to place images on top of each other on a page. If the top image is transparent the image below it can still be seen. When you right click the image you are actually only able to get the top transparent image not the image below. This is an interesting method because it also masks the internet address of the image below. If you try to copy the location of the image you get the location of the transparent image.

Press and grab!

Both the methods above, and similar ones, are sufficient to prevent the casual, non-technical user from stealing images. However, they are absolutely ineffective against one simple theft method – the screen grab. If you click on the window where an image is displayed, hold down [Alt] & press [PrtScrn] the image selects a copy of the window that is currently selected. You can then paste that image into an image editor. If you use [Ctrl] & [PrtScrn] you grab the whole screen as an image. Some web designers have used code to disable these button combinations but it is not reliable. It is also completely ineffective against selection tools. There are many little applications that you can download which will give you the ability to select any section of your screen and copy it. The copy is then pasted into an image editor for saving.

The ultimate solution…

When it comes down to it there is no full-proof method of preventing image theft. If you can see it online, you can steal it. The ultimate solution to preventing image theft online is not to put your images onto a website.

Of course this is not an answer really. If we cannot publish then we cannot get sales, acclaim, support… whatever. These days, if you are not online then your images are not seen. Are there other practical methods of protecting images?

Water marking

One of the more common methods of protecting images is to put a watermark on it. This effectively renders the image unusable on another website or for printing. However, it also makes it difficult to fully appreciate the art in a picture if it has a trade mark or copyright symbol plastered across it.

• Little Langdale •

• Little Langdale •
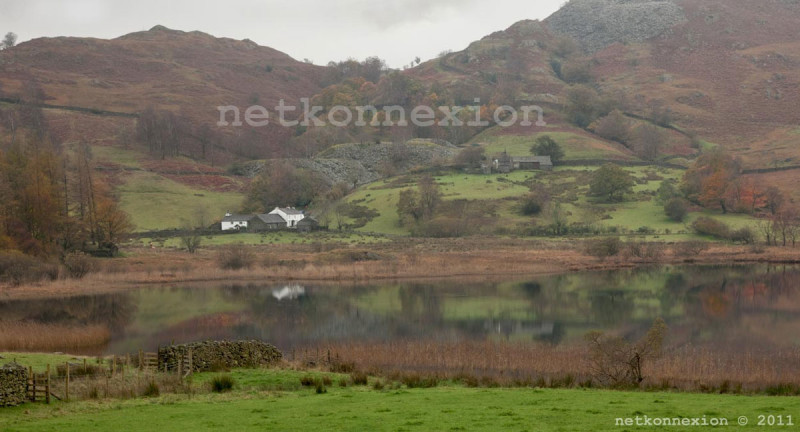
Watermarks can be rather obtrusive like the large one here (centre). Less obtrusive placement and size is easily cloned out or cropped out (the small watermark bottom right).


Generally speaking the smaller or less obtrusive a watermark is on an image the less effective it is against theft. On the other hand the more obtrusive it is the more impact it has on the viewer looking at the image. Writing in particular draws the eye very strongly. So you are in danger of the viewer having to peer around/behind your watermark because the eye is drawn to the watermark before the subject of your image. This is not satisfactory and rather destroys the point of putting the image online.

Copyright and copyright registration

Copyright refers to the established right of the author of a picture to maintain control over the image. However, the law of copyright differs worldwide. So how it applies in your country is something you will have to research. In basic terms a country like the UK has an assumed right of copyright ownership. So the original image file would stand as proof of ownership. In this case it is best to ensure that you also embed your copyright data in the image data (see: Exif data). The Exif data will then reveal the owner. However the data is not secure so the method is not full-proof.

In a country like the USA copyright owners can protect themselves against theft by registering their image with the Library of Congress  External link - opens new tab/page.

Copyright is good protection in that the force of the law lies on the side of the copyright owner. However, in many countries a dispute over copyright involves a lengthy and expensive legal process. This may be beyond the means of the small artist/photograph. This renders it an ineffective method of protection. However, recent legislation in the UK has made it easier for authors to make small claims for disputes covering them for up to £5000 pounds fine. This could change the balance in favour of the photographer/artist seeking remedy for stolen images.

Show the useless image!

It sounds daft, but if you present your images as a low resolution small size image this is a simple and effective protection against most theft. Image thieves want a quality image to use on their own site or to print or to sell to others. If you limit your image longest side to 500 pixels as a *.jpg image compressed to around 60% you will provide partial protection for your image. This size and compression is an acceptable size on a web page for the purpose of viewing. However, the thief cannot blow the image up larger without damaging it. The low resolution at 500 pixels will make print sizes too small. In effect this makes the image perfectly viewable for your site users, at the same time it renders it pretty useless for the image thief. This is a practical and simple method of protecting against theft. It is not full proof – since thieves can still use it small size. However, it does at least limit the possibilities for commercial exploitation by others.

There is no 100% protection – its about risk

When it comes down to it you have to take a risk. There is no method of absolutely protecting your images online. However, there are enough different types of protection to be able to protect most images enough to feel confident that your images ‘probably’ will not be stolen. In the end you have to decide if you are going to gain more by displaying online than you would lose by having an image stolen. It is a very personal decision.

By Damon Guy (author and Photokonnexion editor)

Damon Guy - Netkonnexion

Damon Guy (Netkonnexion)

Damon is a writer-photog and editor of this site. He has run some major websites, a computing department and a digital image library. He started out as a trained teacher and now runs training for digital photographers.
See also: Editors ‘Bio’.

Can you write? Of course you can!
Write for Photokonnexion...

We would love to have your articles or tips posted on our site.
Find out more…
Write for Photokonnexion.

Do you have an intention for your photographs?

Retired Aeroplane - Going wide really brings out certain features of a shot

• Retired Aeroplane •
Going wide really brings out certain features of a shot
Click image to view large.
• Retired Aeroplane • By Netkonnexion on Flickr External link - opens new tab/page

Consider the reason for taking a photograph…

I had cause to consider the nature of several photographs this evening. A judge was discussing the photographs in a competition. On several occasions he referred to photographs he was judging as “record shots”. This is not a negative term.

I have made several references to this type of shot in past posts. Here is a definition from the Photokonnexion Photographic GlossaryRecord Shot. This is a type of shot that you might use to remember something as it was. It is a type of shot that is a legitimate representation of the subject but without any deliberate artistic interpretation. But, there is the rub. What on earth is artistic interpretation?

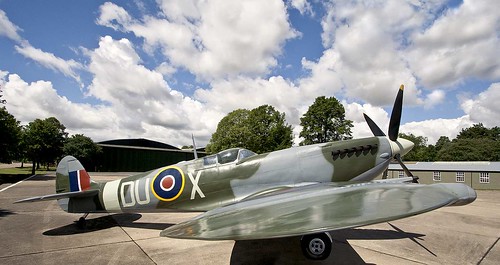
It surprised me when a judge in a competition called the photograph above a record shot. I enjoyed taking this photograph. I had seen the aircraft on a previous visit to The Imperial War Museum at Duxford  External link - opens new tab/page. It is a replica of one of the wonderful fighter aircraft of World War II – a Spitfire. I had considered it for some time and had lined up this shot in my head for some weeks before my arrival. I was fortunate to be blessed with a great sky. The angle of the shot was in line with the movement of clouds in the sky. I put on a wide angle lens and took about 10 shots along the lines I had planned. I wanted to make the wing disproportionate to the fuselage to give it foreground weight and invest depth in the picture. With a wide-angled lens this would make the wing seem really wide and long.

I may not be an artist in the traditional sense. I know I tend to take a rather geometric view in my pictures. It’s my signature, my style and my pleasure. However, it is also my interpretation. In this shot I really took my interpretation to some length. The body is distorted, the wing out of proportion. The sky deliberately elongated by the perspective of the wide angle lens. But to me this view showed the plane off in a unique way and presented a powerful perspective. I think this picture is heavy on interpretation and personal vision. Call it what you will, one thing it was not, is a record shot.

So, this evening when I was considering a judges words on what he called a record shot I was suddenly reminded of my picture above. It struck me that very often the viewer reads into the photograph more than the author has to say on a particular subject. In the case of my picture above the viewer saw a straight forward representation of a great aircraft. I on the other hand saw an opportunity to display, in a unique way, the wonderful geometry that made this aircraft great – its superb flying design.

The two views, my geometric tribute and the judges record of a great aircraft, may not seem too far apart to you, the reader. Yet, to me it signalled that I had failed in my duty as a photographer to represent my vision. I had not convinced the judge that I had invested my personal view, my artistic impression, in this photograph.

As photographers we are communicating a point of view with every shot. It may be appropriate to devote time and effort to faithful reproduction, equivalent proportion and careful exactitude to create a record shot. That is a worthwhile endeavour.

It is equally important that at other times we express our interpretation of our subject in a manner that brings out our unique view, comment or observation about a subject. There are two issues to keep in mind. First, we should always have a clear vision about what we are trying to achieve with a shot. Second, we should be finding the strongest and clearest way to express that intention, lest our viewers miss the point of the shot.

More after this…

find out more...Photokonnexion tips by email
Enjoying this article? Please sign up for our
daily email service.
                                                Find out more
#11030#

Art is fickle but viewers are more fickle…

Yes, throughout the ages art has been misinterpreted. And, we must sometimes acknowledge that the viewer may not understand our point of view. You will never convey your meaning to 100% of the viewers. However, I believe that viewers have a right to expect that you make every possible effort to communicate your intention for the photograph and make your point as clearly as possible.

The difference between a record shot and an artistic impression may be a thin line. But if your photograph is to succeed there should be no such lack of clarity when conveying your communication or meaning.

By Damon Guy (author and Photokonnexion editor)

Damon Guy - Netkonnexion

Damon Guy (Netkonnexion)

Damon is a writer-photog and editor of this site. He has run some major websites, a computing department and a digital image library. He started out as a trained teacher and now runs training for digital photographers.
See also: Editors ‘Bio’.

The secrets of good backgrounds

• Backdrops •

• Backdrops •
Wallpaper can be used extensively as a backdrop. There is plenty of variation and the material is relatively cheap.

Get more out of less.

One of the central ideas behind photography is to reduce the “clutter” especially in the background. We want to simplify our shots to help focus the viewers attention on the subject we have chosen. Often, by way of controlling the scene we use backdrops. For the modern photographer a backdrop provides a simple uncluttered background that can be used to off-set the colours of the subject, or to complement them or remain neutral.

Backdrop secrets

Modern backdrops have a wide range of finishes. However, strong patterns and fussy details draw the eye off the subject. So most backdrop patterns are designed to reduce the impact on the eye. Rather than regular strong lines or shapes these back drops will tend to have random and subdued variations in the theme. Other backdrop types are solid colours. The best backdrops are minimalist.

Black backdrops are often used for darkening and absorbing the light. White backgrounds are frequently used for high-key photography. Reds, purples and blues are often used for different types of shots, but can also form effective variations for monochrome work (single tone shots or a single colour and white).

Bright green backdrops are called chroma-key (chromakey). They are often used to provide a set colour ready for post processing technique called compositing. This is where new colours or entire images are to swapped into the image. The subject is retained but the green colour is replaced with an entirely new image. This technique is the digital replacement of the old ‘back-projection’ or painted backgrounds techniques used to make it look like there was something solid in the background in the days of film. Actually there was a blank screen behind the subject. This technique is also known as “green screen”.

Backdrops can be used anywhere but are used extensively in two particular branches of photography. Portraiture and fashion photography use backdrops to simplify the scene as much as possible. This allows the person or model to be the strongest element in the scene. The eye is therefore drawn to the person which is where the photographer wants people to look. A fashion or portrait shot where the eye is not on the person is a disaster!

Still life

The other area where backdrops are used extensively is in various types of still life. Again the intention is to create a simple scene so the subject is the centre of interest. However, in still life the relatively close up nature of the work can allow the use of stronger elements in the backdrop.

Heart in hand

Heart in hand • By Damon Guy
In smaller scenes or still life backdrops can be stronger. The diagonal wallpaper pattern here helps the flow of the eye.


In the picture above the hands are the centre of attention. The backdrop is used in this case to provide a dynamic feel (from the strong diagonal) and to direct the eye along the line of the phrase in the heart. Eyes naturally tend to follow lines like that.

Wallpaper

While solid colours and simple patterns are well catered for in the market, specific patterns on backdrops are limited. However, in the picture at the top of this page you can see that I have arranged a variety of different wallpaper samples. Wallpaper is easy to find – it is in every DIY store and great patterns, plain or textured can be found at relatively cheap prices. If you are working at small, still life, sizes one piece of wall paper might be sufficient. However, I have sometimes worked with wallpaper on a full sized portrait backdrop. In this case I use strong tape to stick the wallpaper sheets side by side to make the backdrop wide enough. Then, I staple the wall paper to two light wooden battens, top and bottom. This helps hold the papers together with less damage. It also helps pull the paper out so it hangs flat. Wallpaper has a tendency to curl. Then the top batten is clamped to the backdrop cross bar. Hey presto! You have a cheap but patterned backdrop.

Other patterns, shapes and marks can be used to do other things in a picture. In fact if it is used properly the use of backdrops can be complementary, can be contrasting, can form effective reflections, light dampening, and many more things. Understanding backdrops is a great way to ensure that you can control what is going on behind the main subject.

Decor

Backdrops have rich history in the theatre. Today, in modern still photography they are relatively simple and uncluttered. However, if you have a specific scene in mind you can use wall paper to provide fun and varied backdrops to complement or change your scene. While proper cloth or paper backdrops can be quite expensive; wallpaper is a relatively cheap way to use fun patterns and interesting backdrops.

By Damon Guy (author and Photokonnexion editor)

Damon Guy - Netkonnexion

Damon Guy (Netkonnexion)

Damon is a writer-photog and editor of this site. He has run some major websites, a computing department and a digital image library. He started out as a trained teacher and now runs training for digital photographers.
See also: Editors ‘Bio’.

find out more...Photokonnexion tips by email
If you enjoyed this article please sign up for our
daily email service.
                                                 Find out more
#11030#

How to buy a new camera…

Buying a new digital camera

Buying a new digital camera

Buying is a big decision.

Photographers should be wary of the simple answer. Buying a camera is a deeply personal matter and a big investment. You live with the consequences for a long time. Look carefully at considerations that really matter to you and your performance as a photographer. Impulsive buys may spoil your photography. If you’re comfortable with your buy you will be more likely to get to know it, use it and have fun with it.

1. Work out what you need

Impulsive buying means something will not match your need, then you won’t get the use you want. The points below will help refine your thoughts. Write down your ideas to ease your research later.

Budget: Fix a budget – it may define the type of camera you can buy. So write down what you want to spend before starting. Change your mind later, but start with an idea to guide initial research.

Usage: What type of photography will you do? There are broadly two types of photographer…
The ‘point-and-shooter’:

  • Interested in recording fun, family, events and memories.
  • Love things they do when they have a camera around.
  • Take pictures as reminders. (Holidays, family, fun, action, friendship).
  • The camera is an accessory to the activity.
  • The camera is easy to use, probably in auto mode.
  • Simple controls – lighter, lifestyle-type design.
  • Less interested in the art of photography, more the style of life.

The ‘photographer’:

  • Take pride in every shot.
  • Indulges other passions through photography.
  • Wants more equipment.
  • Interested in “functions” and “controls” – technical cameras/DSLRs.
  • Camera is an essential part of the activity. (Landscapes, macro, action, nature, still-life, fine art…).
  • Loves photography for its art, technology, skills and techniques.
  • Documents passions and communicates interests through photography.
  • Take pride in camera control.
  • Enjoys the technical aspects of the capture as much as the images.

Each has an associated type of camera. A heavy DSLR is not well suited to the carefree life of the point-and-shooter. A compact, colourful, wrist-strap camera is not suited to landscape shots and large prints. Preferences and lifestyle should be shorted out early on. Are you are a point-and-shooter or a committed photographer (DSLR style)?

Conditions: Indoors/outdoors, weather, underwater, holiday, abroad, air travel? The situations in which you use the camera affects what you buy. Consider protection, travel, camera size and special equipment needs.

Experience: Skill level affects purchase – your aspirations for your future photography will too. If you’re just starting out, buying a camera with a bewildering range of functions is daunting. Take simple steps. Entry level DSLRs provide for years of growth into your hobby and produce great images. This allows you to develop skills without confusion.

Features/flexibility: Spending more on a camera means more features and flexibility. However, while this gives more control it increases cost for relatively little increase in picture quality for starters. Don’t waste your money. Focus on what you need, not “feature bloat”.

Physique/fitness: When buying you don’t get a feel for using a camera. Little, disabled, or not very fit people may find big cameras unusable. Fit, but not shooting daily? You might struggle to hold up a big camera for long periods. Buy a camera you can hold steady and use all day (if necessary). I know people who bought great cameras and had to sell them again to buy another great, but lighter, camera. Also ensure you can grip it properly and comfortably. Can you reach all the buttons easily?

Size of prints: More megapixels is NOT a better camera today. Good quality cameras have sensors to produce great images. High megapixels are only necessary for high resolution pictures – mostly for large prints. You pay a lot of money for top-megapixel cameras. Only buy them if you frequently do big prints in high definition. Don’t worry about megapixels in the market mid-range.

Lenses: To a committed photographer lenses are key. Buying the right lenses is more important than a camera body. Lens investment pays you back for a lifetime, or many camera bodies. Spend less on the body than you intended and save money for better quality lenses (not more lenses). Consider retaining at least half your budget for lenses.

Other equipment and accessories: New cameras require other items affecting your budget. Consider…

  • Lenses (Wide angle, Zoom, macro etc)
  • Camera/equipment bag
  • Tripod
  • Spare batteries (two)
  • Light modifiers (diffusers), filters, reflectors
  • Specialist equipment for specific interests
  • Memory cards (at least two – eg. 2×16 Gb not 1×32 Gb – cheaper and more secure)
  • Off-camera flash (pop-up flash is rarely useful)
  • Remote trigger to fire the flash/camera

There may be other things too.

Compatibility: Is your existing equipment compatible? Buying a camera could mean buying those extras again, straining your budget. Consider the camera brand you want to buy. That may affect the other equipment you buy later. Lenses are a particular consideration. Top brands make good lenses, but other brands may not. That could be important for your buying strategy.

Picture quality: Quality digital cameras produce great picture quality. However, large, high resolution images (especially for printing) may need larger digital-sensor size (cropped or full frame?) and type of lens and lens quality. Buy up-market lenses as far as you can. For a point-and-shoot camera consider the quality of zoom. ‘Optical zoom’ is best, the lens does the enlarging. The quality will be better with a good optical zoom. With a large digital zoom component expect lower quality prints. Digital zooms crop the picture in-camera to make the picture appear bigger. You will see more detail, but the picture may be a lower definition/resolution.

More after this…

find out more...Photokonnexion tips by email
Enjoying this article? Please sign up for our
daily email service.
                                                Find out more
#11030#

2. Research

Now look at what is available. examine a range of reviews on different websites. Check out what’s popular around the web and get a “best fit” camera to your specification from above. Talk to experienced photographers. Join a club. Leave questions on Internet forums. Ask in shops.

Be prepared for this stage to take quite a long time. You may be committing to a brand for a quite a few years, or your career. Take it slowly so you can understand all implications. Keep notes and be prepared to check definitions and learn about features.

3. Try it out

Once you have identified your dream machine, see if you can try one out. Beg, borrow or hire. You will be unlikely to try everything but spend a weekend or week with it to really get a feel for it. That will help you to feel confident about your ideas or start new research. Ensure you are on the right track.

4. The purchase

From a shop: Local camera shops often have deals and committed staff. They will have knowledge and experience too. Remember they are on commission and a different focus to you. So go to a shop with a really good knowledge from the above before you buy.

Online: There are some great deals but also a lot of scam artists. Consider…

  • Who you are buying from.
  • Does the site cover losses?
  • Is delivery and packaging good?
  • Delivery times?
  • Are there proper cancellation and returns procedures?
  • Transit/purchase insurance (the company or your credit card)
  • Is the online store reputable and well known?
  • Do not click from email ads to the site – insecure.
  • Check with friends to see which online stores they used.

If it sounds too good to be true, it probably is. A reputable company will have protections built into the purchase and made clear on the site.

When you are ready consider negotiations. Lots of websites will do deals. Shops will too. Make sure you get the right deal, but don’t compromise security or safety.

5. After purchasing

Check your purchase properly – has everything arrived? Retain all paperwork and orders for future reference, returns and insurance. Test to see that it works properly. Get signed receipts and correct paper work for returns, delivery shortages or damage.

Satisfied you have the correct equipment and it works? Put it through its paces in a logical way. In Getting started with a new lens I show how to work through testing and getting to know new lenses. Many of the principles apply to the purchase of a camera and help you get to know your camera properly.

Other ideas?

Please share your other ideas, tips or experiences on buying a camera with us below in the comments…

By Damon Guy (author and Photokonnexion editor)

Damon Guy - Netkonnexion

Damon Guy (Netkonnexion)

Damon is a writer-photog and editor of this site. He has run some major websites, a computing department and a digital image library. He started out as a trained teacher and now runs training for digital photographers.
See also: Editors ‘Bio’.
Ten simple ideas to help your portraiture improve

Video

Video

Straight forward portraiture advice is difficult to come by…

In the video we have some great ideas that help you to map out a great Portraiture session. This is straight advice aimed at getting you to a good quality completed portrait as directly as possible.

I have to add that the book advertised in the video is also a great book. It is packed with some excellent ideas and written in a simple and easy-to-read way. If you are interested in following up on the book I can highly recommend it. My copy is pretty dog-eared these days!


Portrait and Candid Photography: Photo Workshop This is a great book packed with lots of hints, tips and ideas like the ones below. A really worthwhile read.


Ten points at the core of good portraiture

In the video Erin Manning highlights the importance of the following ten points…

  1. Don’t fix your subject in the middle of the frame. Instead, think about the rule of thirds – a more dynamic outcome.
  2. Poses and “cheesy” words to force a smile are false and make the photo look strained.
  3. Make your clothes simple and un-distracting. Forget patterns and fussy details. Simple solid colours help the subject to stand out, not the clothes.
  4. Avoid straight on shots with a big flash. The open pupil in the eye will cause light to reflect back to the camera and show bright red eyes… You don’t want your subject to look like red-eyed monsters. Use red-eye reduction settings if your camera has them.
  5. Vary your poses, angles and heights. The more angles you get the more you are telling a story about your subject. Get them in many different ways.
  6. Use flash to help reduce harsh shadows. The sharp sunlight of the middle of the day is very unflattering. The use of fill-in flash softens the shadows bringing out the subjects character.
  7. Look for great quality of light. Remember that hard light (harsh edges and strong contrasts) is very unflattering. Shoot in the later afternoon or early morning to get soft light with better colours. Use shade to reduce hard light if you are forced to work in bright mid-day light.
  8. Don’t stand too close and use a wide angle lens. This exaggerates the nose. Stand away and zoom in. This reduces nose size and is much more flattering. (Great advice).
  9. Pay attention to the background. If it is too busy make sure there is nothing distracting. Check to make sure the background has not created odd effects like poles sticking out of heads and flowers in ears!
  10. Make sure you have enough battery capacity and memory card space to cover the whole session. You don’t want to lose any shots when you are in full swing.
Erin Manning’s Top 10 Dos and Don’ts for Great Portraits


Erin Manning

By Damon Guy (author and Photokonnexion editor)

Damon Guy - Netkonnexion

Damon Guy (Netkonnexion)

Damon is a writer-photog and editor of this site. He has run some major websites, a computing department and a digital image library. He started out as a trained teacher and now runs training for digital photographers.
See also: Editors ‘Bio’.

find out more...Photokonnexion tips by email
If you enjoyed this article please sign up for our
daily email service.
                                                 Find out more
#11030#