Tag Archives: Rule of thirds

Tips for Better Smartphone Photography

This article contributed by Liz Pekler(Bio).

SmartPhone Photography is on an up-trend

Smartphone photography is the source of millions of images per day worldwide. It is not only an important aspect of social interaction, it is also a way to express yourself. Find out how to improve your shots and make the best of your smartphone photography.


Smartphone Photography is attracting more and more people. The number of images made on mobile devices exceeds the number taken on compact or DSLR cameras. Who could blame these keen users? Smartphones are easier to carry, cheaper to maintain, and are more user-friendly than the DSLR. And, with the constantly evolving smartphone camera apps and accessories, the future of smartphone photography seems assured. Indeed, smartphones and tablets are used in conventional photography too.

Is smartphone photography the new norm?

There’s no denying that DSLRs or mirrorless cameras are still the best types of cameras to have despite their larger size and weight. They have powerful sensors that offer the most megapixels. They allow complete user control over camera settings. However, more than that, they provide flexibility and freedom to use a range of accessories, like interchangeable lenses. The flexibility and control provided by a fully functioned DSLR can help you achieve the highest quality output.

Smartphone photography provides well for general image needs, like social media sharing and family records. Using mobile devices has become standard practice in recent years. Their hardware will need time to catch up on the quality and functions of more advanced cameras. However, there are many smartphone photography accessories available. These add-ons can enable your mobile device to get quite close to the high standard of DSLRs.

As long as smartphone manufacturers continue to develop higher specs and more powerful sensors smartphone photography will be likely to trend upward. However, no matter how good these mobile devices become, using the camera will require some user skill. The best photographs are not the product of the camera. They are a reflection of the vision and skill of the photographer – no matter what the device. Smartphone photography can be artistic, can be beautiful, can return great images.

You can get the best out of the built-in camera in your phones by practicing these helpful tips below:

Tips for Better Smartphone Photography

1. Pay Attention to the light levels

As with DSLRs, think, and make sure everything is good before touching the shutter button. Make sure the image is well-lit. One way to do so is to tap your subject on your phone’s display screen. In the smartphone camera on Auto mode, tapping on your subject will command the camera to focus on the area of the tap. Then the camera will make the exposure adjustment. That will ensure your subject is lit to its best advantage. The camera adjusts the overall image in proportion to the exposure. This shows the subject to its best advantage.

To manually adjust the scene’s brightness, swipe the ‘sun’ or ‘bulb icon’ after tapping on your subject. If you want to revert back to the default value, tapping anywhere on the screen of your smartphone usually does the trick.

Brightness changes are not the best way to lighten your scene. You can over-whiten highlights – leading to distracting white burnouts. Instead, try manually adjusting your ISO levels. Higher ISO means the sensor is more sensitive to light. A high ISO number gives a brighter scene in proportion to the ambient light in the rest of the picture. This helps you adjust your image to avoid burnt out highlights.

Raising the ISO has a penalty. High sensitivity to light levels can make your photos look grainy. It is called digital noise. Dimly lit areas brightened by higher ISO are especially likely to show noise if you boost the ISO too high. Practice with ISO a bit to get a feel for the way to use it.

The best way to avoid digital noise is to add light sources or work with natural light. Camera sensors work well with good light levels. So, think about how you can enhance the light rather than rely on high ISO, if you can.

2. Apply the Principles of Composition

Another thing to significantly improve your smartphone photography is to compose your image. This means taking photos to create a more visually appealing image. Try not to “shoot from the hip”. The quick snap often leads to poor shots.

It helps to keep these basic rules of composition in mind when taking photos:

  • The Rule of Thirds – Mentally divide the screen into a grid with 2 horizontal lines and 2 vertical lines. Then, align your subject with any of the guide lines or intersecting points to achieve a more natural-looking and attractive image.
  • The Golden Ratio Smartphone Photography | External link - opens new tab/page – When you compose your photo, leave 1.6 bits of empty space for every 1 bit of occupied space to achieve a balanced image.
  • Leading Lines – Using lines in your composition will help influence viewing behavior, draw your audience’s eyes across an image or towards a subject, and adds motion and dynamism.
  • Three-Layer Image – Having a foreground, a subject in the middle, and a background adds a sense of depth and interest to your photo. See “River Scene” below.
  • Rule of odds – multiple subjects in an image are more attractive if they are an odd number. The most famous case is to have three of something, but five and seven are often used too.
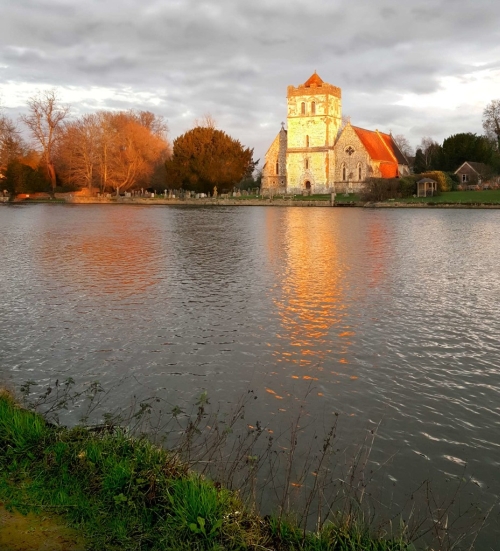
Smartphone photo showing three compositional layers

:: River Scene ::
This smartphone photograph shows three compositional layers. Introducing clear layers into your image helps to bring out a three dimensional depth and structure. Try to use foreground, mid-ground and distance layers in your images.
(Taken on a Galaxy S6 – Android phone)
(Click here to view large)


There are many ways you can use composition to improve your images. There is a whole page of composition links for you learn more here: Composition resources on Photokonnexion

3. Move as Close to your Subject as Possible

When using a smartphone to take photos, opt to move closer to your subject instead of using its zoom feature. Smartphone camera lenses usually have fixed focal lengths so they can’t zoom optically. Instead, it zooms digitally, which visibly distorts, pixelates, and lowers the quality of your images when overdone. Alternatively, you can use a compatible lens attachment that offers optical zoom capabilities.

4. Use Natural Light

The built-in flash on smartphones can sometimes be unflattering as it can wash out your subjects and produce harsh shadows. Harsh shadows with sharp lines create an angular appearance. This is particularly unflattering on faces.

To produce the best results, go for natural lighting. Natural light has an attractive quality for our eyes. We are naturally tuned to it. If you really need a flash there are some good attachments. You can use an attachable pocket spotlight or ring flash. Better still, use a more diffused light. An attractive diffused light provides just enough light for your subjects and creates flattering soft light with shadows. Shadows from soft light helps to create depth – giving a three dimensional feeling in the image.

5. Use A Third-Party Camera App

Your smartphone’s dedicated camera app can get the job done. However, third party apps allow you to do more with your phone’s built-in camera. Some of them offer better exposure adjustments, manual focus and camera settings (like shutter speed and aperture), or even integrated photo editing features so you can touch up captured photos instantly. If your interest is in better smartphone photography then use better editing too. Work to ensure you can navigate within the app and help you optimize its features for better photos.

Also familiarize yourself with the menu, settings, and features of your chosen camera app. If you’re a beginner, spend time and effort on learning photography basics. Think particularly about the shutter speed, ISO, and aperture. Also, think about how they relate to each other to create the exposure. Do some reading of this blog or other photography sites. Watch a YouTube tutorial on manual camera settings. Help yourself to develop a rounded approach to understanding both exposure and how best to take photos. Smartphone photography is as good for producing images as a DSLR. That is only true, providing, you know your tools and how to use them to produce a great image.

6. Take Advantage of the HDR Mode

The HDR mode on your camera phone allows it to take multiple shots of the same scene at different exposures, and then blend them together to create an image that pleases the eye. HDR mode blends the shots to create deeper contrasts in the image. This is particularly useful when shooting landscapes or high contrast scenes where there are obviously uneven highlights and dark areas. However, it must be used sparingly, as it can leave your images looking odd and overly edited. Don’t overuse it – try to work the editor so that your eye sees reality in the results. Trust your eye.

As a safety measure, also leave HDR on Auto. Then, you can manually pick out a better photo from the bunch of shots that were initially taken, in case the HDR blend goes badly. Apply the final result afterwards.

7. Post-Process Your Images

Post-processing can never replace good photography techniques. The best images stand alone for their beautiful content. However, it is also helpful to have editing skills. You can work to enhance a great image, or to work for the overall improvement of your photos. Take out spots, noise, or other irritations. Clean the image up so you show the beauty without distractions.

Photo editing apps like Instagram, VSCO, and Snapseed can be very helpful in making basic photo adjustments that will give you your desired result. Their photo filters are also great for setting or altering the mood of your images.

However, keep your edits at a minimum – especially processing ‘filters’. Instead, strive to make naturally beautiful images. This way, you don’t have to make too many adjustments later. After all, viewers can tell when you “cheat” your way to a good-looking image. Over-editing lowers the quality of your photos.

8. Keep Your Lens Clean and unscratched

This is something that is often overlooked by smartphone owners. It may not seem to be such a big deal for a small camera. However, a lens having oil, dirt, and moisture on it can slowly damage the glass. Leaving the lens on a tabletop can lead to scratching and marking. These ultimately affect image quality. Make sure you wipe the lens before use and use a protector or case, especially when doing a lot of outdoor shoots.

Can smartphone photography ever replace the DSLR?

Not all smartphones are capable of the more complex camera functions. However, many of the models some models currently on the market already have capabilities that mimic those found in DSLRs. In fact, many of them already allow control over the important camera settings, shutter speed, aperture, and ISO. These controls are native to some of the phones without having to use a third-party camera app.

Some of the latest smartphones, like the brand new iPhone and the latest Google Pixel, have more powerful and versatile cameras with more megapixels and other advanced features. Optical image stabilization for sharper photos and smoother videos is appearing, for example. The LG G6, released earlier this year, has great built in features. It carries a wide-angle lens that covers a larger area and is ideal for capturing group shots, magnificent architecture, and stunning landscapes. Many smartphone cameras from other brands offer other impressive features too. These advances are appearing just a few years after we thought such innovations wouldn’t be possible.

Smartphone photography is progressing fast. In a few years time, smartphone cameras are going to become even more sophisticated. For now, it’s safe to say that smartphones are definitely catching up, but whether they will ever surpass the DSLR remains to be seen. One thing is sure, the smartphone camera and DSLR are converging on each other. Furthermore, emergent technologies could take us anywhere. Camera technology still has a long way to go. Enjoy the ride!

Comments, additions, amendments or ideas on this article? Contact Us
or leave a comment at the bottom of the page…

Like this article? Don’t miss the next — sign up for tips by email.

Post contributed by :: Liz Pekler

I am a travel photographer with several years of experience in the field. Being a freelance blogger enables me to help photography beginners and enthusiasts to tell wonderful stories of their travels as seen through their lenses. It also allows me to share my thoughts about another advocacy of mine: social equality and change.
Connect with Liz Pekler: Linkedin :: Twitter: @liz_pekler

find out more...Photokonnexion tips by email
If you enjoyed this article please sign up for our
daily email service.
                                                 Find out more

When to ignore the rules

 Symmetry • by aebphoto, on Flickr

The arrangement of your pictures can be so much more than a simple rule followed.
Click image to view large
Symmetry • by aebphoto, on FlickrExternal link - opens new tab/page

What works tends to get overworked…

The “rule of thirds” works in more than 95% of photographs. OK, maybe there is not a certain statistic like that. But it sure is effective to the eye. For that reason it helps us to compose most of our photos.

The principle behind the rule of thirds is not a universal “Law”. No one went to prison for violating it. It is more what we might refer to as a guideline. The rule helps us to compose a picture to meet the expectations we have wired in our brains about what is pleasing. Aesthetics is a funny thing – we all have our own preferences about what we like. However, we all seem to have some generally appreciated ideas. The rule of thirds seems to be one of them.

What if you feel like breaking the rules?

No problem. Do it!

A cavalier attitude to breaking the “rules” when you are learning photography, or any art, is a good thing. The difficulty is knowing what will work when you stray from the guidelines. That is a fair point. But there is no need to be fearful. You need to have a go to see what will work. And, like any experimentation, you will more likely be unsuccessful than successful.

Ah! But if I am going to be unsuccessful then why try? The simple answer to that is so that you can know yourself and your audience better.

No artist is born as a seasoned and finished creative. They all devote long hours to learning, experimenting and listening to the thoughts of others on their work. In other words, they practice, practice, practice. They get feedback. Then they practice some more. There is a lot of work and experimentation in becoming an artist.

Breaking the rules is about trying out something lots of times. If you have one particular passion for your photography then go for as much variation and feedback on your work as you can. You will perfect your shots only when you know that the work is capturing attention and holding it.

A more general approach to your photography, photographing many different things, is another approach. However, it is reasonable to take a similar attitude. Instead of trying out lots of shots about one subject you can try lots of different angles around each subject. I am not talking about a machine gun blast of pictures from one button push. I am talking about genuinely working the scene. Try all the angles, all the possible ways to frame your subject. Do some of the shots in a traditional way (Rule of thirds etc). But do some shots that are decidedly not traditional. It is all about experimentation.

As long as your approach is considered…

Louis Pasteur External link - opens new tab/page, the father of modern microbiology said, “Chance favours the prepared mind”. He did not mean you should go shooting off random shots at everything in sight. What he meant was you should consider your options. Know your subject. Experiment with a good knowledge and background in your subject. Move forward in a logical and consistent way. It is this approach that will help you to learn to successfully break the rules. Know what the different shots are about, how the different methods of composition can affect the shot. Understand how the different shots would affect your subject, or experiment until you know.

Practice, practice, practice… and careful thought about what you have done and what you are going to do is a route to success. Enjoy the journey as well as the outcome!

By Damon Guy (author and Photokonnexion editor)

Damon Guy - Netkonnexion

Damon Guy (Netkonnexion)

Damon is a writer-photog and editor of this site. He has run some major websites, a computing department and a digital image library. He started out as a trained teacher and now runs training for digital photographers.
See also: Editors ‘Bio’.

Can you write? Of course you can!
Write for Photokonnexion...

We would love to have your articles or tips posted on our site.
Find out more…
Write for Photokonnexion.

When breaking the rules works…

• Coming and Going •

• Coming and Going •
Sometimes having a symmetrical placement works.
Click image to view large
• Coming and Going • By Netkonnexion on Flickr External link - opens new tab/page

Don’t let the rules overwhelm you.

Sometimes the picture you make should flaunt the rules if you have a good reason. An image makes the grade when it catches the eye and draws you into the picture. It is the photographers job to get the viewer interested… not to follow the ‘rules’ of composition. Most of the time the “rule of thirds” works. But getting past that does requires something else to draw the eye into the picture.

Symmetry encourages symmetry

One of the interesting things about symmetry is that when it really exists it draws us right in. Circles and other regular shapes are very attractive to us. Symmetrical faces and other symmetrical objects hold our fascination too. So when we can create a truly symmetrical scene it actually helps to centre the subject. In my photograph above the piece of art in the case and the placement of the case screamed for a symmetrical placement. In fact the comings and goings of the public in the gallery created the imbalance in the symmetry. That simply added interest around the central placement of the art – which itself has an interesting symmetry.

So, while a symmetrical shape encourages a symmetrical placement of the subject even that “rule” can be broken by introducing imbalance to break the background symmetry.

Two lessons

The simple lesson is that a truly symmetrical subject can be centrally placed to encourage symmetry throughout the picture.

The other lesson is, “don’t be trapped in the rule of thirds”. That rule is a great benefit to us. However, as your artistic eye develops you can find some ways to capture the eye with other compositional ploys.

By Damon Guy (author and Photokonnexion editor)

Damon Guy - Netkonnexion

Damon Guy (Netkonnexion)

Damon is a writer-photog and editor of this site. He has run some major websites, a computing department and a digital image library. He started out as a trained teacher and now runs training for digital photographers.
See also: Editors ‘Bio’.

Ten simple ideas to improve your photography (and a fun quiz)

Ten Tips

Ten Tips and 12 fun quiz questions.

Simple things help you…

We should all take a step back and think about the basics sometimes. It helps us remember essential techniques and keeps us on our toes. Here are the basics with some fun quiz questions too.

The simplest techniques in photography are often the most important ones. In this post we make sure we don’t forget them…

10 essential things to know; 12 fun quiz questions
  1. Not knowing your camera: This is really bad news. If you are hoping to improve your photography make sure you learn what every lump, bump, dial, screen, lens and twiddly bit does. Read your manual regularly. Practice with each function until you have got it right. Then practice it in the dark so you can do a night shoot.
    Quiz Question 1: How many lenses are there on a camera? Answers at the end!
  2. Poor stance: Most people when starting photography don’t realise that the way they stand and hold the camera creates all sorts of problems and poor performance. If you are a keen photographer a good stance can contribute to improved sharpness (hand-held shots), better focus, more steady hand and better shot timing. Learn to stand properly right at the start and you will save yourself lots of re-training time later.
    Quiz Question 2: At what point in the breath cycle is it best to take your shot?
  3. Not using a tripod: classic mistake. Tripods save you lots of time and give you pin sharp photographs. They give you an opportunity to set your camera up properly and ensures that your are ready for your shot.
    Quiz Question 3: A monopod has one leg, a tripod has three legs. What is, and how might you use, a bipod?
  4. Not giving the camera time to focus: When you press the shutter button halfway down it causes the auto-focus to cut in which focuses the camera. But if you punch straight through that to the shot the focus has not had time to do the full focus. This normally happens on the first focus attempt when the focus is right off. After that the lens in nearly focused and will adjust more quickly. So don’t make your first focus attempt too close to the shot or it will be blurred.
    Quiz Question 4: Why do you have two rings on a modern auto-focus/zooming photographic lens? What do you call each of them?
  5. Taking pictures against a bright light? Cameras don’t like very bright lights. Especially if there are also very dark spots nearby. Shooting indoors while looking at a window out to a bright sky will cause a strong white spot. This is very distracting and draws the eye away from the subject. Not good. There are Light and Lighting resource pages on Photokonnexion for you to learn more.
    Quiz Question 5: How many stops of light can healthy human eyes see (20:20 vision)? How many can the camera (rough generalisation) cope with?
  6. Relying on flash (especially pop-up flash): Pop up light has a very small concentrated source. It discolours faces, washes out colours, creates harsh, sharp-lined shadows and is badly placed (too close to the optical axis) creating nasty highlights on faces. Try to use natural light more. It is much more forgiving and does not produce such harsh shadows most of the time.
    Quiz Question 6: What is often the result of using pop-up flash with respect to two parts of the face?
  7. Dead centre subject: If you put the subject of your picture in the centre it will usually be boring. If you off-set your subject the eye will be looking to see why the symmetry is broken. That keeps the eye hunting around the screen. Learn about the “Rule of thirds” and other Composition principles. That will help you make the shot more compelling to the eye.
    Quiz Question 7: What type of compositional perspective would you be working with if you want to promote a three dimensional feel to your picture composition?
  8. Horizon control: Make sure your horizon is level, especially if it is a seascape. If you leave it on an angle the picture will be ruined because it will look like the sea is sliding off the page! Horizons also induce mid-picture viewer-stupor. Make a decision. Either shoot for the sky in which case place the horizon in the bottom third of the picture. Or, shoot for the ground in which case the horizon goes in the top third of the picture. An off-set horizon is more dynamic and keeps the viewers eye moving.
    Quiz Question 8: If your main choice is to shoot for the sky, where would you take your exposure from? (Where would you point your viewfinder focus point?) a. The sky? b. The ground?
    Quiz Question 9: Describe autofocus hunting and why it happens?
  9. Simplify, simplify, simplify: The most effective way to show a subject to your viewer is to de-clutter the picture. Take out of your composition everything that is nothing to do with the subject. The more you make the viewers eye go to the subject the more effective your shot will be.
    Did I mention that you should simplify your shot?
    Quiz Question 10: What is it called when you paint out something from your picture in post processing to simplify a shot?
    By the way, did I mention that you should work really hard to simplify your shots?
  10. Go manual: Auto-modes on your camera are really best guesses about what the manufacturer thinks will be suitable for the average shots most snappers will take. Buy you are a keen photographer. To get the camera to do exactly what you want, and to make discerning choices about your images you should work on improving your manual control. Your understanding of photographic principles will improve, your skill at exposure will improve and you will find yourself making informed choices about how you want your picture to come out. You will turn from a snapper into a photographer.
    Quiz Question 11: What does the ISO control do? a. Adjust the sensitivity of the digital image sensor or b. Change the aperture size?
    Quiz Question 12: Does ‘shutter speed’ or ‘aperture’ control movement blur?
Answers to quiz questions
  • Quiz Question Answer 1: I am talking about any camera that has a lens, not just DSLRs. the number of lenses is a matter of variation. If you are discussing photographic lenses then only that one will count (but read on). Some people think of each glass element in the photographic lens as an independent lens. Technically that is not true. They are optical lenses or glass elements, not photographic lenses. However, if the photographic lens (and elements if you included those) were all you counted you would be wrong. Here is a short list of Possible lenses on a camera of any sort…

    There may be others.

  • Quiz Question Answer 2: You should take a shot at the full inhale point or full exhale point before inhaling or exhaling in the next part of the cycle. You can choose which is best for you. All you do is delay the next part of the cycle while you take a shot. This is the point in the breath cycle when there is least movement of the shoulders/chest. Read more about it in Simple tips for a good stance
  • Quiz Question Answer 3: A bipod is photographically uncommon. Understandably, it has two legs. Find out more here… Definition: Bipod
  • Quiz Question Answer 4: The two rings on an auto-focussing photographic lens allow one ring to focus the image – the focus ring. The other ring is for zooming the lens. The latter changes the focal length and is called the focal length ring.
  • Quiz Question Answer 5: Human eyes can see about 18 to 20 stops of light when healthy. However, by contrast the best commercially available cameras have to operate with a dynamic range of 8 to 12 stops of light. Research is pushing the boundaries but there is still a big gap to meet the dynamic range of the human eye (in 2013).
  • Quiz Question Answer 6: Pop-up flash is very likely to cause red-eye.
  • Quiz Question Answer 7: To make things look three dimensional in your image you should be working with three point perspective. Look for lines in your image that promote cube-like structures. For example buildings, walls and other objects with lines and shapes that have a solid feel in real life. This will trick the eye into believing that there is a solid object in the picture. Read: Simple ideas about perspective in photography and: Definition: Perspective
  • Quiz Question Answer 8: If you shoot for the sky you will need to be taking your exposure from the sky as that is the brightest point. This will leave the ground darker in your exposure than you would see it with your eye. You can use one of a number of techniques to correct that later.
  • Quiz Question 9: Auto-focus hunting is when the auto-focus in the lens cannot focus and will keep going up and down the focus range trying to get a focus. This is a common problem at night, in darker conditions, low contrast conditions and clear or totally grey skies. You can read more about it in: Auto-focus ‘Hunting’ Definition: Hunting, Auto-focus

  • Quiz Question 10: when you paint out something from your picture in post processing to simplify a shot? You normally use a cloning tool. You can find out more in: Definition: Cloning; To Clone; Cloned; Clone Tool.
  • Quiz Question 11: What does the ISO control do? It adjusts the sensitivity of the digital image sensor allowing you to work in bright light (low ISO setting) or low light (high ISO setting). There is an article on ISO here: ISO.

  • Quiz Question 12: Shutter speed controls movement blur. Aperture controls blur (bokeh) created by the loss of sharpness outside the zone of acceptable sharpness. This is traditionally known as the depth of field. More reading on: Definition: Exposure and related to aperture: Definition: f number.

find out more...Photokonnexion tips by email
If you enjoyed this article please sign up for our
Tips by email service.
                                                 Find out more
#11030#

By Damon Guy (author and Photokonnexion editor)

Damon Guy - Netkonnexion

Damon Guy (Netkonnexion)

Damon is a writer-photog and editor of this site. He has run some major websites, a computing department and a digital image library. He started out as a trained teacher and now runs training for digital photographers.
See also: Editors ‘Bio’.

This one peculiar idea can transform your photography

Compositional elements :: Look at a large number of photographs every day

Everything you see in a photograph is a composition. Looking at lots of photos every day, particularly good ones, helps you appreciate good images. The article shows you how to identify simple Compositional elements.

Involve yourself to improve

Every day, expose yourself to great images. The mind soaks up the goodness. But to make it effective you should also be seeing into the image. It is surprising, but the the good things about a photograph are seen with the first glances. Compositional elements in a photo jump out at you, even if you can’t tell me about them. I am going to show you how to find them with a simple exercise.

What is in an image? Compositional elements

When we look at an image it is often difficult to see what is good about it. Obviously our personal taste plays a part. Often however, other people who do not share our taste, also like it. The common appeal comes from the compositional elements of the image. Often these elements are very simple structural lines or edges. They help the eye through the image or lead the eye to the key subject. Composition is all about helping the eye to appreciate the main point of the image.

How do we pick out the compositional elements?

Knowing about composition is important. The “Rule of Thirds” and other simple rules help you to analyse a scene. You can use them to understand ways the eye uses compositional elements in a scene. Find out more about composition from our page: “Composition resources on Photokonnexion”. There are lots of posts there to help you with composition.

You can already spot basic compositional elements

The main compositional elements can be picked out by eye. Anyone can do it. This is what you do…

  1. Take a small piece of paper – postcard size is ideal.
  2. You are going to draw on the small piece of paper…
  3. Pick out a photo – any picture.
  4. Study it for five seconds.
  5. Put the picture out of sight.
  6. Using simple curved and straight lines make a skeleton sketch of the picture. Do it from memory take no more than thirty seconds.

That’s it. You have simply isolated the elements of the compositional structure.

Here is an example. Click this link and follow the short procedure above. to create the skeleton sketch.
Test Picture

Here is a good example of what you should see when you have finished your sketch: Test Picture Compositional Skeleton. It was done by my wife, who is not a photog or artist. Despite that, she has successfully isolated the major compositional elements in the picture. It shows how effectively this exercise can work

More after this…

find out more...Photokonnexion tips by email
Enjoying this article? Please sign up for our
daily email service.
                                                Find out more
#11030#

Analysis

The test image is of Honister Pass in the English Lake District. All the lines lead the viewer to one point. The exit in the hills in the distance is dynamically off-centre. That keeps your search for symmetry. You feel like you know where the road is going. It draws the eye into the picture. Your eye does not exit upward – the clouds hold the eye into the valley. You are drawn along the road into the image, giving it depth. The picture has a 3d structure and a strong mood.

The strong lines and balance of this picture make it simple to pick out compositional elements. With practice this procedure will help you analyse complex examples. With a few practice examples you will be able to pick out compositional elements by eye. If you do this in your head you’re on the way to doing compositional analysis through the viewfinder.

As you learn new compositional ideas you will pick out more compositional elements. Use them as tools of analysis. They will help you understand and compose in the frame while taking a shot. Soon you will compose to draw the viewer into the picture.

Rules don’t make things beautiful

Rules of composition are limited in many ways. They are more guidelines than rules really. So do not fear to break them. Instead, know the things that work well for the eye. Develop harmony and balance, learn to appreciate beauty. Look at as many great images you can every day. Knowing a little about why they are attractive will help you to create more beautiful and effective images of your own.

By Damon Guy (author and Photokonnexion editor)

Damon Guy - Netkonnexion

Damon Guy (Netkonnexion)

Damon is a writer-photog and editor of this site. He has run some major websites, a computing department and a digital image library. He started out as a trained teacher and now runs training for digital photographers.
See also: Editors ‘Bio’.

Can you write? Of course you can!
Write for Photokonnexion...

We would love to have your articles or tips posted on our site.
Find out more…
Write for Photokonnexion.

Going with the basics – a simple way to see subjects

Stones And Shell by Netkonnexion, on Flickr

• Stones And Shell • (based on rule of thirds)
Click image to view large
Stones And Shell by Netkonnexion, on FlickrExternal link - opens new tab/page

Simple composition leads to great images.

We have all photo-walked with idol intent and fired off a few shots. I find this unproductive. How about a photo-walk with a composition principle in mind? That helps concentrate the mind wonderfully.

Walk with intent…

No, not criminal intent – photographic intent! If you want to go out for a photo-walk then sit down for two minutes first. Think of a random, generic subject. Try something like “squares”, or “wheels”. Even something more challenging like “Feet” or “Glass” would be good. Your idea can be tailored to where you are going to be walking. In the park you might go for “holes”, or “Rocks” or even “puddles”. In other words, give yourself something to focus on, to look out for and to challenge your view of an ordinary scene. The aim is to capture as many different types of your chosen subject as you can and picture them in as many interesting ways as possible.

I have played this game with myself many times. It’s fun and you get home with a memory card filled with lots of pictures with a common theme. This is great, especially for making a diptych, triptych or other sort of photomontage (not a collage – that’s not a photographic term).

A new idea

Today, I came across the video below. It is a great video explaining three simple principles of composition. Back to basics is always a good idea – even for the experienced photographer. It helps re-ground us in a little simplicity from time to time. The new idea I spotted was to undertake a photo-walk with a compositional principle as your photographic theme. In the video Mark Wallace explains about “pattern”, “unusual point of view” and “rule of thirds“. Then in the second part of the video he goes on a photo-walk in the park where he is looking for these three composition elements.

Digital Photography 1 on 1: Episode 32

This idea of a shoot with a compositional theme produces pictures where the content does not necessarily have a common theme. Instead this game is great for helping you to practice putting composition into your pictures. It is a way to renew your enthusiasm for simple composition at the same time as having fun and improving your photography. You can do it for any of the compositional elements. However, keep it simple, this is an exercise in learning about or getting back to basics.

Have fun!

find out more...Photokonnexion tips by email
If you enjoyed this article please sign up for our
daily email service.
                                                 Find out more
#11030#

By Damon Guy (author and Photokonnexion editor)

Damon Guy - Netkonnexion

Damon Guy (Netkonnexion)

Damon is a writer-photog and editor of this site. He has run some major websites, a computing department and a digital image library. He started out as a trained teacher and now runs training for digital photographers.
See also: Editors ‘Bio’.

A quick look at ruins and countryside

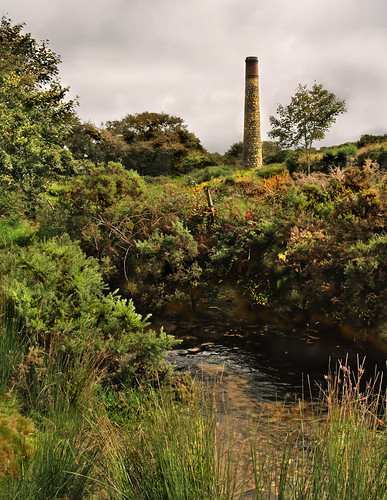
• Lonely Bodmin Chimney •

• Lonely Bodmin Chimney •
Click image to view large
• Lonely Bodmin Chimney • By Netkonnexion on Flickr External link - opens new tab/page

The influence of man on the countryside is worth photographing.

For centuries we’ve created substantial buildings in open country. Today, these have become an intimate part of the rural scene. For photographers they provide an interesting focus for landscapes. Sometimes quaint, sometimes aesthetically pleasing, these old relics can provide great interest for the eye. They draw the viewer into the scene and provide a starting point for the appreciation of the rest of the image.

Finding ruins and old buildings

In the UK the Ordinance Survey  External link - opens new tab/page sell maps that carry a key which marks out old, derelict and protected buildings. Other countries have similar mapping systems. Surprisingly some online mapping systems are not so good at highlighting these features of our history. Unless, that is, they are part of some sort of commercial or historic leisure opportunity on the site.

I was crossing Bodmin Moor in the West Country, UK, one day and came across the chimney above in a tiny country lane. Well off the beaten track. Bodmin Moor, with many other places in Cornwall and Devon, was once a thriving mining area. The locals extracted tin. Sadly the workings bring little prosperity to either county now. But many of the old mine buildings, and especially the distinctive chimneys, bring many tourists. In the parks and moors these mines are preserved and they provide brilliant photographic opportunities. The ones that are away from the crowds are best. A lonely feature in a landscape is always more attractive than a solitary chimney surrounded by heavily trodden ground, tourists and coaches.

So how do you find these hidden gems? Here are some things you can do…

  • At walkers/backpackers shops ask the staff. They often know local interest spots.
  • Get to know some local people in places you stay.
  • Tourist information offices are found world wide and often know of hidden places.
  • Study maps and aerial views of places you are going to visit.
  • Ask in local camera shops.
  • Contact the local camera club to your destination before your trip.
  • Search out ‘interest’ booklets written by local people for local people – often found in walkers/backpackers shops
  • Contact historical and walkers societies in advance of your trip
How should you photograph ruins?

There are some basics you should think about…

Use perspective to exaggerate depth: Find a long wall or fence, even ancient pathways/hedges to shoot along and use these to create perspectives and lines to draw the eye into the picture and create depth.

Rule of thirds: In the picture above the chimney is on a third. The rule of thirds always helps with a more dynamic placement of solid objects in the landscape.

Foreground, mid-ground, distance: These help create layers in the picture. Picture something close to you as detailed and tail off the detail on the other side of some breakpoint in the image. My little steam in the foreground (above) not only provides detail, but acts to break up the picture into fore and mid-ground too. Nearer the horizon the chimney provides interest drawing in the eye and creating depth.

• Rock backdrop •

• Rock backdrop •
The textures on the sites of ruins are often great for portraits


Detail and texture: Some great things can be found around ruins, derelict buildings, mines and old industrial sites. Think of old spillways, waterways, old machinery, the wonderful textures, rocks, farm animals, heaps of mine spoils, rust, old beams of wood… the list is endless. They all provide great photographic opportunities.

People! ruins and derelict sites make great places for portraits. The textures and variations of the scene both make great backdrops. Look for surfaces that have high contrast. Lots of mid-tone highlights and darks mixed so that the texture stands out. If the light is no good then you can side light with an off-camera flash to exaggerate the texture in the rocks.

Light painting: There are some brilliant opportunities for lighting up these sorts of places fat night with all sorts of exotic lights, colours and fun light painting shots. You can find out more about light painting in this post: Night photography – let the sparks fly!. Be mindful of your safety – some of these places are dangerous and make sure you get any permissions you need before invading a site with bizarre night lights. Someone may object, especially on private ground.

Opportunities

Ruins and the like provide great opportunities for landscapes, portraits, studies in texture and fun shots. Be on the look out for local situations for you to get to know and plan ahead for when you are away.

find out more...Photokonnexion tips by email
If you enjoyed this article please sign up for our
daily email service.
                                                 Find out more
#11030#

By Damon Guy (author and Photokonnexion editor)

Damon Guy - Netkonnexion

Damon Guy (Netkonnexion)

Damon is a writer-photog and editor of this site. He has run some major websites, a computing department and a digital image library. He started out as a trained teacher and now runs training for digital photographers.
See also: Editors ‘Bio’.